Android启动流程浅谈
Posted ShouCeng
tags:
篇首语:本文由小常识网(cha138.com)小编为大家整理,主要介绍了Android启动流程浅谈相关的知识,希望对你有一定的参考价值。
一、开机启动流程:
android系统启动是由BootLoader引导开机,然后依次进入kernel、Native、Framework、App。
二、冷起进程创建流程:
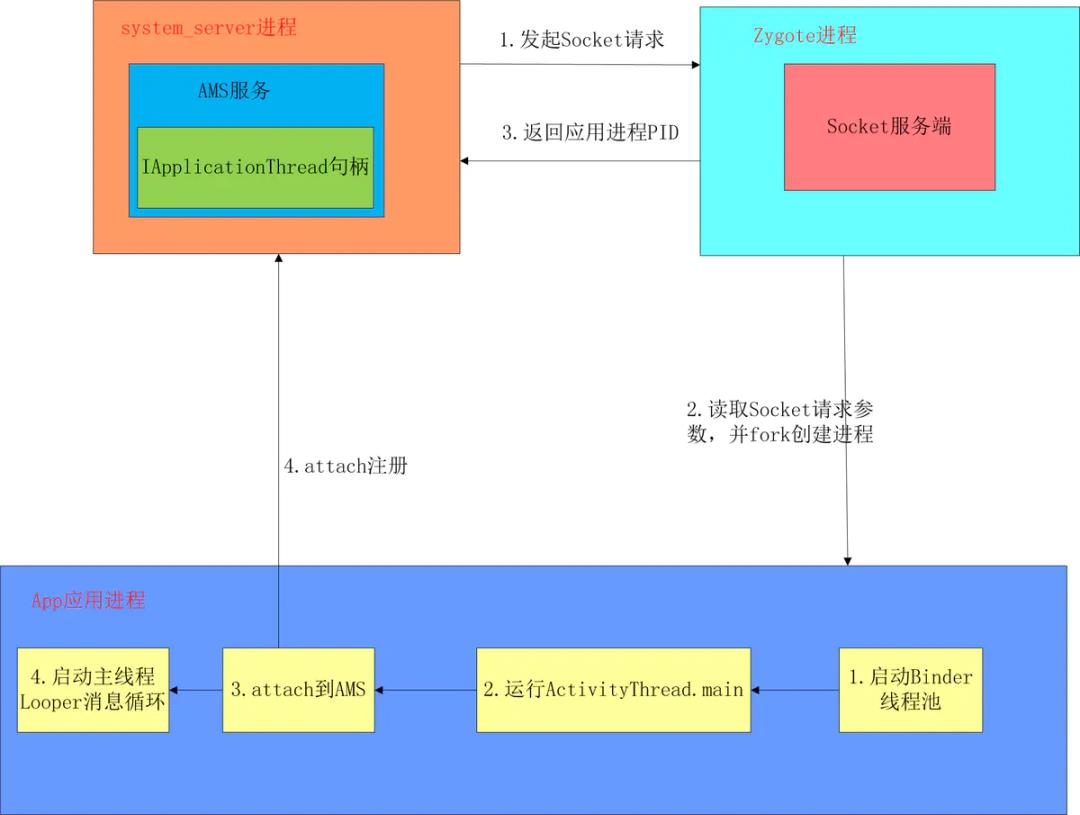
进程的创建,主要涉及到两个进程的通信
system_server进程和Zygote进程:
- system_server进程:是用于管理整个Java framework层,包含ActivityManager,PowerManager等各种系统服务;
- Zygote进程:是Android系统的首个Java进程,Zygote是所有Java进程的父进程,包括 system_server进程以及所有的App进程都是Zygote的子进程,注意这里说的是子进程。

1、AMS发送请求启动进程
//文件位置:/Users/XXX/Library/Android/sdk/sources/android-30/com/android/server/am/ActivityManagerService.java
@GuardedBy("this")
final ProcessRecord startProcessLocked(。。。)
    return mProcessList.startProcessLocked(。。。);


//文件位置:/Users/duanshoucheng/Library/Android/sdk/sources/android-30/com/android/server/am/ProcessList.java
private Process.ProcessStartResult startProcess(HostingRecord hostingRecord, String entryPoint,
        ProcessRecord app, int uid, int[] gids, int runtimeFlags, int zygotePolicyFlags,
        int mountExternal, String seInfo, String requiredAbi, String instructionSet,
        String invokeWith, long startTime)
    try
        final Process.ProcessStartResult startResult;
        if (hostingRecord.usesWebviewZygote())
            startResult = startWebView(。。。); //Process.startWebView,是静态方法
         else
            startResult = Process.start(。。。);

        checkSlow(startTime, "startProcess: returned from zygote!");
        return startResult;
     finally
        Trace.traceEnd(Trace.TRACE_TAG_ACTIVITY_MANAGER);


//文件位置:/Users/duanshoucheng/Library/Android/sdk/sources/android-30/android/os/Process.java
Process.start(...) ->ZYGOTE_PROCESS.start(...) -> ... -> zygoteSendArgsAndGetResult(openZygoteSocketIfNeeded(abi),...);  //会有两次机会和Zygote进程match。这里是LocalSocket
HostRecord构造参数HostingType,可取值:“activity”,“service”, “broadcast”, “contentProvider”
Java层进程的创建都是通过Process.start()方法,告知Zygote进程创建fork子进程,创建新进程后将ActivityThread类加载到新进程,并调用ActivityThread.main()方法。
2、Zygote处理请求
zygote进程在系统开机时就创建了。
//文件位置:/Users/xxx/Library/Android/sdk/sources/android-30/com/android/internal/os/ZygoteInit.java
@UnsupportedAppUsage
public static void main(String[] argv)
        ZygoteServer zygoteServer = null;
         ...
        try
            ...
            // 跟进该方法内,可以看到都是提前加载框架通用类和系统资源等
            if(!enableLazypreload)
                preload(bootTimingsTraceLog);

            ...
            // 创建zygote进程的socket server服务端对象
            zygoteServer = new ZygoteServer(isPrimaryZygote);

            if (startSystemServer)
                Runnable r = forkSystemServer(abiList, zygoteSocketName, zygoteServer);
                if (r != null)
                    r.run();
                    return;


            ...
            // 等待AMS发请求过来
            caller = zygoteServer.runSelectLoop(abiList);
            ...

        ...


    //文件位置:/Users/xxx/Library/Android/sdk/sources/android-30/com/android/internal/os/ZygoteServer.java
 ZygoteServer.runSelectLoop(...) ->
 ZygoteConnection.processCommand -> handleChildProc(...);
 private Runnable handleChildProc(ZygoteArguments parsedArgs,
            FileDescriptor pipeFd, boolean isZygote)
       ...
        if (parsedArgs.mInvokeWith != null)
           ...
         else
            if (!isZygote)
                // 继续进入ZygoteInit#zygoteInit继续完成子应用进程的相关初始化工作
                return ZygoteInit.zygoteInit(parsedArgs.mTargetSdkVersion,
                        parsedArgs.mDisabledCompatChanges,
                        parsedArgs.mRemainingArgs, null /* classLoader */);
3、应用进程初始化
public static final Runnable zygoteInit(int targetSdkVersion, long[] disabledCompatChanges,
        String[] argv, ClassLoader classLoader)

    RuntimeInit.redirectLogStreams();

    RuntimeInit.commonInit();
    ZygoteInit.nativeZygoteInit(); //native方法,jni调用启动进程的binder线程池
    return RuntimeInit.applicationInit(targetSdkVersion, disabledCompatChanges, argv,
            classLoader);
应用进程至此就启动了,启动之后需要main方法的入口:
//文件位置:/Users/xxx/Library/Android/sdk/sources/android-30/com/android/internal/os/RuntimeInit.java

protected static Runnable applicationInit(int targetSdkVersion, long[] disabledCompatChanges,
        String[] argv, ClassLoader classLoader)
    ...
    final Arguments args = new Arguments(argv);
    // Remaining arguments are passed to the start class's static main
    return findStaticMain(args.startClass, args.startArgs, classLoader);


protected static Runnable findStaticMain(String className, String[] argv,
        ClassLoader classLoader)
    Class<?> cl;

    try
        //反射加载创建ActivityThread类对象
        cl = Class.forName(className, true, classLoader);
     catch (ClassNotFoundException ex)
        throw new RuntimeException(
                "Missing class when invoking static main " + className, ex);


    Method m;
    try
        //反射调用main方法
        m = cl.getMethod("main", new Class[]  String[].class );
     catch (NoSuchMethodException ex)
        throw new RuntimeException(
                "Missing static main on " + className, ex);
     catch (SecurityException ex)
        throw new RuntimeException(
                "Problem getting static main on " + className, ex);


    int modifiers = m.getModifiers();
    if (! (Modifier.isStatic(modifiers) && Modifier.isPublic(modifiers)))
        throw new RuntimeException(
                "Main method is not public and static on " + className);

    /*
     * This throw gets caught in ZygoteInit.main(), which responds
     * by invoking the exception's run() method. This arrangement
     * clears up all the stack frames that were required in setting
     * up the process.
     */
    return new MethodAndArgsCaller(m, argv);


//内部静态类
static class MethodAndArgsCaller implements Runnable
    /** method to call */
    private final Method mMethod;

    /** argument array */
    private final String[] mArgs;

    public MethodAndArgsCaller(Method method, String[] args)
        mMethod = method;
        mArgs = args;


    public void run()
        try
            mMethod.invoke(null, new Object[]  mArgs );
         ...
4、新进程app
//文件位置:/Users/xxx/Library/Android/sdk/sources/android-30/android/app/ActivityThread.java
public static void main(String[] args)
    Looper.prepareMainLooper();
    ActivityThread thread = new ActivityThread();
    thread.attach(false, startSeq);

    if (sMainThreadHandler == null)
        sMainThreadHandler = thread.getHandler();

    Looper.loop();


@UnsupportedAppUsage
final ApplicationThread mAppThread = new ApplicationThread(); //内部类,继承IApplicationThread.Stub

@UnsupportedAppUsage
private void attach(boolean system, long startSeq)

    RuntimeInit.setApplicationObject(mAppThread.asBinder());
    final IActivityManager mgr = ActivityManager.getService();
    mgr.attachApplication(mAppThread, startSeq);
简单总结下:
初始化完,主线程就有了完整的 Looper、MessageQueue、Handler,此时 ActivityThread 的 Handler 就可以开始处理 Message,包括 Application、Activity、ContentProvider、Service、Broadcast 等组件的生命周期函数,都会以 Message 的形式,在主线程按照顺序处理。
5、总结
应用进程的启动是被动式的,在桌面点击图标启动一个组件如Activity实,如果该进程不存在,就会创建并启动进程。应用进程是由Zygote进程fork创建的,AMS在需要创建应用进程时,会通过socket并通知到Zygote进程进程在开机阶段就创建好的socket服务端,然后由Zygote进程fork创建出应用进程。
三、Service启动流程
1、startService调用链
启动方式:startService()和binderService()。也是由ActivityManagerService来完成。
Launcher#startService()–> ContextWrapper#startService()–>ContextImpl#startService() -->
//文件位置:/Users/xxx/Library/Android/sdk/sources/android-30/android/app/ContextImpl.java
private ComponentName startServiceCommon(Intent service, boolean requireForeground,
        UserHandle user)
    try
        validateServiceIntent(service);
        service.prepareToLeaveProcess(this); //ActivityManagerService
        ComponentName cn = ActivityManager.getService().startService(
                mMainThread.getApplicationThread(), service,
                service.resolveTypeIfNeeded(getContentResolver()), requireForeground,
                getOpPackageName(), getAttributionTag(), user.getIdentifier());
        ...
        return cn;
     catch (RemoteException e)
        throw e.rethrowFromSystemServer();
获取AMS:
//文件位置:/Users/xxx/Library/Android/sdk/sources/android-30/android/app/ActivityManager.java
@UnsupportedAppUsage
public static IActivityManager getService()
    return IActivityManagerSingleton.get(); //其实就是ActivityManagerService,AMS也是继承该类


private static IActivityTaskManager getTaskService()
    return ActivityTaskManager.getService();


@UnsupportedAppUsage
private static final Singleton<IActivityManager> IActivityManagerSingleton =
        new Singleton<IActivityManager>()
            @Override
            protected IActivityManager create()
                final IBinder b = ServiceManager.getService(Context.ACTIVITY_SERVICE);
                final IActivityManager am = IActivityManager.Stub.asInterface(b);
                return am;

        ;
// AMS
@Override
public ComponentName startService(IApplicationThread caller, Intent service,
        String resolvedType, boolean requireForeground, String callingPackage,
        String callingFeatureId, int userId)
        throws TransactionTooLargeException
           ...
        ComponentName res;
        try
            res = mServices.startServiceLocked(caller, service,
                    resolvedType, callingPid, callingUid,
                    requireForeground, callingPackage, callingFeatureId, userId);
         finally
            Binder.restoreCallingIdentity(origId);

        return res;
参数:
- caller:类型是IApplicationThread,是ActivityThread.java内部类,IApplicationThread.Stub的子类
- service:Intent类型,包含需要运行的service信息
- callingPackage: String类型,调用该方法的package
然后ActiveService#startServiceLocked -> ActiveService#startServiceInnerLocked->ActiveService#bringUpServiceLocked
//文件位置: /Users/xxx/Library/Android/sdk/sources/android-30/com/android/server/am/ActiveService.java

//2848行,bindService最后也会走这里
private String bringUpServiceLocked(ServiceRecord r, int intentFlags, boolean execInFg,
        boolean whileRestarting, boolean permissionsReviewRequired)
        throws TransactionTooLargeException
    if (r.app != null && r.app.thread != null)
        sendServiceArgsLocked(r, execInFg, false);
        return null;

    ....
        if (app != null && app.thread != null)
            try
                app.addPackage(r.appInfo.packageName, r.appInfo.longVersionCode, mAm.mProcessStats);
                realStartServiceLocked(r, app, execInFg); //启动服务
                return null;
            ...


            // If a dead object exception was thrown -- fall through to
            // restart the application.


    // 进程没启动,需要启动进程
    if (app == null && !permissionsReviewRequired)
        if ((app=mAm.startProcessLocked(...)
            ...


...
    return null;
总结下:该方法流程比较多,重要的是realStartServiceLocked和startProcessLocked两个启动方法,如果进程不存在,执行AMS#startProcessLocked–>AMS#attachApplicationLocked,然后执行realStartServiceLocked.
2、startProcessLocked创建进程
AMS#startProcessLocked -> ProcessList#startProcessLocked,之后的流程参考第二节,下面是第二节之后继续执行的流程:
//AMS.java
@Override
public final void attachApplication(IApplicationThread thread, long startSeq)
    if (thread == null)
        throw new SecurityException("Invalid application interface");

    synchronized (this)
        int callingPid = Binder.getCallingPid();
        final int callingUid = Binder.getCallingUid();
        final long origId = Binder.clearCallingIdentity();
        attachApplicationLocked(thread, callingPid, callingUid, startSeq);
        Binder.restoreCallingIdentity(origId);


private boolean attachApplicationLocked(@NonNull IApplicationThread thread,
        int pid, int callingUid, long startSeq)
        ...

        thread.bindApplication(processName, appInfo, providerList,
        instr2.mClass,
        profilerInfo, instr2.mArguments,
        instr2.mWatcher,
        instr2.mUiAutomationConnection, testMode,
        mBinderTransactionTrackingEnabled, enableTrackAllocation,
        isRestrictedBackupMode || !normalMode, app.isPersistent(),
        new Configuration(app.getWindowProcessController().getConfiguration()),
        app.compat, getCommonServicesLocked(app.isolated),
        mCoreSettingsObserver.getCoreSettingsLocked(),
        buildSerial, autofillOptions, contentCaptureOptions,
        app.mDisabledCompatChanges);
        ...

// Find any services that should be running in this process...
        if (!badApp)
            try
                didSomething |= mServices.attachApplicationLocked(app, processName);
            //mServices是ActiveService
继续
boolean attachApplicationLocked(ProcessRecord proc, String processName)
        throws RemoteException
    boolean didSomething = false;
    // Collect any services that are waiting for this process to come up.
    if (mPendingServices.size() > 0)
                ...
                realStartServiceLocked(sr, proc, sr.createdFromFg);
                didSomething = true;
                ...

    return didSomething;
看到了吧,第6行,创建了新的进程之后,会继续执行ActiveService#realStartServiceLocked。
忽略第2小节,继续第1小节的流程:realStartServiceLocked().
3、realStartServiceLocked继续启动服务
//文件位置: /Users/xxx/Library/Android/sdk/sources/android-30/com/android/server/am/ActiveService.java
private final void realStartServiceLoc以上是关于Android启动流程浅谈的主要内容,如果未能解决你的问题,请参考以下文章