Elasticsearch:在多个机器上创建多节点的 Elasticsearch 集群 - Elastic Stack 8.0
Posted Elastic 中国社区官方博客
tags:
篇首语:本文由小常识网(cha138.com)小编为大家整理,主要介绍了Elasticsearch:在多个机器上创建多节点的 Elasticsearch 集群 - Elastic Stack 8.0相关的知识,希望对你有一定的参考价值。
自动上次我写了文章 “Elasticsearch:创建多个节点的集群 - Elastic Stack 8.0” 以来,有位开发者想知道如何在多个机器上创建一个集群而不是使用 docker 的方式来在一个机器上创建多个节点的集群。在今天的文章中,我来详述如何跨多个机器并在不同的操作系统下创建多于一个节点的集群。
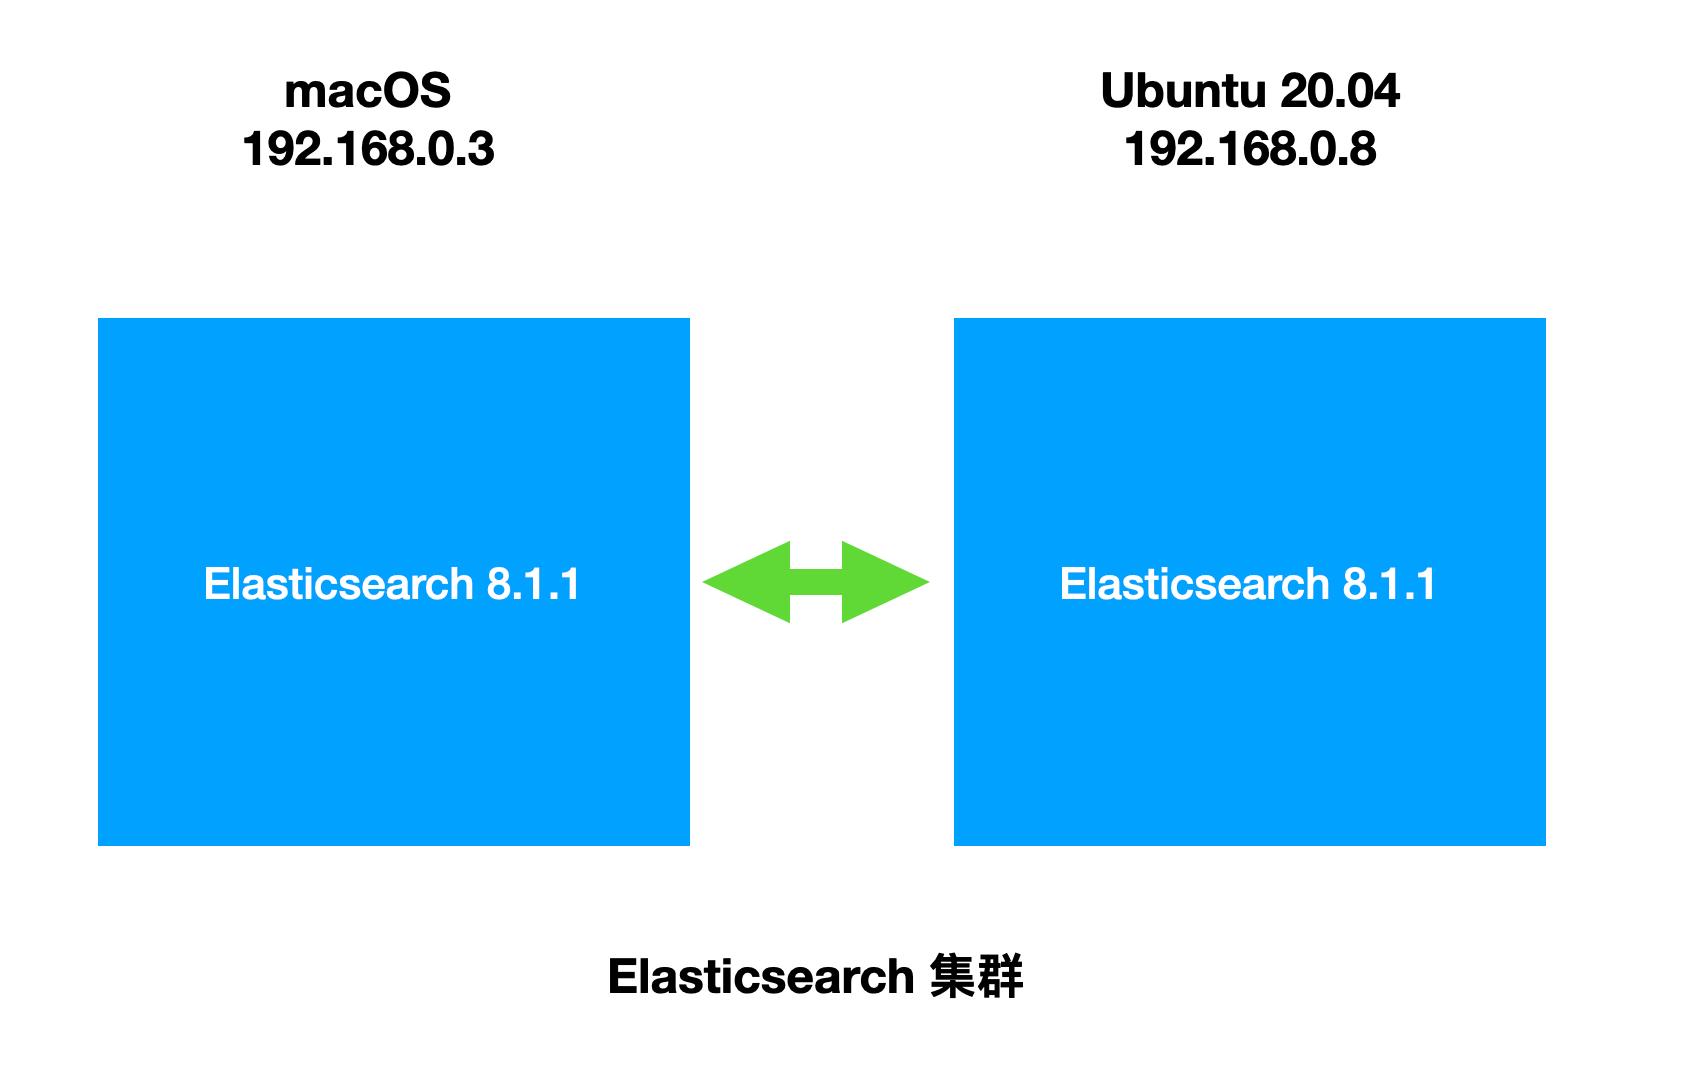
为了描述的方便,我把配置描述如下:
在多个机器上创建多节点的 Elasticsearch 集群 - Elastic Stack 8.0
在多个机器上创建多节点的 Elasticsearch 集群 - Elastic Stack 8.0_哔哩哔哩_bilibili
如上所示,我在两个不同的操作系统下安装 Elasticsearch。它们的 IP 地址如上所示。它们处于同一个局域网里,并可以互相访问。我们可以通过如下的方式来获取电脑的 IP 地址:
$ ifconfig | grep 192
	inet 192.168.0.3 netmask 0xffffff00 broadcast 192.168.0.255
为了保证安装的顺利进行,需要在两个机器上安装同样版本的 Elasticsearch。
在 macOS 上安装 Elasticsearch
在 macOS 上的安装非常直接,我们可以直接在 Elastic 的官方网站来下载 Elasticsearch 的安装包。你可以在地址找到相应的安装包。
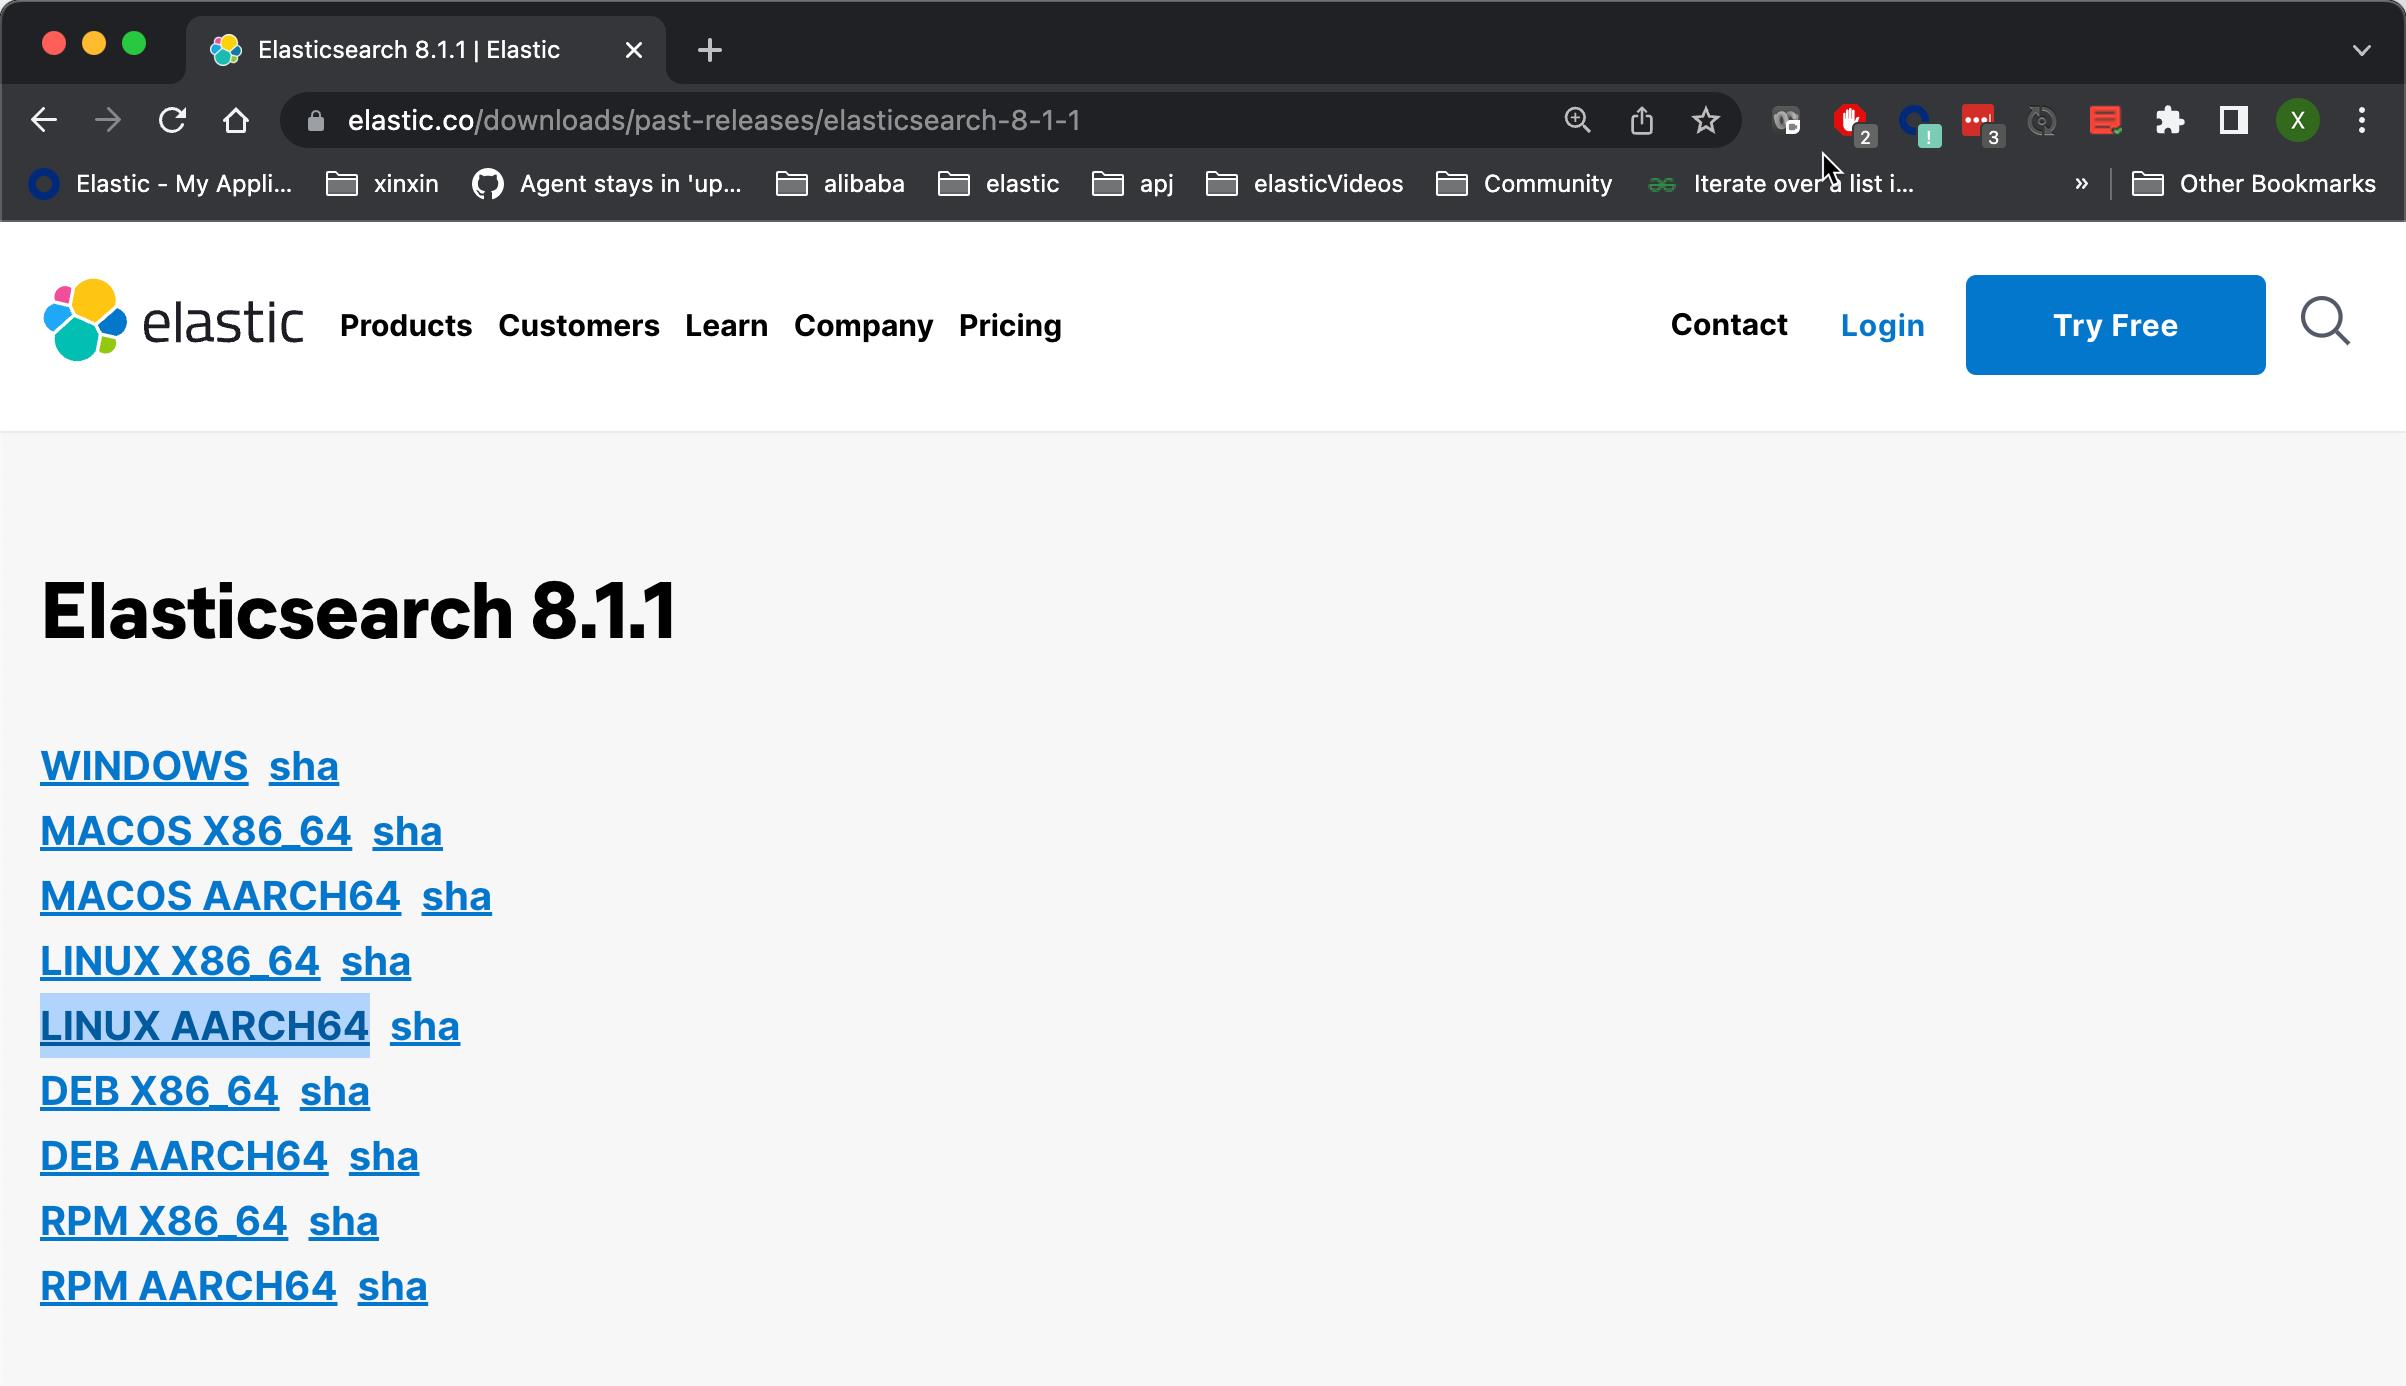
我们需要根据自己的操作系统来下载相应的版本。针对我的情况,我下载 apple 芯片的 MACOS AARCH64 版本。安装的方法非常直接。我们可以仿照文章 “Elastic Stack 8.0 安装 - 保护你的 Elastic Stack 现在比以往任何时候都简单”。里面含有一个视频。我们可以通过解压文件的方法,把 Elasticsearch 的安装文件置于一个目录里:
tar xzf elasticsearch-8.1.1-darwin-aarch64.tar.gz然后,进入该安装目录里。在这里特别需要指出的是:在启动 Elasticsearch 之前,我们需要修改 Elasticsearch 的配置文件:
config/elasticsearch.yml
network.host: 192.168.0.3
transport.host: 192.168.0.3
我们需要在 elasticsearch.yml 文件的最后添加这两天语句。然后启动 Elasticsearch:
bin/elasticsearch在启动的过程中,我们可以看到如下的输出:
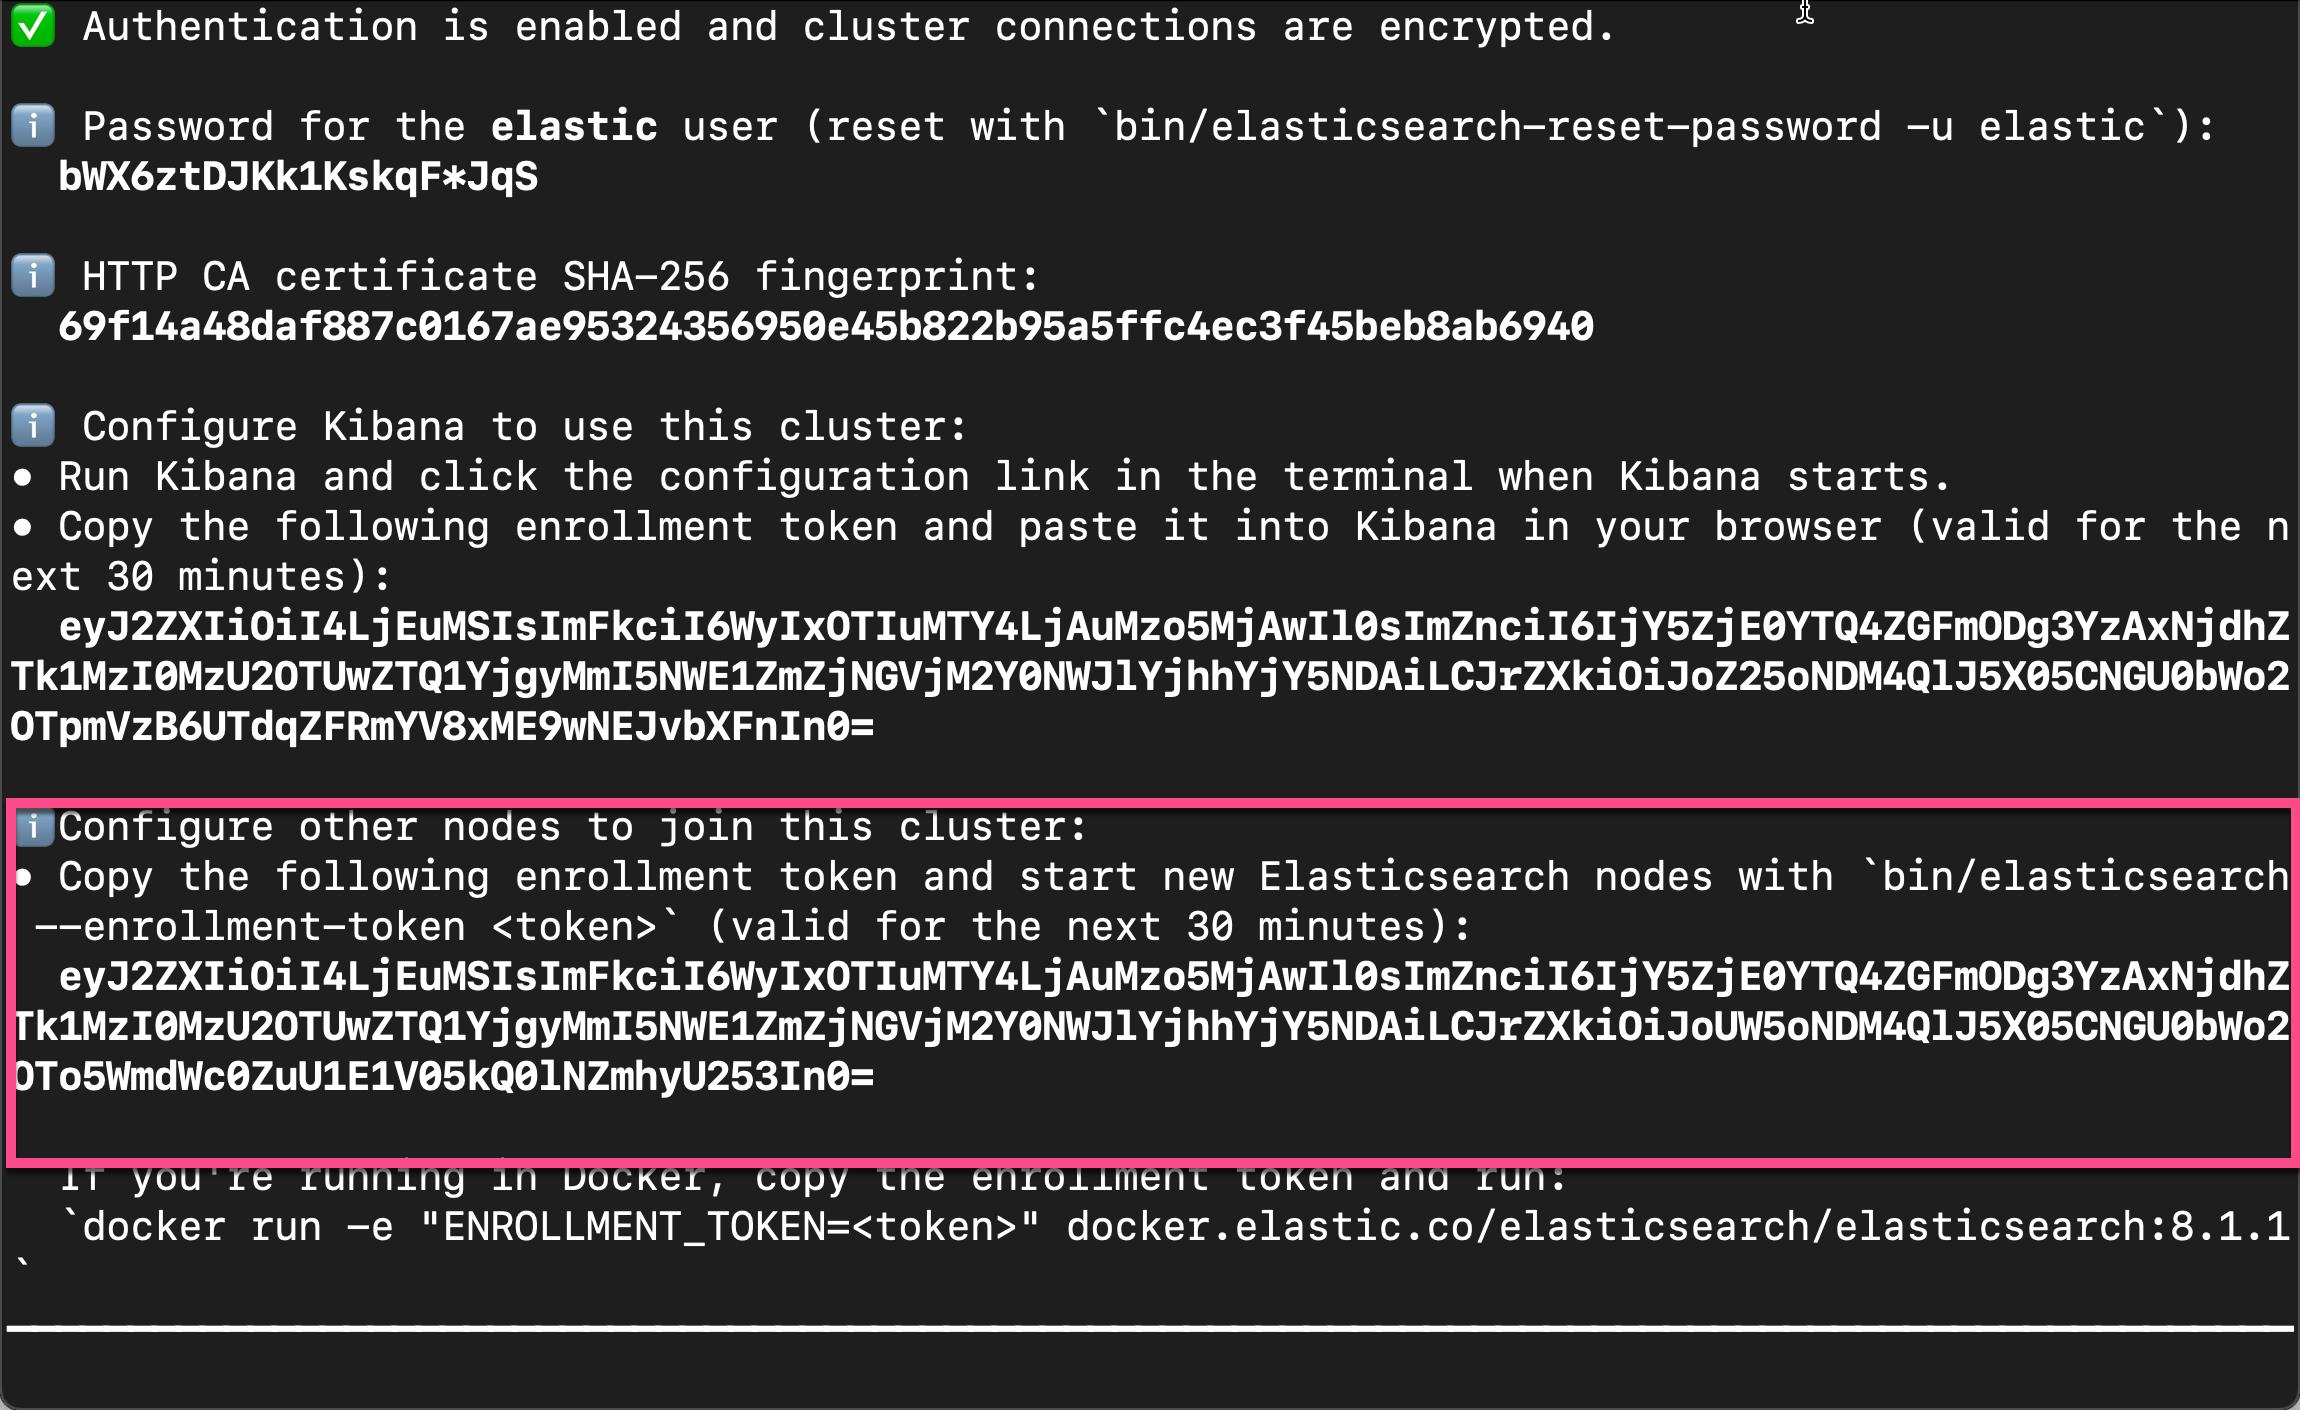
我们记下上面的配置 node 的 enrollment token。如果我们超时没有使用,或者找不到这个 enrollment token,我们可以使用如下的方法来进行生成新的:
bin/elasticsearch-create-enrollment-token -s node比如:
$ bin/elasticsearch-create-enrollment-token -s node
eyJ2ZXIiOiI4LjEuMiIsImFkciI6WyIxOTIuMTY4LjAuMzo5MjAwIl0sImZnciI6ImE2MTMxODJhNjkwNmIxYjAzYzE4N2I5ZDA1NjdhZWE1NDNmNTNkNmQ5OWU2ZTlmMGY2MmVlYTZjZjFhYTc0OTAiLCJrZXkiOiI0Y3JZNDM4QllrQjFGTVV3REI4Xzpyc0VFNkJxS1RkeVJvVmxFRmE3V09RIn0=
如果安装正确的话,我们可以使用如下的命令来检查安装是否正确:
curl --insecure -u elastic:bWX6ztDJKk1KskqF*JqS -XGET "https://192.168.0.3:9200"在上面,请注意 bWX6ztDJKk1KskqF*JqS 是超级用户的密码。可以在上面显示的图中找到。如果正确的话,你可以看到如下的画面:
$ curl --insecure -u elastic:bWX6ztDJKk1KskqF*JqS -XGET "https://192.168.0.3:9200"

  "name" : "liuxgm.local",
  "cluster_name" : "elasticsearch",
  "cluster_uuid" : "33BuPy7iTB-wmbHzE6fXUA",
  "version" :
    "number" : "8.1.1",
    "build_flavor" : "default",
    "build_type" : "tar",
    "build_hash" : "d0925dd6f22e07b935750420a3155db6e5c58381",
    "build_date" : "2022-03-17T22:01:32.658689558Z",
    "build_snapshot" : false,
    "lucene_version" : "9.0.0",
    "minimum_wire_compatibility_version" : "7.17.0",
    "minimum_index_compatibility_version" : "7.0.0"
  ,
  "tagline" : "You Know, for Search"
好了,我们就这样完成了 macOS 上的 Elasticsearch 的安装了。
在 Ubuntu 上安装 Elasticsearch
我们在 Ubuntu 上的安装也非常直接。具体操作步骤请参考我之前的文章 “Elasticsearch: 使用 Debian 安装包来安装 Elasticsearch 8.x”。在这里特别需要指出的是:在第一次启动 Elasticsearch 服务之前,我们需要做如下的一个步骤:
sudo /usr/share/elasticsearch/bin/elasticsearch-reconfigure-node --enrollment-token <enrollment-token>请注意:上面的 <enrollment-token> 就是在上面一步生成的节点 enrollment token。我们可以看到:
root@liuxg:~# /usr/share/elasticsearch/bin/elasticsearch-reconfigure-node --enrollment-token eyJ2ZXIiOiI4LjEuMSIsImFkciI6WyIxOTIuMTY4LjAuMzo5MjAwIl0sImZnciI6IjY5ZjE0YTQ4ZGFmODg3YzAxNjdhZTk1MzI0MzU2OTUwZTQ1YjgyMmI5NWE1ZmZjNGVjM2Y0NWJlYjhhYjY5NDAiLCJrZXkiOiJod25qNDM4QlJ5X05CNGU0VVQ2cDpJc0lpaDNrbVNISy1qQ2Z3VGNwUUV3In0=

This node will be reconfigured to join an existing cluster, using the enrollment token that you provided.
This operation will overwrite the existing configuration. Specifically:
  - Security auto configuration will be removed from elasticsearch.yml
  - The [certs] config directory will be removed
  - Security auto configuration related secure settings will be removed from the elasticsearch.keystore
Do you want to continue with the reconfiguration process [y/N]y另外:这个 enrollment token 必须是一个已经正在运行的 Elasticsearch 集群里的 elasticsearch 所生成的 token。
然后,我们就按照正常的步骤来启动 elasticsearch 服务:
root@liuxg:~# service elasticsearch start
root@liuxg:~# service elasticsearch status
● elasticsearch.service - Elasticsearch
     Loaded: loaded (/lib/systemd/system/elasticsearch.service; disabled; vendor preset: enabled)
     Active: active (running) since Fri 2022-04-01 14:55:20 CST; 57s ago
       Docs: https://www.elastic.co
   Main PID: 101908 (java)
      Tasks: 54 (limit: 4576)
     Memory: 2.3G
     CGroup: /system.slice/elasticsearch.service
             ├─101908 /usr/share/elasticsearch/jdk/bin/java -Xshare:auto -Des.networkaddress.cache.ttl=60 -Des.networka>
             └─102184 /usr/share/elasticsearch/modules/x-pack-ml/platform/linux-aarch64/bin/controller

Apr 01 14:55:12 liuxg systemd[1]: Starting Elasticsearch...
Apr 01 14:55:20 liuxg systemd[1]: Started Elasticsearch.
我们可以看到 elasticsearch 服务已经被成功运行。如果我们想查看 elasticsearch 服务的日志,我们可以使用如下的方式:
root@liuxg:~# journalctl -u elaticsearch
-- Logs begin at Fri 2022-04-01 14:23:22 CST, end at Fri 2022-04-01 14:55:30 CST. --
-- No entries --
root@liuxg:~# journalctl -u elasticsearch
-- Logs begin at Fri 2022-04-01 14:23:22 CST, end at Fri 2022-04-01 14:55:30 CST. --
Apr 01 14:23:41 liuxg systemd[1]: Starting Elasticsearch...
Apr 01 14:24:19 liuxg systemd[1]: Started Elasticsearch.
Apr 01 14:29:09 liuxg systemd[1]: Stopping Elasticsearch...
Apr 01 14:29:12 liuxg systemd[1]: elasticsearch.service: Succeeded.
Apr 01 14:29:12 liuxg systemd[1]: Stopped Elasticsearch.
Apr 01 14:31:43 liuxg systemd[1]: Starting Elasticsearch...
Apr 01 14:32:20 liuxg systemd[1]: Started Elasticsearch.
Apr 01 14:35:00 liuxg systemd[1]: Stopping Elasticsearch...
Apr 01 14:35:03 liuxg systemd[1]: elasticsearch.service: Succeeded.
Apr 01 14:35:03 liuxg systemd[1]: Stopped Elasticsearch.
Apr 01 14:37:11 liuxg systemd[1]: Starting Elasticsearch...
Apr 01 14:37:18 liuxg systemd[1]: Started Elasticsearch.
Apr 01 14:38:09 liuxg systemd[1]: Stopping Elasticsearch...
Apr 01 14:38:11 liuxg systemd[1]: elasticsearch.service: Succeeded.
Apr 01 14:38:11 liuxg systemd[1]: Stopped Elasticsearch.
Apr 01 14:39:40 liuxg systemd[1]: Starting Elasticsearch...
Apr 01 14:40:18 liuxg systemd[1]: Started Elasticsearch.
Apr 01 14:50:20 liuxg systemd[1]: Stopping Elasticsearch...
Apr 01 14:50:23 liuxg systemd[1]: elasticsearch.service: Succeeded.
Apr 01 14:50:23 liuxg systemd[1]: Stopped Elasticsearch.
Apr 01 14:55:12 liuxg systemd[1]: Starting Elasticsearch...
Apr 01 14:55:20 liuxg systemd[1]: Started Elasticsearch.
我们可以看到 elasticsearch 已经被成功运动了。
检查集群的节点
我们可以在命令行中使用如下的方法来检查集群有哪些节点:
curl --insecure -u elastic:oYCPMKq5m0gQZyeKA-G2 -XGET "https://192.168.0.3:9200/_cat/nodes"同样,上面的 oYCPMKq5m0gQZyeKA-G2 是超级用户 elastic 的密码。你需要根据自己的配置来进行修改。如果你的集群已经正确运行,你可以看到如下的输出:
$ curl --insecure -u elastic:bWX6ztDJKk1KskqF*JqS -XGET "https://192.168.0.3:9200/_cat/nodes"
192.168.0.8 16 97 41 0.38 0.15 0.11 cdfhilmrstw - liuxg
192.168.0.3  2 99 21 3.93           cdfhilmrstw * liuxgm.local
从上,我们可以看到有两个节点已经成功地运行。
Hurray! 我们终于有了自己的在多个机器上运行的多个节点的 Elasticsearch。
以上是关于Elasticsearch:在多个机器上创建多节点的 Elasticsearch 集群 - Elastic Stack 8.0的主要内容,如果未能解决你的问题,请参考以下文章