对注意力机制(Attention)的一些理解附上Bi-LSTM和seq2seq加上注意力机制的代码
Posted Icy Hunter
tags:
篇首语:本文由小常识网(cha138.com)小编为大家整理,主要介绍了对注意力机制(Attention)的一些理解附上Bi-LSTM和seq2seq加上注意力机制的代码相关的知识,希望对你有一定的参考价值。
注意力机制,简单来说就是让模型能够学会具体问题具体分析吧,比如问你是个水果大师,别人问你这个苹果怎么样,那总得盯着苹果端详吧,而不是去看那个西瓜。
理解的应该差不太多吧…

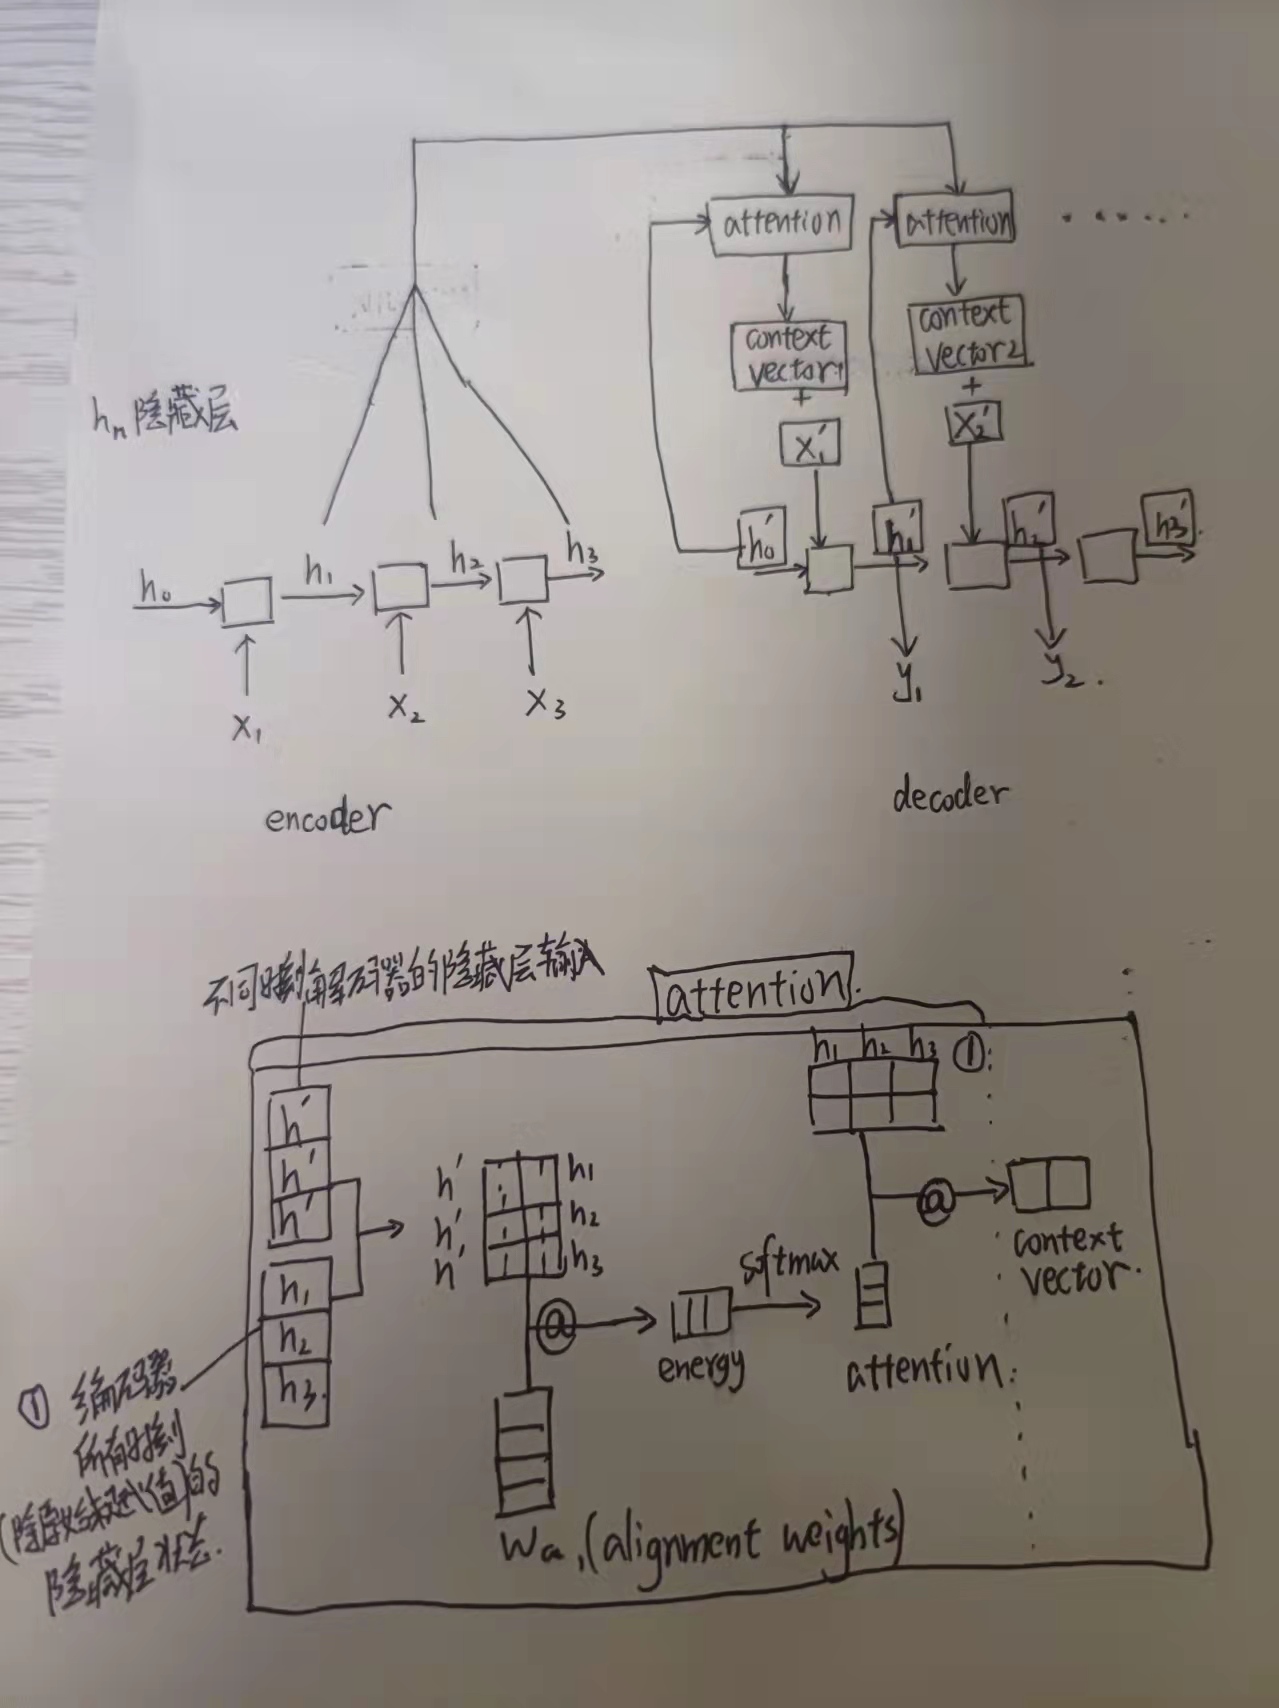
这个是从b站看的一个手推注意力机制的视频,照着画了一遍,感觉大概也是明白了一点。主要计算过程(当时她讲的是机器翻译的例子)就是编码器所有的隐藏层以及解码器当前的隐藏层一起计算出attention后再计算出context-vector最后和当前时刻需要输入的序列拼接,然后一起生成解码器下一个隐藏层然后通过这个隐藏层预测下一个词,然后这个隐藏层也和所有编码器的隐藏层一起计算attetion…
多说无益,还是上链接去看看比较能懂https://www.bilibili.com/video/BV1jh41187Qq?from=search&seid=13828532683994909740&spm_id_from=333.337.0.0
讲的真的真的很好很好了吧。
下面有个代码,但是Bi-LSTM里文本分类用了注意力机制,和seq2seq不太一样,但是我发现pytorch里LSTM的output输出的其实就是所有时刻隐藏层的信息,因为output最后一维就包含了最后一层隐藏层,那就好理解了。
主要看下面的注意力机制部分吧,不过这里只是计算出来context-vector就直接拿出去用了,毕竟要实现的目的不一样,注意力机制使用的方法也就不一样吧。
代码也是别人的,给出链接https://github.com/graykode/nlp-tutorial
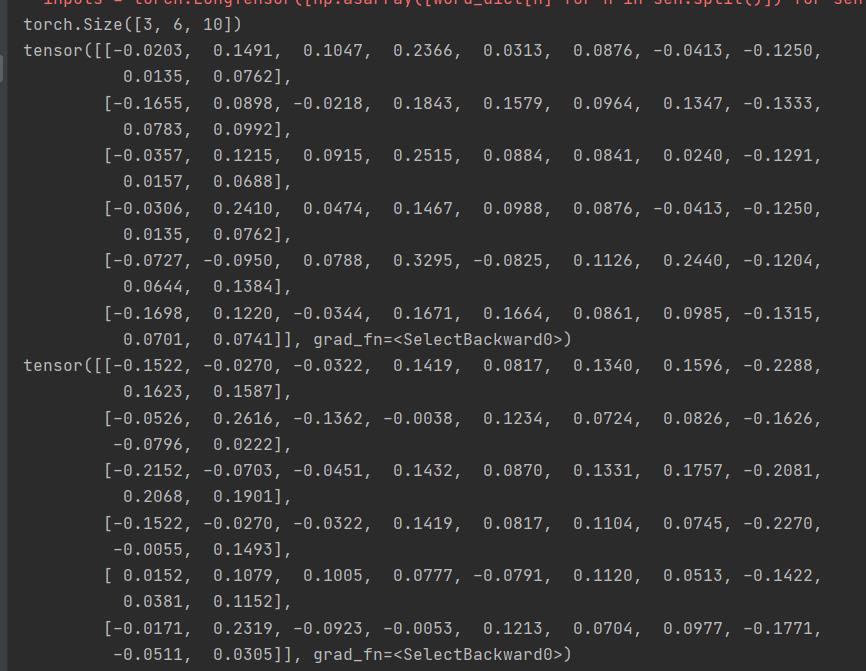
然后LSTM的out其实就是历史时刻的隐藏层值得强调一下,就是下面这个例子运行的结果。
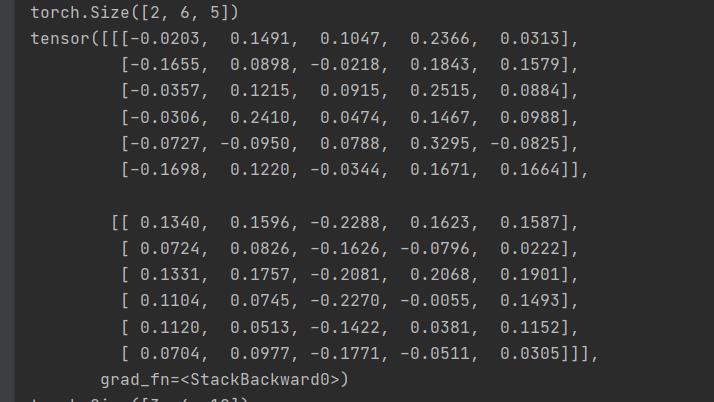
lstm_out的第一维和最后一维

最后一层隐藏层final_hidden_state的输出结果:

会发现最后一侧隐藏层分别在out的第一维和最后一维出现了,因为双向LSTM,两个隐藏层拼接是头尾相接的,因此就出现了这样的情况,因此也能说明out其实就是历史隐藏层的信息吧,就可以用计算attention了。
Bi-LSTM with attention
import numpy as np
import torch
import torch.nn as nn
import torch.optim as optim
import torch.nn.functional as F
import matplotlib.pyplot as plt


class BiLSTM_Attention(nn.Module):
    def __init__(self):
        super(BiLSTM_Attention, self).__init__()

        self.embedding = nn.Embedding(vocab_size, embedding_dim)
        self.lstm = nn.LSTM(embedding_dim, n_hidden, bidirectional=True)
        self.out = nn.Linear(n_hidden * 2, num_classes)

    # lstm_output : [batch_size, n_step, n_hidden * num_directions(=2)], F matrix
    def attention_net(self, lstm_output, final_state):
        hidden = final_state.view(-1, n_hidden * 2, 1)
        # hidden : [batch_size, n_hidden * num_directions(=2), 1(=n_layer)]
        # lstm_output.shape:[batch_size, len_seq, n_hidden * num_directions(=2)]
        # attn_weights : [batch_size, n_step], n_step其实就是len_seq吧
        attn_weights = torch.bmm(lstm_output, hidden).squeeze(2)
        soft_attn_weights = F.softmax(attn_weights, 1)  # 标准化计算出权重
        # [batch_size, n_hidden * num_directions(=2), n_step] * [batch_size, n_step, 1] = [batch_size, n_hidden * num_directions(=2), 1]
        context = torch.bmm(lstm_output.transpose(1, 2), soft_attn_weights.unsqueeze(2)).squeeze(2)
        return context, soft_attn_weights.data.numpy()  # context : [batch_size, n_hidden * num_directions(=2)]

    def forward(self, X):
        input = self.embedding(X)  # input : [batch_size, len_seq, embedding_dim]
        batch_size = len(X)
        input = input.permute(1, 0, 2)  # 转换后input : [len_seq, batch_size, embedding_dim], 因为没有设置batch_first=True因此需要调换维度以符合输入

        hidden_state = torch.zeros(1*2, batch_size, n_hidden)  # [num_layers(=1) * num_directions(=2), batch_size, n_hidden]
                                                            #  默认隐藏层为1层,双向LSTM因此有两个隐藏层
        cell_state = torch.zeros(1*2, batch_size, n_hidden)  # [num_layers(=1) * num_directions(=2), batch_size, n_hidden]

        # final_hidden_state, final_cell_state : [num_layers(=1) * num_directions(=2), batch_size, n_hidden]
        output, (final_hidden_state, final_cell_state) = self.lstm(input, (hidden_state, cell_state))
        # output.shape[len_seq, batch_size, n_hidden*2] 这里双向LSTM
        # output其实就是全部的历史隐藏层状态, 不信可以对着输出看看,双向LSTM隐藏层头尾相接的
        print(output.shape)
        print(output[-1])
        print(output[0])
        print(final_hidden_state.shape)
        print(final_hidden_state)

        output = output.permute(1, 0, 2)  # 转换后output : [batch_size, len_seq, n_hidden]
        attn_output, attention = self.attention_net(output, final_hidden_state)  # 传入所有历史隐藏层h1,h2...hn,以及hn
        return self.out(attn_output), attention  # model : [batch_size, num_classes], attention : [batch_size, n_step]


if __name__ == '__main__':
    embedding_dim = 2  # embedding size
    n_hidden = 5  # number of hidden units in one cell
    num_classes = 2  # 0 or 1

    # 3 words sentences (=sequence_length is 3)
    sentences = ["i love you", "he loves me", "she likes baseball", "i hate you", "sorry for that", "this is awful"]
    labels = [1, 1, 1, 0, 0, 0]  # 1 is good, 0 is not good.

    word_list = " ".join(sentences).split()
    word_list = list(set(word_list))
    word_dict = w: i for i, w in enumerate(word_list)
    vocab_size = len(word_dict)

    model = BiLSTM_Attention()

    criterion = nn.CrossEntropyLoss()
    optimizer = optim.Adam(model.parameters(), lr=0.001)

    inputs = torch.LongTensor([np.asarray([word_dict[n] for n in sen.split()]) for sen in sentences])
    # inputs.shape [batch_size, len_seq] [6, 3]
    targets = torch.LongTensor([out for out in labels])  # To using Torch Softmax Loss function

    # Training
    for epoch in range(5000):
        optimizer.zero_grad()
        output, attention = model(inputs)
        loss = criterion(output, targets)
        if (epoch + 1) % 1000 == 0:
            print('Epoch:', '%04d' % (epoch + 1), 'cost =', ':.6f'.format(loss))

        loss.backward()
        optimizer.step()

    # Test
    test_text = 'sorry hate you'
    tests = [np.asarray([word_dict[n] for n in test_text.split()])]
    test_batch = torch.LongTensor(tests)

    # Predict
    predict, _ = model(test_batch)
    predict = predict.data.max(1, keepdim=True)[1]
    if predict[0][0] == 0:
        print(test_text, "is Bad Mean...")
    else:
        print(test_text, "is Good Mean!!")

    fig = plt.figure(figsize=(6, 3)) # [batch_size, n_step]
    ax = fig.add_subplot(1, 1, 1)
    ax.matshow(attention, cmap='viridis')
    ax.set_xticklabels(['']+['first_word', 'second_word', 'third_word'], fontdict='fontsize': 14, rotation=90)
    ax.set_yticklabels(['']+['batch_1', 'batch_2', 'batch_3', 'batch_4', 'batch_5', 'batch_6'], fontdict='fontsize': 14)
    plt.show()
下面的代码时机器翻译的例子,计算attetion的大体流程应该和b站视频讲的差不多,即用编码器所有的隐藏层以及解码器的隐藏层来计算出注意力得出context-vector然后和此时输入粘起来作为一个整体预测。
不过这下面代码,感觉还是有一点点不一样的。
b站视频里是 编码器所有隐藏层+解码器输入的隐藏层=>context-vector + 此时的输入序列=>解码器此刻的隐藏层=>全连接=>预测
但是下面代码好像是 解码器输入的隐藏层+此时输入的序列=>解码器此时的隐藏层+编码器所有的隐藏层=>context-vector + 解码器此时的隐藏层=>全连接=>预测
感觉可能差不太多吧,因为隐藏层其实就包含着前一时刻的序列输入内容了。
seq2seq with attention
import numpy as np
import torch
import torch.nn as nn
import torch.nn.functional as F
import matplotlib.pyplot as plt

# S: 解码器起始输入符
# E: 解码器输出结束符
# P: 填充缺失的符号

def make_batch():  # 数据预处理
    input_batch = [np.eye(n_class)[[word_dict[n] for n in sentences[0].split()]]]  # 'ich mochte ein bier P',
    output_batch = [np.eye(n_class)[[word_dict[n] for n in sentences[1].split()]]]  # 'S i want a beer',
    target_batch = [[word_dict[n] for n in sentences[2].split()]]  # 'i want a beer E'

    # make tensor
    return torch.FloatTensor(input_batch), torch.FloatTensor(output_batch), torch.LongTensor(target_batch)


class Attention(nn.Module):
    def __init__(self):
        super(Attention, self).__init__()
        self.enc_cell = nn.RNN(input_size=n_class, hidden_size=n_hidden, dropout=0.5)  # 编码器
        self.dec_cell = nn.RNN(input_size=n_class, hidden_size=n_hidden, dropout=0.5)  # 解码器

        # Linear for attention
        self.attn = nn.Linear(n_hidden, n_hidden)
        self.out = nn.Linear(n_hidden * 2, n_class)  # 全连接

    def forward(self, enc_inputs, hidden, dec_inputs):
        # 原本输入inputs都为[batch_size, n_step, n_class],没有设置batch_first=True,因此需要交换一下维度
        enc_inputs = enc_inputs.transpose(0, 1)  # enc_inputs: [n_step(=n_step, time step), batch_size, n_class]
        dec_inputs = dec_inputs.transpose(0, 1)  # dec_inputs: [n_step(=n_step, time step), batch_size, n_class]

        # enc_outputs : [n_step, batch_size, num_directions(=1) * n_hidden], matrix F
        # enc_hidden : [num_layers(=1) * num_directions(=1), batch_size, n_hidden]
        enc_outputs, enc_hidden = self.enc_cell(enc_inputs, hidden)

        trained_attn = []  # 保存训练后的注意力
        hidden = enc_hidden  # 编码器的最后一层隐藏层
        n_step = len(dec_inputs)  # 解码器的需要输入的词长
        model = torch.empty([n_step, 1, n_class])

        for i in range(n_step):  # each time step
            # dec_output : [n_step(=1), batch_size(=1), num_directions(=1) * n_hidden]
            # hidden : [num_layers(=1) * num_directions(=1), batch_size(=1), n_hidden]

            # 初始的hidden为编码器的最后一层隐藏层,带入模型后就为解码器输出的隐藏层,然后一层一层不断迭代进去
            # 例如起始的hidden为编码器的h5,也相当于解码器的h0',带入能够计算出h1',然后继续带入就是h2‘....
            # dec_inputs[i].unsqueeze(0).shape: [1, 1, 11],即代表一个词
            dec_output, hidden = self.dec_cell(dec_inputs[i].unsqueeze(0), hidden)

            #  dec_output.shape: [1, 1, 128]
            #  enc_outputs.shape: [5, 1, 128], 为编码器所有的隐藏层信息,用于计算注意力权重
            #  attn_weights : [1, 1, n_step], 注意力权重
            attn_weights = self.get_att_weight(dec_output, enc_outputs)
            trained_attn.append(attn_weights.squeeze().data.numpy())

            # matrix-matrix product of matrices [1,1,n_step] x [1,n_step,n_hidden] = [1,1,n_hidden]
            context = attn_weights.bmm(enc_outputs.transpose(0, 1))  # 计算context-vector,即注意力权重与编码器隐藏层矩阵相乘
            dec_output = dec_output.squeeze(0)  # dec_output : [batch_size(=1), num_directions(=1) * n_hidden]
            context = context.squeeze(1)  # [1, num_directions(=1) * n_hidden]
            model[i] = self.out(torch.cat((dec_output, context), 1))  # 将解码器输入和context-vector拼接之后放入模型,进行预测,得到预测结果放入model中
        # model.shape:[5, 1, 11]
        # make model shape [n_step, n_class]
        return model.transpose(0, 1).squeeze(0), trained_attn

    def get_att_weight(self, dec_output, enc_outputs):  # get attention weight one 'dec_output' with 'enc_outputs'
        n_step = len(enc_outputs)
        attn_scores = torch.zeros(n_step)  # attn_scores : [n_step]

        for i in range(n_step):  # 遍历所有时刻编码器的隐藏层,计算出各自注意力分数
            attn_scores[i] = self.get_att_score(dec_output, enc_outputs[i])

        # Normalize scores to weights in range 0 to 1, 标准化注意力分数即转换为权重
        return F.softmax(attn_scores).view(1, 1, -1)

    def get_att_score(self, dec_output, enc_output):  # enc_outputs [batch_size, num_directions(=1) * n_hidden]
        score = self.attn(enc_output)  # score : [batch_size, n_hidden]
        return torch.dot(dec_output.view(-1), score.view(-1))  # inner product make scalar value


if __name__ == '__main__':
    n_step = 5  # number of cells(= number of Step)
    n_hidden = 128  # number of hidden units in one cell

    sentences = ['ich mochte ein bier P', 'S i want a beer', 'i want a beer E']

    word_list = " ".join(sentences).split()
    word_list = list(set(word_list))
    word_dict = w: i for i, w in enumerate(word_list)
    number_dict = i: w for i, w in enumerate(word_list)
    n_class = len(word_dict)  # vocab list =11


    # hidden : [num_layers(=1) * num_directions(=1), batch_size, n_hidden]
    hidden = torch.zeros(1, 1, n_hidden)  # 初始化隐藏层信息

    model = Attention()
    criterion = nn.CrossEntropyLoss()
    optimizer = torch.optim.Adam(model.parameters(), lr=0.001)

    input_batch, output_batch, target_batch = make_batch()

    # Train
    for epoch in range(2000):
        optimizer.zero_grad()
        output, _ = model(input_batch, hidden, output_batch)

        loss = criterion(output, target_batch.squeeze(0))
        if (epoch + 1) % 400 == 0:
            print('Epoch:', '%04d' % (epoch + 1), 'cost =', ':.6f'.format(loss))

        loss.backward()
        optimizer.step()

    # Test
    test_batch = [np.eye(n_class)[[word_dict[n] for n in 'SPPPP']]]

    test_batch = torch.FloatTensor(test_batch)
    predict, trained_attn = model(input_batch, hidden, test_batch)
    predict = predict.data.max(1, keepdim=True)[1]
    print(sentences[0], '->', [number_dict[n.item()] for n in predict.squeeze()])

    # Show Attention
    fig = plt.figure(figsize=(5, 5))
    ax = fig.add_subplot(1, 1, 1)
    ax.matshow(trained_attn, cmap='viridis')
    ax.set_xticklabels([''] + sentences[0].split(), fontdict='fontsize': 14)
    ax.set_yticklabels([''] + sentences[2].split(), fontdict='fontsize': 14)
    plt.show()
https://github.com/graykode/nlp-tutorial
以上是关于对注意力机制(Attention)的一些理解附上Bi-LSTM和seq2seq加上注意力机制的代码的主要内容,如果未能解决你的问题,请参考以下文章