vue2,vue3移动端实现表格固定和首列固定
Posted twinkle||cll
tags:
篇首语:本文由小常识网(cha138.com)小编为大家整理,主要介绍了vue2,vue3移动端实现表格固定和首列固定相关的知识,希望对你有一定的参考价值。
好久都没有写文章了,上个月业务繁忙,事情比较多,最近在做移动端中发现了一个好玩的事情,那就是移动端中实现表格,固定列有哪些方法:
1. position: sticky
粘性布局,这个属性也可以实现行和列的固定,在pc端上没有啥问题,但是在手机端上会抖动。
使用注意事项:
要求父级不能够使用overflow:auto,否则不生效。
牛刀小试
<!DOCTYPE html>
<html>

<head>
  <meta charset="UTF-8">
  <meta name="viewport" content="width=device-width, initial-scale=1.0">
  <title>Test</title>
  <style>
    *,
    body,
    html
      margin: 0;
      padding: 0;
      box-sizing: border-box;
      height: 100%;
      width: 100%;


    .condition
      height: 50px;
      background-color: rgb(19, 13, 13);
      color: #fff;
      font-size: 2em;
      text-align: center;


    .table-container
      width: 100%;
      height: calc(100% - 50px);
      overflow: auto;


    table
      border-collapse: collapse;


    th,
    td
      padding: 5px;
      text-align: center;
      border: 1px solid #999;
      min-width: 100px;


    th
      background-color: #333;
      color: #fff;
      position: sticky;
      top: 0px;


    td:first-child
      background-color: #333;
      color: #fff;
      position: sticky;
      left: 0px;


    th:first-child
      position: sticky;
      left: 0px;
      top: 0px;
      z-index: 10;

  </style>
  <script src="https://cdn.staticfile.org/vue/2.5.17-beta.0/vue.min.js"></script>
  <script>
    document.addEventListener("DOMContentLoaded", function ()
      let t = new Vue( el: "#app" );
    );
  </script>
</head>

<body>
  <div id="app">
    <!-- 其他东西 -->
    <div class="condition">条件查询</div>
    <div class="table-container">
      <table>
        <thead>
          <tr>
            <th v-for="(n,i) of 50">字段 i+1</th>
          </tr>
        </thead>
        <tbody>
          <tr v-for="(n,i) of 100">
            <td v-for="(m,j) of 50">j+1</td>
          </tr>
        </tbody>
      </table>
    </div>
  </div>

</body>

</html>
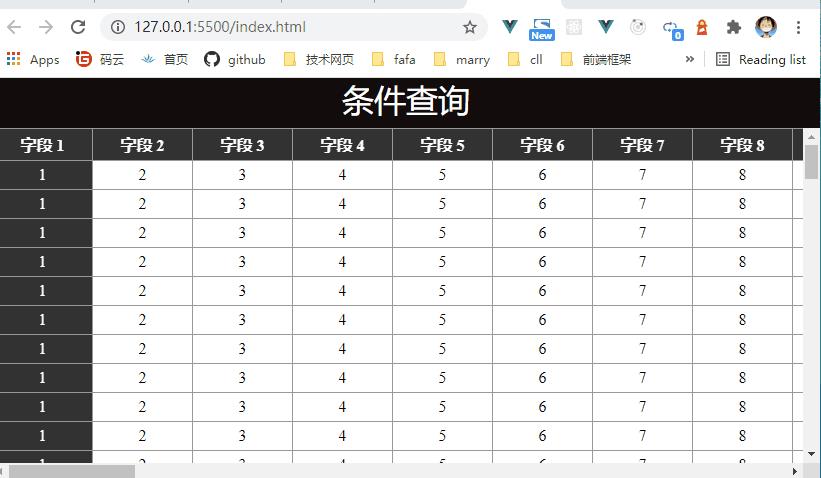
pc端的效果如下:

pc端的效果咋们都可以接收,虽然会有点看起来不舒服。
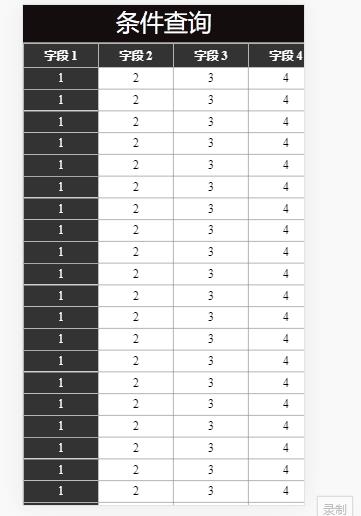
移动端效果

这啥呀,还抖动的,对于真机的测试,安卓会抖动,但是苹果机型不会抖动。这种肯定是不行的,打开ele的table看到人家的表格蛮不错的,那就学习下。
2.多表格实现固定
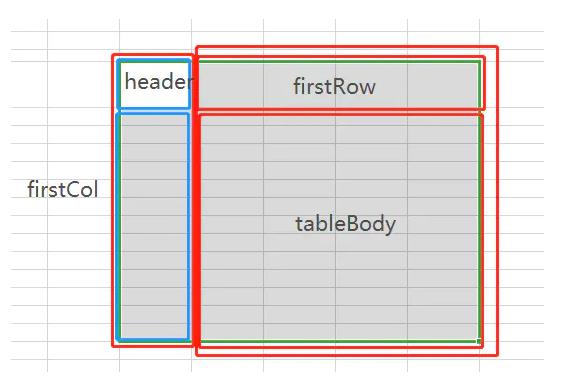
思路,在ele中,固定是有多个表格来的,所以咋也来搞多个表格。首先将表格分成左右两部分,左边第一列在上下滑动是header部分需要固定;右边第一行在左右滑动时firstRow和header部分也需要是固定的。可将这几个划分区域分别用table填充,滑动tableBody时保持firstRow和firstCol的同步滑动即可。
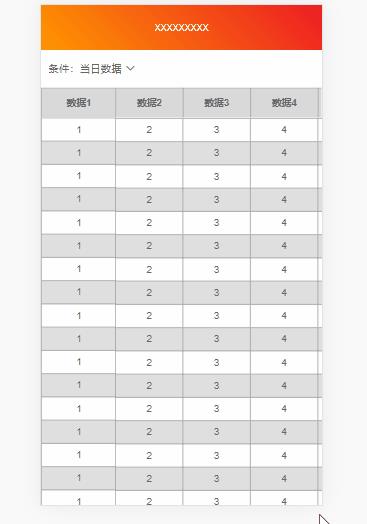
看看效果图

这回总不会抖动了吧,为了方便大家学习,我就把我的这个组件贡献出来。让有需要的同学使用,vue3都出来了这么久,肯定用vue3了哇!
<script lang='ts' setup>
import  computed, Ref, ref  from 'vue'

const props = defineProps<

  // 传我表头,表头的列数,需要和tableData每一个对象里的属性值一样
  headerData:  title: string, props: string [],
  // 表格数据
  tableData:  [key: string]: any [],
  // 表格高度
  tableScrollHeight: number
>()

const tableContainer: Ref<HTMLDivElement | null> = ref(null);
const firstRowLayer: Ref<HTMLDivElement | null> = ref(null);
const firstColLayer: Ref<HTMLDivElement | null> = ref(null);

// 第一列数据
const firstCol = computed(() => props.tableData.map(p =>
  const pArr = Object.keys(p);
  return p[pArr[0]]
))
// 第一个表头,第一列
const header = computed(() => props.headerData[0].title);
// 第一行
const firstRow = computed(() =>
  const rows: string[] = [];
  props.headerData.forEach((f, i) =>
    if (i !== 0)
      rows.push(f.title)

  )
  return rows;
)


// 表格内容行
const tableBodyRows = computed(() =>
  let arr:  [key: string]: any [] = [];
  props.tableData.forEach((f, index) =>
    // 接下来排除第一列
    let res:  [key: string]: any  = ;
    for (const key in f)
      if (Object.prototype.hasOwnProperty.call(f, key))
        if (key !== props.headerData[0].title)
          res[key] = f[key]


    arr.push(res)
  )
  return arr
)
// 表格内容列
const tableBodyCols = computed(() =>
  let arr:  title: string, props: string [] = []
  props.headerData.forEach((f, i) =>
    if (i !== 0)
      arr.push(f)

  )
  return arr;
)


// table滚动
const tableScroll = () =>
  // 首行固定
  firstRowLayer.value!.scrollLeft = tableContainer.value!.scrollLeft;
  // 首列固定
  firstColLayer.value!.scrollTop = tableContainer.value!.scrollTop;

</script>
<template>
  <div class="content-table">
    <template v-if="props.tableData.length > 0">
      <div class="left-div">
        <div class="left-div1">
          <table>
            <tr>
              <th> header </th>
            </tr>
          </table>
        </div>
        <div
          ref="firstColLayer"
          class="left-div2"
          :style=" height: `calc(100vh - $tableScrollHeightpx` "
        >
          <table class="left-table2">
            <tr v-for="(col, index) in firstCol" :key="index">
              <td> col </td>
            </tr>
          </table>
        </div>
      </div>
      <div class="right-div">
        <div ref="firstRowLayer" class="right-div1">
          <table class="right-table1" :style=" width: (firstRow.length - 1) * 100 + 'px' ">
            <tr>
              <th class="first-row-style" v-for="(row, index) in firstRow" :key="index"> row </th>
            </tr>
          </table>
        </div>
        <div
          ref="tableContainer"
          class="right-div2"
          :style=" height: `calc(100vh - $tableScrollHeightpx` "
          @scroll="tableScroll()"
        >
          <table class="right-table2" :style=" width: (firstRow.length - 1) * 100 + 'px' ">
            <tr v-for="(body,index) in tableBodyRows" :key="index">
              <td v-for="(col, i) in tableBodyCols" :key="col.props + i"> body[col.props] </td>
            </tr>
          </table>
        </div>
      </div>
    </template>
    <template v-else>
      <div class="empty-content">
        <table
          cellspacing="0"
          :style=" width: (headerData.length - 1) * 100 + 'px', height: '10rem', overflow: 'auto' "
        >
          <thead class="table-header">
            <tr>
              <th v-for="(item,index) in props.headerData" :key="item.title"> item.title </th>
            </tr>
          </thead>

          <van-empty class="empty-res" description="空空如也!" />
        </table>
      </div>
    </template>
  </div>
</template>

<style lang="scss" scoped>
.content-table
  box-sizing: border-box;
  overflow-x: hidden;

table
  border-collapse: collapse;
  margin: 0 auto;
  width: 100%;
  border-spacing: 0;
  font-size: 13px;

th
  word-break: break-all;
  word-wrap: break-word;
  height: 40px;
  width: 100px;
  vertical-align: middle;
  text-align: center;
  border-left: 1px solid #999;
  background: #d9d9d9;
  box-sizing: border-box;

td
  word-break: break-all;
  word-wrap: break-word;
  width: 100px;
  text-align: center;
  vertical-align: middle;
  line-height: 30px;
  border-left: 1px solid #999;
  box-sizing: border-box;

tr
  border-top: 1px solid #999;
  box-sizing: border-box;

.left-div
  width: 100px;
  float: left;

.left-div1
  width: 100%;

.left-div2
  width: 100%;
  overflow: hidden;

.left-table2
  margin-bottom: 4px;

.right-div
  float: left;
  width: calc(100vw - 100px);
  margin-left: -1px;

.right-div1
  width: 100%;
  overflow: hidden;

  .first-row-style
    box-sizing: border-box;


.right-div2
  width: 100%;
  overflow: auto;


.right-table2
  overflow: hidden;

table tr:nth-child(odd)
  background: rgba(255, 255, 255, 0.3);

table tr:nth-child(even)
  background: rgba(153, 153, 153, 0.3);

.empty-content
  width: 100%;
  overflow: auto;

</style>
上个月自己也用vue3写了个前台的管理系统,有需要的可以看看哦!http://ruoyi-doc.chenliangliang.top/
以上是关于vue2,vue3移动端实现表格固定和首列固定的主要内容,如果未能解决你的问题,请参考以下文章
