ubuntu18.04下cuda.cu在c/c++中的三种使用方式
Posted 每天看一遍,防止恋爱&&堕落
tags:
篇首语:本文由小常识网(cha138.com)小编为大家整理,主要介绍了ubuntu18.04下cuda.cu在c/c++中的三种使用方式相关的知识,希望对你有一定的参考价值。
操作系统
ubuntu 18.04
前提
想要在.c文件中使用cuda的函数,即.cu的内容
安装nvcc不是这里的内容,但是确保能使用nvcc,这是保证能编译.cu的前提,查看nvcc的版本命令如下
nvcc --version
输出内容如下
nvcc: NVIDIA (R) Cuda compiler driver
Copyright (c) 2005-2017 NVIDIA Corporation
Built on Fri_Nov__3_21:07:56_CDT_2017
Cuda compilation tools, release 9.1, V9.1.85
第一种方式使用cuda函数
第一种方式,则是通过采用lib的形式来使用cuda的函数
foo文件中使用了5个gpu线程,来执行核函数foo
文件的内容如下
foo.h内容如下,加上ifdef是为了方便我们引入,在.c调用的时候如果不去掉extern则会报错
#ifndef FOO_CUH
#define FOO_CUH

#include <stdio.h>

//__global__ void foo();

#ifdef EXPORTS
extern "C"
#endif
void useCUDA();


#endif
foo.cu内容如下
#define EXPORTS

#include "foo.h"

#define CHECK(res)  if(res != cudaSuccess)printf("Error :%s:%d , ", __FILE__,__LINE__);   \\
printf("code : %d , reason : %s \\n", res,cudaGetErrorString(res));exit(-1);

__global__ void foo()

    printf("CUDA!\\n");


void useCUDA()

    foo<<<1,5>>>();
    printf("CUDA zeng!\\n");
    CHECK(cudaDeviceSynchronize());
main.c内容如下
#include <stdio.h>
#include "foo.h"

int main()

    useCUDA();
    return 0;
开始编译
用nvcc将foo编译成.a库
nvcc -c foo.cu -o foo.o
ar cr libfoo.a foo.o
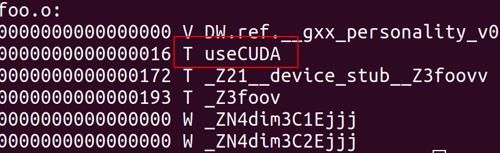
查看一下.a是否导出了对应的符号
nm -g --defined-only libfoo.a
可以看到正确导出了
链接libfoo.a并编译main.c
gcc main.c -o main libfoo.a -lcudart -lcuda -lstdc++
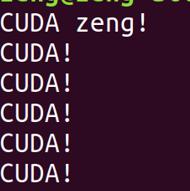
执行生成的main
.main
可以看到输出如下
如果main是cpp,则可以使用如下命令
g++ main.cpp -o main libfoo.a -lcudart -lcuda -lstdc++
整理一下所使用的.sh文件内容
nvcc -c foo.cu -o foo.o
ar cr libfoo.a foo.o
nm -g --defined-only libfoo.a
gcc main.c -o main libfoo.a -lcudart -lcuda -lstdc++
第二种方式使用cuda函数
这种方法不打算使用lib来引入,直接通道.o来加载,这种形式相对简单一些,但是不怎么灵活,如果有一天我需要修改foo的文件内容,重新编译以后,还得顺带将main一块再次编译
第二种方式是普通的.c调用方式,直接放脚本好了
rm -rf *.o main
nvcc -c foo.cu -o foo.o
gcc -Wall -c main.c
gcc -o main foo.o main.o -lcudart -lcuda -lstdc++
./main
第三种方式使用cuda函数
按照ffmpeg里面使用.cu的方式,首先将.cu编译成.ptx,然后在源码中加载这个.ptx并使用里面的func,其中.ptx是与平台无关的汇编代码
下面是测试所用cubin.cu,他一共有三个函数
#include <stdio.h>
#include <cuda_runtime.h>

extern "C"   __global__  void kernel_run()
    printf("hello world!\\n");


extern "C"   __global__  void kernel_run2(void *p1, void *p2)
    printf("p1:%c====p2:%c.\\r\\n", p1, p2);


extern "C"   __global__  void kernel_add(int *sum, int *p1, int *p2)
    *sum = *p1 + *p2;
main.c则首先加载这个.ptx文件,然后load这三个函数并调用
#include <stdio.h>
#include <string.h>
#include <cuda_runtime.h>
#include <cuda.h>


int main()

    CUresult error;
    CUdevice cuDevice;
    cuInit(0);
    int deviceCount = 0;
    error = cuDeviceGetCount(&deviceCount);
    printf("device count is %d\\n",deviceCount);
    error = cuDeviceGet(&cuDevice, 0);

    if(error!=CUDA_SUCCESS)
        printf("Error happened in get device!\\n");


    CUcontext cuContext;
    error = cuCtxCreate(&cuContext, 0, cuDevice);
    if(error!=CUDA_SUCCESS)
        printf("Error happened in create context!\\n");


    // 使用编译出来的cubin
    CUmodule module;
    CUfunction function; // 调用kernel_run
    CUfunction function2; // 调用kernel_run2
    CUfunction function3; // 调用kernel_add

    const char* module_file = "cubin.ptx";
    const char* kernel_name = "kernel_run";
    const char* kernel_name2 = "kernel_run2";
    const char* kernel_name3 = "kernel_add";

    error = cuModuleLoad(&module, module_file);
    if(error!=CUDA_SUCCESS)
        printf("Error happened in load moudle %d!\\n",error);


    // 测试用kernel_run函数
    error = cuModuleGetFunction(&function, module, kernel_name);
    if(error!=CUDA_SUCCESS)
        printf("get function error!\\n");

    cuLaunchKernel(function, 1, 1, 1, 1, 1, 1, 0, 0, 0, 0);
    cudaThreadSynchronize();

    // 测试用kernel_run2函数
    error = cuModuleGetFunction(&function2, module, kernel_name2);
    if(error!=CUDA_SUCCESS)
        printf("get function error!\\n");


    int age1 = 23;
    int age2 = 99;
    void *kernelParams[]= (void *)&age1, (void *)&age2;
    cuLaunchKernel(function2, 1, 1, 1, 1, 1, 1, 0, 0, kernelParams, 0);
    cudaThreadSynchronize();

    // 测试用kernel_run3函数
    int *dev_a = 0;
    int *dev_b = 0;
    int *dev_c = 0;
    int cudaStatus = cudaMalloc((void**)&dev_a, sizeof(int));
    cudaStatus = cudaMalloc((void**)&dev_b, sizeof(int));
    cudaStatus = cudaMalloc((void**)&dev_c, sizeof(int));
    int h_a = 1;
    int h_b = 99;
    cudaMemcpy(dev_a, &h_a, sizeof(int), cudaMemcpyHostToDevice);
    cudaMemcpy(dev_b, &h_b, sizeof(int), cudaMemcpyHostToDevice);
    void *kernelParams3[]= &dev_c, &dev_a, &dev_b;
    error = cuModuleGetFunction(&function3, module, kernel_name3);
    if(error!=CUDA_SUCCESS)
        printf("get function error!\\n");

    cuLaunchKernel(function3, 1, 1, 1, 1, 1, 1, 0, 0, kernelParams3, 0);
    cudaThreadSynchronize();
    // exchange data
    int sum;
    cudaMemcpy(&sum, dev_c, sizeof(int), cudaMemcpyDeviceToHost);
    printf("------%d------\\r\\n", sum);
    cudaFree( dev_a );
    cudaFree( dev_b );
    cudaFree( dev_c );

    return 1;
执行顺序
- 1、先用nvcc编译.cu得到.ptx
- 2、在用gcc编译main.c得到最终的可执行程序
- 3、执行该可执行程序
所使用到的代码如下
nvcc -ptx cubin.cu
gcc main.c -o main -lcudart -lcuda -lstdc++ && ./main
输出内容如下
device count is 1
hello world!
p1:23====p2:99.
------100------
参考网站
以上是关于ubuntu18.04下cuda.cu在c/c++中的三种使用方式的主要内容,如果未能解决你的问题,请参考以下文章