04插件化换肤技术实战
Posted 清风百草
tags:
篇首语:本文由小常识网(cha138.com)小编为大家整理,主要介绍了04插件化换肤技术实战相关的知识,希望对你有一定的参考价值。
(1)使用插件化的方案为App换肤
(2)不需要重启App就能够换肤
(3)市场上所有的APP都可以当成自己的皮肤包来用。
(4)无闪烁
(5)便于扩展与维护,入侵性很小。
(6)只需要在Application初始化一次即可使用
(7)喜欢什么样的皮肤包,就可以将它的apk包拿过来就可以了。
【04】插件化换肤技术实战
文章目录
1.插件化换肤需要了解的技术
1.1LayoutInflater.inflate
(1)从PhoneWindow中进入到setContentView方法
(2)installDecor()完成了之后,Activity的整个布局就是Activity上面放了一个PhoneWindow,PhoneWindow上面又放了一个DecorView.
(3)DecorView的加载实际上加载的是预编译时期选择的不同的主题,在frameWork里面去搜过文件可以清楚其具体的布局。
(4)Activity的布局文件是通过LayoutInflater进行加载的,其最主要的功能是通过带3个参数的inflate方法实现的。
-
createviewFromTag是通过反射来生成对象,这个对象实际上是不带参数的,会帮我们造一个参数。
-
如果根布局存在,就通过generateLayoutParams()将根布局的参数造出来,造出来之后,需要根据inflate()的第三个参数attachToRoot为false的情况,才将参数填充进去。
-
正常的代码,系统在运行的时候,基本上值都是为true的,都是通过往root上去添加这个View.然后直接将参数填充进去。
-
用第三个参数,实际上就是将系统使用的与用户用的将它隔离开来。
-
我们自己在使用的时候,经常将第三个参数写为false,如果为true,就直接报出异常。
android.view.LayoutInflater#inflate(org.xmlpull.v1.XmlPullParser, android.view.ViewGroup, boolean)
是因为系统在设计View系统的时候,它的希望值是所有的View能够以树形结构来摆放。树形结构的特点就是每一个节点都只有一个父亲。
即在调用addView方法的时候,只要这个View有父亲,就抛出异常,因此childView是不能够有父亲的。
android.view.ViewGroup#addViewInner
if (child.getParent() != null)
            throw new IllegalStateException("The specified child already has a parent. " +
                    "You must call removeView() on the child's parent first.");
也就是说inflate方法的第三个参数为false的时候,没有去调用addView方法。
没有addView在实现代码中,在LinearLayout自己去写了一个属性,虽然在布局文件中看起来有一个属性,例如layout_width=“110dp”,在没有addView之前,这个值是毫无意义的,是取不到的。即在父控件上去拿这个值是拿不到的。
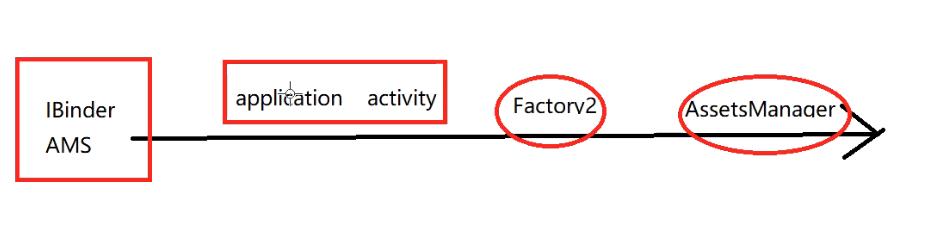
1.2Factory2
android.view.LayoutInflater.Factory2
android.view.LayoutInflater#tryCreateView
(1)这个factory是一个空的接口,仅仅声明了一个onCreateView方法
(2)它将createVeiw的过程交给了程序员,如果我们去设置一个工厂,在View里面只创建了一个Button,程序执行之后,就只能看到Button.
(3)具体重写Factory2创建View的方法,后续加上。
(4)android.view.LayoutInflater#createViewFromTag(android.view.View, java.lang.String, android.content.Context, android.util.AttributeSet, boolean)
这个方法是不是只执行了一次
android.view.LayoutInflater#rInflateChildren
android.view.LayoutInflater#rInflate
它会通过一个循环用pull解析,不断遍历标签,只要不到根节点,就用一个where循环去加载我们的View,还是调用的createViewFromTag(),所以整个布局里面的每一个View都会执行这一个方法。
while (((type = parser.next()) != XmlPullParser.END_TAG ||
                parser.getDepth() > depth) && type != XmlPullParser.END_DOCUMENT)

            if (type != XmlPullParser.START_TAG)
                continue;


            final String name = parser.getName();

            if (TAG_REQUEST_FOCUS.equals(name))
                pendingRequestFocus = true;
                consumeChildElements(parser);
             else if (TAG_TAG.equals(name))
                parseViewTag(parser, parent, attrs);
             else if (TAG_INCLUDE.equals(name))
                if (parser.getDepth() == 0)
                    throw new InflateException("<include /> cannot be the root element");

                parseInclude(parser, context, parent, attrs);
             else if (TAG_MERGE.equals(name))
                throw new InflateException("<merge /> must be the root element");
             else
                final View view = createViewFromTag(parent, name, context, attrs);
                final ViewGroup viewGroup = (ViewGroup) parent;
                final ViewGroup.LayoutParams params = viewGroup.generateLayoutParams(attrs);
                rInflateChildren(parser, view, attrs, true);
                viewGroup.addView(view, params);
(5)因此我们自己写工厂是为了去收集这些View用的。
2.动态换肤实现
(1)好处是进入项目之后,可以随时无屏闪的将皮肤换掉。
(2)采用插件化的方案,任何一个APP的apk都可以复制之后拿过来使用,可以在里边儿加一些自定义的属性,整个APK的包就可以直接去使用了。
2.1自定义控件实现换肤的接口
/**
 * @author XiongJie
 * @version appVer
 * @Package com.gdc.lib.interfaces
 * @file
 * @Description:
 * 1.接口用于帮助写自定义控件时能够让控件自己提供换肤的方案
 * (1)自定义控件实现换肤的接口
 * @date 2021-6-14 07:01
 * @since appVer
 */

public interface SkinViewSupport
    void applySkin();
2.2换肤方案信息的存储
/**
 * @author XiongJie
 * @version appVer
 * @Package com.gdc.lib.interfaces
 * @file
 * @Description:
 * 1.换肤方案信息的存储
 * @date 2021-6-14 07:44
 * @since appVer
 */

public class SkinPreference
    //1.目录是skins中的
    private static final String SKIN_SHARED = "skins";
    /**
     * 1.用一个键值对保存一下最后一个皮肤包的文件名,即文件名的路径
     */
    private static final String KEY_SKIN_PATH = "skin-path";
    private volatile static SkinPreference    instance;
    private final           SharedPreferences mPref;

    public static void init(Context context)
        if (instance == null)
            synchronized (SkinPreference.class)
                if (instance == null)
                    instance = new SkinPreference(context.getApplicationContext());


    public static SkinPreference getInstance()
        return instance;


    private SkinPreference(Context context)
        mPref = context.getSharedPreferences(SKIN_SHARED, Context.MODE_PRIVATE);


    /**
     * 1.设置皮肤包的路径
     * (1)如果这个皮肤包里面没有数据,那么就证明使用的是整个皮肤包里面最原始的一个皮肤。
     * (2)如果这个皮肤包里面有数据,就会找到目录里面的那一个皮肤。
     * @param skinPath
     */
    public void setSkin(String skinPath)
        mPref.edit().putString(KEY_SKIN_PATH, skinPath).apply();


    /**
     * 重新设置主题的路径
     */
    public void reset()
        mPref.edit().remove(KEY_SKIN_PATH).apply();


    /**
     * 获取主题的路径
     * @return
     */
    public String getSkin()
        return mPref.getString(KEY_SKIN_PATH, null);
2.3换肤资源的获取
(1)设置背景色,setBackgroundColor实际上是对应着主APK 某一个View的属性,以及某个资源的值。
案例代码:
new View().setBackgroundColor(R.color.xxxx);
(2)setColor() 改颜色就要给颜色填写一个颜色R.color.xxxx,而这个颜色是有一个真实的数据的。我们在set的时候,就是在主APP里面,setColor是一个控件属性。对于系统来说是一个颜色属性。最终想要的效果是将#223344这样的颜色值填写上去。在主app里面根据id是能够找得到这个颜色值所对应的名称的。
(3)在插件包里面, 唯一的区别是#23122442颜色的值不一样,因此只需要从主APP的id找到这一个名称,再利用这个名称对应插件中的颜色值,如果拿到这个值,再去setColor,去设置这一个值,皮肤就按照插件中的颜色改掉了。
(4)R.color.xxxx怎么去拿到?
可以通过AssetsManager去拿到。
- AssetsManager是包了三层了的,最上层是Resources,Resources里面又有一个ResourceImpl,在ResourcesImpl里面包含了一个AssetsManager.
- 即只要能够拿到Resources,对于资源文件就可以全部操作了。不管是用AssetsManager操作还是使用Resources操作,都是可以通用的。
public class SkinResources

    /**
     * 1.皮肤包的包名
     * (1)用来保存皮肤包的包名
     */
    private String mSkinPkgName;

    /**
     * 1.是否使用默认的皮肤。
     * (1)正常情况下,一打开APP,就是一个默认的皮肤,使用的是原生的参数
     */
    private boolean isDefaultSkin = true;

    /**
     * 1.app原始的resource
     * (1)主APP使用的资源
     * (2)根据主APP的名字,然后将名字传到另外一个APP,再去找那个值。
     */
    private Resources mAppResources;

    /**
     * 1.皮肤包的resource
     */
    private Resources mSkinResources;


    /**
     * 双重松测单例
     */
    private volatile static SkinResources instance;

    private SkinResources(Context context)
        mAppResources = context.getResources();


    public static void init(Context context)
        if(null == instance)
            synchronized (SkinResources.class)
                if(null == instance)
                    instance = new SkinResources(context);


    public static SkinResources getInstance()
        return instance;


    /**
     * 1.复位
     * (1)将皮肤包,皮肤包名,是否为默认值将其置空。
     * (2)假如不去加载皮肤包了,只需要将这几个属性值置空就可以了。
     */
    public void reset()
        mSkinResources = null;
        mSkinPkgName = null;
        isDefaultSkin = true;


    /**
     * 使用皮肤
     * @param resources
     * @param pkgName
     */
    public void applySkin(Resources resources, String pkgName)
        mSkinResources = resources;
        mSkinPkgName = pkgName;

        isDefaultSkin = TextUtils.isEmpty(pkgName) || resources == null;


    /**
     * 1.通过原始app中的resId(R.color.XX)获取到自己的名字
     * 2.根据名字和类型获取皮肤包中的ID号
     * 3.mAppResources就是apk中的resources.arsc文件中的一些信息,也就是ID,Name,值。
     * 4.能够拿到插件包中的id号,将来需要数据值的时候,比如需要填充颜色,就可以调用这个方法去拿值。
     * new View().setBackgroundColor(getIdentifier(resId));
     * 即自己APK中的颜色值就可以被插件中的颜色值替换掉。
     * 5.插件就是一个单独的APK,在市场上下载的任何一个APK包都能用,或者自己新建的一个APK都可以用,
     * 也就是市场上任何一个APK的皮肤都可以拿来用的。
     * 6.正常情况是无论放在手机的哪一目录都可以,一般是从服务器下载之后,放在手机的任一目录,但一定是
     * 可以访问的目录,一般处在data/data....的某个地方。
     */
    public int getIdentifier(int resId)
        //(1)默认皮肤的,就返回当前这个资源的id值
        if(isDefaultSkin)
            return resId;

        //(2)拿自己APP里面对应的id的名称,id的类型,以及
        String resName = mAppResources.getResourceEntryName(resId);
        String restType = mAppResources.getResourceTypeName(resId);
        //(3)从皮肤包中根据名称及资源类型以及包名获取插件包中的ID号
        int skinId = mSkinResources.getIdentifier(resName,restType,mSkinPkgName);
        return skinId;


    /**
     * 1.输入主APP的ID,到皮肤包APK文件中去找到对应的ID的颜色值
     * (1)即实现动态的获取
     * (2)APP
     * (3)皮肤.apk
     * (4)调用一下getColor,对应在皮肤.apk中的值就可以拿到,拿到之后,在APP中就可以通过setColor
     * 进行设置,屏幕上的效果就可以动态改变了。
     * @param resId
     * @return
     */
    public int getColor(int resId)
        //(1)如果是默认的情况,返回的是自己的主APP里面的颜色
        if(isDefaultSkin)
            return mAppResources.getColor(resId);


        //(2)否则返回的是皮肤包中的资源的id
        int skinId = getIdentifier(resId);

        //(3)如果没有相同的值,就还是返回自己的资源
        if(skinId == 0)
            return mAppResources.getColor(resId);


        //(4)如果有相同的值,就根据得到的插件中的资源id,获取其资源值。
        return  mSkinResources.getColor(skinId);


    /**
     * 1.输入主APP的ID,到皮肤包APK文件中去找到对应的ID的颜色状态列表
     * @param resId
     * @return
     */
    public ColorStateList getColorStateList(int resId)
        if (isDefaultSkin)
            return mAppResources.getColorStateList(resId);

        int skinId = getIdentifier(resId);
        if (skinId == 0)
            return mAppResources.getColorStateList(resId);

        return mSkinResources.getColorStateList(skinId);


    /**
     * 1.输入主APP的ID,到皮肤包APK文件中去找到对应的ID的图片
     * @param resId
     * @return
     */
    public Drawable getDrawable(int resId)
        if (isDefaultSkin)
            return mAppResources.getDrawable(resId);

        //通过 app的resource 获取id 对应的 资源名 与 资源类型
        //找到 皮肤包 匹配 的 资源名资源类型 的 皮肤包的 资源 ID
        int skinId = getIdentifier(resId);
        if (skinId == 0)
            return mAppResources.getDrawable(resId);

        return mSkinResources.getDrawable(skinId);


    /**
     * 1.输入主APP的ID,到皮肤包APK文件中去找到对应的ID的背景
     * (1)可能是Color
     * (2)也可能是drawable
     * @param resId
     * @return
     */
    public Object getBackground(int resId)
        String resourceTypeName = mAppResources.getResourceTypeName(resId);

        if ("color".equals(resourceTypeName))
            return getColor(resId);
         else
            // drawable
            return getDrawable(resId);
(1)如果在项目中还有其他的属性,都按以上逻辑进行编写。找到自己的API,将自己的逻辑加进去。
2.4变更Theme主题中的样式
public class SkinThemeUtils

    private static int[] APPCOMPAT_COLOR_PRIMARY_DARK_ATTRS =
            androidx.appcompat.R.attr.colorPrimaryDark
    ;

    private static int[] STATUSBAR_COLOR_ATTRS =
            android.R.attr.statusBarColor,android.R.attr.navigationBarColor
    ;

    /**
     * 1.获得theme属性中定义的资源id
     * (1)obtainStyledAttributes从theme中寻找attrIdArray的值
     * (2)参考地址:https://blog.csdn.net/qq_34224268/article/details/102900281
     * @param context
     * @param attrs
     * @return
     */
    public static int[] getResId(Context context,int[] attrs)
        int [] resIds = new int[attrs.length];
        TypedArray a = context.obtainStyledAttributes(attrs);
        for(int i = 0 ; i < attrs.length; i++)
            resIds[i] = a.getResourceId(i,0);

        a.recycle();
        return resIds;


    public static void updateStatusBarColor(Activity activity)

        //(1)要求Android5.0以上系统
        if(Build.VERSION.SDK_INT<Build.VERSION_CODES.LOLLIPOP)
            return;


        //(2)获得theme属性中定义的资源id
        int [] resIds = getResId(activity,STATUSBAR_COLOR_ATTRS);

        int statusBarColorResId = resIds[0];
        int navigationBarColor = resIds[1];

        /**
         * (3)设置状态栏颜色
         * - 如果直接在style中写入固定颜色值(而不是 @color.xx )获得0
         * - 获得 colorPrimaryDark
         */
        if(0 != statusBarColorResId)
            int color = SkinResources.getInstance().getColor(statusBarColorResId);
            activity.getWindow().setStatusBarColor(color);
        else
            int colorPrimaryDarkResId = getResId(activity,
                    APPCOMPAT_COLOR_PRIMARY_DARK_ATTRS)[0];
            if(0 != colorPrimaryDarkResId)
                int color =
                        SkinResources.getInstance().getColor(colorPrimaryDarkResId);
                activity.getWindow().setStatusBarColor(color);


        /**
         * (4)设置导航条颜色
         */
        if(0 != navigationBarColor)
            int color = SkinResources.getInstance().getColor(navigationBarColor);
            activity.getWindow().setNavigationBarColor(color);
2.5存放需要换肤的View及View所对应的属性
public class SkinAttribute

    //记录换肤需要操作的View与属性信息
    private List<SkinView> skinViews = new ArrayList<>();

    static class SkinView
        /**
         * 一个View
         */
        View view;

        /**
         * 这个View能被换肤的属性与它对应id的集合
         */
        List<SkinPair> skinPairs;


    static class SkinPair
        /**
         * 属性名
         */
        String attributeName;
        /**
         * 对应的资源id
         */
        int resId;

        public SkinPair(String attributeName, int resId)
            this.attributeName = attributeName;
            this.resId = resId;
2.6寻找并记录需要换肤的属性
    /**
     * 1.查找需要换肤的属性是否出现在自己定义的需要换肤的属性列表中
     * (1)记录一个View的哪几个属性需要换肤textColor/src
     * (2)带?的属性,都是系统私有的属性,属于主题包中的属性。就到主题中寻找。
     * (3)@是在app的xml文件中能够找到的属性,到xml文件中去找。
     * (4)#开始的属性值,换肤没有任何意义,因为它已经写死了。
     */
    public void look(View view, AttributeSet attrs)
        List<SkinPair> skinPairs = new ArrayList<>();

        for(int i = 0 ; i < attrs.getAttributeCount();i++)
            //1.1获得属性名 textColor/background
            String attributeName = attrs.getAttributeName(i);
            if(mAttributes.contains(attributeName))
                /**
                 * 能换肤的包含:
          以上是关于04插件化换肤技术实战的主要内容,如果未能解决你的问题,请参考以下文章