旋转Apriltag角度检测
Posted 卓晴
tags:
篇首语:本文由小常识网(cha138.com)小编为大家整理,主要介绍了旋转Apriltag角度检测相关的知识,希望对你有一定的参考价值。
简 介: 从实验角度介绍了Apriltag的角度检测,与Apriltag张贴方向有关系,与摄像头内参设定也有关系。通过旋转Apriltag码方向检测验证了算法的鲁棒性。
关键词: Apriltag,单应矩阵
§00 前 言
在 根据Apriltag进行角度和距离检测 中对于旋转的Apriltag码进行识别和角度测试。测量得到角度稳定显示的范围还比较小,检测到的角度不是很稳定。
通过摄像头内参进行调整,寻找可以更好适应Apriltag角度测量的参数范围。 下面给出更多的测试结果。
0.1 旋转Apriltag样本集合
-
APR8 :选择在 旋转的Apriltag码 采集到的的APR8样本集合。
-
数据集合下载链接 : https://aistudio.baidu.com/aistudio/datasetdetail/123271
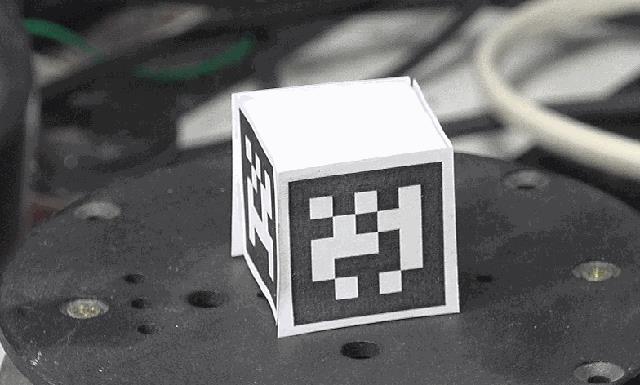
▲ 图1.1 测试旋转Apriltag数据集合
§01 角度曲线
1.1 算法代码
1.1.1 数据准备
import sys,os,math,time
import matplotlib.pyplot as plt
from numpy import *
import cv2
import apriltag
from tqdm import tqdm
import zipfile

outdir = '/home/aistudio/data'
zzipfile = '/home/aistudio/data/data123271/apr8.zip'

aprdir = os.path.join(outdir, os.path.basename(zzipfile).split('.')[0])
if not os.path.isdir(aprdir):
    with zipfile.ZipFile(zzipfile) as f:
        f.extractall(outdir)

filedim = [s for s in sorted(os.listdir(aprdir)) if s.find('JPG') > 0]
1.1.2 设置镜头参数
f = 3e3
px = 6e2
py = 2e2
mtx = array(
[[f,0.00000000e+00,px],
 [0.00000000e+00,f,py],
 [0.00000000e+00,0.00000000e+00,1.00000000e+00]]
)
1.1.3 计算角度
由于同一时刻可能检测到两个Apriltag,所以需要根据角度的连续性来确定所使用角度数值曲线。
atd = apriltag.Detector(apriltag.DetectorOptions(families='tag25h9'))
angledim =[[],[],[],[]]
lastangle = 100000
tagnum = []

for id,imgfile in tqdm(enumerate(filedim)):
    procfile = os.path.join(aprdir, imgfile)
    img = cv2.imread(procfile)
    gray = cv2.cvtColor(img, cv2.COLOR_BGR2GRAY)

    tags = atd.detect(gray)
    if len(tags) == 0: continue

    angle1 = 0
    angle2 = 0
    tagnum.append(len(tags)*25)

    for iidd,tag in enumerate(tags):
        homo = tag.homography
        num,Rs,Ts,Ns = cv2.decomposeHomographyMat(homo, mtx)
        r = R.from_dcm(Rs[0].T)
        euler = r.as_euler('xyz').T*180/pi
        angle = euler[2]

        if iidd == 0: angle1 = angle
        else: angle2 = angle

    angleA = angle1
    if len(tags) > 1:
        if abs(angle1-lastangle) < abs(angle2-lastangle):
            angleA = angle1
        else: angleA = angle2

    lastangle = angleA

    angledim[0].append(angleA)
    angledim[1].append(angleA)
    angledim[2].append(angleA)
    angledim[3].append(angleA)

print("shape(angledim): ".format(shape(angledim)))

plt.clf()
plt.figure(figsize=(10,6))

plt.plot(angledim[0], label='L1')
plt.plot(tagnum, label='num')

plt.xlabel("Step")
plt.ylabel("Angle")
plt.grid(True)
plt.legend(loc='upper right')
plt.tight_layout()
plt.show()
1.2 计算结果
如下是整个采集到的的300张旋转Apriltag对应的角度。
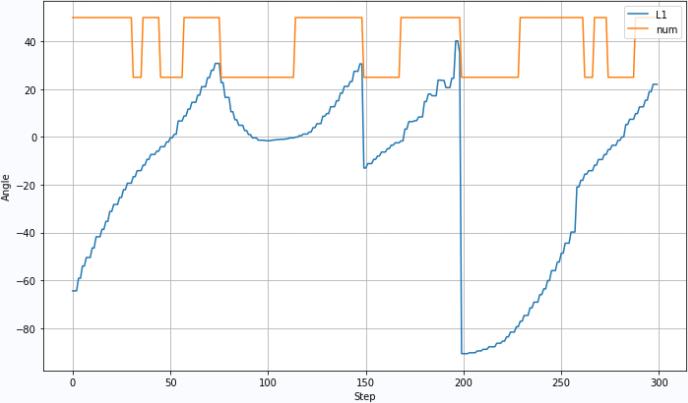
▲ 图1.2.1 Apriltag角度曲线
其中主要问题出现在 75 ~ 115左右,出现仅仅检测到一个Apriltag的情况。而此时对应Apriltag对应镜头应该有两个Apriltag。
下面是仅仅只有一个Apriltag被检测到的图片集合:
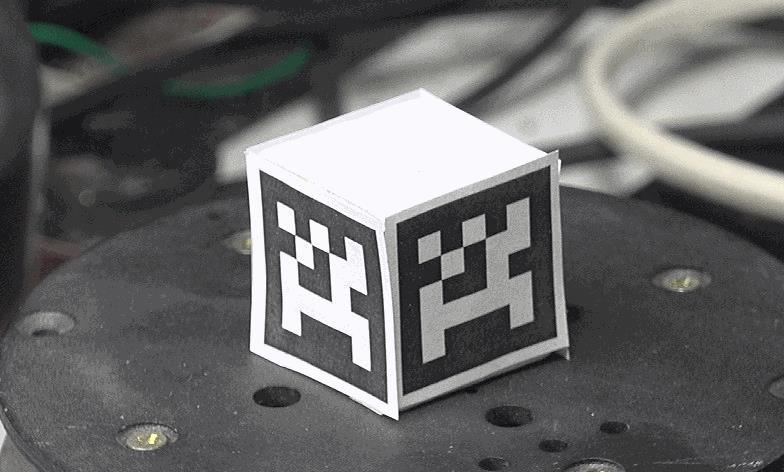
▲ 图1.2.2 仅仅只有一个Apriltag被检测到的图片集合:
1.3 绘制方向图像
绘制Apriltag法向量。可以看到其中tagid=1 角度法向量显示正常,但是tagid=2法向量显示始终有问题。
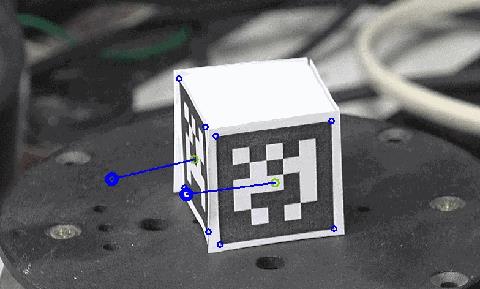
▲ 图1.3.1 绘制Apriltag法向量
对照两种不同的Apriltag及其方向,可以看到在粘贴的时候,TAG25H9,id=2 Apriltag在粘贴的时候旋转了90°。 因此选择它的角度的时候,需要更换不同的轴。
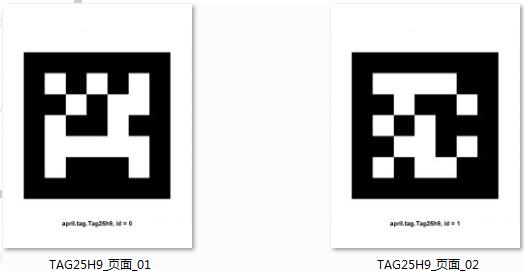
▲ 图1.3.2 两种不同的Apriltag及其方向
1.4 修正角度
根据检测到tag_id信息,对于角度信息进行校正。
gifpath = '/home/aistudio/GIF'
gifdim = os.listdir(gifpath)
for f in gifdim:
    fn = os.path.join(gifpath, f)
    if os.path.isfile(fn):
        os.remove(fn)

atd = apriltag.Detector(apriltag.DetectorOptions(families='tag25h9'))

for id,imgfile in tqdm(enumerate(filedim)):
    procfile = os.path.join(aprdir, imgfile)
    img = cv2.imread(procfile)
    gray = cv2.cvtColor(img, cv2.COLOR_BGR2GRAY)

    tags = atd.detect(gray)
    if len(tags) == 0: continue

    for iidd,tag in enumerate(tags):
        homo = tag.homography
        num,Rs,Ts,Ns = cv2.decomposeHomographyMat(homo, mtx)

        if tag.tag_id == 0:
            r = R.from_dcm(Rs[0].T)
            euler = r.as_euler('xyz').T*180/pi
            angle = euler[2]
        else:
            r = R.from_dcm(Rs[0].T)
            euler = r.as_euler('yxz').T*180/pi
            angle = euler[0]

        for c in tag.corners:
            cv2.circle(img, tuple(c.astype(int)), 4, (255, 0, 0), 2)

        cc = tag.center
        cv2.circle(img, tuple(cc.astype(int)), 6, (20, 200, 120), 2)

        ARROW_LENGTH        = 150

        shiftx = sin(angle*pi/180) * ARROW_LENGTH
        shifty = ARROW_LENGTH / 2 * cos(angle*pi/180)

        newcenter = array([shiftx, shifty]) + cc

        cv2.circle(img, tuple(newcenter.astype(int)), 8, (0, 0, 255), 5)
        cv2.line(img, tuple(newcenter.astype(int)), tuple(cc.astype(int)), (0, 0, 255), 2)

    outfile = os.path.join(gifpath, '%03d.JPG'%id)
    cv2.imwrite(outfile, img)

plt.clf()
plt.figure(figsize=(12,12))
plt.axis("off")
plt.imshow(img)
角度修正结果:
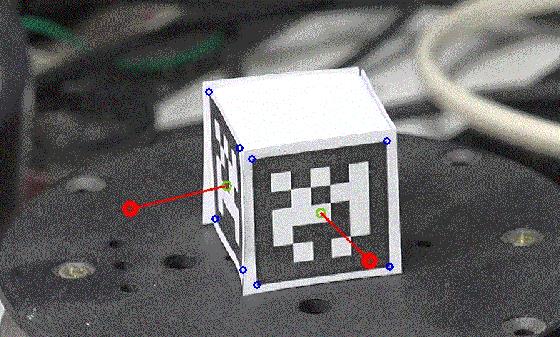
▲ 图1.3.3 角度修正结果
可以看到对于两种Apriltag码对应的角度出现了明显的改善。
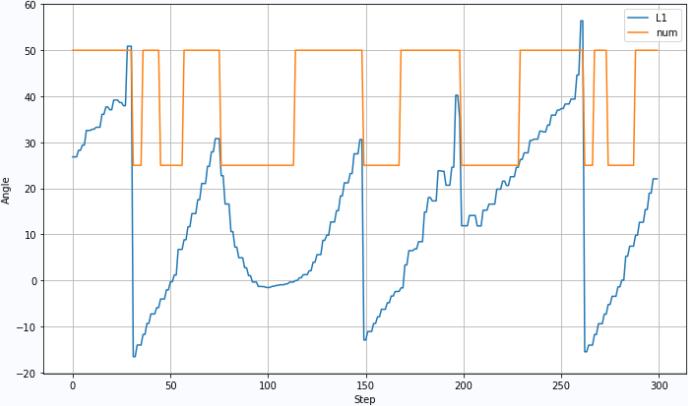
▲ 图1.4.2 对应不同tag检测的数值
1.5 选择摄像头内参
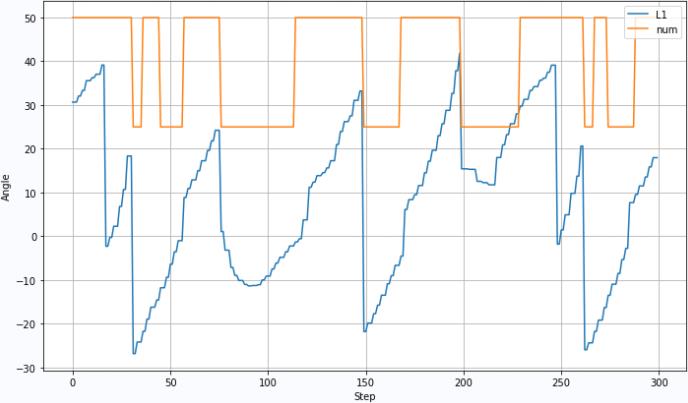
▲ 图1.5.1 选择新的摄像头内参对应的角度变化
选择新的摄像头内参的结果:
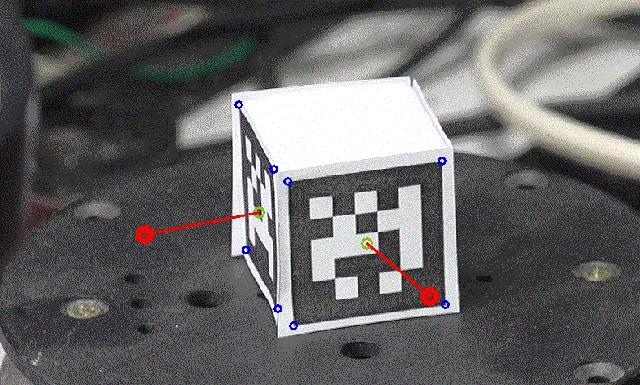
▲ 图1.4.3 选择新的摄像头内参的结果
※ 检测总结 ※
从实验角度介绍了Apriltag的角度检测,与Apriltag张贴方向有关系,与摄像头内参设定也有关系。通过旋转Apriltag码方向检测验证了算法的鲁棒性。
■ 相关文献链接:
● 相关图表链接:
- 图1.1 测试旋转Apriltag数据集合
- 图1.2.1 Apriltag角度曲线
- 图1.2.2 仅仅只有一个Apriltag被检测到的图片集合:
- 图1.3.1 绘制Apriltag法向量
- 图1.3.2 两种不同的Apriltag及其方向
- 图1.3.3 角度修正结果
- 图1.4.2 对应不同tag检测的数值
- 图1.5.1 选择新的摄像头内参对应的角度变化
- 图1.4.3 选择新的摄像头内参的结果
#!/usr/local/bin/python
# -*- coding: gbk -*-
#============================================================
# TEST1.PY                     -- by Dr. ZhuoQing 2021-12-31
#
# Note:
#============================================================

from headm import *                 # =
import cv2
import apriltag
from tqdm import tqdm
import zipfile

 #------------------------------------------------------------

outdir = '/home/aistudio/data'
zzipfile = '/home/aistudio/data/data123271/apr8.zip'

aprdir = os.path.join(outdir, os.path.basename(zzipfile).split('.')[0])
if not os.path.isdir(aprdir):
    with zipfile.ZipFile(zzipfile) as f:
        f.extractall(outdir)

filedim = [s for s in sorted(os.listdir(aprdir)) if s.find('JPG') > 0]
#printt(filedim:)
#------------------------------------------------------------
#mtx = array(
#[[1.50786300e+04,0.00000000e+00,6.54543821e+02],
# [0.00000000e+00,1.50723843e+04,3.14862050e+02],
# [0.00000000e+00,0.00000000e+00,1.00000000e+00]]
#)

f = 1.5e3
px = 6e2
py = 2e2
mtx = array(
[[f,0.00000000e+00,px],
 [0.00000000e+00,f,py],
 [0.00000000e+00,0.00000000e+00,1.00000000e+00]]
)

 #------------------------------------------------------------
'''
gifpath = '/home/aistudio/GIF'
gifdim = os.listdir(gifpath)
for f in gifdim:
    fn = os.path.join(gifpath, f)
    if os.path.isfile(fn):
        os.remove(fn)


atd = apriltag.Detector(apriltag.DetectorOptions(families='tag25h9'))

for id,imgfile in tqdm(enumerate(filedim)):
    procfile = os.path.join(aprdir, imgfile)
    img = cv2.imread(procfile)
    gray = cv2.cvtColor(img, cv2.COLOR_BGR2GRAY)

    tags = atd.detect(gray)
    if len(tags) == 0: continue


    for iidd,tag in enumerate(tags):
        homo = tag.homography
        num,Rs,Ts,Ns = cv2.decomposeHomographyMat(homo, mtx)

        if tag.tag_id == 0:
            r = R.from_dcm(Rs[0].T)
            euler = r.as_euler('xyz').T*180/pi
            angle = euler[2]
        else:
            r = R.from_dcm(Rs[0].T)
            euler = r.as_euler('yxz').T*180/pi
            angle = euler[0]


        for c in tag.corners:
            cv2.circle(img, tuple(c.astype(int)), 4, (255, 0, 0), 2)

        cc = tag.center
        cv2.circle(img, tuple(cc.astype(int)), 6, (20, 200, 120), 2)

        ARROW_LENGTH        = 150

        shiftx = sin(angle*pi/180) * ARROW_LENGTH
        shifty = ARROW_LENGTH / 2 * cos(angle*pi/180)

        newcenter = array([shiftx, shifty]) + cc

        cv2.circle(img, tuple(newcenter.astype(int)), 8, (0, 0, 255), 5)
        cv2.line(img, tuple(newcenter.astype(int)), tuple(cc.astype(int)), (0, 0, 255), 2)


    outfile = os.path.join(gifpath, '%03d.JPG'%id)
    cv2.imwrite(outfile, img)


plt.clf()
plt.figure(figsize=(12,12))
plt.axis("off")
plt.imshow(img)


'''
#------------------------------------------------------------

atd = apriltag.Detector(apriltag.DetectorOptions(families='tag25h9'))

angledim =[[],[],[],[]]

lastangle = 100000
tagnum = []

for id,imgfile in tqdm(enumerate(filedim)):
    procfile = os.path.join(aprdir, imgfile)
    img = cv2.imread(procfile)
    gray = cv2.cvtColor(img, cv2.COLOR_BGR2GRAY)

    tags = atd.detect(gray)
    if len(tags) == 0: continue

    angle1 = 0
    angle2 = 0
    tagnum.append(len(tags)*25)

    for iidd,tag in enumerate(tags):
        homo = tag.homography
        num,Rs,Ts,Ns = cv2.decomposeHomographyMat(homo, mtx)

        if tag.tag_id == 0:
            r = R.from_dcm(Rs[0].T)
            euler = r.as_euler('xyz').T*180/pi
            angle = euler[2]
        else:
            r = R.from_dcm(Rs[0].T)
            euler = r.as_euler('yxz').T*180/pi
            angle = euler[0]


        if iidd == 0: angle1 = angle
        else: angle2 = angle

    angleA = angle1
    if len(tags) > 1:
        if abs(angle1-lastangle) < abs(angle2-lastangle):
            angleA = angle1
        else: angleA = angle2

    lastangle = angleA

    angledim[0].append(angleA)
    angledim[1].append(angleA)
    angledim[2].append(angleA)
    angledim[3].append(angleA)


#    for i in range(4):
#        r = R.from_dcm(Rs[i].T)
#        euler = r.as_euler('xyz').T*180/pi
#        angle = euler[2]
#        angledim[i].append(angle)


printt(shape(angledim):)

 #------------------------------------------------------------

plt.clf()
plt.figure(figsize=(10,6))

plt.plot(angledim[0], label='L1')
plt.plot(tagnum, label='num')
#plt.plot(angledim[1][:200], label='L2')
#plt.plot(angledim[2], label='L3')
#plt.plot(angledim[3], label='L4')

plt.xlabel("Step")
plt.ylabel("Angle")
plt.grid(True)
plt.legend(loc='upper right')
plt.tight_layout()
plt.show()

#------------------------------------------------------------
#        END OF FILE : TEST1.PY
#============================================================
以上是关于旋转Apriltag角度检测的主要内容,如果未能解决你的问题,请参考以下文章