Koa2+MongoDB+JWT实战--Restful API最佳实践
Posted 前端森林
tags:
篇首语:本文由小常识网(cha138.com)小编为大家整理,主要介绍了Koa2+MongoDB+JWT实战--Restful API最佳实践相关的知识,希望对你有一定的参考价值。

引言
Web API 已经在最近几年变成重要的话题,一个干净的 API 设计对于后端系统是非常重要的。
通常我们为 Web API 使用 RESTful 设计,REST 概念分离了 API 结构和逻辑资源,通过 Http 方法GET, DELETE, POST 和 PUT等 来操作资源。
本篇文章是结合我最近的一个项目,基于koa+mongodb+jwt来给大家讲述一下 RESTful API 的最佳实践。
RESTful API 是什么?
具体了解RESTful API前,让我们先来看一下什么是REST。
REST的全称是Representational state transfer。具体如下:
- Representational: 数据的表现形式(JSON、XML...)
- state: 当前状态或者数据
- transfer: 数据传输
它描述了一个系统如何与另一个交流。比如一个产品的状态(名字,详情)表现为 XML,JSON 或者普通文本。
REST 有六个约束:
- 客户-服务器(Client-Server)
关注点分离。服务端专注数据存储,提升了简单性,前端专注用户界面,提升了可移植性。
- 无状态(Stateless)
所有用户会话信息都保存在客户端。每次请求必须包括所有信息,不能依赖上下文信息。服务端不用保存会话信息,提升了简单性、可靠性、可见性。
- 缓存(Cache)
所有服务端响应都要被标为可缓存或不可缓存,减少前后端交互,提升了性能。
- 统一接口(Uniform Interface)
接口设计尽可能统一通用,提升了简单性、可见性。接口与实现解耦,使前后端可以独立开发迭代。
- 分层系统(Layered System)
- 按需代码(Code-On-Demand)
看完了 REST 的六个约束,下面让我们来看一下行业内对于RESTful API设计最佳实践的总结。
最佳实践
请求设计规范
URI 使用名词,尽量使用复数,如/users- URI 使用
嵌套表示关联关系,如/users/123/repos/234 - 使用
正确的 HTTP 方法,如 GET/POST/PUT/DELETE
响应设计规范
查询分页字段过滤
如果记录数量很多,服务器不可能都将它们返回给用户。API 应该提供参数,过滤返回结果。下面是一些常见的参数(包括上面的查询、分页以及字段过滤):
?limit=10:指定返回记录的数量
?offset=10:指定返回记录的开始位置。
?page=2&per_page=100:指定第几页,以及每页的记录数。
?sortby=name&order=asc:指定返回结果按照哪个属性排序,以及排序顺序。
?animal_type_id=1:指定筛选条件状态码错误处理
就像 html 的出错页面向访问者展示了有用的错误消息一样,API 也应该用之前清晰易读的格式来提供有用的错误消息。
比如对于常见的提交表单,当遇到如下错误信息时:
{
    "error": "Invalid payoad.",
    "detail": {
        "surname": "This field is required."
    }
}
接口调用者很快就能定位到错误原因。
安全
HTTPS鉴权
RESTful API 应该是无状态。这意味着对请求的认证不应该基于cookie或者session。相反,每个请求应该带有一些认证凭证。
限流
为了避免请求泛滥,给 API 设置速度限制很重要。为此 RFC 6585 引入了 HTTP 状态码429(too many requests)。加入速度设置之后,应该给予用户提示。
上面说了这么多,下面让我们看一下如何在 Koa 中践行RESTful API最佳实践吧。
Koa 中实现 RESTful API
先来看一下完成后的项目目录结构:
|-- rest_node_api
    |-- .gitignore
    |-- README.md
    |-- package-lock.json
    |-- package.json      # 项目依赖
    |-- app
        |-- config.js     # 数据库(mongodb)配置信息
        |-- index.js      # 入口
        |-- controllers   # 控制器:用于解析用户输入,处理后返回相应的结果
        |-- models        # 模型(schema): 用于定义数据模型
        |-- public        # 静态资源
        |-- routes        # 路由
项目的目录呈现了清晰的分层、分模块结构,也便于后期的维护和扩展。下面我们会对项目中需要注意的几点一一说明。
Controller(控制器)
什么是控制器?
- 拿到路由分配的任务并执行
- 在 koa 中是一个中间件
为什么要用控制器
获取 HTTP 请求参数- Query String,如?q=keyword
- Router Params,如/users/:id
- Body,如{name: \'jack\'}
- Header,如 Accept、Cookie
处理业务逻辑发送 HTTP 响应- 发送 Status,如 200/400
- 发送 Body,如{name: \'jack\'}
- 发送 Header,如 Allow、Content-Type
编写控制器的最佳实践
- 每个资源的控制器放在不同的文件里
- 尽量使用类+类方法的形式编写控制器
- 严谨的错误处理
示例
app/controllers/users.js
const User = require("../models/users");
class UserController {
  async create(ctx) {
    ctx.verifyParams({
      name: { type: "string", required: true },
      password: { type: "string", required: true }
    });
    const { name } = ctx.request.body;
    const repeatedUser = await User.findOne({ name });
    if (repeatedUser) {
      ctx.throw(409, "用户名已存在");
    }
    const user = await new User(ctx.request.body).save();
    ctx.body = user;
  }
}

module.exports = new UserController();
错误处理机制
koa自带错误处理
要执行自定义错误处理逻辑,如集中式日志记录,您可以添加一个 “error” 事件侦听器:
app.on(\'error\', err => {
  log.error(\'server error\', err)
});
中间件
本项目中采用koa-json-error来处理错误,关于该中间件的详细介绍会在下文展开。
用户认证与授权
目前常用的用于用户信息认证与授权的有两种方式-JWT和Session。下面我们分别对比一下两种鉴权方式的优劣点。
Session

相关的概念介绍session::主要存放在服务器,相对安全cookie:主要存放在客户端,并且不是很安全sessionStorage:仅在当前会话下有效,关闭页面或浏览器后被清除localstorage:除非被清除,否则永久保存
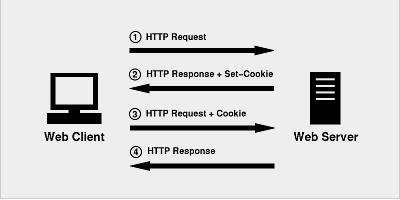
工作原理- 客户端带着用户名和密码去访问/login 接口,服务器端收到后校验用户名和密码,校验正确就会在服务器端存储一个 sessionId 和 session 的映射关系。
- 服务器端返回 response,并且将 sessionId 以 set-cookie 的方式种在客户端,这样,sessionId 就存在了客户端。
- 客户端发起非登录请求时,假如服务器给了 set-cookie,浏览器会自动在请求头中添加 cookie。
- 服务器接收请求,分解 cookie,验证信息,核对成功后返回 response 给客户端。
优势- 相比 JWT,最大的优势就在于可以主动清楚 session 了
- session 保存在服务器端,相对较为安全
- 结合 cookie 使用,较为灵活,兼容性较好(客户端服务端都可以清除,也可以加密)
劣势- cookie+session 在跨域场景表现并不好(不可跨域,domain 变量,需要复杂处理跨域)
- 如果是分布式部署,需要做多机共享 Session 机制(成本增加)
- 基于 cookie 的机制很容易被 CSRF
- 查询 Session 信息可能会有数据库查询操作
JWT

相关的概念介绍由于详细的介绍 JWT 会占用大量文章篇幅,也不是本文的重点。所以这里只是简单介绍一下。主要是和 Session 方式做一个对比。关于 JWT 详细的介绍可以参考
https://www.ruanyifeng.com/blog/2018/07/json_web_token-tutorial.html
JWT 的原理是,服务器认证以后,生成一个 JSON 对象,发回给用户,就像下面这样:
{
  "姓名": "森林",
  "角色": "搬砖工",
  "到期时间": "2020年1月198日16点32分"
}
以后,用户与服务端通信的时候,都要发回这个 JSON 对象。服务器完全只靠这个对象认证用户身份。为了防止用户篡改数据,服务器在生成这个对象的时候,会加上签名。
服务器就不保存任何 session 数据了,也就是说,服务器变成无状态了,从而比较容易实现扩展。
JWT 的格式大致如下:

它是一个很长的字符串,中间用点(.)分隔成三个部分。
JWT 的三个部分依次如下:
Header(头部)
Payload(负载)
Signature(签名)JWT相比Session- 安全性(两者均有缺陷)
- RESTful API,JWT 优胜,因为 RESTful API 提倡无状态,JWT 符合要求
- 性能(各有利弊,因为 JWT 信息较强,所以体积也较大。不过 Session 每次都需要服务器查找,JWT 信息都保存好了,不需要再去查询数据库)
- 时效性,Session 能直接从服务端销毁,JWT 只能等到时效性到了才会销毁(修改密码也无法阻止篡夺者的使用)
jsonwebtoken
由于 RESTful API 提倡无状态,而 JWT 又恰巧符合这一要求,因此我们采用JWT来实现用户信息的授权与认证。
项目中采用的是比较流行的jsonwebtoken。具体使用方式可以参考https://www.npmjs.com/package/jsonwebtoken
实战
初始化项目
mkdir rest_node_api  # 创建文件目录
cd rest_node_api  # 定位到当前文件目录
npm init  # 初始化,得到`package.json`文件
npm i koa -S  # 安装koa
npm i koa-router -S # 安装koa-router基础依赖安装好后可以先搞一个hello-world
app/index.js
const Koa = require("koa");
const Router = require("koa-router");

const app = new Koa();
const router = new Router();

router.get("/", async function (ctx) {
    ctx.body = {message: "Hello World!"}
});

app.use(router.routes()).use(router.allowedMethods());

app.listen(3000);
相关中间件和插件依赖
koa-body
之前使用 koa2 的时候,处理 post 请求使用的是 koa-bodyparser,同时如果是图片上传使用的是 koa-multer。这两者的组合没什么问题,不过 koa-multer 和 koa-route(注意不是 koa-router) 存在不兼容的问题。
koa-body结合了二者,所以 koa-body 可以对其进行代替。
依赖安装
npm i koa-body -Sapp/index.js
const koaBody = require(\'koa-body\');
const app = new koa();
app.use(koaBody({
  multipart:true, // 支持文件上传
  encoding:\'gzip\',
  formidable:{
    uploadDir:path.join(__dirname,\'public/uploads\'), // 设置文件上传目录
    keepExtensions: true,    // 保持文件的后缀
    maxFieldsSize:2 * 1024 * 1024, // 文件上传大小
    onFileBegin:(name,file) => { // 文件上传前的设置
      // console.log(`name: ${name}`);
      // console.log(file);
    },
  }
}));
参数配置:
基本参数参数名 描述 类型 默认值 patchNode 将请求体打到原生 node.js 的 ctx.req中Boolean falsepatchKoa 将请求体打到 koa 的 ctx.request中Boolean truejsonLimit JSON 数据体的大小限制 String / Integer 1mbformLimit 限制表单请求体的大小 String / Integer 24kbtextLimit 限制 text body 的大小 String / Integer 23kbencoding 表单的默认编码 String utf-8multipart 是否支持 multipart-formdate的表单Boolean falseurlencoded 是否支持 urlencoded的表单Boolean trueformidable 配置更多的关于 multipart的选项Object {}onError 错误处理 Function function(){}stict 严格模式,启用后不会解析 GET, HEAD, DELETE请求Boolean trueformidable 的相关配置参数参数名 描述 类型 默认值 maxFields 限制字段的数量 Integer 500maxFieldsSize 限制字段的最大大小 Integer 1 * 1024 * 1024uploadDir 文件上传的文件夹 String os.tmpDir()keepExtensions 保留原来的文件后缀 Boolean falsehash 如果要计算文件的 hash,则可以选择 md5/sha1String falsemultipart 是否支持多文件上传 Boolean trueonFileBegin 文件上传前的一些设置操作 Function function(name,file){}
koa-json-error
在写接口时,返回json格式且易读的错误提示是有必要的,koa-json-error中间件帮我们做到了这一点。
依赖安装
npm i koa-json-error -Sapp/index.js
const error = require("koa-json-error");
const app = new Koa();
app.use(
  error({
    postFormat: (e, { stack, ...rest }) =>
      process.env.NODE_ENV === "production" ? rest : { stack, ...rest }
  })
);错误会默认抛出堆栈信息stack,在生产环境中,没必要返回给用户,在开发环境显示即可。
koa-parameter
采用koa-parameter用于参数校验,它是基于参数验证框架parameter, 给 koa 框架做的适配。
依赖安装
npm i koa-parameter -S使用
// app/index.js
const parameter = require("koa-parameter");
app.use(parameter(app));

// app/controllers/users.js
 async create(ctx) {
    ctx.verifyParams({
      name: { type: "string", required: true },
      password: { type: "string", required: true }
    });
    ...
}因为koa-parameter是基于parameter的,只是做了一层封装而已,底层逻辑还是按照 parameter 来的,自定义规则完全可以参照 parameter 官方说明和示例来编写。
let TYPE_MAP = Parameter.TYPE_MAP = {
  number: checkNumber,
  int: checkInt,
  integer: checkInt,
  string: checkString,
  id: checkId,
  date: checkDate,
  dateTime: checkDateTime,
  datetime: checkDateTime,
  boolean: checkBoolean,
  bool: checkBoolean,
  array: checkArray,
  object: checkObject,
  enum: checkEnum,
  email: checkEmail,
  password: checkPassword,
  url: checkUrl,
};
koa-static
如果网站提供静态资源(图片、字体、样式、脚本......),为它们一个个写路由就很麻烦,也没必要。koa-static模块封装了这部分的请求。
app/index.js
const Koa = require("koa");
const koaStatic = require("koa-static");
const app = new Koa();
app.use(koaStatic(path.join(__dirname, "public")));
连接数据库
数据库我们采用的是mongodb,连接数据库前,我们要先来看一下mongoose。
mongoose是nodeJS提供连接 mongodb的一个库,类似于jquery和js的关系,对mongodb一些原生方法进行了封装以及优化。简单的说,Mongoose就是对node环境中MongoDB数据库操作的封装,一个对象模型(ODM)工具,将数据库中的数据转换为javascript对象以供我们在应用中使用。
安装 mongoose
npm install mongoose -S连接及配置
const mongoose = require("mongoose");
mongoose.connect(
  connectionStr,  // 数据库地址
  { useUnifiedTopology: true, useNewUrlParser: true },
  () => console.log("mongodb 连接成功了!")
);
mongoose.connection.on("error", console.error);
用户的 CRUD
项目中的模块是比较多的,我不会一一去演示,因为各个模块实质性的内容是大同小异的。在这里主要是以用户模块的crud为例来展示下如何在 koa 中践行RESTful API最佳实践。
app/index.js(koa 入口)
入口文件主要用于创建 koa 服务、装载 middleware(中间件)、路由注册(交由 routes 模块处理)、连接数据库等。
const Koa = require("koa");
const path = require("path");
const koaBody = require("koa-body");
const koaStatic = require("koa-static");
const parameter = require("koa-parameter");
const error = require("koa-json-error");
const mongoose = require("mongoose");
const routing = require("./routes");
const app = new Koa();
const { connectionStr } = require("./config");
mongoose.connect(  // 连接mongodb
  connectionStr,
  { useUnifiedTopology: true, useNewUrlParser: true },
  () => console.log("mongodb 连接成功了!")
);
mongoose.connection.on("error", console.error);

app.use(koaStatic(path.join(__dirname, "public")));  // 静态资源
app.use(  // 错误处理
  error({
    postFormat: (e, { stack, ...rest }) =>
      process.env.NODE_ENV === "production" ? rest : { stack, ...rest }
  })
);
app.use(  // 处理post请求和图片上传
  koaBody({
    multipart: true,
    formidable: {
      uploadDir: path.join(__dirname, "/public/uploads"),
      keepExtensions: true
    }
  })
);
app.use(parameter(app));  // 参数校验
routing(app);  // 路由处理

app.listen(3000, () => console.log("程序启动在3000端口了"));
app/routes/index.js
由于项目模块较多,对应的路由也很多。如果一个个的去注册,有点太麻烦了。这里用 node 的 fs 模块去遍历读取 routes 下的所有路由文件,统一注册。
const fs = require("fs");

module.exports = app => {
  fs.readdirSync(__dirname).forEach(file => {
    if (file === "index.js") {
      return;
    }
    const route = require(`./${file}`);
    app.use(route.routes()).use(route.allowedMethods());
  });
};
app/routes/users.js
用户模块路由,里面主要涉及到了用户的登录以及增删改查。
const jsonwebtoken = require("jsonwebtoken");
const jwt = require("koa-jwt");
const { secret } = require("../config");
const Router = require("koa-router");
const router = new Router({ prefix: "/users" });  // 路由前缀
const {
  find,
  findById,
  create,
  checkOwner,
  update,
  delete: del,
  login,
} = require("../controllers/users");  // 控制器方法

const auth = jwt({ secret });  // jwt鉴权

router.get("/", find);  // 获取用户列表

router.post("/", auth, create);  // 创建用户(需要jwt认证)

router.get("/:id", findById);  // 获取特定用户

router.patch("/:id", auth, checkOwner, update);  // 更新用户信息(需要jwt认证和验证操作用户身份)

router.delete("/:id", auth, checkOwner, del);  // 删除用户(需要jwt认证和验证操作用户身份)

router.post("/login", login);  // 用户登录

module.exports = router;
app/models/users.js
用户数据模型(schema)
const mongoose = require("mongoose");

const { Schema, model } = mongoose;

const userSchema = new Schema(
  {
    __v: { type: Number, select: false },
    name: { type: String, required: true },  // 用户名
    password: { type: String, required: true, select: false },  // 密码
    avatar_url: { type: String },  // 头像
    gender: {  //   性别
      type: String,
      enum: ["male", "female"],
      default: "male",
      required: true
    },
    headline: { type: String },  // 座右铭
    locations: {  // 居住地
      type: [{ type: Schema.Types.ObjectId, ref: "Topic" }],
      select: false
    },
    business: { type: Schema.Types.ObjectId, ref: "Topic", select: false },  // 职业
  },
  { timestamps: true }
);

module.exports = model("User", userSchema);
app/controllers/users.js
用户模块控制器,用于处理业务逻辑
const User = require("../models/users");
const jsonwebtoken = require("jsonwebtoken");
const { secret } = require("../config");
class UserController {
  async find(ctx) {  // 查询用户列表(分页)
    const { per_page = 10 } = ctx.query;
    const page = Math.max(ctx.query.page * 1, 1) - 1;
    const perPage = Math.max(per_page * 1, 1);
    ctx.body = await User.find({ name: new RegExp(ctx.query.q) })
      .limit(perPage)
      .skip(page * perPage);
  }
  async findById(ctx) {  // 根据id查询特定用户
    const { fields } = ctx.query;
    const selectFields =  // 查询条件
      fields &&
      fields
        .split(";")
        .filter(f => f)
        .map(f => " +" + f)
        .join("");
    const populateStr =  // 展示字段
      fields &&
      fields
        .split(";")
        .filter(f => f)
        .map(f => {
          if (f === "employments") {
            return "employments.company employments.job";
          }
          if (f === "educations") {
            return "educations.school educations.major";
          }
          return f;
        })
        .join(" ");
    const user = await User.findById(ctx.params.id)
      .select(selectFields)
      .populate(populateStr);
    if (!user) {
      ctx.throw(404, "用户不存在");
    }
    ctx.body = user;
  }
  async create(ctx) {  // 创建用户
    ctx.verifyParams({  // 入参格式校验
      name: { type: "string", required: true },
      password: { type: "string", required: true }
    });
    const { name } = ctx.request.body;
    const repeatedUser = await User.findOne({ name });
    if (repeatedUser) {  // 校验用户名是否已存在
      ctx.throw(409, "用户名已存在");
    }
    const user = await new User(ctx.request.body).save();
    ctx.body = user;
  }
  async checkOwner(ctx, next) {  // 判断用户身份合法性
    if (ctx.params.id !== ctx.state.user._id) {
      ctx.throw(403, "没有权限");
    }
    await next();
  }
  async update(ctx) {  // 更新用户信息
    ctx.verifyParams({
      name: { type: "string", required: false },
      password: { type: "string", required: false },
      avatar_url: { type: "string", required: false },
      gender: { type: "string", required: false },
      headline: { type: "string", required: false },
      locations: { type: "array", itemType: "string", required: false },
      business: { type: "string", required: false },
    });
    const user = await User.findByIdAndUpdate(ctx.params.id, ctx.request.body);
    if (!user) {
      ctx.throw(404, "用户不存在");
    }
    ctx.body = user;
  }
  async delete(ctx) {  // 删除用户
    const user = await User.findByIdAndRemove(ctx.params.id);
    if (!user) {
      ctx.throw(404, "用户不存在");
    }
    ctx.status = 204;
  }
  async login(ctx) {  // 登录
    ctx.verifyParams({
      name: { type: "string", required: true },
      password: { type: "string", required: true }
    });
    const user = await User.findOne(ctx.request.body);
    if (!user) {
      ctx.throw(401, "用户名或密码不正确");
    }
    const { _id, name } = user;
    const token = jsonwebtoken.sign({ _id, name }, secret, { expiresIn: "1d" });  // 登录成功返回jwt加密后的token信息
    ctx.body = { token };
  }
  async checkUserExist(ctx, next) {  // 查询用户是否存在
    const user = await User.findById(ctx.params.id);
    if (!user) {
      ctx.throw(404, "用户不存在");
    }
    await next();
  }

}

module.exports = new UserController();
postman演示
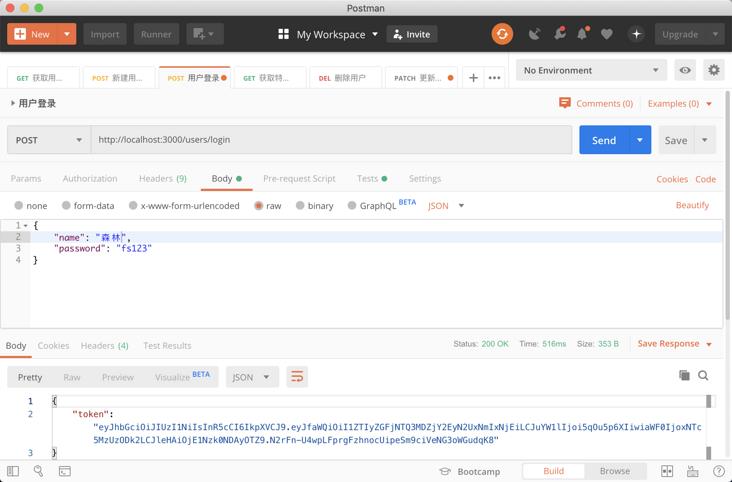
登录

获取用户列表

获取特定用户

创建用户

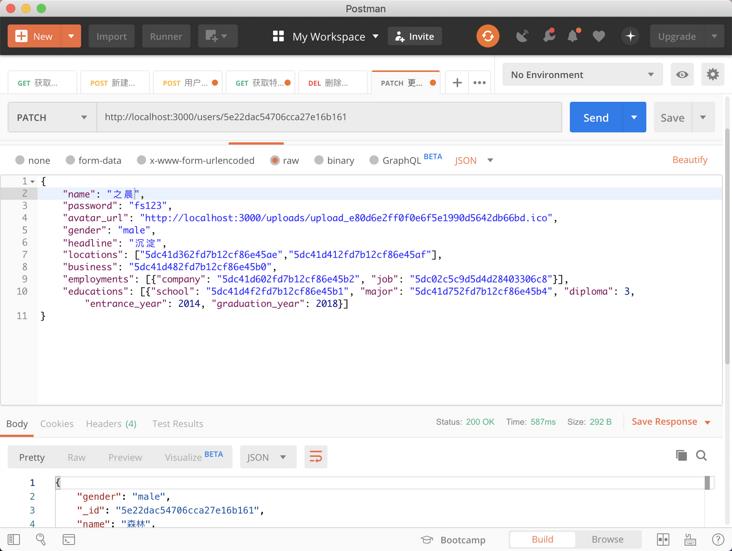
更新用户信息

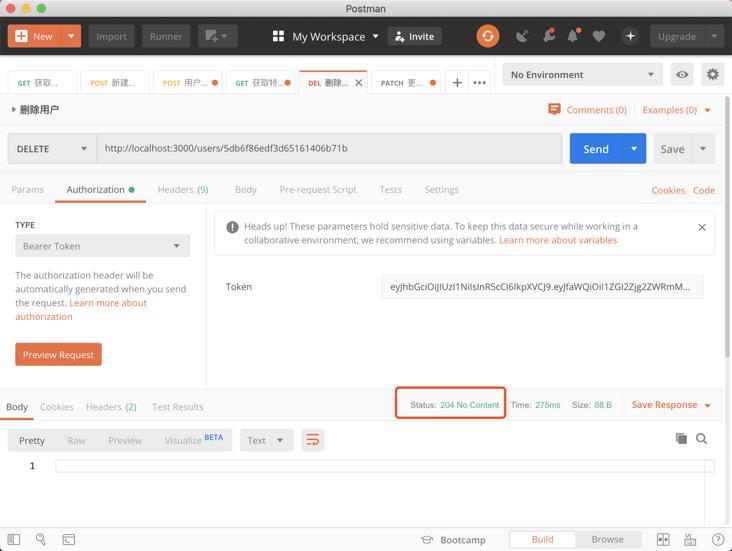
删除用户

最后
到这里本篇文章内容也就结束了,这里主要是结合用户模块来给大家讲述一下RESTful API最佳实践在 koa 项目中的运用。项目的源码已经开源,地址是https://github.com/Cosen95/rest_node_api。需要的自取,感觉不错的话麻烦给个 star!!
同时你可以关注我的同名公众号【前端森林】,这里我会定期发一些大前端相关的前沿文章和日常开发过程中的实战总结。

以上是关于Koa2+MongoDB+JWT实战--Restful API最佳实践的主要内容,如果未能解决你的问题,请参考以下文章