AXIS2+Myeclipse实现WebService数据库存储简单实例
Posted Felx_chu
tags:
篇首语:本文由小常识网(cha138.com)小编为大家整理,主要介绍了AXIS2+Myeclipse实现WebService数据库存储简单实例相关的知识,希望对你有一定的参考价值。
AXIS2+Myeclipse实现WebService数据库存储简单实例
接了个简单的毕业设计。需要WebService实现前台显示后台数据库存储,本人菜鸟,想了下,决定服务端存放有数据库连接的方法,客户端调用服务端提供的方法,实现与数据库的连接。
一、准备工作:
1.下载AXIS2框架
这里使用的版本是axis2-1.7.2,下载地址:http://axis.apache.org/axis2/java/core/download.cgi官网。
(1)Binary distribution axis2-1.7.2-bin.zip
(2)WAR distribution axis2-1.7.2-war.zip
解压 axis2-1.4.1-war.zip 将 axis2.war 放到%TOME_HOME%\\webapps中.启动Tomcate. IE地址输入:http://localhost:<port>/axis2/
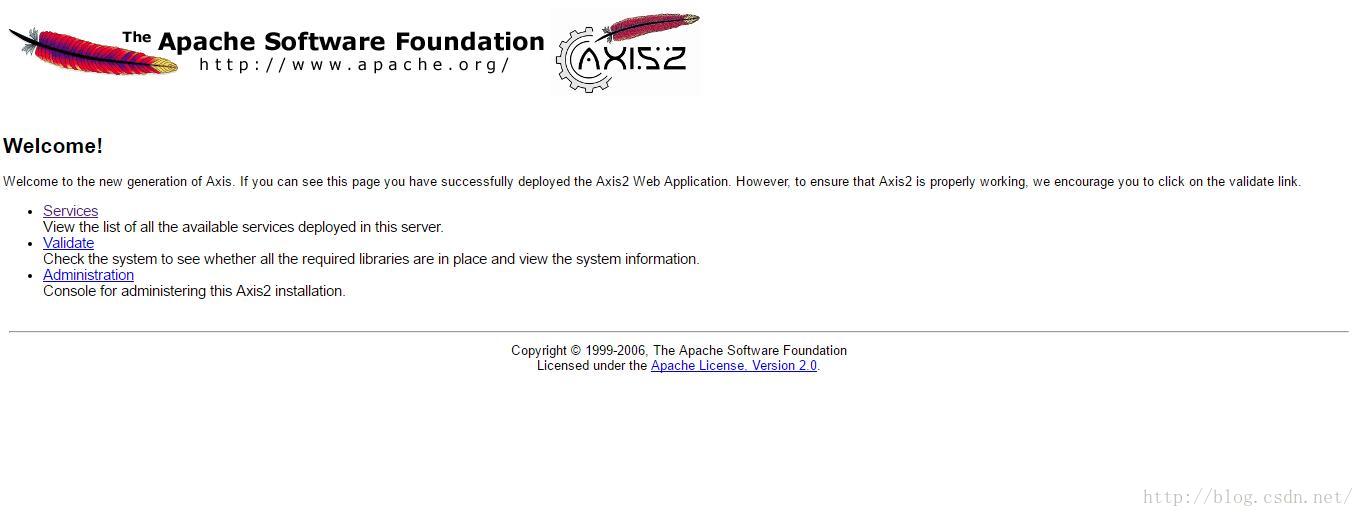
显示欢迎界面,说明AXIS2配置成功。
2.集成AXIS2框架
接下来在Myeclipse上集成AXIS2框架,下载地址:http://axis.apache.org/axis2/java/core/tools/index.html
两个文件,
(1)Service Archive Wizard - Eclipse Plug-in
(2)Code Generator Wizard - Eclipse Plug-in
2:配置环境: 2.1:配置java环境变量(不赘述)。
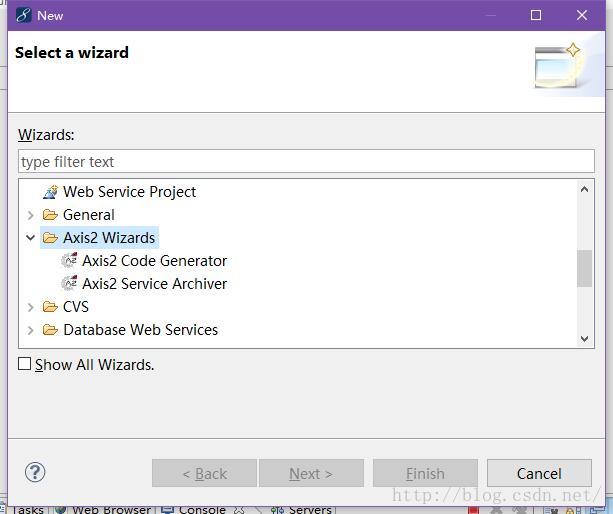
3.安装插件:解压axis2-eclipse-codegen-plugin-1.zip和axis2-eclipse-service-plugin-.zip,把得到的两个jar包放入eclipse目录下的\\plugins\\中,重启eclipse。
安装完插件后,打开eclipse,在package explorer 中点击右键--->选择new---->other 如果安装正确你会看到
3.配置tomcat
解压,配置环境变量Window->Perferences->Server->tomcat下添加。(不赘述)。
由此,配置工作结束。
注意:建议JDK使用1.6及以下,这里我使用的是1.6
二、编写服务端
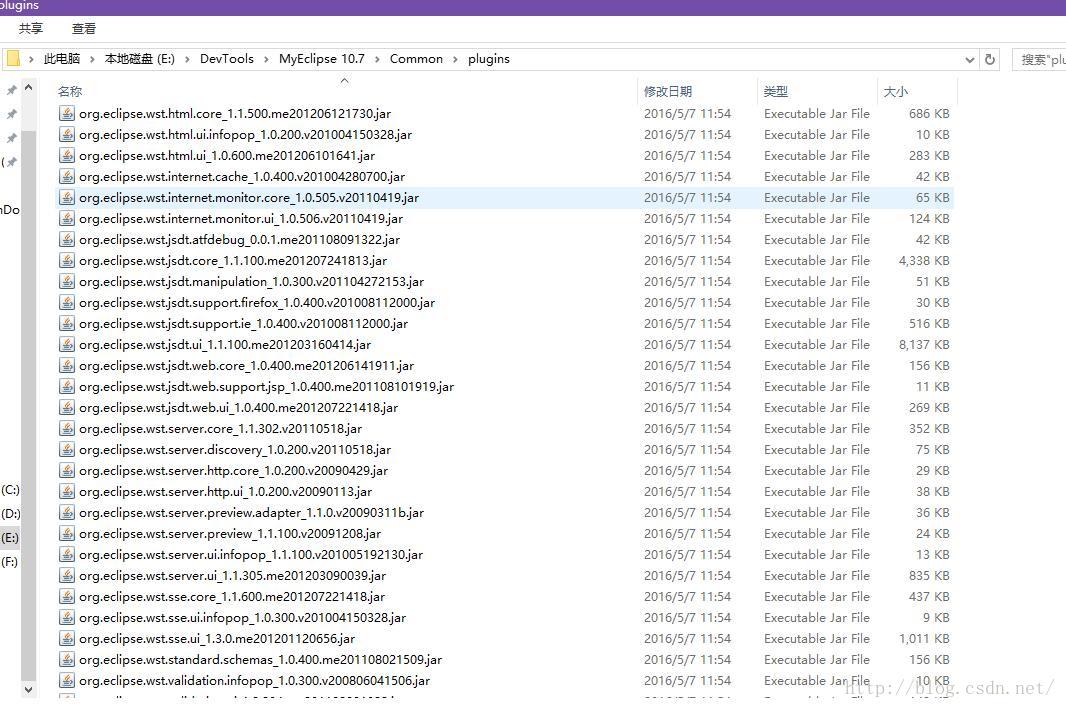
接下来,在Myeclipse中创建两个web项目,并将axis2-1.7.2-bin.zip文件解压,配置axis2home环境变量(自行百度),并将axis2-1.7.2——lib下所有jar包拷贝道Server下的lib中,如图

首先来写服务端,此处已登录为例;首先是将mysql-connector-java-3.0.16-ga-bin数据库连接jar包拷贝到lib文件夹下,
1.编写连接数据库的ConnectionManager文件
package com.book.basic;

import java.sql.Connection;
import java.sql.PreparedStatement;
import java.sql.ResultSet;
import java.sql.SQLException;

import javax.naming.Context;
import javax.naming.InitialContext;
import javax.naming.NamingException;
import javax.sql.DataSource;

public class ConnectionManager
        public static Connection conn=null;
        public static ResultSet rs=null;
        public static PreparedStatement pstmt=null;
        public static PreparedStatement pstmt2=null;
        /**
        * @return
        */
          public static Connection getConnection()
        	  try
        		  Context ct=new InitialContext();
        		  DataSource ds=(DataSource) ct.lookup("java:comp/env/jdbc/webbook");
        		  conn=ds.getConnection();
        	   catch (SQLException e)
        	  e.printStackTrace();
        	  catch (NamingException e)
        	  e.printStackTrace();

        	  return conn;

		public static void closeAll()
			try
				if(conn!=null)
					conn.close();

				if(pstmt!=null)
					pstmt.close();


				if(rs!=null)
					rs.close();

			catch(SQLException e)
				e.printStackTrace();


<span style="font-family:Microsoft YaHei;font-size:18px;">
</span>
在WebRoot目录下创建context.xml:
有图: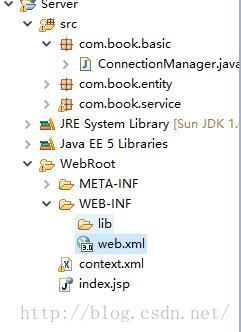
<?xml version='1.0' encoding='utf-8'?>
<!-- The contents of this file will be loaded for each web application -->
<Context>
<Resource
	name="jdbc/webbook" auth="Container" type="javax.sql.DataSource"
	maxAction="100" maxIdle="30" maxWait="10000"
    username="root" password="123456"
	driverClassName="com.mysql.jdbc.Driver"
	url="jdbc:mysql://localhost:3306/webbook?characterEncoding=UTF-8"
	/>

</Context>
然后是web.xml
<?xml version="1.0" encoding="UTF-8"?>
<web-app version="3.0"
	xmlns="http://java.sun.com/xml/ns/javaee"
	xmlns:xsi="http://www.w3.org/2001/XMLSchema-instance"
	xsi:schemaLocation="http://java.sun.com/xml/ns/javaee
	http://java.sun.com/xml/ns/javaee/web-app_3_0.xsd">
  <display-name></display-name>
  <welcome-file-list>
    <welcome-file>index.jsp</welcome-file>
  </welcome-file-list>
  <servlet>
        <servlet-name>Axis2Servlet</servlet-name>
        <servlet-class>org.apache.axis2.transport.http.AxisServlet</servlet-class>
        <load-on-startup>1</load-on-startup>
    </servlet>

    <servlet-mapping>
        <servlet-name>Axis2Servlet</servlet-name>
        <url-pattern>*.jws</url-pattern>
    </servlet-mapping>

    <servlet-mapping>
        <servlet-name>Axis2Servlet</servlet-name>
        <url-pattern>/services/*</url-pattern>
    </servlet-mapping>
</web-app><span style="font-family:Microsoft YaHei;font-size:18px;">
</span>
同时要注意tomcat路径下,conf——context.xml不要忘记配置

2.创建实体类User

代码如下:
package com.book.entity;

public class User
	private int id;
	private String name;
	private String psw;
	public int getId()
		return id;

	public void setId(int id)
		this.id = id;

	public String getName()
		return name;

	public void setName(String name)
		this.name = name;

	public String getPsw()
		return psw;

	public void setPsw(String psw)
		this.psw = psw;

<span style="font-family:Microsoft YaHei;font-size:18px;">
</span>
请参照此代码,自行创建对应数据库webbbook下的user表。
3.编写数据库访问类UserService
package com.book.service;

import java.sql.SQLException;
import java.util.ArrayList;
import java.util.List;

import com.book.basic.ConnectionManager;
import com.book.entity.User;

public class UserService extends ConnectionManager
	public int chkUser(String name, String psw)
		int n=0;
		conn=getConnection();
		String sql="select * from user where name=? and psw=?";

		try
			pstmt=conn.prepareStatement(sql);
			pstmt.setString(1,name);
			pstmt.setString(2,psw);
			rs=pstmt.executeQuery();
			if(rs.next())
				n=1;
			else
				n=0;

		 catch (SQLException e)
			// TODO Auto-generated catch block
			e.printStackTrace();

		return n;
4.发布UserService
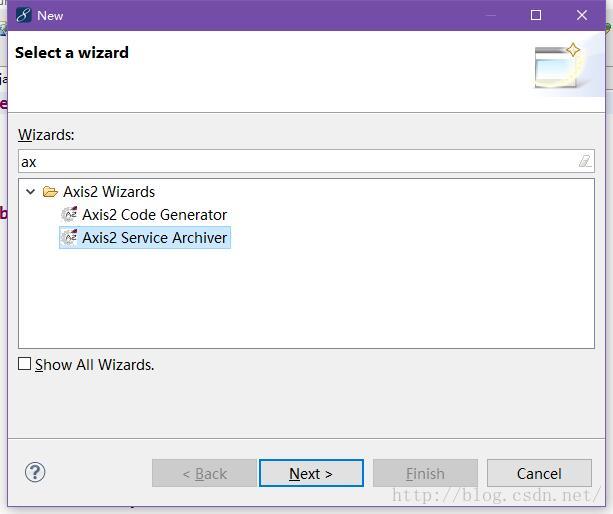
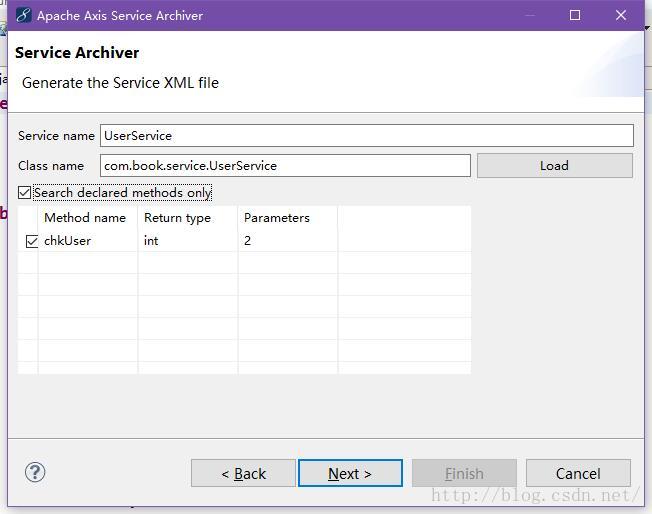
对此文件进行发布,UserService上右键new——other——axis——axis2 service archier
找到WorkSpace下当前项目的WEB-INF下classess


添加mysql的jar包

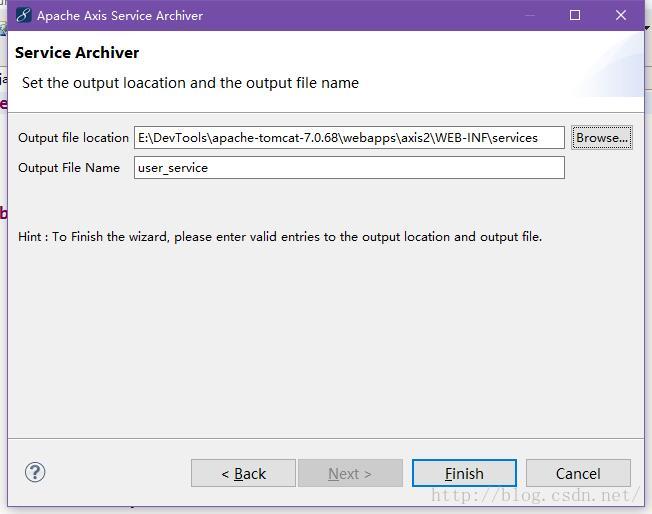
选择输出位置tomcat下webapps——axis2——WEB-INF——services
发布完毕,不熟Server项目,启动tomcat,输入:localhost:8080/axis2检查是否成功。
成功显示axis2的欢迎界面,点击services,点击UserService

显示:
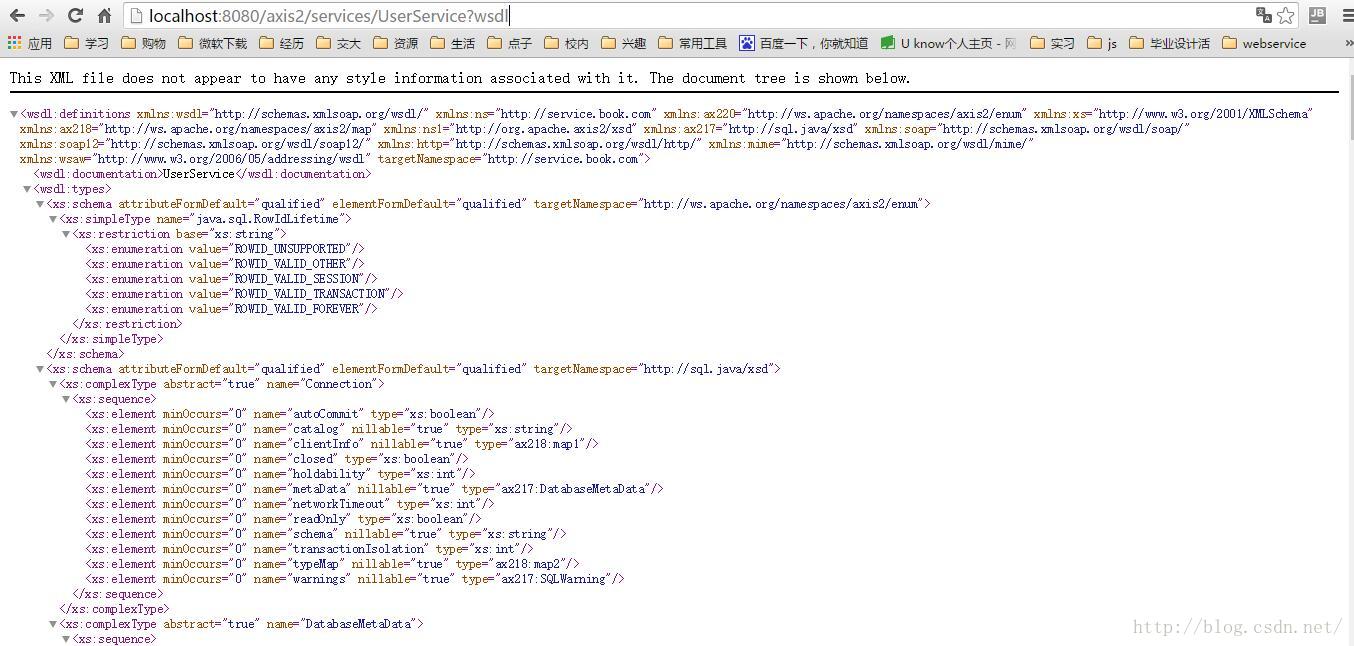
复制浏览器地址。服务端编写完毕。
三、编写客户端Client
1.手动生成服务端发布的文件
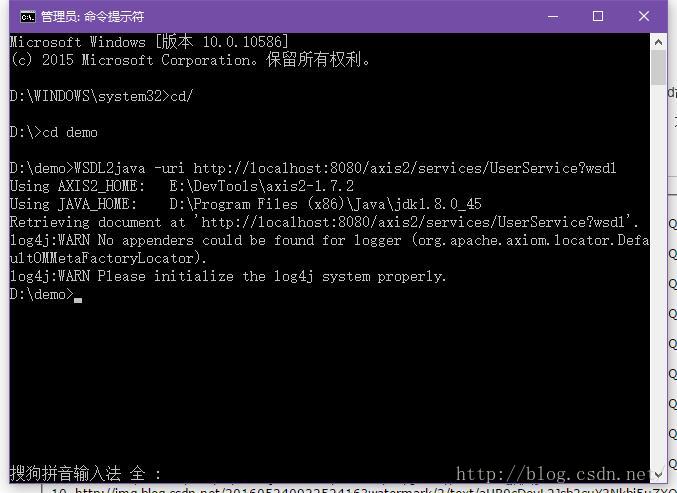
开始编写客户端Client。由于使用myeclipse插件总是报错,没有解决,所以使用cmd命令手动生成。首先,确保配置好了AXIS2_HOME。然后运行cmd(最好用管理员),我在D盘下有个demo文件夹, 为了避免找不到生成到哪了,所以就进入这个文件夹在生成。
接下来,把生成的文件,src下面的整个拷贝到项目中,如图,

如果有错误,请把Server的lib下的jar包都拷过来就ok了。
2.编写客户端调用服务器方法的类LoginServlet
然后,写客户端调用服务器方法的类。
创建LoginServlet在com.book.servlet文件夹下。

修改Web.xml下自动生成的配置如图:
<servlet>
    <description>This is the description of my J2EE component</description>
    <display-name>This is the display name of my J2EE component</display-name>
    <servlet-name>LoginServlet</servlet-name>
    <servlet-class>com.book.servlet.LoginServlet</servlet-class>
  </servlet>

  <servlet-mapping>
    <servlet-name>LoginServlet</servlet-name>
    <url-pattern>/LoginServlet</url-pattern>
  </servlet-mapping>
然后编写LoginServlet
package com.book.servlet;

import java.io.IOException;

import javax.servlet.ServletException;
import javax.servlet.http.HttpServlet;
import javax.servlet.http.HttpServletRequest;
import javax.servlet.http.HttpServletResponse;
import javax.servlet.http.HttpSession;

import com.book.service.UserServiceStub;
import com.book.service.UserServiceStub.ChkUserResponse;

public class LoginServlet extends HttpServlet

	/**
	 * Constructor of the object.
	 */
	public LoginServlet()
		super();


	/**
	 * Destruction of the servlet. <br>
	 */
	public void destroy()
		super.destroy(); // Just puts "destroy" string in log
		// Put your code here


	public void doGet(HttpServletRequest request, HttpServletResponse response)
			throws ServletException, IOException
		request.setCharacterEncoding("GBK");
		response.setCharacterEncoding("GBK");
		String name =request.getParameter("username");
		String psw =request.getParameter("password");
		String target = "http://localhost:8080/axis2/services/UserService";
		UserServiceStub stub = new UserServiceStub(target);
		UserServiceStub.ChkUser  chku = new UserServiceStub.ChkUser();
		chku.setName(name);
		chku.setPsw(psw);
		UserServiceStub.ChkUserResponse chkur = stub.chkUser(chku);
		int n=chkur.get_return();
		if(n>0)
			request.getRequestDispatcher("index.jsp").forward(request, response);
		else
			request.getRequestDispatcher("error.jsp").forward(request, response);


	public void doPost(HttpServletRequest request, HttpServletResponse response)
			throws ServletException, IOException
		try
			doGet(request,response);
		 catch (IOException e)

			e.printStackTrace();


	/**
	 * Initialization of the servlet. <br>
	 *
	 * @throws ServletException if an error occurs
	 */
	public void init() throws ServletException
		// Put your code here
前台页面就不写了,文章最后给出项目下载地址。
3.测试
部署Client,启动服务器,输入:http://localhost:8080/Client/Login.html


跳转到首页,登陆成功!
真的是好久不碰WebService都忘干净了,这次的项目确实是个挑战,每天遇到很多问题,一部分能就解决就解决问题,不能就得绕过这个问题。虽然看起来就是这么简单的技术,但是身为菜鸟,每次通过各种途径解决总是很开心的,直到最终项目成功交付。
如有问题可以参考:
1.http://wenku.baidu.com/link?url=tL2GL5oyrIvN6B47nkou6KPtXRSHkm9Q67t1kq7SWVYN8t5GzjoiG_apPxV7JC_BCGulsV85xpI1KbxJF6vRmDjUpB04fEubO5WDrTL2Pz32.http://www.blogjava.net/tianchijiaozi/archive/2013/03/15/396452.html 项目代码参考:http://download.csdn.net/detail/listentoknow/9530686
以上是关于AXIS2+Myeclipse实现WebService数据库存储简单实例的主要内容,如果未能解决你的问题,请参考以下文章