vue项目中axios的封装
Posted CestLavie
tags:
篇首语:本文由小常识网(cha138.com)小编为大家整理,主要介绍了vue项目中axios的封装相关的知识,希望对你有一定的参考价值。
1.安装
1 npm install axios --save
2.新建http.js,封装拦截器以及多种请求方式

 1 import axios from \'axios\';
 2 import { Message } from \'element-ui\';
 3
 4 // 请求拦截器
 5 axios.interceptors.request.use(
 6   config => {
 7     //发送请求前需要做什么,一般检查token
 8     return config;
 9   },
10
11   error => {
12    // 对请求错误做些什么
13     return Promise.reject(error);
14   }
15 )
16
17 // 响应拦截器
18 axios.interceptors.response.use(
19   response => {
20     // 对响应数据做点什么,一般是判断状态码,进行一些逻辑处理
21     return response;
22   },
23   error => {
24     // 对响应错误做点什么
25     return Promise.reject(error) ;
26   };
27 )
28
29 //GET请求
30 export const $get = function (url, params) {
31   return new Promise((resolve, reject) => {
32     axios({
33       method: \'get\',//请求方式
34       url: url,         //请求url
35       headers:...   //请求头设置,
36       params,      //请求参数
37       baseURL: ...//基础地址,将自动加在 `url` 前面
38     }).then(res => {
39       resolve(res)
40     }).catch(error => {
41       reject(error)
42     })
43   })
44 }
45
46 //POST请求
47 export const $post = function (url, param) {
48   return new Promise((resolve, reject) => {
49     axios({
50       method: \'post\',
51       url: url,
52       headers: ...,
53       data: param ? param : "", //数据体
54       baseURL: ...
55     }).then(res => {
56       resolve(res)
57     }).catch(error => {
58       reject(error)
59     })
60   })
61 }
62
63 //DELETE请求
64 export const $delete = function (url, params) {
65   return new Promise((resolve, reject) => {
66     axios({
67       method: \'delete\',
68       url: url,
69       headers: ...,
70       params,
71       baseURL: ...
72     }).then(res => {
73       resolve(res)
74     }).catch(error => {
75       reject(error)
76     })
77   })
78 }
79
80 //PUT请求
81 export const $put = function (url, params) {
82   return new Promise((resolve, reject) => {
83     axios({
84       method: \'put\',
85       url: url,
86       headers: ...,
87       data: params ? params : "",
88       baseURL: ...
89     }).then(res => {
90       resolve(res)
91     }).catch(error => {
92       reject(error)
93     })
94   })
95 }
3.接口的封装---新建user.js
 1 //导入请求方式
 2 import {
 3   $get,
 4   $post,
 5   $update,
 6   $delete
 7 } from \'../http\';
 8
 9 //获取用户信息接口
10 const getUser = data => {
11   return $get(\'/api/getUserInfo\', data);
12 };
13
14 //其他接口类似
15 ....
16 ....
17 ....
18
19 //导出接口
20 export default {
21 getUser,
22 ...,
23 ...
24 }
4.封装所有接口文件---创建index.js
1 //导入接口文件
2 import user from \'./user\'
3
4 //导出
5 export default {
6   user,
7   ...,
8   ...
9 }
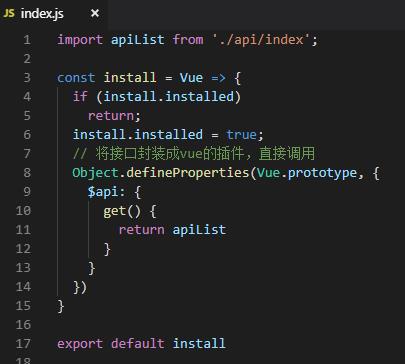
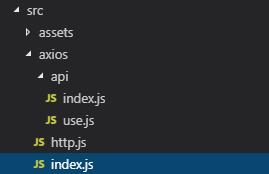
5.axios的所有内容封装(该index.js即为下图目录结构选中的js文件)

目录结构

6.在组件中的使用
 1 methods:{
 2     //方法的调用,传入数据
 3     getUser(){
 4          this.$api.user.getUser({userId:100010})
 5             .then(
 6                 res=>{
 7                 //请求结果,进行相应的逻辑处理
 8                 },
 9                 error=>{
10                 //请求失败后的逻辑处理
11                 })
12       }
13 }
以上是关于vue项目中axios的封装的主要内容,如果未能解决你的问题,请参考以下文章
