快速了解前端——Vue.js(源码)在JS脚本看Vue构建
Posted GYTTking
tags:
篇首语:本文由小常识网(cha138.com)小编为大家整理,主要介绍了快速了解前端——Vue.js(源码)在JS脚本看Vue构建相关的知识,希望对你有一定的参考价值。
目录
1. scripts 脚本构建
- vue 项目的 package.json 文件中可以看到相关的 npm 运行命令行。
- 其中 dev 开头的表示开发环境下相关的运行构建脚本,build 开头的表示生产环境下的构建脚本。【参考文献】
- 只需要根据这些运行的 npm run … 命令,找到对应的入口文件即可。
- 这里开发环境用 npm run dev ,生产环境用 npm run build。
"scripts":
    "dev": "rollup -w -c scripts/config.js --environment TARGET:web-full-dev --sourcemap",
    "dev:cjs": "rollup -w -c scripts/config.js --environment TARGET:web-runtime-cjs-dev",
    "dev:esm": "rollup -w -c scripts/config.js --environment TARGET:web-runtime-esm",
    "dev:test": "karma start test/unit/karma.dev.config.js",
    "dev:ssr": "rollup -w -c scripts/config.js --environment TARGET:web-server-renderer",
    "dev:compiler": "rollup -w -c scripts/config.js --environment TARGET:web-compiler ",
    "dev:weex": "rollup -w -c scripts/config.js --environment TARGET:weex-framework",
    "dev:weex:factory": "rollup -w -c scripts/config.js --environment TARGET:weex-factory",
    "dev:weex:compiler": "rollup -w -c scripts/config.js --environment TARGET:weex-compiler ",
    "build": "node scripts/build.js",
    "build:ssr": "npm run build -- web-runtime-cjs,web-server-renderer",
    "build:weex": "npm run build -- weex",
    "test": "npm run lint && flow check && npm run test:types && npm run test:cover && npm run test:e2e -- --env phantomjs && npm run test:ssr && npm run test:weex",
    "test:unit": "karma start test/unit/karma.unit.config.js",
    "test:cover": "karma start test/unit/karma.cover.config.js",
    "test:e2e": "npm run build -- web-full-prod,web-server-basic-renderer && node test/e2e/runner.js",
    "test:weex": "npm run build:weex && jasmine JASMINE_CONFIG_PATH=test/weex/jasmine.js",
    "test:ssr": "npm run build:ssr && jasmine JASMINE_CONFIG_PATH=test/ssr/jasmine.js",
    "test:sauce": "npm run sauce -- 0 && npm run sauce -- 1 && npm run sauce -- 2",
    "test:types": "tsc -p ./types/test/tsconfig.json",
    "lint": "eslint src scripts test",
    "flow": "flow check",
    "sauce": "karma start test/unit/karma.sauce.config.js",
    "bench:ssr": "npm run build:ssr && node benchmarks/ssr/renderToString.js && node benchmarks/ssr/renderToStream.js",
    "release": "bash scripts/release.sh",
    "release:weex": "bash scripts/release-weex.sh",
    "release:note": "node scripts/gen-release-note.js",
    "commit": "git-cz"
  ,
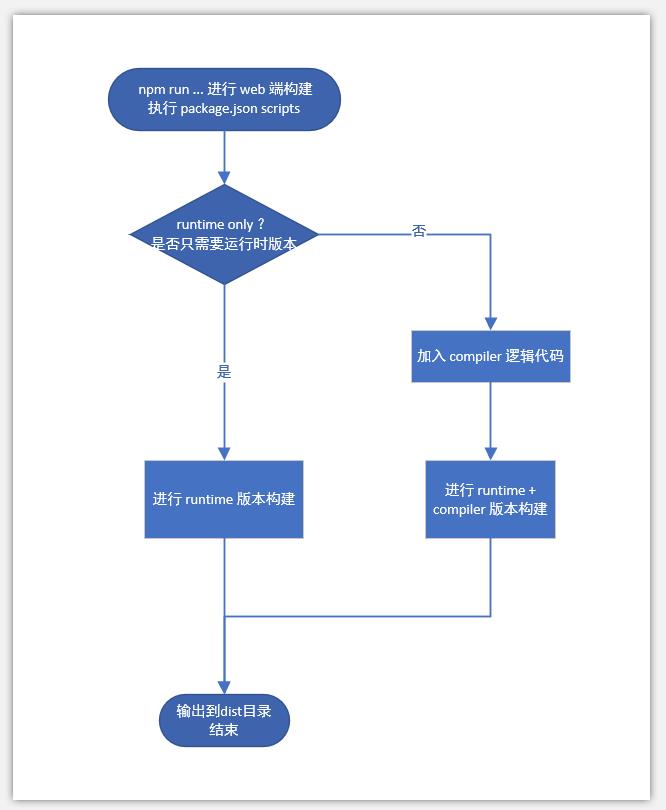
- web 端构建流程简图如下
1.1 dev 开发环境构建过程
1.1.1 配置文件代码
- 执行 npm run dev 的时候,执行的配置文件为 scripts/config.js,参数为 TARGET:web-full-dev。
"scripts":
    ...
    "dev": "rollup -w -c scripts/config.js --environment TARGET:web-full-dev --sourcemap",
    ...
,
- 打开 scripts/config.js 配置文件,查找 web-full-dev,根据源码注释,说明了 web-full-dev 是对 运行 + 编译 的开发环境的构建。

- entry 和 dist 中,有 resolve 函数,目的就是将 alias.js 的目录别名和 resolve 函数中传入的参数路径进行一个拼接,获取文件在系统中的完整路径,代码注释说明如下
// 导入目录别名
const aliases = require('./alias')

// 自定义 resolve 函数,结果返回对应文件的完整路径。
const resolve = p =>

  // 如果 运行 npm run dev,base 在这里得到的就是 "web"
  const base = p.split('/')[0]

  if (aliases[base])
    return path.resolve(aliases[base], p.slice(base.length + 1))
   else
    return path.resolve(__dirname, '../', p)

1.1.2 如何进行代码调试?
- vscode 对 node.js 调试支持的已经比较好。运行 npm run dev 的时候,对应的 config.js 脚本会被解释执行。可以通过点击 vscode 左侧编辑器的 NPM SCRIPTS 选项进行 debug 调试。

- 如在 entry 入口处打上断点,运行调试,这里的调试工具和 chrome 调试工具类似。
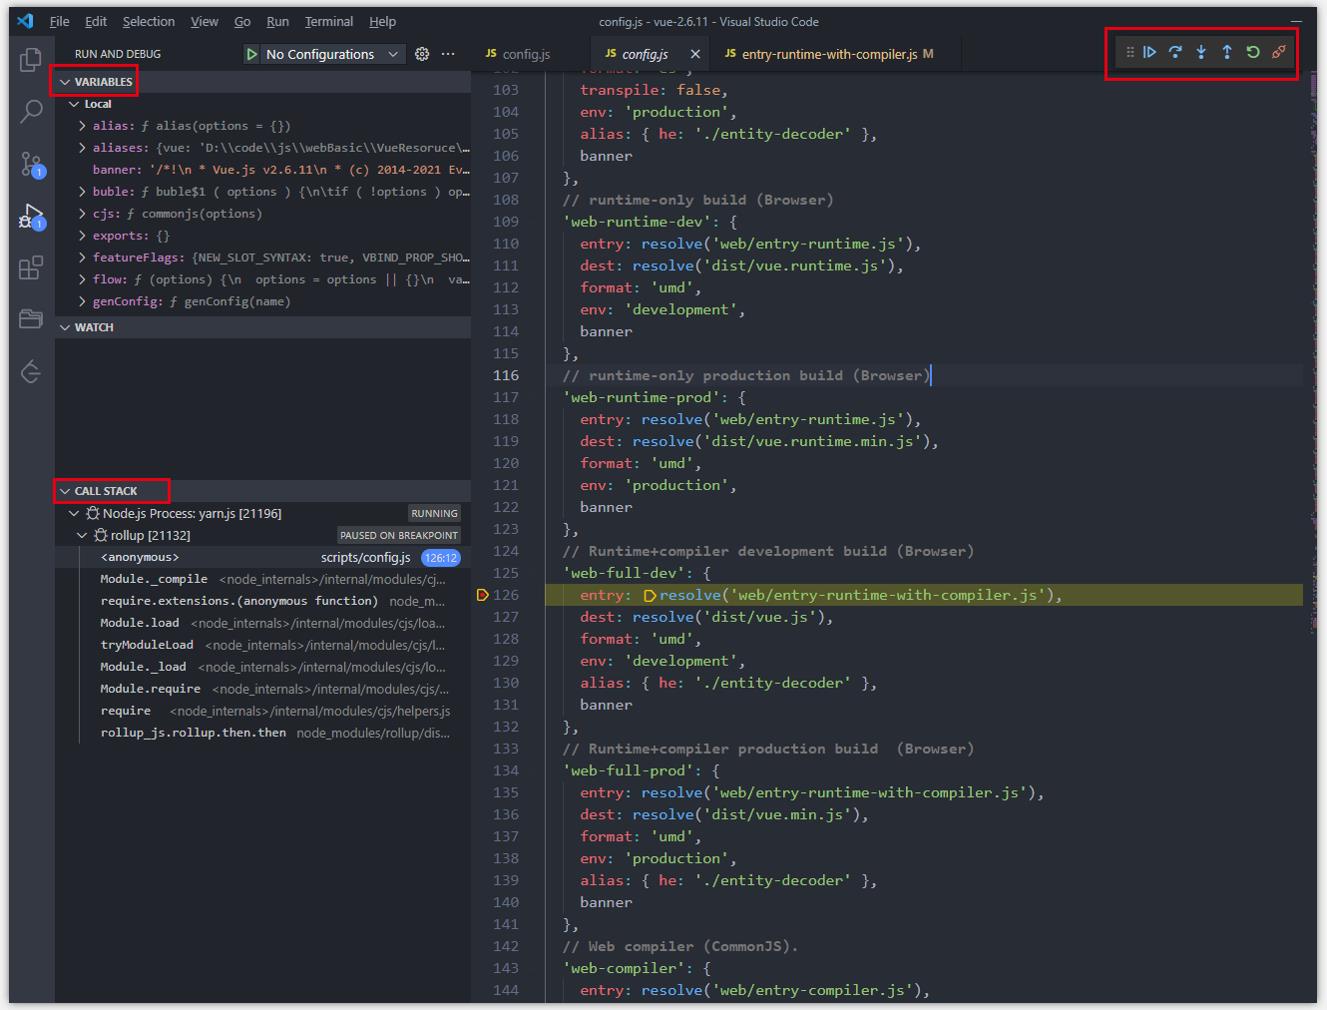
- 断点 step into 进入 resolve 方法,继续进行后续步骤调试。

1.2 build 生产环境构建过程
1.2.1 scripts/build.js 配置文件解析
- 根据 package.json 找到 build 入口文件 scripts/build.js,运行 npm run build, build.js 文件被解释执行,build.js 的代码逻辑也比较简单,下面一起来看一下。
"scripts":
    ...
    "build": "node scripts/build.js",
    ...
,
- 如果 dist 目录不存在,就创建 dist 目录。
- 获取 config.js 配置文件内容 builds。
- 再通过 node 命令行参数,对配置内容容进行筛选,结果重新赋给了 builds。
- 执行 build(builds) ,通过传入的配置项,对项目进行构建。
const fs = require('fs')
const path = require('path')
const zlib = require('zlib')
const rollup = require('rollup')
const terser = require('terser')

// 1. 如果 dist 目录不存在,就创建
if (!fs.existsSync('dist'))
  fs.mkdirSync('dist')


// 2. 获取 config.js 中的配置对象
let builds = require('./config').getAllBuilds()

// 3. 通过 node 命令行 arg 参数,过滤出对应 arg 的配置对象
// filter builds via command line arg
if (process.argv[2])
  const filters = process.argv[2].split(',')
  builds = builds.filter(b =>
    return filters.some(f => b.output.file.indexOf(f) > -1 || b._name.indexOf(f) > -1)
  )
 else
  // filter out weex builds by default
  builds = builds.filter(b =>
    return b.output.file.indexOf('weex') === -1
  )


// 4. 根据筛选后的配置对象,进行 build 构建。
build(builds)

function build (builds)
  let built = 0
  const total = builds.length
  const next = () =>
    buildEntry(builds[built]).then(() =>
      built++
      if (built < total)
        next()

    ).catch(logError)


  next()
- 这样就实现了通过不同的命令行参数传参打包不同生产版本的 vue。
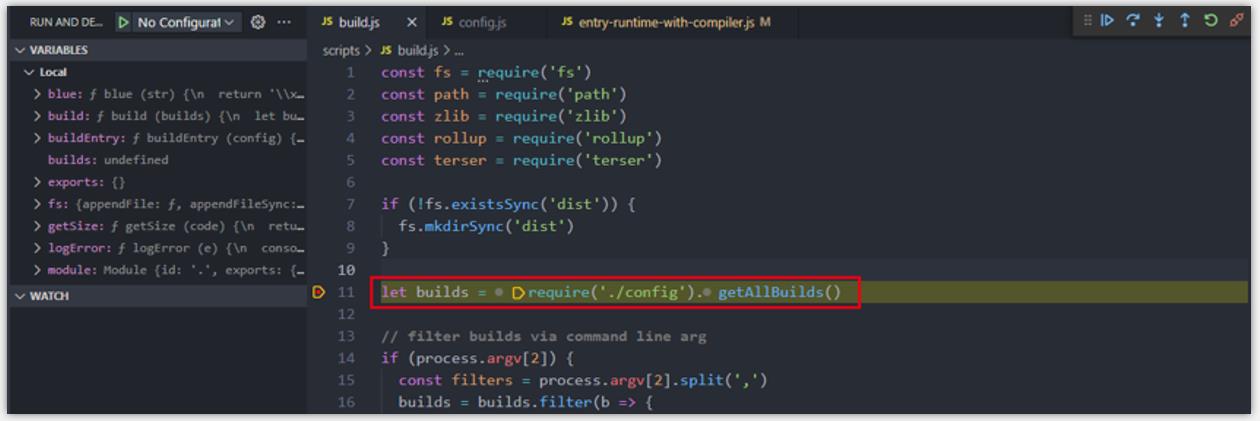
1.2.1 build.js配置文件断点调试实践
- step1: 在 build.js 主要位置打上断点。

- step2: require(’./config’) 引入配置文件,解释执行,获取所有配置内容。
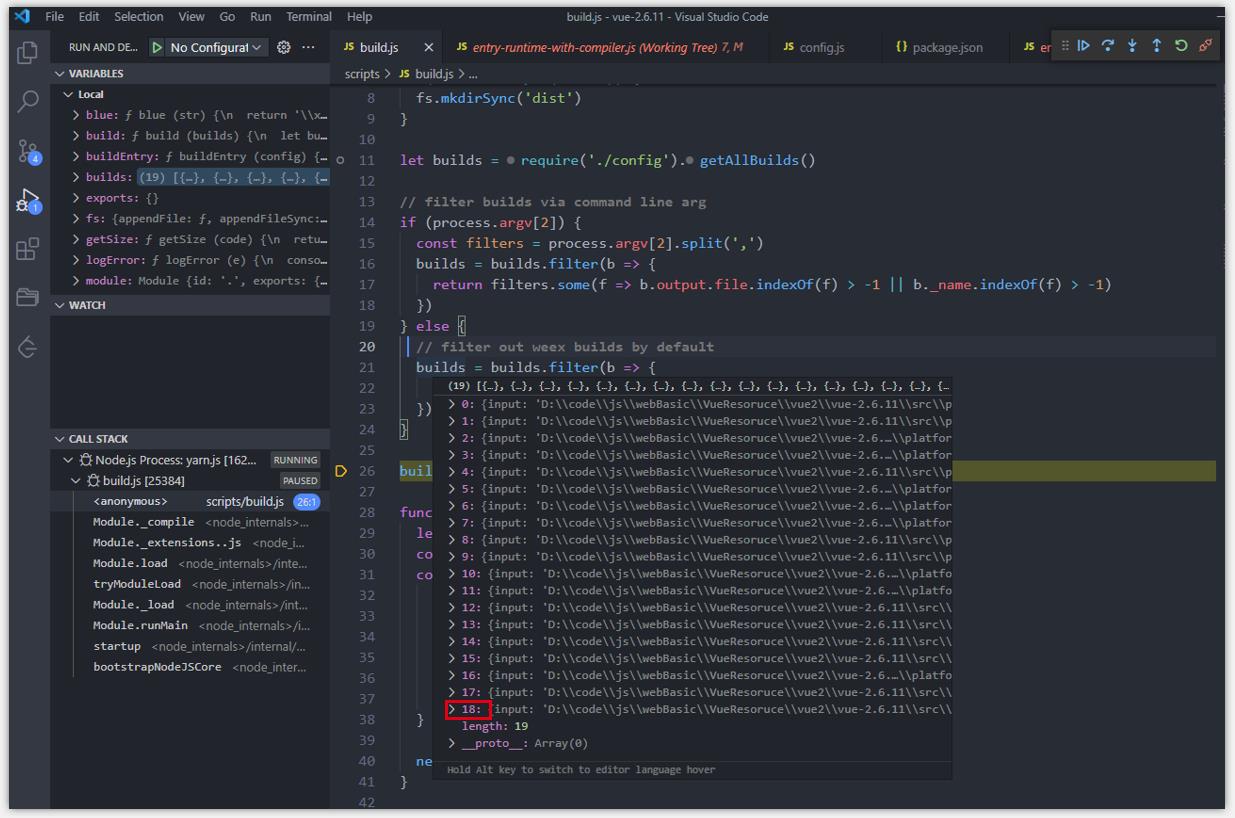
- step3: 获取命令行参数,如果没有传,默认将所有版本都打包(web 端会去掉 weex 相关内容),下面的截图中可以看到运行的配置项已经去掉了 weex 相关。

step4: 可以看到 npm run build 出来的 dist 内容。

2. 浏览器 runtime 版本和 runtime-compiler 版本
- vue构建代码中,可以通过不同的配置项,来生成是否需要 compiler 的 vue 。两者的区别主要在于,如果不使用 vue-loader,前者只能通过写 render 函数,实现模板渲染。后者 template 和 render 函数可以。
2.1 runtime 版本
2.1.1 runtime 版本入口
- 构建的 runtime 版本,里面不带编译器,所以 runtime 打包之后的代码体积更小。
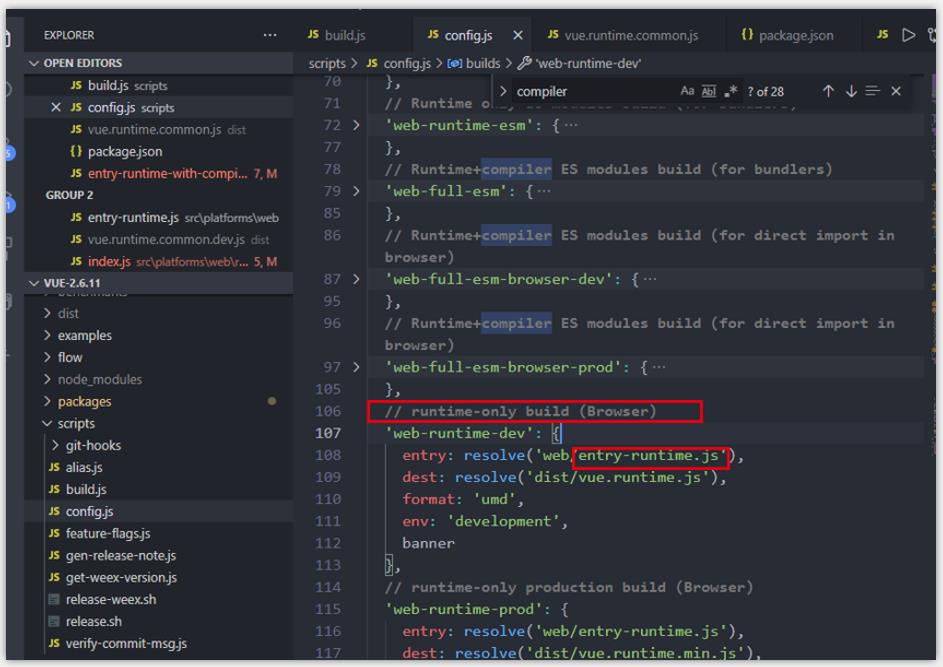
通过 config.js 配置对象的举例,源码对不同的构建也进行了注释说明。
scripts:
  ...
  // runtime-only build (Browser) 构建开发环境的web端runtime版本
  'web-runtime-dev':
    entry: resolve('web/entry-runtime.js'),
    dest: resolve('dist/vue.runtime.js'),
    format: 'umd',
    env: 'development',
    banner
  ,
  // runtime-only production build (Browser) 构建生产环境的web端runtime版本
  'web-runtime-prod':
    entry: resolve('web/entry-runtime.js'),
    dest: resolve('dist/vue.runtime.min.js'),
    format: 'umd',
    env: 'production',
    banner
  ,
  ...
2.1.2 分析 entry-runtime.js
这个文件内容就两行,主要返回 runtime 版的 Vue 构造函数。两行代码单独成文件,应该是为了让项目目录,在功能结构上更加清晰。
/* @flow */

import Vue from './runtime/index'

export default Vue
2.1.3 分析 runtime/index.js
- 在 src/platforms/web/runtime/index.js 中,主要对 Vue 构造函数进行了一些处理。
- 安装 vue 内部定义的指令、组件,安装一些平台相关的特殊工具方法,定义 $mount 挂载方法等
/* @flow */

import Vue from 'core/index'
import config from 'core/config'
import  extend, noop  from 'shared/util'
import  mountComponent  from 'core/instance/lifecycle'
import  devtools, inBrowser  from 'core/util/index'

import
  query,
  mustUseProp,
  isReservedTag,
  isReservedAttr,
  getTagNamespace,
  isUnknownElement
 from 'web/util/index'

import  patch  from './patch'
import platformDirectives from './directives/index'
import platformComponents from './components/index'

// install platform specific utils
Vue.config.mustUseProp = mustUseProp
Vue.config.isReservedTag = isReservedTag
Vue.config.isReservedAttr = isReservedAttr
Vue.config.getTagNamespace = getTagNamespace
Vue.config.isUnknownElement = isUnknownElement

// install platform runtime directives & components
extend(Vue.options.directives, platformDirectives)
extend(Vue.options.components, platformComponents)

// install platform patch function
// 虚拟dom转换为真实dom
Vue.prototype.__patch__ = inBrowser ? patch : noop

// public mount method
// 在这里实现公共 $mount 方法 (entry-runtime-with-compiler.js 带编译器版本中也用到这个方法)
Vue.prototype.$mount = function (
  el?: string | Element,
  hydrating?: boolean
): Component
  el = el && inBrowser ? query(el) : undefined
  // 初始化执行将渲染的结果替换到el上。
  return mountComponent(this, el, hydrating)


// devtools global hook
/* istanbul ignore next */
if (inBrowser)
  setTimeout(() =>
    if (config.devtools)
      if (devtools)
        devtools.emit('init', Vue)
       else if (
        process.env.NODE_ENV !== 'production' &&
        process.env.NODE_ENV !== 'test'
      )
        console[console.info ? 'info' : 'log'](
          'Download the Vue Devtools extension for a better development experience:\\n' +
          'https://github.com/vuejs/vue-devtools'
        )


    if (process.env.NODE_ENV !== 'production' &&
      process.env.NODE_ENV !== 'test' &&
      config.productionTip !== false &&
      typeof console !== 'undefined'
    )
      console[console.info ? 'info' : 'log'](
        `You are running Vue in development mode.\\n` +
        `Make sure to turn on production mode when deploying for production.\\n` +
        `See more tips at https://vuejs.org/guide/deployment.html`
      )

  , 0)


export default Vue
引用关系如下截图。

2.2 runtime-compiler 版本
2.2.1 runtime-compiler 版本入口
- 这个在前面的 npm run dev 执行分析中也提到过了,在阅读调试 vue 源码的时候,如果想要了解 compiler的实现逻辑,就需要用到待 runtime 加 compiler 版本的 vue。
scripts:
  ...
   // Runtime+compiler development build (Browser)
  'web-full-dev':
    entry: resolve('web/entry-runtime-with-compiler.js'),
    dest: resolve('dist/vue.js'),
    format: 'umd',
    env: 'development',
    alias:  he: './entity-decoder' ,
    banner
  ,
  // Runtime+compiler production build  (Browser)
  'web-full-prod':
    entry: resolve('web/entry-runtime-with-compiler.js'),
    dest: resolve('dist/vue.min.js'),
    format: 'umd',
    env: 'production',
    alias:  he: './entity-decoder' ,
    banner
  ,
  ...
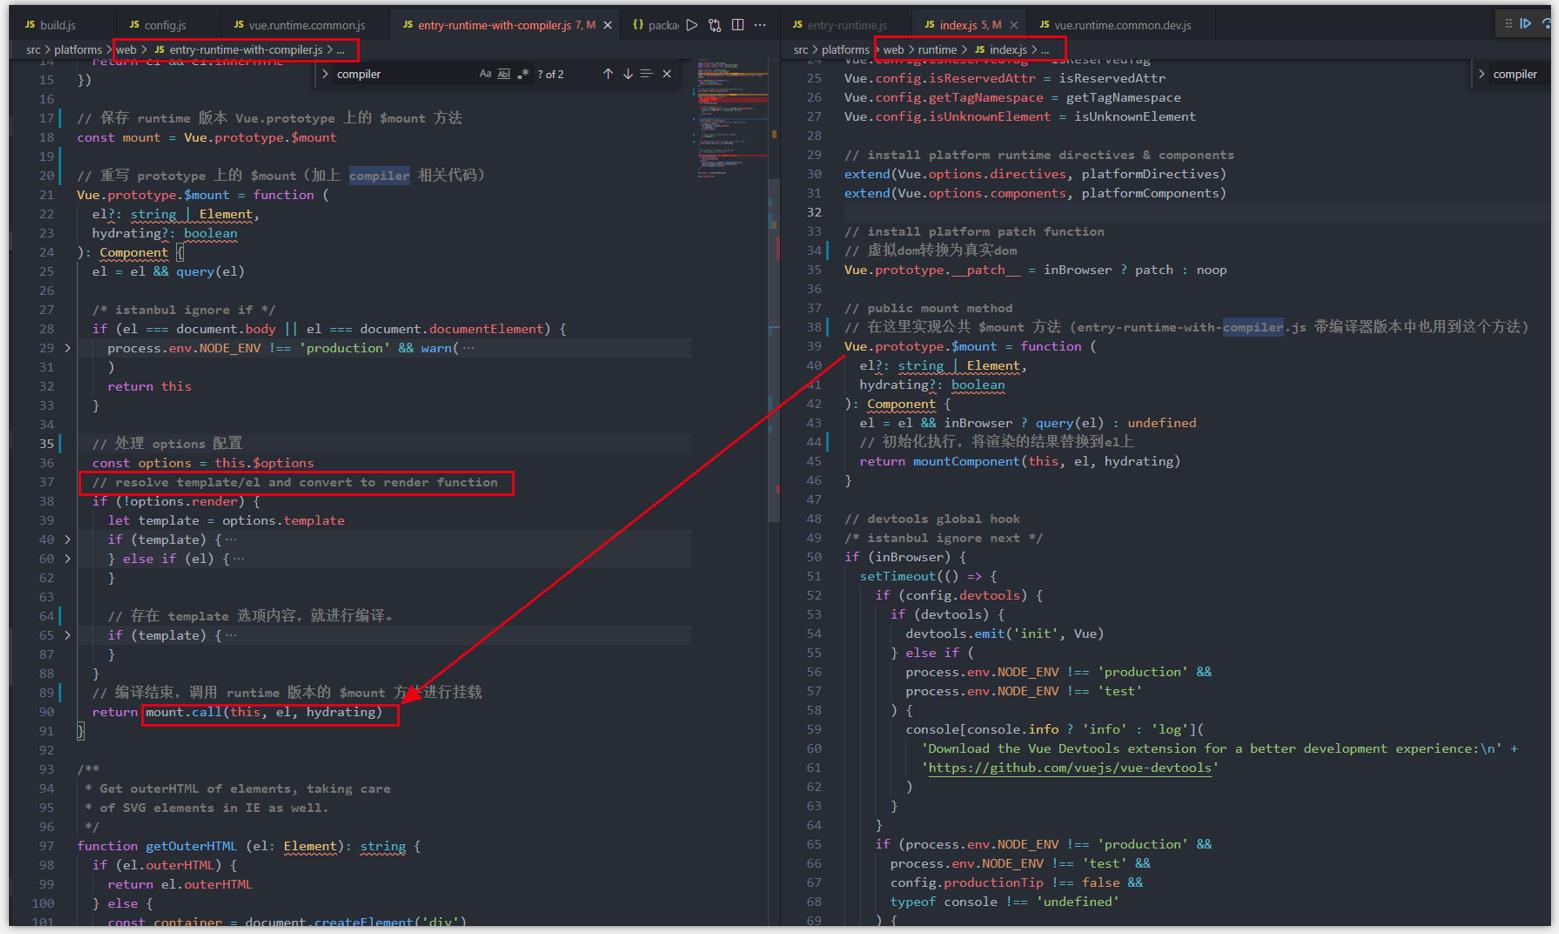
2.2.2 分析 web\\entry-runtime-with-compiler.js
- 主要逻辑在 src\\platforms\\web\\entry-runtime-with-compiler.js 文件中
- runtime + compiler 版本的 vue, 其实是在 runtime 版本的基础上,加
compiler 相关的功能逻辑。 - 它首先保存了 runtime 版本 Vue.prototype 上的 $mount 方法。
- 再重写 Vue.prototype 上的 $mount 方法。
- 如果用户传入了 template 模板,就通过编译器,转换成 render 函数。
- 最后通过先前保存的 runtime 版本的 $mount 方法进行挂载。
/* @flow */

import config from 'core/config'
import  warn, cached  from 'core/util/index'
import  mark, measure  from 'core/util/perf'

import Vue from './runtime/index'
import  query  from './util/index'
import  compileToFunctions  from './compiler/index'
import  shouldDecodeNewlines, shouldDecodeNewlinesForHref  from './util/compat'

const idToTemplate = cached(id =>
  const el = query(id)
  return el && el.innerHTML
)

// 1. 保存 runtime 版本 Vue.prototype 上的 $mount 方法
const mount = Vue.prototype.$mount

// 2. 重写 Vue.prototype 上的 $mount(加上 compiler 相关功能逻辑)
Vue.prototype.$mount = function (
  el?: string | Element,
  hydrating?: boolean
): Component
  el = el && query(el)

  /* istanbul ignore if */
  if (el === document.body || el === document.documentElement)
    process.env.NODE_ENV !== 'production' && warn(
      `Do not mount Vue to <html> or <body> - mount to normal elements instead.`
    )
    return this


  // 处理 options 配置
  const options = this.$options
  // resolve template/el and convert to render function
  if (!options.render)
    let template = options.template
    if (template)
      if (typeof template === 'string')
        if (template.charAt(0) === '#')
          template = idToTemplate(template)
          /* istanbul ignore if */
          if (process.env.NODE_ENV !== 'production' && !template)
            warn(
              `Template element not found or is empty: $options.template`,
              this
            )


       else if (template.nodeType)
        template = template.innerHTML
       else
        if (process.env.NODE_ENV !== 'production')
          warn('invalid template option:' + template, this)

        return this

     else if (el)
      template = getOuterHTML(el)


    // 3. 存在 template 选项内容,就进行编译。
    if (template)
      /* istanbul ignore if */
      if (process.env.NODE_ENV !== 'production' && config.performance && mark)
        mark('compile')


      // 编译获取 render 函数
      const  render, staticRenderFns  = compileToFunctions(template,
        outputSourceRange: process.env.NODE_ENV !== 'production',
        shouldDecodeNewlines,
        shouldDecodeNewlinesForHref,
        delimiters: options.delimiters,
        comments: options.comments
      , this)
      options.render = render
      options.staticRenderFns = staticRenderFns

      /* istanbul ignore if */
      if (process.env.NODE_ENV !== 'production' && config.performance && mark)
        mark('compile end')
        measure(`vue $this._name compile`, 'compile', 'compile end')


  // 4. 编译结束,调用 runtime 版本的 $mount 方法进行挂载
  return mount.call(this, el, hydrating)


/**
 * Get outerHTML of elements, taking care
 * of SVG elements in IE as well.
 */
function getOuterHTML (el: Element): string
  if (el.outerHTML)
    return el.outerHTML
   else
    const container = document.createElement('div')
    container.appendChild(el.cloneNode(true))
    return container.innerHTML


Vue.compile = compileToFunctions

export default Vue
3. 项目开发中的 vue 版本
- 平时在项目开发当中,自己在编写主入口文件的时候,我们都会引入 node_modules 中的 vue。直接import 进来的 vue.js 到底带不带 compiler?下面让我们就来认证一下。
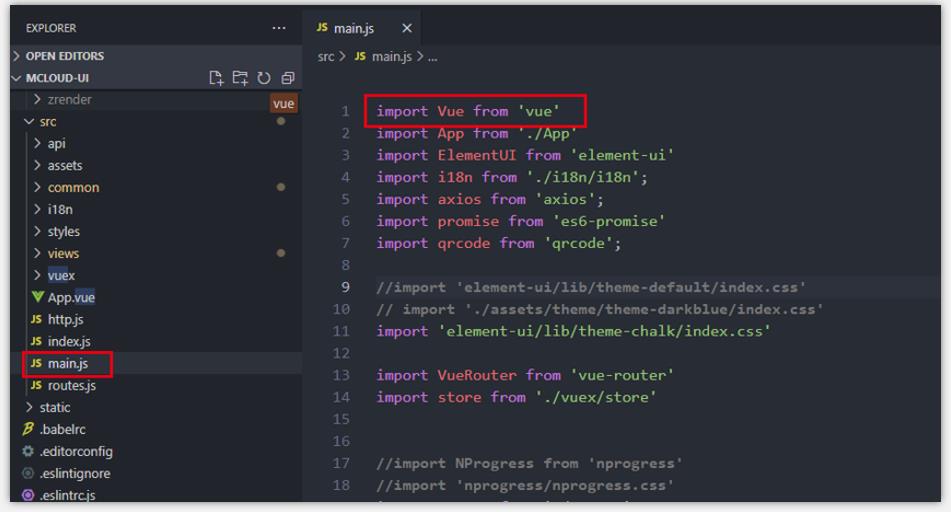
3.1 import 引用了哪个版本vue?
- 主要看 node_modules 中依赖包的package.json 文件。
- 可以看到 main 和 module 配置内容,都是不带 compiler 的版本vue文件。
- 符合 CommonJS 规范的话,使用 main 作为引入主文件,符合 ES 规范的话,使用 module 作为主文件
3.2 对 dist 文件进行认证
- 在上面的内容中,我们知道 es module 项目中 import Vue from ‘vue’,引入的是dist/vue.runtime.common.js
- 而 dist/ue.runtime.common.js 中,如果是开发环境用 dist/vue.runtime.common.dev.js,如果是生产环境用 dist/vue.runtime.common.prod.js
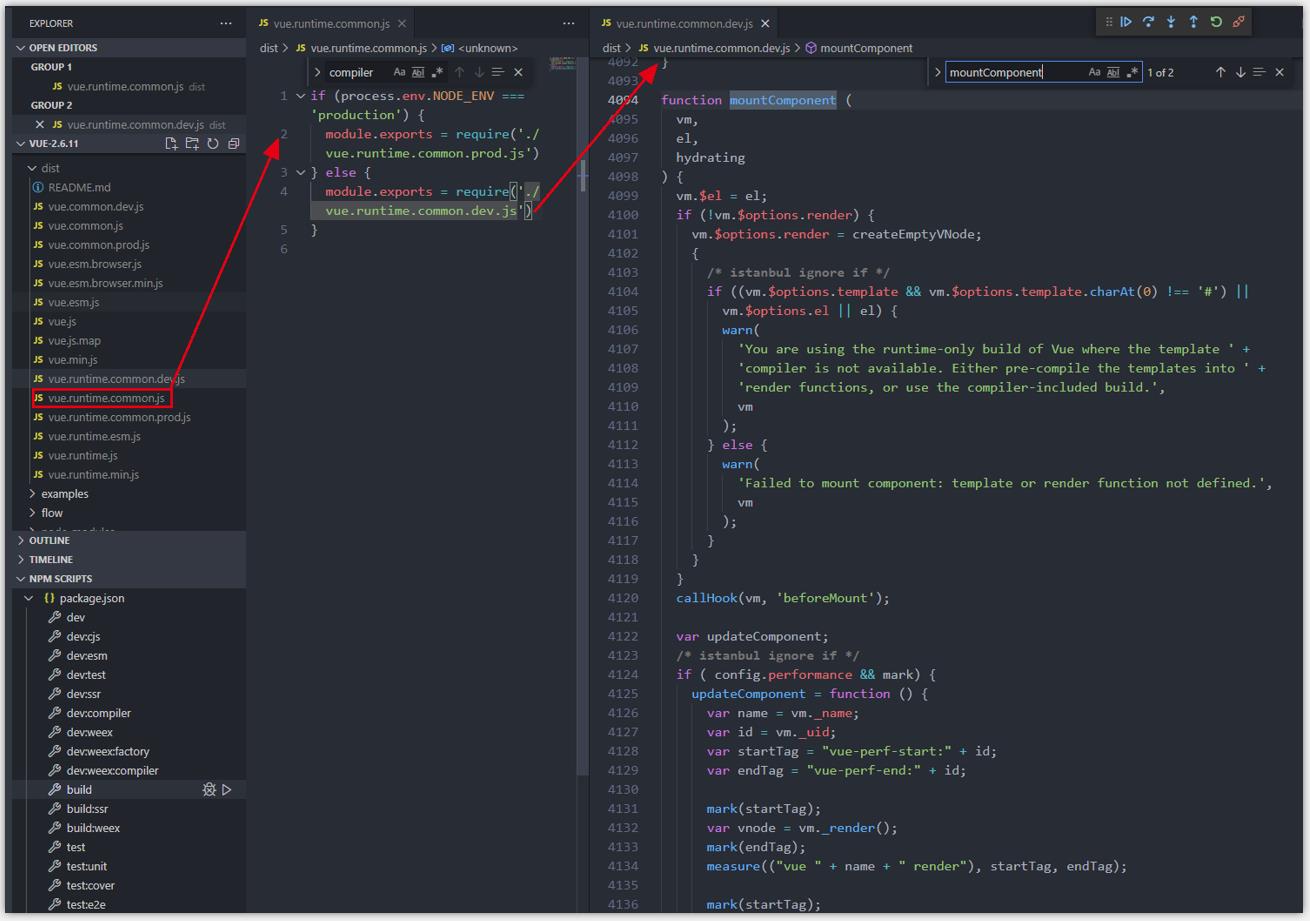
- 在 dist/vue.runtime.common.dev.js 文件中搜索 mountComponent 方法,可以看到对应的warn
function mountComponent (
  vm,
  el,
  hydrating
)
  vm.$el = el;
  if (!vm.$options.render)
    vm.$options.render = createEmptyVNode;

      /* istanbul ignore if */
      if ((vm.$options.template && vm.$options.template.charAt(0) !== '#') ||
        vm.$options.el || el)

        以上是关于快速了解前端——Vue.js(源码)在JS脚本看Vue构建的主要内容,如果未能解决你的问题,请参考以下文章