ffmpeg 64位编译脚本
Posted
tags:
篇首语:本文由小常识网(cha138.com)小编为大家整理,主要介绍了ffmpeg 64位编译脚本相关的知识,希望对你有一定的参考价值。
参考技术A NDK版本:android-ndk-r14bffmpeg版本:4.2.4 / 4.4
Ubuntu版本:15.5
#!/bin/bash
NDK=/home/linrendi/Desktop/Compile/android-ndk-r14b
PLATFORM=$NDK/platforms/android-21/arch-arm64
TOOLCHAIN=$NDK/toolchains/aarch64-linux-android-4.9/prebuilt/linux-x86_64
PREFIX=/home/linrendi/Desktop/ffmpeg64
CPU=armv8-a
function build_one
./configure \
--prefix=$PREFIX \
--target-os=android \
--disable-doc \
--cross-prefix=$TOOLCHAIN/bin/aarch64-linux-android- \
--arch=arm64 \
--cpu=$CPU \
--disable-asm \
--sysroot=$PLATFORM \
--extra-cflags="-I$PLATFORM/usr/include" \
--cc=$TOOLCHAIN/bin/aarch64-linux-android-gcc \
--nm=$TOOLCHAIN/bin/aarch64-linux-android-nm \
--disable-shared --enable-static \
--enable-small --disable-debug \
--disable-doc --disable-ffmpeg --disable-ffplay --disable-ffprobe --disable-symver \
--enable-neon --enable-pthreads \
--disable-devices --disable-encoders \
--enable-hwaccels --enable-jni --enable-mediacodec \
--enable-encoder=aac \
--enable-decoder=h264_mediacodec \
--enable-hwaccel=h264_mediacodec \
--enable-encoder=mjpeg \
--enable-encoder=ljpeg --enable-encoder=jpeg2000 --enable-encoder=jpegls \
--enable-muxer=mp4 --enable-muxer=mjpeg \
--enable-runtime-cpudetect \
make clean
make -j4
make install
$TOOLCHAIN/bin/aarch64-linux-android-ld \
-rpath-link=$PLATFORM/usr/lib \
-L$PLATFORM/usr/lib \
-L$PREFIX/lib \
-soname libffmpeg.so -shared -nostdlib -Bsymbolic --whole-archive --no-undefined -o \
$PREFIX/libffmpeg.so \
libavcodec/libavcodec.a \
libavfilter/libavfilter.a \
libswresample/libswresample.a \
libavformat/libavformat.a \
libavutil/libavutil.a \
libswscale/libswscale.a \
libavdevice/libavdevice.a \
-lc -lm -lz -ldl -llog --dynamic-linker=/system/bin/linker \
$TOOLCHAIN/lib/gcc/aarch64-linux-android/4.9.x/libgcc.a
build_one
FFmpeg开发实战:FFmpeg 打印日志
在Visual Studio 开发(二):VS 2017配置FFmpeg开发环境 一文中,我们配置好了FFmpeg的开发环境,下面我们开始边实战,边学习FFmpeg。
首先,我们要学习的就是FFmpeg的日志输出系统 。
一、FFmpeg 日志输出系统介绍
FFmpeg 日志输出的核心函数方法为: av_log() 。
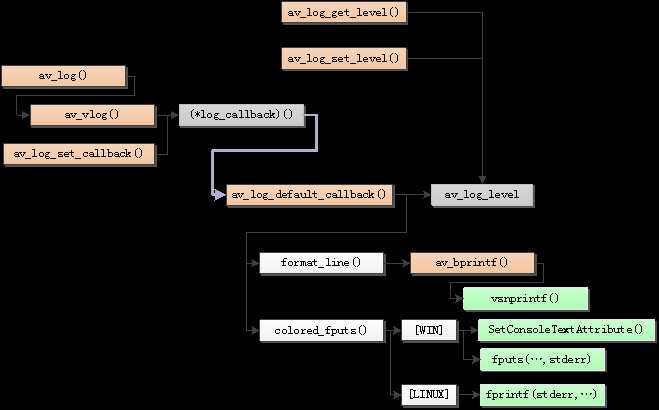
下面是FFmpeg日志输出系统的函数调用结构图:

为什么说av_log()是FFmpeg中输出日志的核心函数函数?
因为我们随便打开一个FFmpeg的源代码文件,就会发现其中遍布着av_log()函数。一般情况下FFmpeg类库的源代码不允许使用printf()这种函数,所有的输出一律使用的av_log()。
二、av_log() 函数说明
av_log()的声明位于libavutillog.h,具体的声明代码如下:
/**
 * Send the specified message to the log if the level is less than or equal
 * to the current av_log_level. By default, all logging messages are sent to
 * stderr. This behavior can be altered by setting a different logging callback
 * function.
 * @see av_log_set_callback
 *
 * @param avcl A pointer to an arbitrary struct of which the first field is a
 *        pointer to an AVClass struct.
 * @param level The importance level of the message expressed using a @ref
 *        lavu_log_constants "Logging Constant".
 * @param fmt The format string (printf-compatible) that specifies how
 *        subsequent arguments are converted to output.
 */
void av_log(void *avcl, int level, const char *fmt, ...) av_printf_format(3, 4);
其中第一个参数指定该log所属的结构体,例如AVFormatContext、AVCodecContext等等。第二个参数指定log的级别,第三个参数为要输出的内容,源代码中定义了如下几个级别:
/**
 * Print no output.
 */
#define AV_LOG_QUIET    -8

/**
 * Something went really wrong and we will crash now.
 */
#define AV_LOG_PANIC     0

/**
 * Something went wrong and recovery is not possible.
 * For example, no header was found for a format which depends
 * on headers or an illegal combination of parameters is used.
 */
#define AV_LOG_FATAL     8

/**
 * Something went wrong and cannot losslessly be recovered.
 * However, not all future data is affected.
 */
#define AV_LOG_ERROR    16

/**
 * Something somehow does not look correct. This may or may not
 * lead to problems. An example would be the use of ‘-vstrict -2‘.
 */
#define AV_LOG_WARNING  24

/**
 * Standard information.
 */
#define AV_LOG_INFO     32

/**
 * Detailed information.
 */
#define AV_LOG_VERBOSE  40

/**
 * Stuff which is only useful for libav* developers.
 */
#define AV_LOG_DEBUG    48
从定义中可以看出来,av_log()的日志级别分别是:
AV_LOG_PANIC,AV_LOG_FATAL,AV_LOG_ERROR,AV_LOG_WARNING,AV_LOG_INFO,AV_LOG_VERBOSE,AV_LOG_DEBUG。
每个级别定义的数值代表了严重程度,数值越小代表越严重。
默认av_log()输出的级别是AV_LOG_INFO。
三、设置日志输出等级
在上面,我们讲到av_log()函数是可以设置日志的内容的等级的。而对于输出的日志内容,我们也是可以设置等级的。FFmpeg提供了av_log_set_level()用于设置当前Log的级别。
函数声明如下:
/**
 * Set the log level
 *
 * @see lavu_log_constants
 *
 * @param level Logging level
 */
void av_log_set_level(int level);
查看函数代码实现:
static int av_log_level = AV_LOG_INFO;
可以看出,设置日志输出等级主要是操作静态全局变量av_log_level。该变量用于存储当前系统Log的级别。
四、日志输出实战
通过下面的代码,我们就可以理解上面讲的日志输出及设置日志输出等级的逻辑了。
#include "pch.h"
#include <iostream>

extern "C"{
#include "libavutil/log.h"
}

int main(int argc, char* argv[]) {
    av_log_set_level(AV_LOG_ERROR);
    av_log(NULL, AV_LOG_INFO, "Hello World
");
    return 0;
}
五、自定义FFmpeg日志输出
从文章开头的函数调用图可以看到,av_log()调用了av_vlog(),av_log()调用了一个函数指针av_log_callback。av_log_callback是一个全局静态变量,定义如下所示:
static void (*av_log_callback)(void*, int, const char*, va_list) = av_log_default_callback;
从代码中可以看出,av_log_callback指针默认指向一个函数av_log_default_callback()。av_log_default_callback()即FFmpeg默认的Log函数。
需要注意的是,这个Log函数是可以自定义的。按照指定的参数定义一个自定义的函数后,可以通过FFmpeg的另一个API函数av_log_set_callback()设定为Log函数。
查看源码,可以看到 av_log_set_callback() 的声明如下:
/**
 * Set the logging callback
 *
 * @note The callback must be thread safe, even if the application does not use
 *       threads itself as some codecs are multithreaded.
 *
 * @see av_log_default_callback
 *
 * @param callback A logging function with a compatible signature.
 */
void av_log_set_callback(void (*callback)(void*, int, const char*, va_list));
从声明中可以看出,需要指定一个参数为(void*, int, const char*, va_list),返回值为void的函数作为Log函数。
查看av_log_set_callback() 源码,可以看到此方法只是做了一个函数指针赋值的工作,代码如下:
void av_log_set_callback(void (*callback)(void*, int, const char*, va_list)) {
    av_log_callback = callback;
}
这样我们可以自定义一个my_logoutput()函数作为Log的输出函数:
void my_logoutput(void* ptr, int level, const char* fmt,va_list vl){
    ****(省略....)
}
编辑好函数之后,使用av_log_set_callback()函数设置该函数为Log输出函数即可。
av_log_set_callback(my_logoutput);
下面是自定义日志输出的实例源码:
#include "pch.h"
#include <iostream>

extern "C"{
#include "libavutil/log.h"
}

void my_logoutput(void* ptr, int level, const char* fmt, va_list vl) {
    printf("Hello Log Output! Content = %s", fmt);
}

int main(int argc, char* argv[]) {
    av_log_set_callback(my_logoutput);  // 设置自定义的日志输出方法
    av_log(NULL, AV_LOG_INFO, "Hello World
");
    return 0;
}
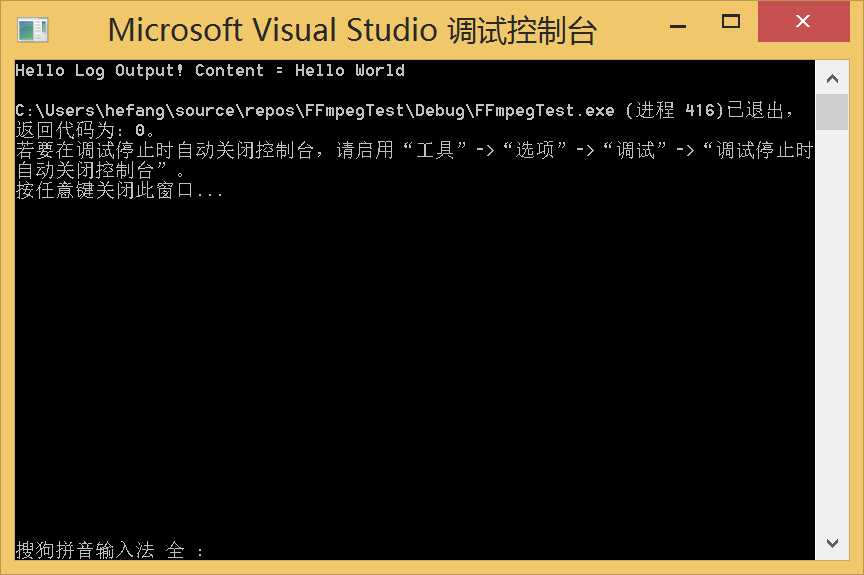
输出如下:

以上是关于ffmpeg 64位编译脚本的主要内容,如果未能解决你的问题,请参考以下文章