人工智能--自动编码器
Posted Abro.
tags:
篇首语:本文由小常识网(cha138.com)小编为大家整理,主要介绍了人工智能--自动编码器相关的知识,希望对你有一定的参考价值。
学习目标:
- 理解自动编码器的基本原理。
- 掌握利用自动编码器进行图像去燥的方法。
学习内容:
- 对cifar10数据库,变为黑白图像,划分训练集和测试集,加上噪音。构造自动编解码器,用加上噪音的训练集和原图进行训练,然后用等于加上噪音的测试集去噪。
学习过程:
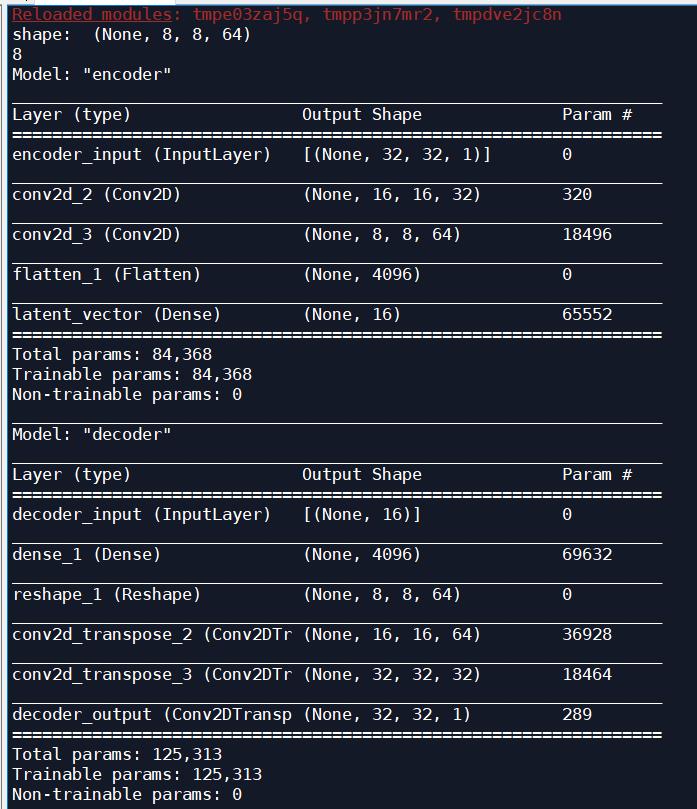
模型各层的输出大小:

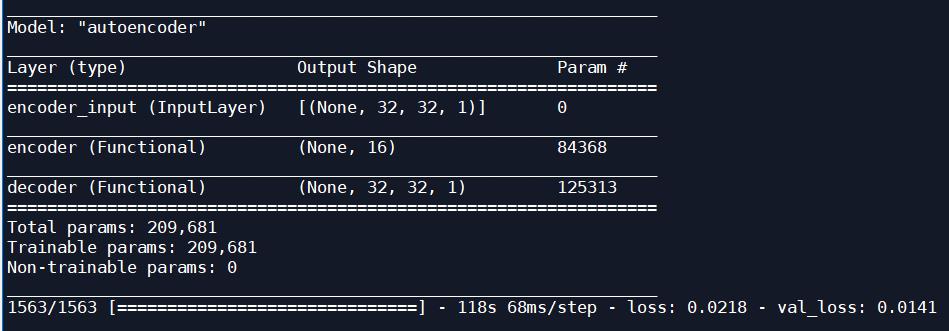
自动解码模型的输出大小:

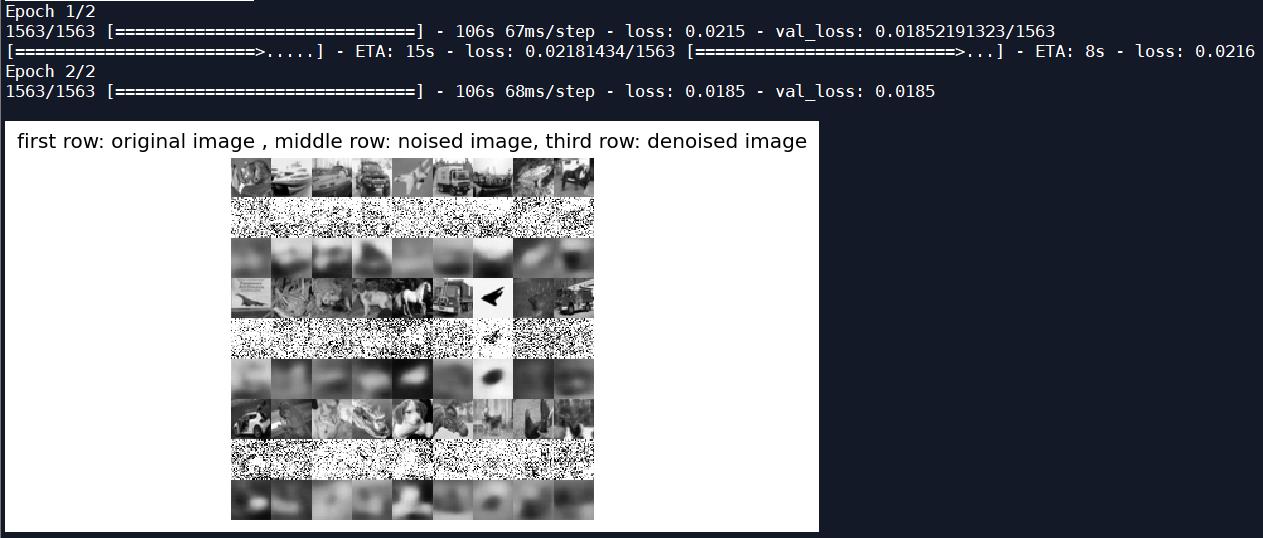
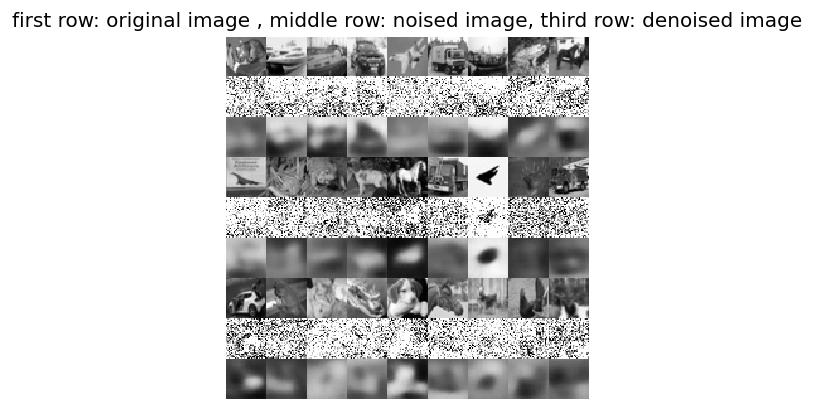
一次迭代后的测试图片:

测试图片输出时变得更加模糊了;


可以看出去噪后的图片比去噪前的图片更加难以辨认了;
源码:
# In[0]: 读取数据
from keras.layers import Dense, Input
from keras.layers import Conv2D, Flatten
from keras.layers import Reshape, Conv2DTranspose
from keras.models import Model
from keras.datasets import cifar10
from keras import backend as K

import numpy as np
import matplotlib.pyplot as plt

#加载手写数字图片数据
(x_train, _), (x_test, _) = cifar10.load_data()
image_size = x_train.shape[1]

#把彩色图转化为灰度图,如果当前像素点为[r,g,b],那么对应的灰度点为0.299*r+0.587*g+0.114*b
def rgb2gray(rgb):
  return np.dot(rgb[...,:3], [0.299, 0.587, 0.114])

x_train = rgb2gray(x_train)
x_test = rgb2gray(x_test)

#把图片大小统一转换成28*28,并把像素点值都转换为[0,1]之间
x_train = np.reshape(x_train, [-1, image_size, image_size, 1])
x_test = np.reshape(x_test, [-1, image_size, image_size, 1])
x_train = x_train.astype('float32') / 255
x_test = x_test.astype('float32') / 255


# In[1]: 构造编码网络

input_shape = (image_size, image_size, 1)
batch_size = 32
#对图片做3*3分割
kernel_size = 3
#让编码器将输入图片编码成含有16个元素的向量
latent_dim = 16
inputs = Input(shape=input_shape, name='encoder_input')
x = inputs
'''
编码器含有两个卷积层,卷积核的大小为3*3
第一个卷积层有32个输出通道,第二个卷积层有64个输出通道
'''
layer_filters = [32, 64]
#stride=2表明每次挪到2个像素,如此一来做一次卷积运算后输出大小会减半
x = Conv2D(filters = layer_filters[0], kernel_size = kernel_size, activation='relu',
            strides = 2, padding = 'same')(x)
x = Conv2D(filters = layer_filters[1], kernel_size = kernel_size, activation='relu',
            strides = 2, padding = 'same')(x)

shape = K.int_shape(x)
print('shape: ', shape)
print(shape[1])
x = Flatten()(x)
#最后一层全连接网络输出含有16个元素的向量
latent = Dense(latent_dim, name = 'latent_vector')(x)
encoder = Model(inputs, latent, name='encoder')
encoder.summary()


# In[2]:构造解码器,解码器的输入正好是编码器的输出结果

latent_inputs = Input(shape = (latent_dim, ), name = 'decoder_input')
'''
它的结构正好和编码器相反,它先是一个全连接层,然后是两层反卷积网络
'''
x = Dense(shape[1] * shape[2] * shape[3])(latent_inputs)
x = Reshape((shape[1], shape[2], shape[3]))(x)

#两层与编码器对应的反卷积网络
x = Conv2DTranspose(filters = layer_filters[1], kernel_size = kernel_size,
                    activation='relu', strides = 2, padding = 'same')(x)
x = Conv2DTranspose(filters = layer_filters[0], kernel_size = kernel_size,
                    activation='relu', strides = 2, padding = 'same')(x)

outputs = Conv2DTranspose(filters = 1, kernel_size = kernel_size,
                          activation = 'sigmoid',
                          padding = 'same',
                          name = 'decoder_output')(x)
decoder = Model(latent_inputs, outputs, name = 'decoder')
decoder.summary()

# In[3]: 联合上述的编码器和解码器,构造自动编解码器

autoencoder = Model(inputs, decoder(encoder(inputs)), name = 'autoencoder')
autoencoder.summary()

'''
网络训练时,我们采用最小和方差,也就是我们希望解码器输出的图片与输入编码器的图片,在像素上的差异
尽可能的小
'''
autoencoder.compile(loss='mse', optimizer='adam')
autoencoder.fit(x_train, x_train, validation_data=(x_test, x_test),
               epochs = 1,
               batch_size = batch_size)

'''
x_test是输入编码器的测试图片,我们看看解码器输出的图片与输入时是否差别不大
'''
x_decoded = autoencoder.predict(x_test)
#把测试图片集中的前8张显示出来,看看解码器生成的图片是否与原图片足够相似
imgs = np.concatenate([x_test[:8], x_decoded[: 8]])
imgs = imgs.reshape((4, 4, image_size, image_size))
imgs = np.vstack([np.hstack(i) for i in imgs])
plt.figure()
plt.axis('off')
plt.title('Input: 1st 2 rows, Decoded: last 2 rows')
plt.imshow(imgs, interpolation='none', cmap='gray')
plt.show()

# In[4]: 为图像像素点增加高斯噪音

noise = np.random.normal(loc=0.5, scale = 0.5, size = x_train.shape)
x_train_noisy = x_train + noise
noise = np.random.normal(loc=0.5, scale = 0.5, size = x_test.shape)
x_test_noisy = x_test + noise
#添加噪音值后,像素点值可能会超过1或小于0,我们把这些值调整到[0,1]之间
x_train_noisy = np.clip(x_train_noisy, 0., 1.)
x_test_noisy = np.clip(x_test_noisy, 0., 1.)

# In[5]: 利用自动编解码器进行图像去噪

autoencoder = Model(inputs, decoder(encoder(inputs)), name = 'autoencoder')
autoencoder.compile(loss='mse', optimizer='adam')
autoencoder.fit(x_train_noisy, x_train, validation_data = (x_test_noisy, x_test),
                                                          epochs = 2, # 迭代两次
                                                          batch_size = batch_size)

# In[6]: 获取去噪后的图片

x_decode = autoencoder.predict(x_test_noisy)
'''
将去噪前和去噪后的图片显示出来,第一行是原图片,第二行时增加噪音后的图片,
第三行时去除噪音后的图片
'''
rows , cols = 3, 9
num = rows * cols
imgs = np.concatenate([x_test[:num], x_test_noisy[:num], x_decode[:num]])
imgs = imgs.reshape((rows * 3, cols, image_size, image_size))
imgs = np.vstack(np.split(imgs, rows, axis = 1))
imgs = imgs.reshape((rows * 3, -1, image_size, image_size))
imgs = np.vstack([np.hstack(i) for i in imgs])
imgs = (imgs * 255).astype(np.uint8)
plt.figure(dpi=120)
plt.axis('off')
plt.title('first row: original image , middle row: noised image, third row: denoised image')
plt.imshow(imgs, interpolation='none', cmap='gray')
plt.show()
学习产出:
- 图片去噪后的效果变差了。
以上是关于人工智能--自动编码器的主要内容,如果未能解决你的问题,请参考以下文章