spring4框架中如何实现servlet功能
Posted
tags:
篇首语:本文由小常识网(cha138.com)小编为大家整理,主要介绍了spring4框架中如何实现servlet功能相关的知识,希望对你有一定的参考价值。
Spring管理filter和servlet在使用spring容器的web应用中,业务对象间的依赖关系都可以用context.xml文件来配置,并且由spring容器来负责依赖对象 的创建。如果要在filter或者servlet中使用spring容器管理业务对象,通常需要使用
WebApplicationContextUtils.getRequiredWebApplicationContext(getServletContext())来获得WebApplicationContext,然后调用WebApplicationContext.getBean("beanName")来获得对象的引用,这实际上是使用了依赖查找来获得对象,并且在filter或者servlet代码中硬编码了应用对象的bean名字。为了能在filter或者servlet中感知spring中bean,可采用如下步骤来实现:
1- 将filter或者servlet作为bean定义在context.xml文件中,和要应用的bean定义放在一起;
2- 实现一个filter代理或者servlet代理,该代理用WebApplicationContext来获得在context.xml中定义的filter或者servlet的对象,并将任务委托给context.xml中定义的filter或者servlet
3- 在web.xml中用ContextLoaderListener来初始化spring 的context,同时在filter代理或者servlet代理的定义中用初始化参数来定义context.xml中filter或者servlet的bean名字(或者直接受用代理的名称获得相应的filter或者servlet的名称)。
4- 在web.xml中定义filter代理或者servlet代理的mapping.
利用这种方式就将filter或者servlet和业务对象的依赖关系用spring 来进行管理,并且不用在servlet中硬编码要引用的对象名字。
具体实例如下:
Filter
1. 在applicationContext.xml中定义filter
<bean id="springFilter" class="com.netqin.filter.SpringFilter">
<property name="name">
<value>SpringFilter</value>
</property>
</bean>
说明:com.netqin.filter.SpringFilter为实现了javax.servlet.Filter接口的filter
2. 实现filter代理
实际上,filter代理不需要我们自己来实现,Spring提供了两种现成的filter代理
org.springframework.security.util.FilterToBeanProxy,
org.springframework.web.filter.DelegatingFilterProxy,两者只是在web.xml中的配置上略有不同,下面就让我们一起看看如何在web.xml中进行配置。
3. 配置web.xml
Ø 初始化spring的context
因为是使用spring来管理,所以在使用filter前先要初始化spring的context,一般来说配置如下:
<context-param>
<param-name>contextConfigLocation</param-name>
<param-value>
/WEB-INF/applicationContext.xml
</param-value>
</context-param>
<listener>
<listener-class>
org.springframework.web.context.ContextLoaderListener
</listener-class>
</listener>
Ø Filter配置:
² FilterToBeanProxy
<filter>
<filter-name> springFilter </filter-name>
<filter-class>
org.springframework.security.util.FilterToBeanProxy
</filter-class>
<init-param>
<param-name>targetBean</param-name>
<param-value>springFilter</param-value>
</init-param>
</filter>
说明:需要为FilterToBeanProxy提供上下文参数,这里我们配置的是targetBean属性,它告诉spring在context中查找的bean名称,所以当请求被过滤器拦截后FilterToBeanProxy会在applicationContext.xml中会查找id为springFilter的bean.
我们也可以配置targetClass属性,意思就是查找该类型的bean.
² DelegatingFilterProxy
<filter>
<filter-name>springFilter</filter-name>
<filter-class>
org.springframework.web.filter.DelegatingFilterProxy
</filter-class>
</filter>
说明:使用DelegatingFilterProxy时不需要配置任何参数,spring会根据filter-name的名字来查找bean,所以这里spring会查找id为springFilter的bean.
4. 配置filter的mapping
<filter-mapping>
<filter-name>springFilter</filter-name>
<url-pattern>/*</url-pattern>
</filter-mapping>
OK!filter配置完成。推荐使用DelegatingFilterProxy,应为配置上更简单。
Servlet
Servlet的配置与Filter的配置十分相似
1. 在applicationContext.xml中定义servlet
<bean id="springServlet" class="com.netqin.servlet.SpringServlet">
<property name="name">
<value>SpringServlet</value>
</property>
</bean>
说明:com.netqin.servlet.SpringServlet继承自
javax.servlet.http.HttpServlet
2. 实现servlet代理
与filter不同,spring没有为servlet提供代理实现,需要我们自己来创建,不过放心,创建一个servlet代理十分简单,一个具体的实现如下:
import java.io.IOException;
import javax.servlet.GenericServlet;
import javax.servlet.Servlet;
import javax.servlet.ServletException;
import javax.servlet.ServletRequest;
import javax.servlet.ServletResponse;
import org.springframework.web.context.WebApplicationContext;
import org.springframework.web.context.support.WebApplicationContextUtils;
public class ServletToBeanProxy extends GenericServlet
private String targetBean;
private Servlet proxy;
public void init() throws ServletException
this.targetBean = getInitParameter("targetBean");
getServletBean();
proxy.init(getServletConfig());
public void service(ServletRequest req, ServletResponse res)
throws ServletException, IOException
proxy.service(req, res);
private void getServletBean()
WebApplicationContext wac = WebApplicationContextUtils
.getRequiredWebApplicationContext(getServletContext());
this.proxy = (Servlet) wac.getBean(targetBean);
参考技术A Servlet是响应客户端请求的技术。就是一个运行在Web服务器上的,由服务器实例化,并根据客户端发送过来的请求,调用其中相应方法的一个类。
q理解HTTP Servlet 基础知识
q使用 Servlet API
q理解Servlet 的生命周期
q使用JBuilder2005演示Servlet
本章很重要,首先要理解servlet的作用,就是用来响应客户端的请求的;然后理解servlet的运行机制,就是什么时候响应客户端请求,由服务器调用什么方法来处理客户端请求;再具体的看每个方法,这时看到方法中出现的一些类,再来理解这些类使用来实现什么功能的。(理解思路)
知识点:
1、生命周期(本节了解servlet何时被调用何方法来处理客户端请求,注意理解每个方法的作用和调用时间。)
生命周期: (重点)
实例化—————————〉初始化——〉服务——〉破坏——〉不可用
| | | |
| | | |
容器创建servlet实例 init() service() destroy()
2、在HttpServlet类中,doGet()和doPost()分别被用来对客户端get请求和post请求来做处理。
3、servlet 应用程序体系结构
在理解了servlet的各个方法是何时被调用之后,再来看每个方法中使用到的这些类是做什么用的,这样再来决定什么时候来使用这些类。
整个servlet的应用程序中,所有的类构成了servlet-API
ServletInputStream类
该类创建的对象用于从客户端请求中读取二进制数据。(用途决定了什么时候使用该类。如果现在要我们从客户端的请求中读取数据,则要考虑到使用该类)
ServletOutputStream类
该类用于将二进制数据传送给客户端。其类中有print(),println()方法可以用来往客户端输出。
ServletRequest接口
该接口对象用于接受客户端请求信息。它的子接口HttpServletRequest用作于doGet()方法的参数,用来接受Servlet容器传递过来的客户端请求。也就是说,Servlet容器,将客户端请求封装成一个HttpServletRequest类型对象,并传递给doGet()方法。由 该方法中HttpServletRequest刑参接受。
ServletResponse接口,
该接口用于接受向客户端发送的响应。它的子接口HttpServletResponse用于doGet()方法的参数,用于接受Servelt容器传递过来的对客户端的响应。也就是说,Servlet容器,创建了HttpServletReponse类型的对象,用于表示对客户端的响应,并传递给doGet()方法。那么我们在doGet()方法中可以通过设置该对象来设置对客户端的响应。
HttpServletRequest接口(重点)
HttpServletResponse接口(重点)
ServletConfig接口
该接口对象是用于传递Servlet的配置信息的。我们在web.xml中配置了关于Servlet的配置信息,而该Servlet被实例化的时候,Servlet容器从web.xml中提取出有关Servlet的初始化信息并且封装成为一个ServletConfig类型的对象,传递给init()方法。(那我们就可以在init()方法中,通过该对象获取Servlet的初始化信息了。)
ServletContext接口(重点)
该接口用于创建一个生存周期为整个应用程序的对象,并用它来存储一些整个应用程序中要使用的变量。
对于每个应用程序Servlet容器将会创建出一个ServletContext类型的对象,并一直存在知道应用程序不再发布在服务器上。那么我们就可以使用该对象来保存一些变量,这些变量在整个应用程序生命周期内都存在。
注意,当有变量要存储于某个范围内时,注意区别、联系、比较该对象与针对于每个客户端创建的HttpSession对象(session);针对于每请求创建的HttpRequestServlet对象;针对于每个页面创建的PageContext对象(page)追问
关键是在Spring4中能用servlet吗?用什么来实现servlet的功能啊?
我在Spring4中用servlet报错啊!
第1步:在web.xml中注册Spring的监听器
<!-- Spring -->
<context-param>
<param-name>contextConfigLocation</param-name>
<param-value>/WEB-INF/classes/applicationContext.xml</param-value>
</context-param>
<listener>
<listener-class>
org.springframework.web.context.ContextLoaderListener
</listener-class>
</listener>
第2步:编写一个管理Servlet的类
这个类主要是将Servlet和Spring中的Bean结合起来,方便Spring对Servlet进行管理,起到一个中转的作用
package com.xwl.estore.servlet;
import java.io.IOException;
import javax.servlet.GenericServlet;
import javax.servlet.Servlet;
import javax.servlet.ServletException;
import javax.servlet.ServletRequest;
import javax.servlet.ServletResponse;
import org.springframework.web.context.WebApplicationContext;
import org.springframework.web.context.support.WebApplicationContextUtils;
/**
* 将Servlet转为Spring管理的Servlet Bean
*/
public class ServletToBeanProxy extends GenericServlet
// 当前客户端请求的Servlet名字
private String targetBean;
// 代理Servlet
private Servlet proxy;
@Override
public void init() throws ServletException
super.init();
// 初始化Spring容器
WebApplicationContext wac = WebApplicationContextUtils.getRequiredWebApplicationContext(getServletContext());
// 获取Servlet名
this.targetBean = getServletName();
// 调用ServletBean
this.proxy = (Servlet) wac.getBean(targetBean);
// 调用初始化方法将ServletConfig传给Bean
proxy.init(getServletConfig());
@Override
public void service(ServletRequest request, ServletResponse response) throws ServletException, IOException
// 在service方法中调用bean的service方法,servlet会根据客户的请求去调用相应的请求方法(Get/Post)
proxy.service(request, response);
第3步:在web.xml中注册Servlet
<servlet-name>的名字必须是Spring容器中ServletBean的id
<servlet-class>必须是上面写的代理类的全路径com.xwl.estore.servlet.ServletToBeanProxy
<!-- Spring -->
<context-param>
<param-name>contextConfigLocation</param-name>
<param-value>/WEB-INF/classes/applicationContext.xml</param-value>
</context-param>
<listener>
<listener-class>
org.springframework.web.context.ContextLoaderListener
</listener-class>
</listener>
<!-- Servlet -->
<servlet>
<servlet-name>helloServlet</servlet-name>
<servlet-class>com.xwl.estore.servlet.ServletToBeanProxy</servlet-class>
</servlet>
<servlet-mapping>
<servlet-name>helloServlet</servlet-name>
<url-pattern>/HelloServlet</url-pattern>
第4步:编写ServletBean
package com.xwl.estore.servlet;
import java.io.IOException;
import java.io.PrintWriter;
import javax.annotation.Resource;
import javax.servlet.ServletException;
import javax.servlet.http.HttpServlet;
import javax.servlet.http.HttpServletRequest;
import javax.servlet.http.HttpServletResponse;
import org.springframework.context.annotation.Scope;
import org.springframework.stereotype.Controller;
import com.xwl.estore.service.UserService;
@Controller
@Scope("prototype")
public class HelloServlet extends HttpServlet
private UserService userService;
@Resource
public void setUserService(UserService userService)
this.userService = userService;
public void doGet(HttpServletRequest request, HttpServletResponse response)
throws ServletException, IOException
PrintWriter out = response.getWriter();
out.println(userService.sayHello("Hello,Spring.Servlet"));
public void doPost(HttpServletRequest request, HttpServletResponse response)
throws ServletException, IOException
PrintWriter out = response.getWriter();
out.println(userService.sayHello("Hello,Spring.Servlet"));
第5步:编写Spring配置文件(applicationContext.xml)
<?xml version="1.0" encoding="UTF-8"?>
<beans xmlns="http://www.springframework.org/schema/beans"
xmlns:xsi="http://www.w3.org/2001/XMLSchema-instance" xmlns:p="http://www.springframework.org/schema/p"
xmlns:aop="http://www.springframework.org/schema/aop" xmlns:context="http://www.springframework.org/schema/context"
xmlns:tx="http://www.springframework.org/schema/tx"
xsi:schemaLocation="
http://www.springframework.org/schema/beans
http://www.springframework.org/schema/beans/spring-beans-2.5.xsd
http://www.springframework.org/schema/context
http://www.springframework.org/schema/context/spring-context-2.5.xsd
http://www.springframework.org/schema/tx
http://www.springframework.org/schema/tx/spring-tx-2.5.xsd
http://www.springframework.org/schema/aop
http://www.springframework.org/schema/aop/spring-aop-2.5.xsd">
<context:annotation-config></context:annotation-config>
<context:component-scan base-package="com.xwl.estore"></context:component-scan>
</beans>
第6步:进行测试
package com.xwl.estore.service;
public interface UserService
public String sayHello(String hello);
package com.xwl.estore.service.impl;
import org.springframework.stereotype.Service;
import com.xwl.estore.service.UserService;
@Service
public class UserServiceImpl implements UserService
public String sayHello(String hello)
return hello;
参考技术C spring mvc中的controller就是类似与servlet的功能。
如果你要在controller方法中添加参数HttpServletRequest或HttpServletResponse spring会自动注入这两个对象的实例,也就是servlet中的request和response对象。
JavaWeb_(Spring框架)用户登陆Spring整合到Servlet中
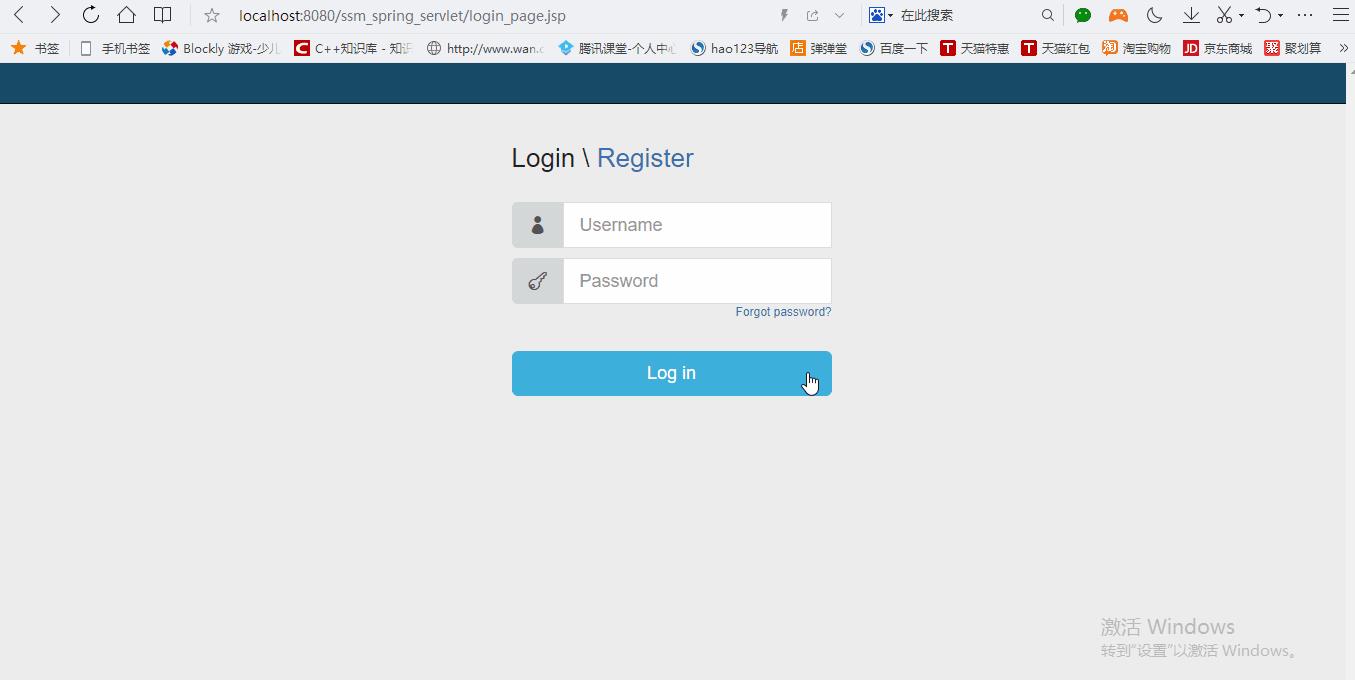
一、使用servlet技术开发用户登陆功能
在MySQL中准备一个user表,表中增加一条假数据

使用Servlet实现用户登陆的功能

用户登陆的<from>表单
  <form id="loginFrom" action="${pageContext.request.contextPath }/userLogin" method="post">
                    <div class="input-group input-group-lg sepH_a">
                        <span class="input-group-addon"><span class="icon_profile"></span></span>
                        <input type="text" class="form-control" placeholder="Username" name="username">
                    </div>
                    <div class="input-group input-group-lg">
                        <span class="input-group-addon"><span class="icon_key_alt"></span></span>
                        <input type="password" class="form-control" placeholder="Password" name="password">
                    </div>

                    <div>
                        <a id="errorMsg" href="javascript:void(0)" style="color: red">${errorMsg}</a>
                    </div>

                    <div class="sepH_c text-right">
                        <a href="javascript:void(0)" class="small">Forgot password?</a>
                    </div>
                    <div class="form-group sepH_c">
                        <a href="javascript:doucment:loginFrom.submit()" class="btn btn-lg btn-primary btn-block">Log in</a>
                    </div>
  </form>


<%@ page language="java" contentType="text/html; charset=UTF-8"
    pageEncoding="UTF-8"%>
<!DOCTYPE html PUBLIC "-//W3C//DTD HTML 4.01 Transitional//EN" "http://www.w3.org/TR/html4/loose.dtd">
<html>
    <head>
        <meta charset="UTF-8">
        <title>登录/注册</title>
        <meta name="viewport" content="initial-scale=1.0,maximum-scale=1.0,user-scalable=no">
        <meta http-equiv="X-UA-Compatible" content="IE=edge">

        <!-- bootstrap framework -->
        <link href="${pageContext.request.contextPath }/css/bootstrap.min.css" rel="stylesheet" media="screen">
        <!-- elegant icons -->
        <link href="${pageContext.request.contextPath }/css/style.css" rel="stylesheet" media="screen">
        <!-- main stylesheet -->
        <link href="${pageContext.request.contextPath }/css/main.min.css" rel="stylesheet" media="screen">

        <!-- jQuery -->
        <script src="${pageContext.request.contextPath }/js/jquery.min.js"></script>

    </head>
    <body class="login_page">
        <div class="login_header">
        </div>
        <div class="login_register_form">
            <div class="form_wrapper animated-short" id="login_form">
                <h3 class="sepH_c"><span>Login</span> \\ <a href="javascript:void(0)" class="form-switch" data-switch-form="register_form">Register</a></h3>
                <form id="loginFrom" action="${pageContext.request.contextPath }/userLogin" method="post">
                    <div class="input-group input-group-lg sepH_a">
                        <span class="input-group-addon"><span class="icon_profile"></span></span>
                        <input type="text" class="form-control" placeholder="Username" name="username">
                    </div>
                    <div class="input-group input-group-lg">
                        <span class="input-group-addon"><span class="icon_key_alt"></span></span>
                        <input type="password" class="form-control" placeholder="Password" name="password">
                    </div>

                    <div>
                        <a id="errorMsg" href="javascript:void(0)" style="color: red">${errorMsg}</a>
                    </div>

                    <div class="sepH_c text-right">
                        <a href="javascript:void(0)" class="small">Forgot password?</a>
                    </div>
                    <div class="form-group sepH_c">
                        <a href="javascript:doucment:loginFrom.submit()" class="btn btn-lg btn-primary btn-block">Log in</a>
                    </div>
                </form>
            </div>
            <div class="form_wrapper animated-short" id="register_form" style="display:none">
                <h3 class="sepH_c"><span>Register</span> \\ <a href="javascript:void(0)" class="form-switch" data-switch-form="login_form">Login</a></h3>
                <form name = "registerForm" action="${pageContext.request.contextPath}/userRegister" method="post">
                    <div class="input-group input-group-lg sepH_a">
                        <span class="input-group-addon"><span class="icon_profile"></span></span>
                        <input type="text" class="form-control" placeholder="Username" name="username">
                    </div>
                    <div class="input-group input-group-lg sepH_a">
                        <span class="input-group-addon"><span class="icon_key_alt"></span></span>
                        <input type="password" class="form-control" placeholder="Password" name="password">
                    </div>
                    <div class="input-group input-group-lg sepH_c">
                        <span class="input-group-addon"><span class="icon_mail_alt"></span></span>
                        <input type="email" class="form-control" placeholder="Email" name="email">
                    </div>
                    <div class="form-group sepH_c">
                        <a href="javascript:doucment:registerForm.submit()" class="btn btn-lg btn-success btn-block">Register</a>
                    </div>
                </form>
            </div>
        </div>

        <script>
            $(function () {
                $(\'.form-switch\').on(\'click\', function (e) {
                    e.preventDefault();

                    var $switchTo = $(this).data(\'switchForm\'),
                        $thisForm = $(this).closest(\'.form_wrapper\');

                    $(\'.form_wrapper\').removeClass(\'fadeInUpBig\');
                    $thisForm.addClass(\'fadeOutDownBig\');

                    setTimeout(function () {
                        $thisForm.removeClass(\'fadeOutDownBig\').hide();
                        $(\'#\' + $switchTo).show().addClass(\'fadeInUpBig\');
                    }, 300);

                });
            });
        </script>
    </body>
</html>

package com.Gary.bean;

public class User {

    private Integer u_id;
    private String u_username;
    private String u_password;


    public Integer getU_id() {
        return u_id;
    }
    public void setU_id(Integer u_id) {
        this.u_id = u_id;
    }
    public String getU_username() {
        return u_username;
    }
    public void setU_username(String u_username) {
        this.u_username = u_username;
    }
    public String getU_password() {
        return u_password;
    }
    public void setU_password(String u_password) {
        this.u_password = u_password;
    }


}

package com.Gary.dao;

import java.beans.PropertyVetoException;
import java.sql.SQLException;

import org.apache.commons.dbutils.QueryRunner;
import org.apache.commons.dbutils.handlers.BeanHandler;

import com.Gary.bean.User;
import com.mchange.v2.c3p0.ComboPooledDataSource;

public class UserDao {

    private static ComboPooledDataSource dataSource;

    static {
        //配置c3p0
        try {
            //使用c3p0链接数据库
            dataSource = new ComboPooledDataSource();
            dataSource.setDriverClass("com.mysql.jdbc.Driver");
            dataSource.setJdbcUrl("jdbc:mysql://localhost:3306/ssm_spring");
            dataSource.setUser("root");
            dataSource.setPassword("123456");
        } catch (PropertyVetoException e) {

            e.printStackTrace();
        }
    }

    //通过数据库获取用户
    public User getUserByInfo(User u) throws SQLException {

        //使用dbutils操作数据库 查询并返回用户对象
        QueryRunner qr = new QueryRunner(dataSource);

        String sql ="select * from user where u_username = ? and u_password = ?";

        return    qr.query(sql, new BeanHandler<User>(User.class),u.getU_username(),u.getU_password());

    }

}

package com.Gary.service;

import java.sql.SQLException;

import com.Gary.bean.User;
import com.Gary.dao.UserDao;

public class UserService{

    private UserDao ud= new UserDao();

    public User getUserByInfo(User u) throws SQLException {

        return ud.getUserByInfo(u);
    }

}

package com.Gary.web;

import java.io.IOException;
import java.sql.SQLException;

import javax.servlet.ServletException;
import javax.servlet.annotation.WebServlet;
import javax.servlet.http.HttpServlet;
import javax.servlet.http.HttpServletRequest;
import javax.servlet.http.HttpServletResponse;
import javax.servlet.http.HttpSession;

import com.Gary.bean.User;
import com.Gary.service.UserService;


@WebServlet("/userLogin")
public class UserLoginServlet extends HttpServlet {
    private static final long serialVersionUID = 1L;

    protected void doGet(HttpServletRequest request, HttpServletResponse response) throws ServletException, IOException {

        //接收表单数据
        String username = request.getParameter("username");
        String password = request.getParameter("password");

        //封装成User对象
        User u = new User();
        u.setU_username(username);
        u.setU_password(password);

        //调用service方法验证
        UserService us = new UserService();
        User loginUser = null;
        try {
            loginUser = us.getUserByInfo(u);
        } catch (SQLException e) {

            e.printStackTrace();
        }

        //根据用户验证结果进行操作
        if(loginUser == null)
        {
            //验证成功登陆,并重定向到index.jsp
            request.setAttribute("errorMsg", "用户名或密码错误");
            request.getRequestDispatcher("/login_page.jsp").forward(request, response);
        }else {
            //验证失败,重定向到login_page.jsp
            HttpSession session = request.getSession();
            session.setAttribute("user", loginUser);
            response.sendRedirect(request.getContextPath()+"/index.jsp");
        }


    }

    public UserLoginServlet() {
        super();

    }


    protected void doPost(HttpServletRequest request, HttpServletResponse response) throws ServletException, IOException {
        doGet(request, response);

    }

}
修改项目
利用Spring改造项目
导入Spring的核心包,并配置Spring随项目启动


package com.Gary.bean;

public class User {

    private Integer u_id;
    private String u_username;
    private String u_password;


    public Integer getU_id() {
        return u_id;
    }
    public void setU_id(Integer u_id) {
        this.u_id = u_id;
    }
    public String getU_username() {
        return u_username;
    }
    public void setU_username(String u_username) {
        this.u_username = u_username;
    }
    public String getU_password() {
        return u_password;
    }
    public void setU_password(String u_password) {
        this.u_password = u_password;
    }


}

package com.Gary.dao;

import java.beans.PropertyVetoException;
import java.sql.SQLException;

import org.apache.commons.dbutils.QueryRunner;
import org.apache.commons.dbutils.handlers.BeanHandler;

import com.Gary.bean.User;
import com.mchange.v2.c3p0.ComboPooledDataSource;

public class UserDao {

    /*
    private static ComboPooledDataSource dataSource;

    static {
        //配置c3p0
        try {
            //使用c3p0链接数据库
            dataSource = new ComboPooledDataSource();
            dataSource.setDriverClass("com.mysql.jdbc.Driver");
            dataSource.setJdbcUrl("jdbc:mysql://localhost:3306/ssm_spring");
            dataSource.setUser("root");
            dataSource.setPassword("123456");
        } catch (PropertyVetoException e) {

            e.printStackTrace();
        }
    }
    */

    private ComboPooledDataSource dataSource;


    public void setDataSource(ComboPooledDataSource dataSource) {
        this.dataSource = dataSource;
    }

    //通过数据库获取用户
    public User getUserByInfo(User u) throws SQLException {

        //使用dbutils操作数据库 查询并返回用户对象
        QueryRunner qr = new QueryRunner(dataSource);

        String sql ="select * from user where u_username = ? and u_password = ?";

        return    qr.query(sql, new BeanHandler<User>(User.class),u.getU_username(),u.getU_password());

    }


}

package com.Gary.service; import java.sql.SQLException; import com.Gary.bean.User; import com.Gary.dao.UserDao; public class UserService{ private UserDao ud= new UserDao(); public以上是关于spring4框架中如何实现servlet功能的主要内容,如果未能解决你的问题,请参考以下文章
