Android中 网络框架Volley的用法
Posted 小威少威
tags:
篇首语:本文由小常识网(cha138.com)小编为大家整理,主要介绍了Android中 网络框架Volley的用法相关的知识,希望对你有一定的参考价值。
Volley是在Google I/O 2013上发布的一框网络通信http模块,新版本的android已经废除了HttpClient的使用,目前主流的android网络通信库有:Async-Http、NoHttp、xUtil等。本文就自己学习了Volley一些相关知识,基于Volley的部分源码分析,简单描述一下Volley的用法,主要从以下几点进行介绍:
- Volley源码浅析
- Volley使用教程
- 总结
1、Volley源码浅析:
首先,我们先看下Volley.java的整个类代码:
package com.android.volley.toolbox;

import android.content.Context;
import android.content.pm.PackageInfo;
import android.content.pm.PackageManager.NameNotFoundException;
import android.net.http.AndroidHttpClient;
import android.os.Build;

import com.android.volley.Network;
import com.android.volley.RequestQueue;

import java.io.File;

public class Volley

    /** Default on-disk cache directory. */
    private static final String DEFAULT_CACHE_DIR = "volley";

    /**
     * Creates a default instance of the worker pool and calls @link RequestQueue#start() on it.
     *
     * @param context A @link Context to use for creating the cache dir.
     * @param stack An @link HttpStack to use for the network, or null for default.
     * @return A started @link RequestQueue instance.
     */
    public static RequestQueue newRequestQueue(Context context, HttpStack stack)
        File cacheDir = new File(context.getCacheDir(), DEFAULT_CACHE_DIR);

        String userAgent = "volley/0";
        try
            String packageName = context.getPackageName();
            PackageInfo info = context.getPackageManager().getPackageInfo(packageName, 0);
            userAgent = packageName + "/" + info.versionCode;
         catch (NameNotFoundException e)


        if (stack == null)
            if (Build.VERSION.SDK_INT >= 9)
                stack = new HurlStack();
             else
                // Prior to Gingerbread, HttpUrlConnection was unreliable.
                // See: http://android-developers.blogspot.com/2011/09/androids-http-clients.html
                stack = new HttpClientStack(AndroidHttpClient.newInstance(userAgent));


        Network network = new BasicNetwork(stack);

        RequestQueue queue = new RequestQueue(new DiskBasedCache(cacheDir), network);
        queue.start();

        return queue;


    /**
     * Creates a default instance of the worker pool and calls @link RequestQueue#start() on it.
     *
     * @param context A @link Context to use for creating the cache dir.
     * @return A started @link RequestQueue instance.
     */
    public static RequestQueue newRequestQueue(Context context)
        return newRequestQueue(context, null);
其实可以发现,整个类并不庞大,不到100行的代码量,当我们使用Volley时,我们调用了newRequestQueue(Context context)这个方法来初始化一个请求队列,该方法在源码中调用的是newRequestQueue(Context context, HttpStack stack)这块主体的代码块。
该方法的前面声明了缓存路径,接下来初始化了HttpStack:
if (Build.VERSION.SDK_INT >= 9)
   stack = new HurlStack();
进入HurlStack中我们看下它主要的方法:
@Override
    public HttpResponse performRequest(Request<?> request, Map<String, String> additionalHeaders)
            throws IOException, AuthFailureError
        String url = request.getUrl();
        HashMap<String, String> map = new HashMap<String, String>();
        map.putAll(request.getHeaders());
        map.putAll(additionalHeaders);
        if (mUrlRewriter != null)
            String rewritten = mUrlRewriter.rewriteUrl(url);
            if (rewritten == null)
                throw new IOException("URL blocked by rewriter: " + url);

            url = rewritten;

        URL parsedUrl = new URL(url);
        HttpURLConnection connection = openConnection(parsedUrl, request);
        for (String headerName : map.keySet())
            connection.addRequestProperty(headerName, map.get(headerName));

        setConnectionParametersForRequest(connection, request);
        // Initialize HttpResponse with data from the HttpURLConnection.
        ProtocolVersion protocolVersion = new ProtocolVersion("HTTP", 1, 1);
        int responseCode = connection.getResponseCode();
        if (responseCode == -1)
            // -1 is returned by getResponseCode() if the response code could not be retrieved.
            // Signal to the caller that something was wrong with the connection.
            throw new IOException("Could not retrieve response code from HttpUrlConnection.");

        StatusLine responseStatus = new BasicStatusLine(protocolVersion,
                connection.getResponseCode(), connection.getResponseMessage());
        BasicHttpResponse response = new BasicHttpResponse(responseStatus);
        response.setEntity(entityFromConnection(connection));
        for (Entry<String, List<String>> header : connection.getHeaderFields().entrySet())
            if (header.getKey() != null)
                Header h = new BasicHeader(header.getKey(), header.getValue().get(0));
                response.addHeader(h);


        return response;
就是涉及跟网络通信交互的方式,基于了HttpURLConnection 的实现。回到Volley类中,接下来就是这几句代码:
RequestQueue queue = new RequestQueue(new DiskBasedCache(cacheDir), network);
queue.start();
return queue;
我们的请求队列就是在这里生成的。这边就涉及到了RequestQueue这个类,我们还是先看下这个类的构造方法吧,下面方法块是最终在类内部调用的最终构造方法:
/**
     * Creates the worker pool. Processing will not begin until @link #start() is called.
     *
     * @param cache A Cache to use for persisting responses to disk
     * @param network A Network interface for performing HTTP requests
     * @param threadPoolSize Number of network dispatcher threads to create
     * @param delivery A ResponseDelivery interface for posting responses and errors
     */
    public RequestQueue(Cache cache, Network network, int threadPoolSize,
            ResponseDelivery delivery)
        mCache = cache;
        mNetwork = network;
        mDispatchers = new NetworkDispatcher[threadPoolSize];
        mDelivery = delivery;
那我们知道了,初始化queue主要跟以下几个对象有关:Cache 、Network 、ResponseDelivery 、NetworkDispatcher、CacheDispatcher
之后便是queue.start()方法:
/**
     * Starts the dispatchers in this queue.
     */
    public void start()
        stop();  // Make sure any currently running dispatchers are stopped.
        // Create the cache dispatcher and start it.
        mCacheDispatcher = new CacheDispatcher(mCacheQueue, mNetworkQueue, mCache, mDelivery);
        mCacheDispatcher.start();

        // Create network dispatchers (and corresponding threads) up to the pool size.
        for (int i = 0; i < mDispatchers.length; i++)
            NetworkDispatcher networkDispatcher = new NetworkDispatcher(mNetworkQueue, mNetwork,
                    mCache, mDelivery);
            mDispatchers[i] = networkDispatcher;
            networkDispatcher.start();
至此,便返回一个请求队列,完成queue的初始化工作。
最后,我们这个队列可以添加request,完成访问网络的工作。我们也还是贴下add方法的源码进行看下先:
/**
     * Adds a Request to the dispatch queue.
     * @param request The request to service
     * @return The passed-in request
     */
    public Request add(Request request)
        // Tag the request as belonging to this queue and add it to the set of current requests.
        request.setRequestQueue(this);
        synchronized (mCurrentRequests)
            mCurrentRequests.add(request);


        // Process requests in the order they are added.
        //设置序列号,按顺序执行请求
        request.setSequence(getSequenceNumber());
        request.addMarker("add-to-queue");

        // If the request is uncacheable, skip the cache queue and go straight to the network.
        if (!request.shouldCache())
            mNetworkQueue.add(request);
            return request;


        // Insert request into stage if there's already a request with the same cache key in flight.
         // 表示这个请求可以去先去缓存中获取数据。
        synchronized (mWaitingRequests)
            String cacheKey = request.getCacheKey();
            if (mWaitingRequests.containsKey(cacheKey))
                // There is already a request in flight. Queue up.
                Queue<Request> stagedRequests = mWaitingRequests.get(cacheKey);
                if (stagedRequests == null)
                    stagedRequests = new LinkedList<Request>();

                stagedRequests.add(request);
                mWaitingRequests.put(cacheKey, stagedRequests);
                if (VolleyLog.DEBUG)
                    VolleyLog.v("Request for cacheKey=%s is in flight, putting on hold.", cacheKey);

             else
                // Insert 'null' queue for this cacheKey, indicating there is now a request in
                // flight.
                mWaitingRequests.put(cacheKey, null);
                mCacheQueue.add(request);

            return request;
当mCacheQueue或者mNetworkQueue的add方法添加请求之后,我们运行的线程就会接收到请求,从而去处理相对应的请求,最后将处理的结果由mDelivery来发送到主线程进行更新。到这里,我们的请求就会在缓存线程或者网络线程中去处理了,在以上步骤完成之后,request会调用自身的finish()方法,表示结束整个请求:
/**
     * Called from @link Request#finish(String), indicating that processing of the given request
     * has finished.
     *
     * <p>Releases waiting requests for <code>request.getCacheKey()</code> if
     *      <code>request.shouldCache()</code>.</p>
     */
    void finish(Request request)
        // Remove from the set of requests currently being processed.
        synchronized (mCurrentRequests)
            mCurrentRequests.remove(request);


        if (request.shouldCache())
            synchronized (mWaitingRequests)
                String cacheKey = request.getCacheKey();
                Queue<Request> waitingRequests = mWaitingRequests.remove(cacheKey);
                if (waitingRequests != null)
                    if (VolleyLog.DEBUG)
                        VolleyLog.v("Releasing %d waiting requests for cacheKey=%s.",
                                waitingRequests.size(), cacheKey);

                    // Process all queued up requests. They won't be considered as in flight, but
                    // that's not a problem as the cache has been primed by 'request'.
                    mCacheQueue.addAll(waitingRequests);
干完了源码分析的工作,接下来我们就实际操刀一下:
2、使用教程:
1、AndroidManifest中添加访问网络的权限,不用说都知道。
2、引入Volley包。这里大家可以去搜一下。
3、代码编写。
按我自己的代码风格,喜欢先封装一下VolleyUtil的工具类,写了部分代码,不打完善,大家可以自行补充。:VolleyUtil .java
import android.content.Context;

import com.android.volley.NetworkResponse;
import com.android.volley.Request;
import com.android.volley.RequestQueue;
import com.android.volley.Response;
import com.android.volley.toolbox.HttpHeaderParser;
import com.android.volley.toolbox.JsonObjectRequest;
import com.android.volley.toolbox.StringRequest;
import com.android.volley.toolbox.Volley;

import org.json.JSONObject;

import java.io.UnsupportedEncodingException;

/**
 * 作者:viviant on 2016/6/30 14:08
 * 描述:Volley封装类
 */
public class VolleyUtil

    private static RequestQueue mQueue; // volley的请求队列
    private static VolleyUtil instance;
    private static Context context;

    private VolleyUtil(Context context)
        this.context = context;


    public static VolleyUtil getInstance()
            synchronized (VolleyUtil.class)
                if (instance == null)
                    instance = new VolleyUtil(context);


        return instance;


    /**
     * get方式请求
     */
    public void get(Context context, String url, Response.Listener<String> listener, Response.ErrorListener errorListener)
        mQueue = Volley.newRequestQueue(context);
        mQueue.add(new MyStringRequest(Request.Method.GET, url, listener, errorListener));


    /**
     * get方式请求
     */
    public void get(Context context, String url, JSONObject jsonObject, Response.Listener<JSONObject> listener, Response.ErrorListener errorListener)
        mQueue = Volley.newRequestQueue(context);
        mQueue.add(new JsonObjectRequest(Request.Method.GET, url, jsonObject, listener, errorListener));


    /**
     * post方式请求
     */
    public void post(Context context, String url, Response.Listener<String> listener, Response.ErrorListener errorListener)
        mQueue = Volley.newRequestQueue(context);
        mQueue.add(new MyStringRequest(Request.Method.POST, url, listener, errorListener));


    /**
     * post方式请求
     */
    public void put(Context context, String url, Response.Listener<String> listener, Response.ErrorListener errorListener)
        mQueue = Volley.newRequestQueue(context);
        mQueue.add(new MyStringRequest(Request.Method.PUT, url, listener, errorListener));


    /**
     * post方式请求
     */
    public void delete(Context context, String url, Response.Listener<String> listener, Response.ErrorListener errorListener)
        mQueue = Volley.newRequestQueue(context);
        mQueue.add(new MyStringRequest(Request.Method.DELETE, url, listener, errorListener));


    /**
     * get by tag方式请求
     */
    public void getByTag(Context context, String url, Response.Listener<String> listener, Response.ErrorListener errorListener, Object tag)
        mQueue = Volley.newRequestQueue(context);
        MyStringRequest request = new MyStringRequest(Request.Method.GET, url, listener, errorListener);
        request.setTag(tag);
        mQueue.add(request);


    /**
     * 根据tag取消请求
     * @param tag
     */
    public void cancleRequests(Object tag)
        if (mQueue != null)
            mQueue.cancelAll(tag);


    /**
     * 取消所有的请求
     */
    public void onStop()
        if (mQueue != null)
            mQueue.cancelAll(new RequestQueue.RequestFilter()
                @Override
                public boolean apply(Request<?> request)
                    // do I have to cancel this?
                    return true; // -> always yes

            );


    public class MyStringRequest extends StringRequest

        public MyStringRequest(int method, String url, Response.Listener<String> listener,Response.ErrorListener errorListener)
            super(method, url, listener, errorListener);


        /**
         * 重写以解决乱码问题
         */
        @Override
        protected Response<String> parseNetworkResponse(NetworkResponse response)
            String str = null;
            try
                str = new String(response.data, "utf-8");
             catch (UnsupportedEncodingException e)
                e.printStackTrace();

            return Response.success(str,  HttpHeaderParser.parseCacheHeaders(response));
以上也包含了一个填坑操作,我们使用StringRequest 时返回来的数据会乱码,这边我在网上查了别人的解决方案,重写了一个类。
下面是我的二次封装代码:VolleyNetManager.java
import android.content.Context;
import android.util.Log;

import com.android.volley.Response;
import com.android.volley.VolleyError;

import org.json.JSONObject;

import viviant.cn.weeklyplan.common.util.VolleyUtil;

/**
 * 作者:viviant on 2016/6/30 14:18
 * 描述:
 */
public class VolleyNetManager

    /**
     * 根据标签取消请求
     * @param tag
     */
    public static void cancleRequests (Object tag)
        VolleyUtil.getInstance().cancleRequests(tag);


    /**
     * 取消所有请求
     */
    public static void cancleAllRequests ()
        VolleyUtil.getInstance().onStop();


    /**
     * Volley Get 方法测试方法
     */
    public static void TestVolleyGet(Context context, String url)
        VolleyUtil.getInstance().get(context, url,new Response.Listener<String>()

            @Override
            public void onResponse(String arg0)
//                Toast.makeText(getActivity(), arg0, Toast.LENGTH_LONG).show();
                Log.d("weiwei", arg0);

        , new Response.ErrorListener()

            @Override
            public void onErrorResponse(VolleyError arg0)
//                Toast.makeText(getActivity(), arg0.toString(), Toast.LENGTH_LONG).show();
                Log.d("weiwei", "error : " + arg0.toString());

        );


    /**
     * Volley Get JSONObject 方法测试方法
     */
    public static void TestVolley(Context context, String url)
        VolleyUtil.getInstance().get(context, url, null, new Response.Listener<JSONObject>()

            @Override
            public void onResponse(JSONObject jsonObject)
//                Toast.makeText(getActivity(), arg0, Toast.LENGTH_LONG).show();
                Log.d("weiwei", jsonObject.toString());

        , new Response.ErrorListener()

            @Override
            public void onErrorResponse(VolleyError arg0)
//                Toast.makeText(getActivity(), arg0.toString(), Toast.LENGTH_LONG).show();
                Log.d("weiwei", "error : " + arg0.toString());

        );


    /**
     * VolleyPost方法测试方法
     */
    public static void TestVolleyPost(Context context, String url)

        VolleyUtil.getInstance().post(context, url, new Response.Listener<String>()

            @Override
            public void onResponse(String arg0)
//                Toast.makeText(getActivity(), arg0, Toast.LENGTH_LONG).show();
                Log.d("weiwei", arg0);

        , new Response.ErrorListener()

            @Override
            public void onErrorResponse(VolleyError arg0)
//                Toast.makeText(getActivity(), arg0.toString(), Toast.LENGTH_LONG).show();
                Log.d("weiwei", "error : " + arg0.toString());

        );
我们在activity中可以调用:
private static final String URL = "http://www.baidu.com/";
VolleyNetManager.TestVolleyGet(getContext(), URL);
然后就可以在VolleyNetManager 得到我们返回来的数据。
3、总结:
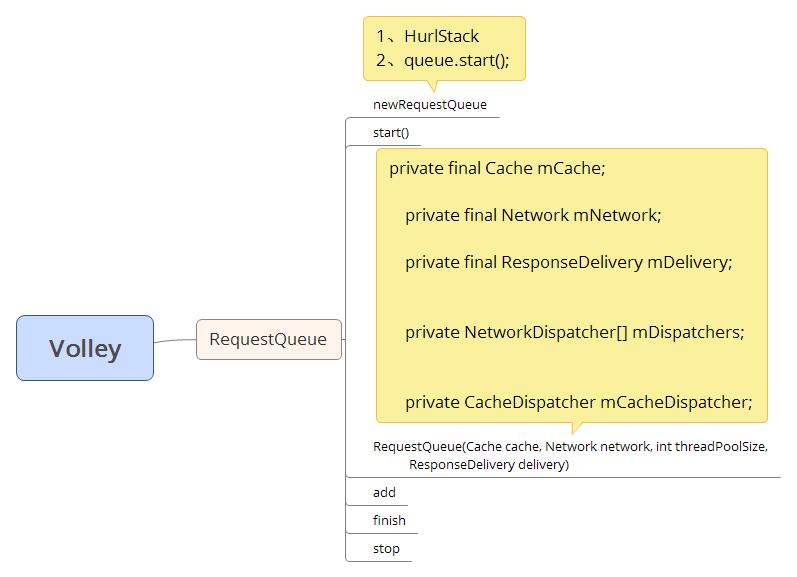
这边画了个草图,梳理下RequestQueue的主要方法:
总得来说,volley是一个很优秀的框架,比较简洁。好歹是谷歌自己出的。
以上是我对自己使用时做的一个小小的总结,有不好的地方欢迎提出意见。
以上是关于Android中 网络框架Volley的用法的主要内容,如果未能解决你的问题,请参考以下文章