(译)LearnOpenGL实际案例Breakout:关卡
Posted 键盘春秋
tags:
篇首语:本文由小常识网(cha138.com)小编为大家整理,主要介绍了(译)LearnOpenGL实际案例Breakout:关卡相关的知识,希望对你有一定的参考价值。
之前一直更新的实际上是LearnOpenGL的笔记,说起来没什么价值,还不如直接去看原文
LearnOpenGL英文版最后有一个实际小游戏打砖块,中文部分只翻译了部分内容。为了更好的学习,我将剩下的部分翻译出来,英语水平一般,仅供参考。
英文链接
以下是翻译部分:
不幸的是Breakout并不仅仅是一个绿色笑脸,还包含了有一大堆好玩的彩色砖块的完整关卡。我们想要这些关卡变得灵活多样这样他们就能够支持任何数量的行数和/或列数,我们想要这些关卡包含固体砖块(不会被破坏),我们想要这些关卡支持多个砖块颜色并且我们想要他们被存储到额外的文件中。
在这个教程中我们将会穿行在被用来管理一大堆砖块的游戏色阶物体代码中。首先我们必须定义一个实际的砖块是什么样的。
我们创建一个叫做游戏物体的组件以便代表游戏中的基础物体。这样一个游戏物体持有状态数据例如它的位置,尺寸和速度。它包含了一个颜色,一个旋转组件,是否是固体和/或是否能被破坏以及他还要存储一个Texture2D参数为它的精灵。
游戏中的任何物体表示为GameObject或者它的衍生类。你能在这找到GameObject的源码:
GameObject: header, code
Breakout中的一个关卡基本上完全由砖块构成这样我们就能够表示出一个正确的关卡:砖块的集合。因为一个砖块需要我们会表现出的作为一个游戏关卡的任何一个砖块的几乎所有的游戏状态。GameLevel的布局类看起来像这样:
class GameLevel

public:
    std::vector<GameObject> Bricks;
    GameLevel()
    // Loads level from file
    void Load(const GLchar *file, GLuint levelWidth, GLuint levelHeight);
    // Render level
    void Draw(SpriteRenderer &renderer);
    // Check if the level is completed (all non-solid tiles are destroyed)
    GLboolean IsCompleted();
private:
    // Initialize level from tile data
    void init(std::vector<std::vector<GLuint>> tileData, GLuint levelWidth, GLuint levelHeight);
;
由于一个关卡被从外部文件加载,我们需要提供一些结构类型。下面是一个游戏关卡在文件中看起来的例子:
1 1 1 1 1 1
2 2 0 0 2 2
3 3 4 4 3 3
在这里一个关卡被存储到像一个矩阵的结构中,矩阵中的每一个元素表现出砖块的类型,每个元素用空格分开。在关卡代码中我们能够指派每个数字的意义。我们选择下列表现:
- 0:没有砖块,一个关卡的空的空间。
- 1:一个硬砖块,它无法被破坏。
- 高于1:一个可破坏的砖块,每个数字代表唯一不同的颜色。
上面的关卡列表例子被GameLevel加工后看起来像这样:
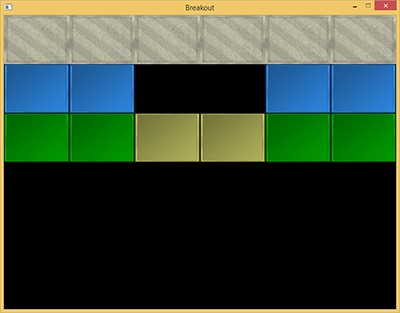
这个GameLevel类使用两个方法从文件生成关卡。首先将所有数字通过Load方法加载到一个二维vector容器中并且在它们的init方法中处理(创建所有是游戏物体)这些数字。
void GameLevel::Load(const GLchar *file, GLuint levelWidth, GLuint levelHeight)

    // Clear old data
    this->Bricks.clear();
    // Load from file
    GLuint tileCode;
    GameLevel level;
    std::string line;
    std::ifstream fstream(file);
    std::vector<std::vector<GLuint>> tileData;
    if (fstream)

        while (std::getline(fstream, line)) // Read each line from level file

            std::istringstream sstream(line);
            std::vector<GLuint> row;
            while (sstream >> tileCode) // Read each word seperated by spaces
                row.push_back(tileCode);
            tileData.push_back(row);

        if (tileData.size() > 0)
            this->init(tileData, levelWidth, levelHeight);
然后加载好的砖块数据被传送到游戏关卡的init方法:
void GameLevel::init(std::vector<std::vector<GLuint>> tileData, GLuint lvlWidth, GLuint lvlHeight)

    // Calculate dimensions
    GLuint height = tileData.size();
    GLuint width = tileData[0].size();
    GLfloat unit_width = lvlWidth / static_cast<GLfloat>(width);
    GLfloat unit_height = lvlHeight / height;
    // Initialize level tiles based on tileData
    for (GLuint y = 0; y < height; ++y)

        for (GLuint x = 0; x < width; ++x)

            // Check block type from level data (2D level array)
            if (tileData[y][x] == 1) // Solid

                glm::vec2 pos(unit_width * x, unit_height * y);
                glm::vec2 size(unit_width, unit_height);
                GameObject obj(pos, size,
                    ResourceManager::GetTexture("block_solid"),
                    glm::vec3(0.8f, 0.8f, 0.7f)
                    );
                obj.IsSolid = GL_TRUE;
                this->Bricks.push_back(obj);

            else if (tileData[y][x] > 1)

                glm::vec3 color = glm::vec3(1.0f); // original: white
                if (tileData[y][x] == 2)
                    color = glm::vec3(0.2f, 0.6f, 1.0f);
                else if (tileData[y][x] == 3)
                    color = glm::vec3(0.0f, 0.7f, 0.0f);
                else if (tileData[y][x] == 4)
                    color = glm::vec3(0.8f, 0.8f, 0.4f);
                else if (tileData[y][x] == 5)
                    color = glm::vec3(1.0f, 0.5f, 0.0f);
                glm::vec2 pos(unit_width * x, unit_height * y);
                glm::vec2 size(unit_width, unit_height);
                this->Bricks.push_back(
                    GameObject(pos, size, ResourceManager::GetTexture("block"), color)
                    );
init方法遍历任何一个加载好的数字并且添加一个游戏物体到关卡的基于加工过的数字的砖块容器。每个砖块的尺寸被基于砖块总数自动计算好(unit_width和unit_height),这样任何一个砖块完美的铁盒屏幕边界。
我们在这用两个新的贴图加载游戏物体,一个叫 block 贴图一个叫solid block贴图。

这有一些贴图应用了灰度的不错的小砖块。效果时我们能够灵活的在游戏代码中用定义好的颜色矢量乘以它们的颜色;恰如我们在SpriteRenderer中所做的。这样,定制它们的颜色就不会太过怪异或者失去平衡。
GameLevel类也寄宿着一些其他的方法比如渲染所有未销毁的砖块或者确认是否所有非固体砖块被销毁。GmaeLevel类的源码:
GameLevel: header, code
游戏关卡类给我们提供了很大的灵活性因为任何数量的横纵都被支持并且一个用户能够通过修改关卡文件很容易的创建他/她自己的关卡。
1. Within the game
我们将在Breakout游戏中支持多个关卡所以我们必须通过添加一个包含了GameLevel参数的容器来扩展game类。我们将会存储当前激活的关卡:
class Game

    [...]
    std::vector<GameLevel> Levels;
    GLuint                 Level;
    [...]
;
Breakout游戏的教程版本一共有4个关卡:
- 标准
5 5 5 5 5 5 5 5 5 5 5 5 5 5 5
5 5 5 5 5 5 5 5 5 5 5 5 5 5 5
4 4 4 4 4 0 0 0 0 0 4 4 4 4 4
4 1 4 1 4 0 0 1 0 0 4 1 4 1 4
3 3 3 3 3 0 0 0 0 0 3 3 3 3 3
3 3 1 3 3 3 3 3 3 3 3 3 1 3 3
2 2 2 2 2 2 2 2 2 2 2 2 2 2 2
2 2 2 2 2 2 2 2 2 2 2 2 2 2 2
- 几个小缺口
1 1 1 1 1 1 1 1 1 1 1 1 1 1 1
1 0 5 5 0 5 5 0 5 5 0 5 5 0 1
1 5 5 5 5 5 5 5 5 5 5 5 5 5 1
1 0 3 3 0 3 3 0 3 3 0 3 3 0 1
1 3 3 3 3 3 3 3 3 3 3 3 3 3 1
1 0 2 2 0 2 2 0 2 2 0 2 2 0 1
1 2 2 2 2 2 2 2 2 2 2 2 2 2 1
1 0 1 1 0 1 1 0 1 1 0 1 1 0 1
- 太空入侵
0 0 0 0 0 0 0 0 0 0 0 0 0
0 0 2 0 0 0 0 0 0 0 2 0 0
0 0 0 2 0 0 0 0 0 2 0 0 0
0 0 0 5 5 5 5 5 5 5 0 0 0
0 0 5 5 0 5 5 5 0 5 5 0 0
0 5 5 5 5 5 5 5 5 5 5 5 0
0 3 0 1 1 1 1 1 1 1 0 3 0
0 3 0 3 0 0 0 0 0 3 0 3 0
0 0 0 0 4 4 0 4 4 0 0 0 0
- 反弹
1 2 1 2 1 2 1 2 1 2 1 2 1
2 2 2 2 2 2 2 2 2 2 2 2 2
2 1 3 1 4 1 5 1 4 1 3 1 2
2 3 3 4 4 5 5 5 4 4 3 3 2
2 1 3 1 4 1 5 1 4 1 3 1 2
2 2 3 3 4 4 5 4 4 3 3 2 2
每个贴图和关卡都将会在game类的Init方法中被初始化:
void Game::Init()

    [...]
    // Load textures
    ResourceManager::LoadTexture("textures/background.jpg", GL_FALSE, "background");
    ResourceManager::LoadTexture("textures/awesomeface.png", GL_TRUE, "face");
    ResourceManager::LoadTexture("textures/block.png", GL_FALSE, "block");
    ResourceManager::LoadTexture("textures/block_solid.png", GL_FALSE, "block_solid");
    // Load levels
    GameLevel one; one.Load("levels/one.lvl", this->Width, this->Height * 0.5);
    GameLevel two; two.Load("levels/two.lvl", this->Width, this->Height * 0.5);
    GameLevel three; three.Load("levels/three.lvl", this->Width, this->Height * 0.5);
    GameLevel four; four.Load("levels/four.lvl", this->Width, this->Height * 0.5);
    this->Levels.push_back(one);
    this->Levels.push_back(two);
    this->Levels.push_back(three);
    this->Levels.push_back(four);
    this->Level = 1;
现在所有剩下的事情就是通过调用当前激活的关卡的Draw方法实际渲染关卡,使用给定的精灵渲染器依次调用每个游戏物体的Draw方法。抛开关卡,我们仍然通过一个不错的背景图片来渲染场景:
void Game::Render()

    if (this->State == GAME_ACTIVE)

        // Draw background
        Renderer->DrawSprite(ResourceManager::GetTexture("background"),glm::vec2(0, 0), glm::vec2(this->Width, this->Height), 0.0f);
        // Draw level
        this->Levels[this->Level].Draw(*Renderer);
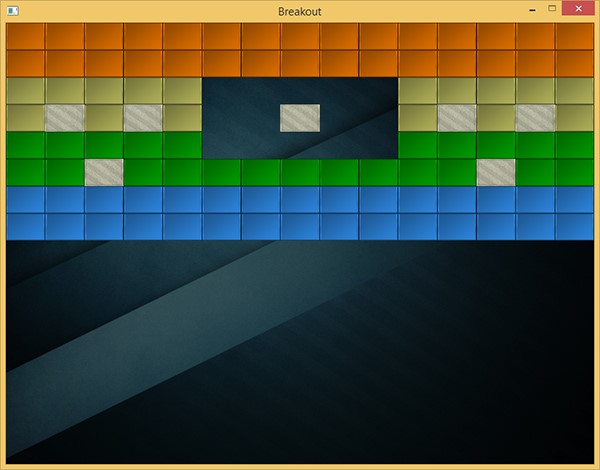
结果是一个渲染得很不错的关卡,开始有真实的游戏感了:
The player paddle
当我们忙个不停的时候,我们可能仅仅需要在场景底部引入一个被玩家控制的挡板。这个挡板仅仅允许水平移动并且每当它触碰到场景边缘,它的移动必须停止。我们将会使用下列贴图作为玩家挡板:

一个挡板对象将包含位置,尺寸和精灵贴图,因此让场景来定义挡板物体:
// Initial size of the player paddle
const glm::vec2 PLAYER_SIZE(100, 20);
// Initial velocity of the player paddle
const GLfloat PLAYER_VELOCITY(500.0f);
GameObject      *Player;
void Game::Init()

    [...]
    ResourceManager::LoadTexture("textures/paddle.png", true, "paddle");
    [...]
    glm::vec2 playerPos = glm::vec2(
        this->Width / 2 - PLAYER_SIZE.x / 2,
        this->Height - PLAYER_SIZE.y
        );
    Player = new GameObject(playerPos, PLAYER_SIZE, ResourceManager::GetTexture("paddle"));
我们在这定义几个挡板尺寸和速度的常量值。在Game的初始化方法中我们计算挡板在场景中的起始位置。我们确保玩家挡板的中心在场景的水平中心。
随着玩家挡板被初始化,我们还需要添加一个声明到Game的渲染方法:
Player->Draw(*Renderer);如果你现在开始游戏你将不仅仅看到关卡,还有一个花哨的玩家挡板对齐场景底部边缘。现在,它静止在那没做任何实际事情,因此我们将会研究Game的输出处理方法来让我们输入A和D键的时候挡板进行水平移动。
void Game::ProcessInput(GLfloat dt)

    if (this->State == GAME_ACTIVE)

        GLfloat velocity = PLAYER_VELOCITY * dt;
        // Move playerboard
        if (this->Keys[GLFW_KEY_A])

            if (Player->Position.x >= 0)
                Player->Position.x -= velocity;

        if (this->Keys[GLFW_KEY_D])

            if (Player->Position.x <= this->Width - Player->Size.x)
                Player->Position.x += velocity;
我们基于玩家按键来左右移动玩家档板(注意我们如何通过时间增量来叠加速度)。如果档板的x值比0小它将会移动到左边的外面因此我们仅仅在档板坐标的x值比左边界坐标(0,0)高的时候移动档板。向右移动的时候我们对档板做相同的事情,但是我们必须用右边界和档板的右边界进行比较(从右边界的x值扣除档板的宽度)。
现在运行游戏会给我们呈现一个玩家挡板,我们能够在底部移动它。

转载请注明出处:http://blog.csdn.net/ylbs110/article/details/52663680
这里是更新后的Game类代码:
Game: header, code
以上是关于(译)LearnOpenGL实际案例Breakout:关卡的主要内容,如果未能解决你的问题,请参考以下文章