自定义移位寄存器模块
Posted 芯青年0
tags:
篇首语:本文由小常识网(cha138.com)小编为大家整理,主要介绍了自定义移位寄存器模块相关的知识,希望对你有一定的参考价值。
快速定位
自定义移位寄存器模块
前几日想着整理下之前写的FPGA图像处理的一些模块,如高斯滤波、边沿检测,形态学滤波等的模块,重新巩固下相关的知识点,为秋招做准备,其中图像处理中涉及到的一个很重要的IP就是移位寄存器,之前接触的代码都是使用的是软件自带的IP,想着还是自己写个来的实在,故在昨晚运动完后,花了几十分钟写了下代码并仿真。特记录在此。
Verilog代码
/*******************************************************************
* -------------------  Module Specification ------------------------
    *
    *  * Name     :myshift
    *
    *  * Function :数据位宽和移位深度可调的自定义移位寄存器
    *
    *  * Input    :
    *   clk:输入时钟
        rst_n:输入复位信号,低电平有效
        shift_din_valid:输入数据有效信号
        shift_din:输入数据
    *  * Output   :
    *  shift_dout:移位寄存器输出数据
       shift_dout_valid:移位寄存器输出数据有效信号
    *  * author   :彧芯
    *
    *  * Edit time:2021/05/16/22:30:16
    *
    *  *************************************************************/
module myshift #(//Defines parameters for uploading
parameter DATA_W = 8,       //数据位宽
parameter SHIFT_DEPTH = 10  //移位寄存器的深度
)(
input wire clk,
input wire rst_n,
input wire               shift_din_valid,
input wire[DATA_W-1:0]   shift_din,
//Other signals
output wire[DATA_W-1:0]  shift_dout,
output wire              shift_dout_valid
);

//Define local parameters(localparam)

//Intermediate signal definition
reg[DATA_W-1:0]           shift_fifo[SHIFT_DEPTH-1:0];
reg[SHIFT_DEPTH-1:0]      shift_valid_fifo;
//Combinatorial logic

assign shift_dout = (shift_dout_valid)?shift_fifo[SHIFT_DEPTH-1]:DATA_W1'b0;
assign shift_dout_valid = shift_valid_fifo[SHIFT_DEPTH-1];
//Sequential logic
always@(posedge clk) begin
    shift_valid_fifo <= shift_valid_fifo[SHIFT_DEPTH-2:0],shift_din_valid;
end

generate
    genvar i;
    for(i=0;i<SHIFT_DEPTH;i=i+1)begin:u_shift
        always@(posedge clk) begin
            if(i==0 && shift_din_valid) begin
                shift_fifo[i] <= shift_din;
            end
            else begin
                shift_fifo[i] <= shift_fifo[i-1];
            end
        end
    end
endgenerate

endmodule
该代码实现了输入数据位宽和移位深度可调的移位寄存器IP,都是基本的Verilog语法的使用,其中需要注意的是generate for 模块的使用,注意给generate for后的begin end模块命名。
Testbench文件
`timescale 1 ns/1 ns
module shift_tb();

//parameters
parameter CYCLE    = 20; //!Clock cycle, 20ns, where the clock cycle can be modified
parameter RST_TIME = 3 ; //Reset time, at this point represents the reset time of 3 clock cycles

//Clock and reset signals
reg clk  ;
reg rst_n;

//The input signal of the instantiate module
reg[7:0]  shift_din  ;
reg       shift_din_valid  ;

//The output signal of the instantiate module
wire[7:0] shift_dout;
wire      shift_dout_valid;

//Instantiate the modules to be tested
myshift#(
    .DATA_W      ( 8 ),
    .SHIFT_DEPTH ( 5 )
)u_myshift(
    .clk         ( clk         ),
    .rst_n       ( rst_n       ),
    .shift_din_valid ( shift_din_valid ),
    .shift_din   ( shift_din   ),
    .shift_dout  ( shift_dout  ),
    .shift_dout_valid  ( shift_dout_valid  )
);


//Generate the local clock, at 50MHz here
initial begin
    clk = 0;
    forever
    #(CYCLE/2)
    clk=~clk;
end

//Generate the reset signal
initial begin
    rst_n = 1;
    #2;
    rst_n = 0;
    #(CYCLE*RST_TIME);
    rst_n = 1;
end

//Assign a value to the input signal din0
initial begin
    #1;
    //initialise
    shift_din_valid = 0;
    shift_din = 0;
    #(10.5*CYCLE);
    #(CYCLE*RST_TIME);
    //Start the assignment

    shift_din_valid = 1'b1;
    #(11*CYCLE);
    shift_din_valid = 1'b0;
    #(20*CYCLE);
    $stop();
end

//Always part
always @(posedge clk)begin
    if(shift_din_valid) shift_din = $random()%255;
end

endmodule
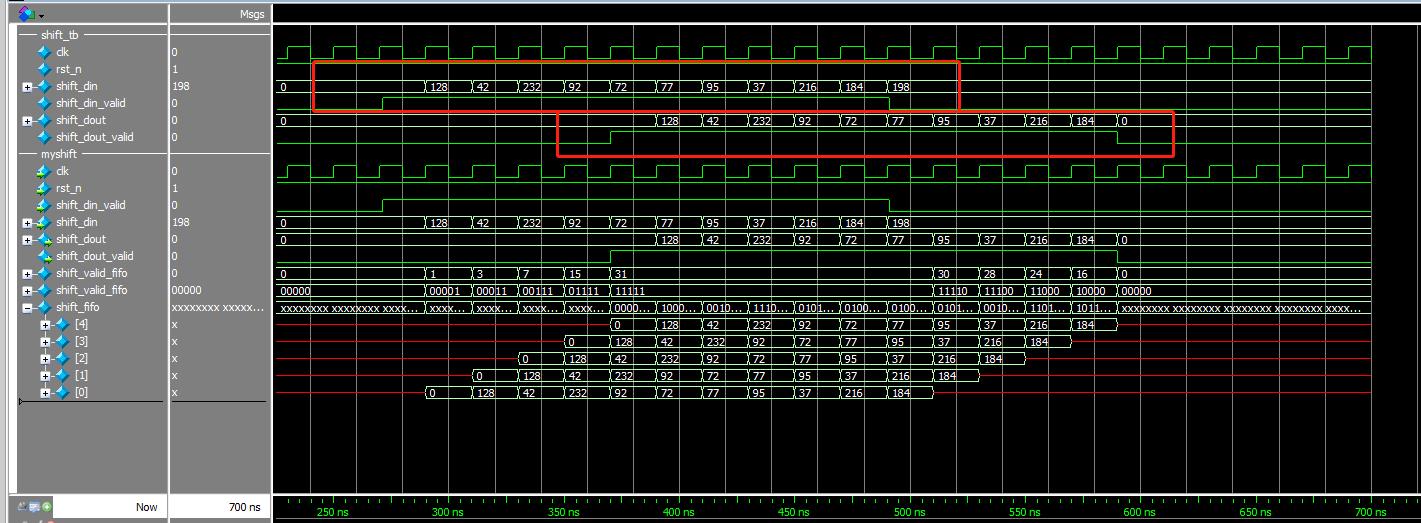
在该仿真模块中,将前述的移位寄存器模块例化为数据位宽为8,移位深度为5的模块。输入输入采用随机生成
仿真结果

由仿真结果可以,符合预期。
以上是关于自定义移位寄存器模块的主要内容,如果未能解决你的问题,请参考以下文章