CocosCreator实战篇 | 实现刮刮卡和橡皮擦 | 擦除效果
Posted 肩匣与橘
tags:
篇首语:本文由小常识网(cha138.com)小编为大家整理,主要介绍了CocosCreator实战篇 | 实现刮刮卡和橡皮擦 | 擦除效果相关的知识,希望对你有一定的参考价值。
📢欢迎点赞 👍 收藏 ⭐留言 📝 如有错误敬请指正!
📢本文由肩匣与橘编写,首发于CSDN🙉
📢生活依旧是美好而又温柔的,你也是✨
🏳️🌈实现刮刮卡和橡皮擦 | 擦除效果
📢前言
Cocos Creator是一款广泛使用的游戏开发引擎,其中包含了许多强大的功能,包括Mask._graphics技术。本文将深入探讨Mask._graphics技术的实现原理和应用场景。 Mask._graphics是Cocos Creator中用于实现遮罩效果的一个关键技术。在游戏中,我们常常需要对某些元素进行遮罩,以达到特定的视觉效果,比如实现圆形头像、矩形裁剪等。
🏳️🌈使用方法
使用 Mask._graphics 功能可以将一个节点或者一个图片或者任何其他的Cocos Creator 控件转换为遮罩层。使用 Mask._graphics 功能的步骤如下:
- 创建一个新节点或选择一个已有的节点。
- 将Mask 组件添加到节点上。
- 在Mask 组件中选择要使用的 MaskType 类型。
- 在 Mask 组件中的 Graphics 属性面板中,选择要使用的绘制类型和参数。
- 在节点中添加要遮罩的元素,如图片或其他控件。
在上述步骤中,最核心的是 Mask 组件中的 Graphics 属性。这个属性用于设置绘制类型和参数。下面将详细介绍这个属性的技术细节。
🏳️🌈技术细节
Mask._graphics 属性主要用于设置遮罩层的绘制类型和参数。常用的绘制类型有以下几种:
- 矩形(Rect):用于创建一个矩形形状的遮罩层。
- 圆形(Circle):用于创建一个圆形形状的遮罩层。
- 椭圆形(Ellipse):用于创建一个椭圆形状的遮罩层。
- 多边形(Polygon):用于创建一个多边形形状的遮罩层。
- 路径(Path):用于创建一个任意形状的遮罩层。
除了绘制类型外,Mask._graphics 属性还可以设置绘制参数,如颜色、线条宽度、线条样式等。这些参数可以用于调整遮罩层的样式和效果。
Mask._graphics的实现原理非常简单:它通过绘制一个遮罩图形,然后将要被遮罩的元素限制在这个图形内部来实现遮罩效果。具体而言,Mask._graphics通过继承自Graphics组件,并重写了其中的draw方法来实现遮罩绘制。当遮罩图形发生变化时,Mask._graphics会自动重新绘制遮罩图形,并将其与要被遮罩的元素进行渲染。
🏳️🌈案例实现
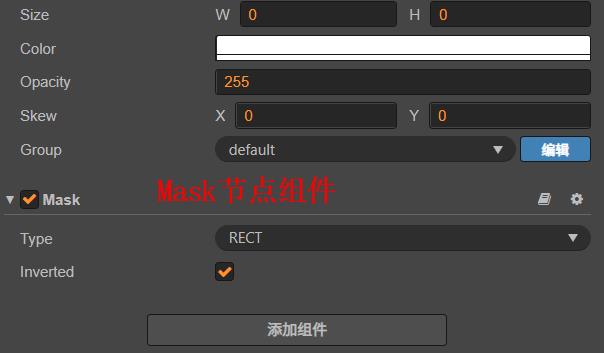
①场景布局
- 新建底部图片节点。
- 创建一个挂载mask的节点(勾选反向遮罩),并在mask节点下创建顶部图片节点(擦除的图片)。
节点细节如下图所示:


②脚本编写
原理:设置鼠标监听事件,在移动过程中执行函数(获取Mask的_graphics,并执行circle()进行圆形路径的绘制,最后使用fill()进行路径的填充)
源码:
@property(
        type: cc.Mask
    )
    myMask: cc.Mask = null;


    @property(
        displayName: "刮卡路径大小",
        min: 20
    )
    size: number = 20;

    onLoad()
        this.node.on(cc.Node.EventType.TOUCH_START, this._onTouchBegin, this);
        this.node.on(cc.Node.EventType.TOUCH_MOVE, this._onTouchMoved, this);
        this.node.on(cc.Node.EventType.TOUCH_END, this._onTouchEnd, this);

/**鼠标事件 */
    _onTouchBegin(event)
        var point = event.touch.getLocation();
        point = this.node.convertToNodeSpaceAR(point);
        this._addCircle(point);


    _onTouchMoved(event)
        var point = event.touch.getLocation();
        point = this.node.convertToNodeSpaceAR(point);
        this._addCircle(point);


    _onTouchEnd(event)
        var point = event.touch.getLocation();
        point = this.node.convertToNodeSpaceAR(point);
        this._addCircle(point);


/**绘制函数*/
    aaa: cc.Graphics;
    _addCircle(point)
        this.aaa = this.myMask._graphics;
        this.aaa.circle(point.x, point.y, this.size);
        this.aaa.fill();
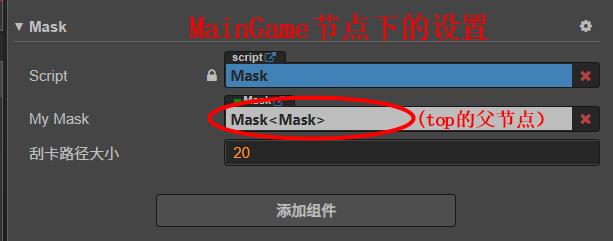
③脚本和组件挂载
- 将上方创建的节点放在同一父节点下。
- 将mask节点挂载到脚本节点中。
如图:


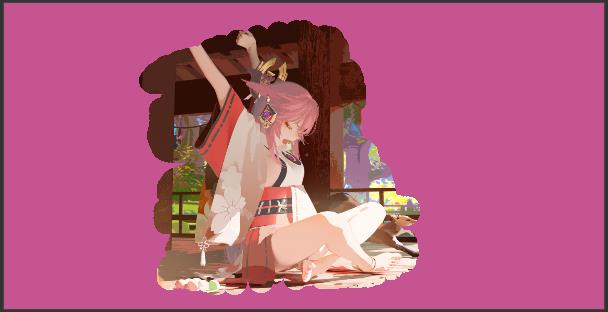
🏳️🌈实现效果

总之,Mask._graphics 是Cocos Creator 引擎中一个非常实用的功能,可以帮助开发者轻松创建遮罩层和实现各种特效效果。在使用这个功能时,需要注意其使用方法和技术细节,以确保游戏的性能和效果都能够达到最优状态。
刮刮卡功能实现封装
lz项目里会经常用到刮刮卡这个小功能,其实就是利用canvas清除图层去实现;之前在网上看过一些封装,感觉有些封装的还是相对比较复杂,所以就把他封装成了一个相对简单点可复用的组件;
思路很简单,就不再一一赘述;lz直接粘贴个人的代码;
/**
 * @param {object} config
 * @param {string} canvasId 要进行操作的图层
 * @param { nunber } wd,ht  绘图的宽高
 * @param { string } imgurl 刮卡图层
 * @param { number } clearRange 刮多少下停止
 * @param { number } radius 刮开圆的半径
 * @param { function } Start touchStart 事件回调
 * @param { function } Move touchMove 事件回调
 * @param { function } End touchEnd 事件回调
 * @param { boolean } ifend 判断是否要结束监听事件
 *
 */
export class Scratch {
    constructor(config) {
        this.config = config;
        let { clearRange, canvasId, radius } = config;
        this.moveNum = 0;
        this.clearRange = clearRange || 2;
        this.canvasId = canvasId;
        this.radius = radius || 25;
        this.canvas = $(this.canvasId);
        this.ifend = false;
        this.init();
    }
    init() {
        this.renderAct();
        this.bindEvent();
    }
    bindEvent() {
        this.touchStart();
        this.touchMove();
        this.touchEnd();
    }
    //初始化绘画图层
    renderAct() {
        let image = new Image();
        let { wd, ht, imgurl } = this.config;
        image.onload = () => {
            [this.width, this.height] = [wd / 2, ht / 2];
            let canvas = $(this.canvasId)[0];
            canvas.width = this.width;
            canvas.height = this.height;
            if (canvas.getContext) {
                this.ctx = canvas.getContext(‘2d‘);
                this.ctx.drawImage(image, 0, 0, image.width, image.height, 0, 0, this.width, this.height);
            }
        };
        image.src = imgurl;
    }
    /**
     * 取消事件,以及回调
     */
    offFn() {
        this.ifend = true;
        $(this.canvasId).off(‘touchstart‘);
        $(this.canvasId).off(‘touchmove‘);
        $(this.canvasId).off(‘touchend‘);
    }
    /**
     * touchStart事件
     */
    touchStart() {
        $(document).on(‘touchstart‘, this.canvasId, () => {
            if (this.ifend) return;
            this.offset = this.canvas.offset();
            if (typeof this.config.Start === ‘function‘) {
                this.config.Start();
            }
        });
    }
    /**
     * touchMove事件
     */
    touchMove() {
        $(document).on(‘touchmove‘, this.canvasId, event => {
            if (this.ifend) return;
            this.rx = event.touches[0].pageX - this.offset.left;
            this.ry = event.touches[0].pageY - this.offset.top;
            this.ctx.beginPath();
            this.ctx.globalCompositeOperation = ‘destination-out‘;
            this.ctx.arc(this.rx, this.ry, this.radius, 0, 2 * Math.PI);
            this.ctx.fill();
            this.moveNum++;
            if (typeof this.config.Move === ‘function‘) {
                this.config.Move();
            }
        });
    }
    /**
     * touchEnd事件
     */
    touchEnd() {
        $(document).on(‘touchend‘, this.canvasId, () => {
            if (this.ifend) return;
            if (this.moveNum > this.clearRange) {
                // this.ctx.clearRect(0, 0, this.width, this.height);
                if (typeof this.config.End === ‘function‘) {
                    this.config.End();
                    this.moveNum = 0;
                }
            }
            $(this.canvasId).off(‘touchstart‘);
            $(this.canvasId).off(‘touchmove‘);
            $(this.canvasId).off(‘touchend‘);
        });
    }
}
使用如下:
<canvas id="ActCover"></canvas>
<script>
    new Scratch({
        canvasId: ‘#ActCover‘,
        wd: ‘640‘,
        ht: ‘360‘,
        imgurl: `${Gdata.assetPath}/private/T/T042/img/T042_area_gray.png`,
        Move(){

        },
        Start() {

        },
        End() {

        }
    });
</script>
在日常项目中,我们一定有一个态度就是能提炼出来的东西一定思考怎样提炼出来,只有多思考才能把代码越写越好;lz也在努力中。。。
如有不妥,请大佬指正;
以上是关于CocosCreator实战篇 | 实现刮刮卡和橡皮擦 | 擦除效果的主要内容,如果未能解决你的问题,请参考以下文章