android局域网连接TSC桌面打印机打印
Posted LZ涸泽而渔
tags:
篇首语:本文由小常识网(cha138.com)小编为大家整理,主要介绍了android局域网连接TSC桌面打印机打印相关的知识,希望对你有一定的参考价值。
最近收到了需求,安卓设备连接打印机打印,因为使用场景选择了局域网连接打印机,并最终选择了TSC的PE210打印机,下面陈述实现方式
一:将所有的图文排版成一张图片,然后通过sendPicture方法进行打印

二:将生成的图片转为BMP格式图片,下载到打印机后,通过指令打印这张图片


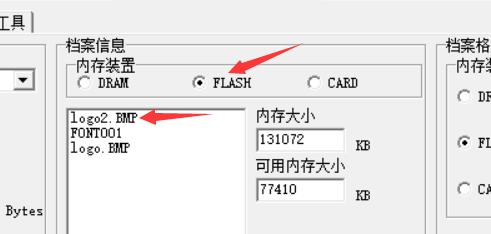
第一个方法,将图片文件下载到打印机内存,存储位置可以通过diagtool工具看到,查看源码看到,传送的file必须存储在/Download目录下,而传送指令PUTBMP时指定的文件名 必须与打印机存储好的文件名一样(.bmp存储到打印机后 会变成.BMP)

总结:以上两种方式,能够打印出效果,但是有两个缺点:
1,打印速度很慢,大多数时间花在了图片数据传输与开始打印的过程,尽管图片被我压缩到了只有40K ;
2,这种打印方式,虽然排版异常的简单,但是会出现打印不定数张后,机器死机,绿灯常亮,但是机器不再接受任何指令,咨询多个售后技术后,他们提供的解决方案包括每次打印后删除这张图片 或者延时打印,并无效果
因此,建议大家直接使用图文混排的方式,避免踩坑,排雷
三:正式实现
1:打开打印机工具 Diagnostic


将通讯端口切换为ETHERENT,可以自动搜索到局域网内的打印机,更改IP地址可以设定这个打印机的ip

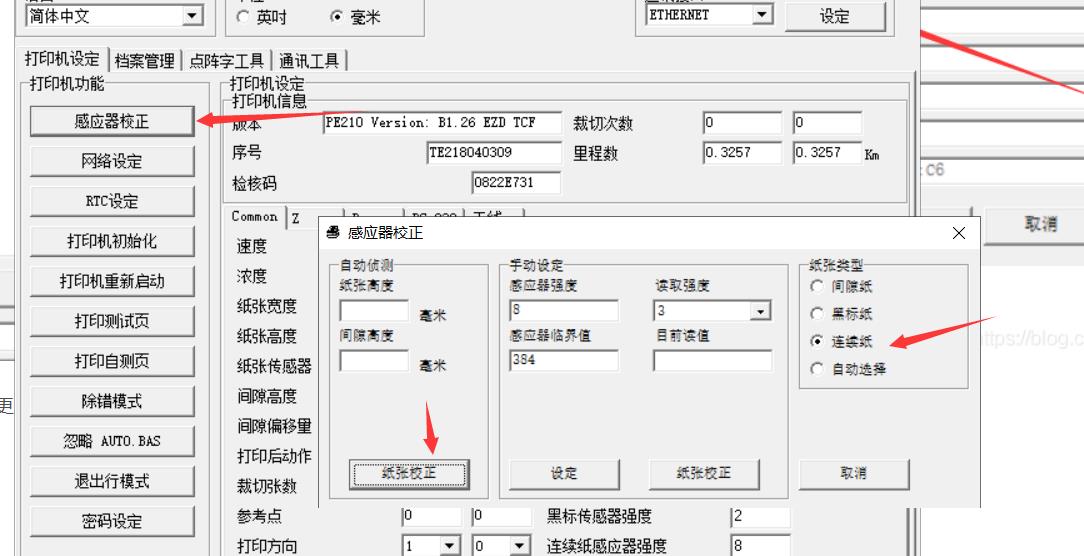
打印机选择感应器矫正,可以矫正为当前选择的纸张类型
矫正完成后,设定打印一张的宽,高以及一些其他参数即可

可以在档案管理里面,将制作好的BMP格式图片下载到打印机里

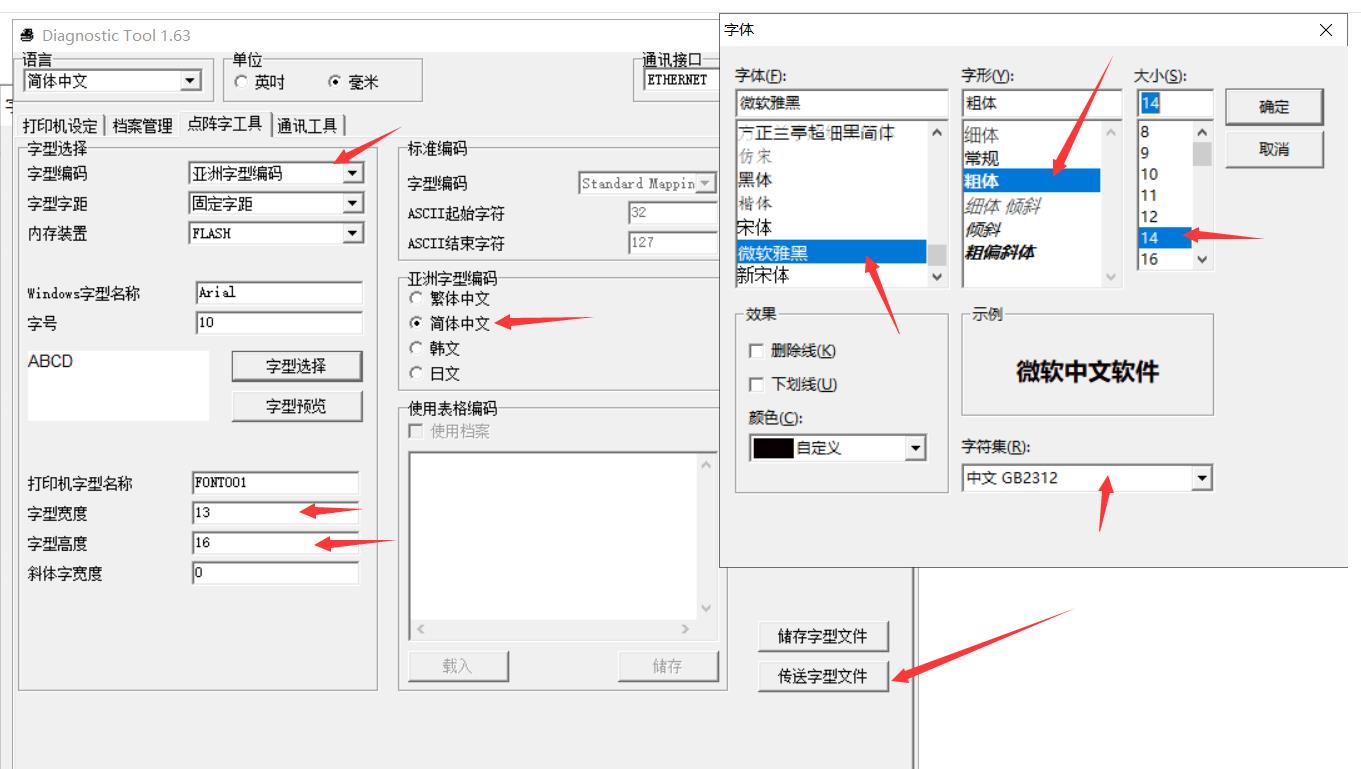
如果想要打印中文或者其他字体,可以通过工具制作字体文件,关键点都标了出来,制作完成后,传送字型文件 会将刚刚选择的字体文件制作,并传送到打印机存储空间中
准备工作完成,接下来开始代码实现
将打印行为放在服务中,并且绑定这个服务
<service android:name="com.jmj.lib_comm.server.PrinterService"/>
val serviceConnection: ServiceConnection = object : ServiceConnection
    override fun onServiceDisconnected(name: ComponentName?)


    override fun onServiceConnected(name: ComponentName?, service: IBinder?)
        Constant.printerService = (service as PrinterService.MyBinder).getService()


private fun bindPrinterService()
    bindService(
        Intent(this, PrinterService::class.java),
        serviceConnection,
        Context.BIND_AUTO_CREATE
    )


override fun onDestroy()
    unbindService(serviceConnection)
    super.onDestroy()
每次打印启动的时候,连接端口,打印完成后,关闭端口,指的是一次动作,无论这次动作打印多少张,最好不要在没有关闭端口的时候,再次去申请连接端口,否则很大概率会死机
fun connectPrint(): Boolean
    val openResult = tscEthernetDll.openport(Constant.printerIp, Constant.printerPort)
    return openResult == "1"

fun closePort()
    tscEthernetDll.closeport()
连接完成后,开始打印
fun printSewnInLabel(waterBarCode: WaterBarCode)
    try
        tscEthernetDll.clearbuffer()
        //打印标线
        printText(
            0,
            0,
            0,
            "------------------------------------------------------------------------------------------------------------"
        )
        //订单号
        tscEthernetDll.printerfont(520, 220, "3", 90, 1, 1, waterBarCode.orderSn)
        //店铺名
        printText(420, 220, 90, "店铺:$waterBarCode.shopName")
        //客户
        printText(320, 220, 90, "客户名:$waterBarCode.clientName")
        //详情
        printText(
            220,
            220,
            90,
            "$waterBarCode.roomType $waterBarCode.orderProductType:$if (waterBarCode.ignoreFolio) waterBarCode.getPartNumber() else waterBarCode.getDealFolio()"
        )
        //宽高或规格
        tscEthernetDll.printerfont(
            120,
            220,
            if (waterBarCode.getSizeOrSpecification().length > 16) "2" else "3",
            90,
            1,
            1,
            waterBarCode.getSizeOrSpecification()
        )

        //打印logo
        tscEthernetDll.sendcommand("PUTBMP 440,640,\\"$Constant.sewninLabelLogo\\"\\n");
        //打印二维码
        printQrCode("$waterBarCode.barCode")
        //打印barcode
        tscEthernetDll.printerfont(140, 720, "3", 90, 1, 1, "$waterBarCode.barCode")
        tscEthernetDll.printlabel(1, 1)
     catch (e: java.lang.Exception)
        KLog.e(e.message)


private fun printText(x: Int, y: Int, rotation: Int, content: String)
    val byte = content.toByteArray(Charset.forName("GB2312"))
    tscEthernetDll.sendcommand("TEXT $x,$y,\\"FONT001\\",$rotation,1,1,\\"")
    tscEthernetDll.sendcommand(byte)
    tscEthernetDll.sendcommand("\\"\\n")


private fun printQrCode(barCode: String)
    tscEthernetDll.sendcommand("QRCODE 180,720,H,6,A,0,M2,\\"$Host.BARCODE_URL$barCode\\"\\n")
以上 演示了打印 图片,中文,英文(打印中文的方法也可打印英文,但是偶尔出现打印问题,如M 打印不全),二维码
如此就完成了一张打印,多张打印循环即可,不用加延时,可以一次性把指令都传送给打印机 它会以队列的形式打印出来,但是注意Socket端口的连接与断开
PS:跑一边他的源码会发现,原理还是Socket连接,但是不能通过发送心跳包的形式去检测socket是否连接与断开,emm 一言难尽
这边附上android Bmp单色图制作方法
  fun createPrintPicture(onCreateFileFinish: () -> Unit)
        Thread
            val bitmap =
                Bitmap.createBitmap(
                    ivLogo!!.width,
                    ivLogo!!.height,
                    Bitmap.Config.RGB_565
                )
            val canvas = Canvas(bitmap)
            ivLogo!!.draw(canvas)

            //bitmap旋转缩放
            val matrix = Matrix()
            matrix.setRotate(90f)
            val rotateBitmap =
                Bitmap.createBitmap(bitmap, 0, 0, bitmap.width, bitmap.height, matrix, true)

//            val baos = ByteArrayOutputStream()
//            //质量压缩方法,这里100表示不压缩,把压缩后的数据存放到baos中
//            rotateBitmap.compress(Bitmap.CompressFormat.JPEG, 100, baos)
//            //把压缩后的数据baos存放到ByteArrayInputStream中
//            val isBm = ByteArrayInputStream(baos.toByteArray())
//            val compressBitmap =
//                BitmapFactory.decodeStream(isBm, null, null) //把ByteArrayInputStream数据生成图片

            val changeToMonochromeBitmap = BmpUtil.changeToMonochromeBitmap(rotateBitmap)

            //bitmap生成为本地临时文件
            try
                val printFile = File("$Constant.printPictureFilePath$Constant.printFileName")
                if (!printFile.exists())
                    printFile.createNewFile()


                val fos =
                    FileOutputStream(printFile)
                fos.write(changeToMonochromeBitmap)
                fos.close()

                bitmap.recycle()
                rotateBitmap.recycle()
//                compressBitmap.recycle()
                onCreateFileFinish()
             catch (e: Exception)
                KLog.e("print", e.message)

        .start()
/**
 * 保存为单色位图,即使黑白位图
 */
public class BmpUtil


    /**
     * 保存为单色bmp格式的完整字节数
     **/
    public static byte[] changeToMonochromeBitmap(Bitmap bmp)
        int[] binarys = gray2Binary(bmp);
        byte[] data = compressMonoBitmap(bmp, binarys);
        byte[] header = addBMPImageHeader(data.length + 62);
        byte[] infos = addBMPImageInfosHeader(bmp.getWidth(), bmp.getHeight());
        byte[] buffer = new byte[62 + data.length];
        System.arraycopy(header, 0, buffer, 0, header.length);
        System.arraycopy(infos, 0, buffer, 14, infos.length);
        System.arraycopy(data, 0, buffer, 62, data.length);
        return buffer;


    /**
     * 保存为单色bmp数据,不包含头,正向头
     **/
    public static byte[] changeSingleBytes(Bitmap bmp)
        int[] binarys = gray2Binary(bmp);
        byte[] data = compressMonoBitmap_ps(bmp, binarys);
        return data;


    /**
     * 将彩色图转换为灰阶图,并二值化处理
     *
     * @param bmp 位图
     * @return 返回灰阶图二值化后的颜色int[]
     */
    private static int[] gray2Binary(Bitmap bmp)
        int width = bmp.getWidth();   // 获取位图的宽
        int height = bmp.getHeight(); // 获取位图的高
        int[] pixels = new int[width * height];  // 通过位图的大小创建像素点数组,
        bmp.getPixels(pixels, 0, width, 0, 0, width, height);   // int 0 代表0XFFFFFFFF,即是1.0完全不透明,0.0f完全透明。黑色完全透明。
        for (int i = 0; i < height; i++)
            for (int j = 0; j < width; j++)
                int grey = pixels[width * i + j];  // 第几行,第几个
                // 分离三原色
                int alpha = ((grey & 0xFF000000) >> 24); // 透明度
                int red = ((grey & 0x00FF0000) >> 16);   // 红色
                int green = ((grey & 0x0000FF00) >> 8);  // 绿色
                int blue = (grey & 0x000000FF);          // 蓝色
                if (alpha == 0)   // 透明度为0,则说明没有颜色,那变更为白色
                    pixels[width * i + j] = 0;           // 白色是0
                    continue;

                grey = (int) (red * 0.3 + green * 0.59 + blue * 0.11);  // 转化为灰度图  灰度值:255为白色,0为黑色
                // TODO: 2016/12/27 灰度值为200,可调整该参数
                grey = grey <= 127 ? 0 : 255;  // 灰度小于200就转化为黑色,不然就为白色。200为可调整参数。// 二值化
                pixels[width * i + j] = grey;


        return pixels;


    /**
     * 压缩为完整单色bmp数组,并反向
     *
     * @param bmp     压缩需要用到位图的宽度,高度。
     * @param binarys 二值化数据
     * @return
     */
    private static byte[] compressMonoBitmap(Bitmap bmp, int[] binarys)
        int width = bmp.getWidth();   // 获取位图的宽
        int height = bmp.getHeight(); // 获取位图的高
        // 行补位的公式为 widthBytes = (width*biBitCount+31)/32*4
        // 需要转化为单色,所以biBitCount=1;
        // 确定一行几个字节
        int widthBytes = (width + 31) / 32 * 4;

        byte[] newss = new byte[widthBytes * height];
        for (int i = height; i > 0; i--)
            for (int j = 0; j < width; j++)
                if (binarys[width * (i - 1) + j] > 0)
                    newss[(height - i) * widthBytes + j / 8] |= (byte) (1 << (7 - j % 8));


        return newss;
        // 方法二:
        /*  // 确定需要一行要补足的位数
        int wei = widthBytes * 8 - width;
        int[] newbs = new int[widthBytes * 8 * height];  // 总字节数
        // 白色是要插入0,并完成翻转;  bmp保存格式是从下到上,从左到右
        for (int i = 0; i < height; i++)
            System.arraycopy(binarys, i * width, newbs, (height - i - 1) * (width + wei), width);

        // 压缩
        byte[] data = new byte[newbs.length / 8];
        for (int i = 0; i < newbs.length; i++)
            if (newbs[i] > 0)
                data[i / 8] |= (1 << (7 - i % 8));


        return data;*/


    /**
     * 压缩为完整单色bmp数组,并正向
     *
     * @param bmp     压缩需要用到位图的宽度,高度。
     * @param binarys 二值化数据
     * @return
     */
    private static byte[] compressMonoBitmap_ps(Bitmap bmp, int[] binarys)
        int width = bmp.getWidth();   // 获取位图的宽
        int height = bmp.getHeight(); // 获取位图的高
        // 行补位的公式为 widthBytes = (width*biBitCount+31)/32*4
        // 需要转化为单色,所以biBitCount=1;
        // 确定一行几个字节
        int widthBytes = (width + 31) / 32 * 4;

        byte[] newss = new byte[widthBytes * height];
        for (int i = 0; i < height; i++)
            for (int j = 0; j < width; j++)
                if (binarys[width * i + j] > 0)  // 第几行第几个字节
                    newss[i * widthBytes + j / 8] |= (byte) (1 << (7 - j % 8));  // 新压缩的第几行第几个


        return newss;
        // 方法二:
        /*  // 确定需要一行要补足的位数
        int wei = widthBytes * 8 - width;
        int[] newbs = new int[widthBytes * 8 * height];  // 总字节数
        // 白色是要插入0,并完成翻转;  bmp保存格式是从下到上,从左到右
        for (int i = 0; i < height; i++)
            System.arraycopy(binarys, i * width, newbs, (height - i - 1) * (width + wei), width);

        // 压缩
        byte[] data = new byte[newbs.length / 8];
        for (int i = 0; i < newbs.length; i++)
            if (newbs[i] > 0)
                data[i / 8] |= (1 << (7 - i % 8));


        return data;*/


    /**
     * BMP文件头
     *
     * @param size 整个文件的大小,包括文件头,信息头,和位图内容
     * @return
     */
    private static byte[] addBMPImageHeader(int size)
        byte[] buffer = new byte[14];
        //magic number 'BM'
        buffer[0] = 0x42;
        buffer[1] = 0x4D;
        //记录大小
        buffer[2] = (byte) (size);
        buffer[3] = (byte) (size >> 8);
        buffer[4] = (byte) (size >> 16);
        buffer[5] = (byte) (size >> 24);
        buffer[6] = 0x00;
        buffer[7] = 0x00;
        buffer[8] = 0x00;
        buffer[9] = 0x00;
        buffer[10] = 0x3E;
        buffer[11] = 0x00;
        buffer[12] = 0x00;
        buffer[13] = 0x00;
        return buffer;


    /**
     * BMP文件信息头
     *
     * @param w 宽,单位像素
     * @param h 高,单位像素
     * @return
     */
    private static byte[] addBMPImageInfosHeader(int w, int h)
        byte[] buffer = new byte[48];
        //这个是固定的 BMP 信息头要40个字节
        buffer[0] = 0x28;
        buffer[1] = 0x00;
        buffer[2] = 0x00;
        buffer[3] = 0x00;
        //宽度 地位放在序号前的位置 高位放在序号后的位置
        buffer[4] = (byte) (w);
        buffer[5] = (byte) (w >> 8);
        buffer[6] = (byte) (w >> 16);
        buffer[7] = (byte) (w >> 24);
        //长度 同上
        buffer[8] = (byte) (h);
        buffer[9] = (byte) (h >> 8);
        buffer[10] = (byte) (h >> 16);
        buffer[11] = (byte) (h >> 24);
        //总是被设置为1
        buffer[12] = 0x01;
        buffer[13] = 0x00;
        //比特数 像素 32位保存一个比特 这个不同的方式(ARGB 32位 RGB24位不同的!!!!)
        //黑白图置1
        buffer[14] = 0x01;
        buffer[15] = 0x00;
        //0-不压缩 1-8bit位图
        //2-4bit位图 3-16/32位图
        //4 jpeg 5 png
        //设置为不压缩
        buffer[16] = 0x00;
        buffer[17] = 0x00;
        buffer[18] = 0x00;
        buffer[19] = 0x00;
        //说明图像大小
        buffer[20] = 0x00;
        buffer[21] = 0x00;
        buffer[22] = 0x00;
        buffer[23] = 0x00;
        //水平分辨率
        buffer[24] = 0x00;
        buffer[25] = 0x00;
        buffer[26] = 0x00;
        buffer[27] = 0x00;
        //垂直分辨率
        buffer[28] = 0x00;
        buffer[29] = 0x00;
        buffer[30] = 0x00;
        buffer[31] = 0x00;
        //0 使用所有的调色板项
        buffer[32] = 0x00;
        buffer[33] = 0x00;
        buffer[34] = 0x00;
        buffer[35] = 0x00;
        //开颜色索引
        buffer[36] = 0x00;
        buffer[37] = 0x00;
        buffer[38] = 0x00;
        buffer[39] = 0x00;
        // 加上颜色表
        // 00 00 00 00 ff ff ff 00 那么 0代表黑,1代表白
        // 若为
        // ff ff ff 00 00 00 00 00 那么 1代表黑,0代表白  --- 选择这个
        buffer[40] = (byte) 0xFF;
        buffer[41] = (byte) 0xFF;
        buffer[42] = (byte) 0xFF;
        buffer[43] = (byte) 0x00;

        buffer[44] = (byte) 0x00;
        buffer[45] = (byte) 0x00;
        buffer[46] = (byte) 0x00;
        buffer[47] = (byte) 0xFF;
        return buffer;
这是TSC官网的资源链接:https://www.chinatsc.cn/SC/support/support_download/TTP-244M_Pro_Series
其中比较重要的 Diagtool 工具,sdk ,示例文档,指令集
懒得去下的 ,我这边上传了个整合版资源:https://download.csdn.net/download/LZ511321/15466176
踩了很多坑,卡在图片方式打印这块很久最终决定更换方式,希望有所帮助
以上是关于android局域网连接TSC桌面打印机打印的主要内容,如果未能解决你的问题,请参考以下文章