基于光流的视频插帧算法 TOFlow 解读教程
Posted OpenMMLab
tags:
篇首语:本文由小常识网(cha138.com)小编为大家整理,主要介绍了基于光流的视频插帧算法 TOFlow 解读教程相关的知识,希望对你有一定的参考价值。
在之前的文章中,我们介绍了基于深度学习的视频插帧。视频插帧旨在提高视频的帧率和流畅度,让视频看起来更加“丝滑”。
OpenMMLab:一键慢镜头:视频插帧,让老电影“纵享丝滑”13 赞同 · 2 评论文章正在上传…重新上传取消
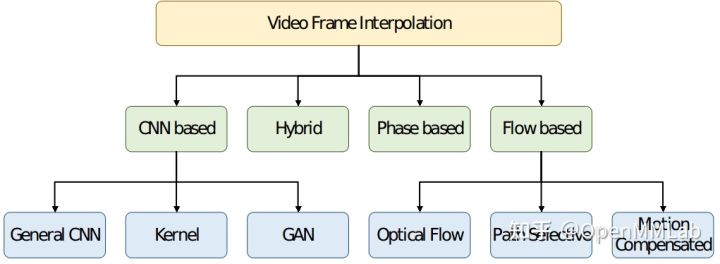
基于深度学习的视频插帧算法可分为以下几类:

其中基于 Flow 的算法通过确定连续帧中相应实体之间流的性质,合成中间图像,以提高生成的视频质量。基于 Flow 的算法包括光流、路径选择、运动补偿,依赖于精确的运动估计技术,相比其他方法能够获取更佳的插帧效果。
今天我们就以 TOFlow (Video Enhancement with Task-Oriented Flow) 为例介绍基于光流的视频插帧算法以及其在 MMEditing 中的实现。
目录
TOFlow 的贡献
光流算法的目标是让扭曲后的图像和目标图像一致。但这种精确的光流估计前提是假设亮度一致,在变化的光照、姿势等具有挑战性的情况下,光流图的估计并不准确,导致目标边界模糊。此外,这种符合物体运动变化的图像光流估计并不适用于所有的视频处理任务。下图中,虽然 EpicFlow (Revaud et al 2015) 预测了目标的精准光流信息,但光流场中的细小误差会导致插帧结果中的伪影,例如(I-c)中模糊的手指。在视频去噪任务中,EpicFlow 预测了准确的光流但是去噪结果中依然包含噪声。

因此 TOFlow 提出将预训练的光流模块和后续处理联合训练,去学习适用于特定任务的光流特征表达。该模型使用基于光流的方法实现了视频插帧、视频去噪和视频超分辨率三个任务,计算量小且处理效果达到最优水平(例如上图 I-e 和 II-e)。
MMEditing 过往版本支持 TOFlow 视频超分辨率算法的推理,v0.14.0 版本新增了 TOFlow 视频插帧算法的训练与推理。
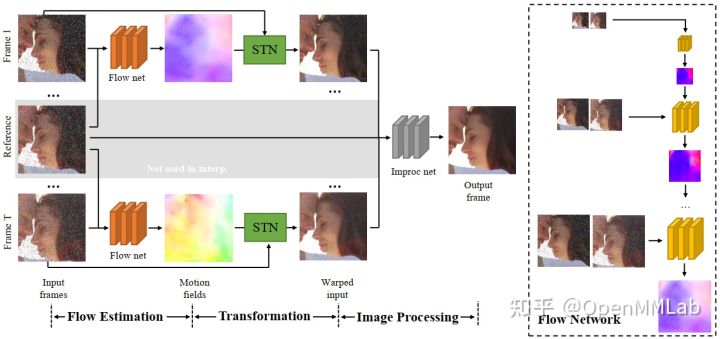
TOFlow 模型结构
TOFlow 模型结构包含三个部分:
- Flow Estimation 光流估计
- Transformation 光流变换
- Image Processing 图像处理
分别对应着下图中的三个阶段。在视频插帧任务中,输入的帧数 N=3;去噪和超分任务中,输入的帧数 N=7。

Flow Estimation
Flow Estimation 模块以预训练的 SPyNet 为 backbone,有 N-1 个结构相同、参数共享的 SPyNet 光流网络。值得注意的是,SPyNet 官方模型不包含 BN 结构,TOFlow 论文使用的 SPyNet 模型增加了 BN 结构。由于 TOFlow 的 batch_size 为 1,MMEditing 复现的模型中采用 SPyNet 官方模型,不包含 BN。
在视频插帧任务中,reference frame 是需要生成的帧,因此不包含在输入中,模型不包括上图中灰色区域。在插帧任务中,TOFlow 网络使用 SPyNet 处理 frame1 和 frame 3 以获取 
 和 。
和 。
Transformation
借助 Flow Estimation 模块预测出的光流场,transformation 模块使用 `flow_warp` 函数(对应上图中的 STN)将输入帧 register 到参考帧。在视频插帧任务中,该部分获取 frame 1 和 frame 3 到 frame 2 的映射:

Image Processing
Image Processing 模块使用 ResNet 结构,将 Transformation 模块获取到的映射图像加工成最终的插帧结果。
Vimeo90k-triplet 数据集
Video Enhancement with Task-Oriented Flow 论文中提出 TOFlow 模型的同时提供了 Vimeo90k 数据集,其中 Vimeo90k-triplet 为用于插帧的数据集,每个场景包含 3 张图片,使用 im1.png 和 im3.png 求解得到 im2.png。MMEditing 中已支持 Vimeo90k-triplet 数据集。
- 训练集数据量:51.3k
- 测试集数据量:3.8k
- tri_testlist.txt / tri_trainlist.txt 标注结构:
00001/0001
00001/0002
数据集的文件结构如下所示:
├── tri_testlist.txt
├── tri_trainlist.txt
├── sequences
│   ├── 00001
│   │   ├── 0001
│   │   │   ├── im1.png
│   │   │   ├── im2.png
│   │   │   └── im3.png
│   │   ├── 0002
│   │   ├── 0003
│   │   ├── ...
│   ├── 00002
│   ├── ...
MMEditing 中的 TOFlow
TOFlow 基于预训练的 SPyNet,根据预训练 SPyNet 的训练数据,MMEditing 提供了以下 5 个模型:
| Method | PSNR / SSIM |
|---|---|
| tof_vfi_spynet_chair_nobn_1xb1_vimeo90k | 33.3294 / 0.9465 |
| tof_vfi_spynet_kitti_nobn_1xb1_vimeo90k | 33.3339 / 0.9466 |
| tof_vfi_spynet_sintel_clean_nobn_1xb1_vimeo90k | 33.3170 / 0.9464 |
| tof_vfi_spynet_sintel_final_nobn_1xb1_vimeo90k | 33.3237 / 0.9465 |
| tof_vfi_spynet_pytoflow_nobn_1xb1_vimeo90k | 33.3426 / 0.9467 |
本文以 tof_vfi_spynet_chair_nobn_1xb1_vimeo90k 为例介绍 MMEditing 中的 TOFlow。
其中 tof_vfi 是模型名称,spynet_chair_nobn 表示使用 chair 数据集预训练的无 BN 结构的 SPyNet 模型,1xb1 代表模型在单卡上训练,每张卡上 batch_size=1,vimeo90k 表示训练数据集是 vimeo90k-triplet。
定义 Model 和 Backbone
训练时需要导入预训练的 SPyNet 参数,如下面代码所示:
# pretrained SPyNet
source = 'https://download.openmmlab.com/mmediting/video_interpolators/toflow'
spynet_file = 'pretrained_spynet_chair_20220321-4d82e91b.pth'
load_pretrained_spynet = f'source/spynet_file'

# model settings
model = dict(
    type='BasicInterpolator',
    generator=dict(
        type='TOFlowVFI',
        rgb_mean=[0.485, 0.456, 0.406],
        rgb_std=[0.229, 0.224, 0.225],
        flow_cfg=dict(norm_cfg=None, pretrained=load_pretrained_spynet)),
    pixel_loss=dict(type='CharbonnierLoss', loss_weight=1.0, reduction='mean'))
# model training and testing settings
train_cfg = None
test_cfg = dict(metrics=['PSNR', 'SSIM'], crop_border=0)
定义数据处理 pipeline
TOFlow 未进行数据增广处理,因此测试、验证的 pipeline 与训练 pipeline 相同,如下面代码所示:
train_pipeline = [
    dict(
        type='LoadImageFromFileList',
        io_backend='disk',
        key='inputs',
        channel_order='rgb',
        backend='pillow'),
    dict(
        type='LoadImageFromFile',
        io_backend='disk',
        key='target',
        channel_order='rgb',
        backend='pillow'),
    dict(type='RescaleToZeroOne', keys=['inputs', 'target']),
    dict(type='FramesToTensor', keys=['inputs']),
    dict(type='ImageToTensor', keys=['target']),
    dict(
        type='Collect',
        keys=['inputs', 'target'],
        meta_keys=['inputs_path', 'target_path', 'key'])
]

Demo pipeline 则为训练 pipeline 剔除 `target` 相关关键词的结果:
demo_pipeline = [
    dict(
        type='LoadImageFromFileList',
        io_backend='disk',
        key='inputs',
        channel_order='rgb',
        backend='pillow'),
    dict(type='RescaleToZeroOne', keys=['inputs']),
    dict(type='FramesToTensor', keys=['inputs']),
    dict(type='Collect', keys=['inputs'], meta_keys=['inputs_path', 'key'])
]
定义训练和测试配置
如下面代码所示:
root_dir = 'data/vimeo_triplet'
data = dict(
    workers_per_gpu=1,
    train_dataloader=dict(samples_per_gpu=1, drop_last=True),  # 1 gpu
    val_dataloader=dict(samples_per_gpu=1),
    test_dataloader=dict(samples_per_gpu=1),

    # train
    train=dict(
        type='RepeatDataset',
        times=1000,
        dataset=dict(
            type=train_dataset_type,
            folder=f'root_dir/sequences',
            ann_file=f'root_dir/tri_trainlist.txt',
            pipeline=train_pipeline,
            test_mode=False)),
    # val
    val=dict(
        type=train_dataset_type,
        folder=f'root_dir/sequences',
        ann_file=f'root_dir/tri_validlist.txt',
        pipeline=train_pipeline,
        test_mode=True),
    # test
    test=dict(
        type=train_dataset_type,
        folder=f'root_dir/sequences',
        ann_file=f'root_dir/tri_testlist.txt',
        pipeline=train_pipeline,
        test_mode=True),
)
其中 tri_validlist.txt 来源于 tri_testlist.txt,为 tri_testlist.txt 中匹配 00001/* 的 42 条数据。RepeatDataset 对训练集文件列表进行了复制,从而扩充训练数据。
定义优化器、学习策略和 Hook
如下面代码所示:
# optimizer
optimizers = dict(
    generator=dict(type='Adam', lr=5e-5, betas=(0.9, 0.99), weight_decay=1e-4))

# learning policy
total_iters = 1000000
lr_config = dict(
    policy='Step',
    by_epoch=False,
    gamma=0.5,
    step=[200000, 400000, 600000, 800000])

checkpoint_config = dict(interval=5000, save_optimizer=True, by_epoch=False)
evaluation = dict(interval=5000, save_image=True)
log_config = dict(
    interval=100, hooks=[
        dict(type='TextLoggerHook', by_epoch=False),
    ])
visual_config = None
结语
MMEditing 是面向底层视觉任务的工具包,经过社区开发者的不懈努力,MMEditing 已经支持了大量先进的超分辨率模型,可以将视频和图像从低分辨率无损放大到高分辨率。同时,MMEditing 也提供了 TOFlow、CAIN 等视频插帧算法,我们的模块化设计可以让大家方便地增加或减少各种 pipeline。欢迎大家来体验,享受一下高帧率的快感。
https://github.com/open-mmlab/mmeditinggithub.com/open-mmlab/mmediting
视频抖动程度检测基于LK光流算法的视频图像序列抖动程度计算matlab仿真
1.软件版本
matlab2021a
2.算法原理概述
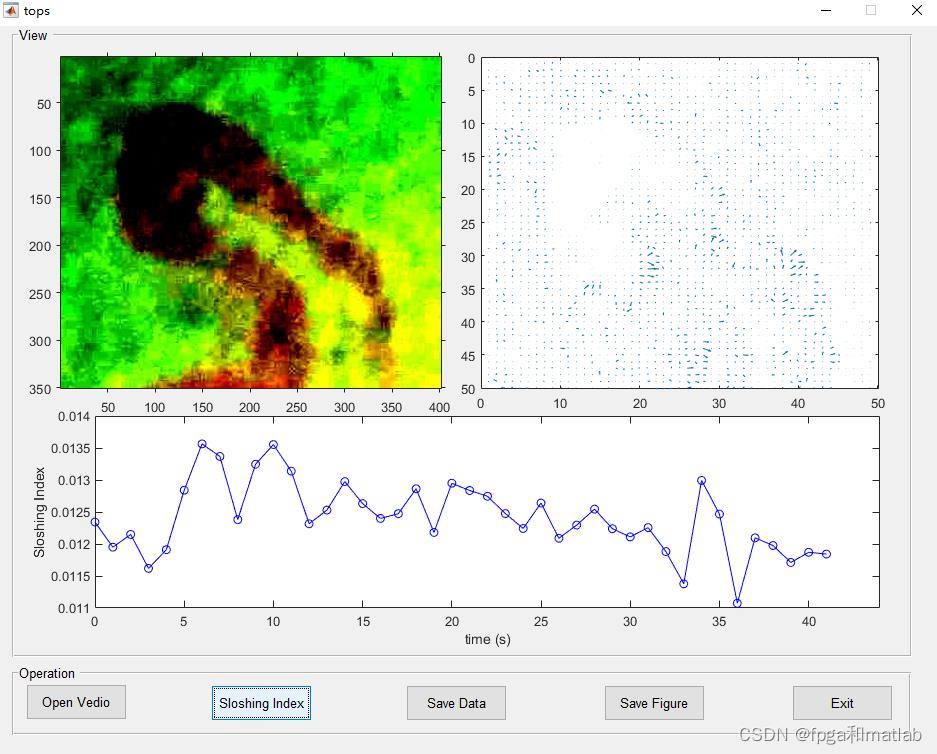
根据LK光流提取算法,得到视频前后两帧图像的光流,假设,
X(t),Y(t)
表示t时刻光流场的X分量和Y分量;
那么晃动计算公为:

其中R为光流场这个图片的变长。
3.部分源码
function varargout = tops(varargin)
% TOPS MATLAB code for tops.fig
%      TOPS, by itself, creates a new TOPS or raises the existing
%      singleton*.
%
%      H = TOPS returns the handle to a new TOPS or the handle to
%      the existing singleton*.
%
%      TOPS('CALLBACK',hObject,eventData,handles,...) calls the local
%      function named CALLBACK in TOPS.M with the given input arguments.
%
%      TOPS('Property','Value',...) creates a new TOPS or raises the
%      existing singleton*.  Starting from the left, property value pairs are
%      applied to the GUI before tops_OpeningFcn gets called.  An
%      unrecognized property name or invalid value makes property application
%      stop.  All inputs are passed to tops_OpeningFcn via varargin.
%
%      *See GUI Options on GUIDE's Tools menu.  Choose "GUI allows only one
%      instance to run (singleton)".
%
% See also: GUIDE, GUIDATA, GUIHANDLES

% Edit the above text to modify the response to help tops

% Last Modified by GUIDE v2.5 22-Dec-2018 15:47:17

% Begin initialization code - DO NOT EDIT
gui_Singleton = 1;
gui_State = struct('gui_Name',       mfilename, ...
                   'gui_Singleton',  gui_Singleton, ...
                   'gui_OpeningFcn', @tops_OpeningFcn, ...
                   'gui_OutputFcn',  @tops_OutputFcn, ...
                   'gui_LayoutFcn',  [] , ...
                   'gui_Callback',   []);
if nargin && ischar(varargin1)
    gui_State.gui_Callback = str2func(varargin1);
end

if nargout
    [varargout1:nargout] = gui_mainfcn(gui_State, varargin:);
else
    gui_mainfcn(gui_State, varargin:);
end
% End initialization code - DO NOT EDIT


% --- Executes just before tops is made visible.
function tops_OpeningFcn(hObject, eventdata, handles, varargin)
% This function has no output args, see OutputFcn.
% hObject    handle to figure
% eventdata  reserved - to be defined in a future version of MATLAB
% handles    structure with handles and user data (see GUIDATA)
% varargin   command line arguments to tops (see VARARGIN)

% Choose default command line output for tops
handles.output = hObject;

% Update handles structure
guidata(hObject, handles);

% UIWAIT makes tops wait for user response (see UIRESUME)
% uiwait(handles.figure1);


% --- Outputs from this function are returned to the command line.
function varargout = tops_OutputFcn(hObject, eventdata, handles)
% varargout  cell array for returning output args (see VARARGOUT);
% hObject    handle to figure
% eventdata  reserved - to be defined in a future version of MATLAB
% handles    structure with handles and user data (see GUIDATA)

% Get default command line output from handles structure
varargout1 = handles.output;


% --- Executes on button press in pushbutton1.
function pushbutton1_Callback(hObject, eventdata, handles)
% hObject    handle to pushbutton1 (see GCBO)
% eventdata  reserved - to be defined in a future version of MATLAB
% handles    structure with handles and user data (see GUIDATA)
parameter;
NAME=0;


[filename filepath]=uigetfile('*.*','请选择文件');

SamplePath1 =[filepath,'\\'];  %存储图像的路径
fileExt = '*.jpg';  %待读取图像的后缀名
%获取所有路径
files = dir(fullfile(SamplePath1,fileExt));

for kk = 1:length(files)
    fileName   = strcat(SamplePath1,files(kk).name);
    I0kk     = imread(fileName);
end
axes(handles.axes1);
imshow(I01);

% --- Executes on button press in pushbutton2.
function pushbutton2_Callback(hObject, eventdata, handles)
% hObject    handle to pushbutton2 (see GCBO)
% eventdata  reserved - to be defined in a future version of MATLAB
% handles    structure with handles and user data (see GUIDATA)
parameter;
global dist;%
 dist=[];
 global x_;%
global y_;%
global hor_;%
global ver_;%
global R;%
global blkSize;%

for kk = 1:length(files)-2
    kk
    [R,C,K]    = size(I0kk);
    %分块
    blkSize    = floor(R/50);
    R1         = blkSize*floor(R/blkSize);
    C1         = blkSize*floor(C/blkSize);

    I1         = double(rgb2gray(I0kk));
    I2         = double(rgb2gray(I0kk+1));

    I1s        = imresize(I1,[C1,R1]);
    I2s        = imresize(I2,[C1,R1]);

    [row,col]  = size(I1s);
    blkr       = row/blkSize;
    blkc       = col/blkSize;

    %光流算法
    %hor为水平运动矢量,ver为垂直运动矢量
    [hor,ver]  = func_Soptflow(I1s,I2s,blkSize);
    x          =(1:1:blkc);
    y          =(1:1:blkr);
    hor_kk = hor;
    ver_kk = ver;


    %晃动指标
    if kk>=2
       dist(kk) = sqrt(mean(mean((hor_kk-hor_kk-1).^2 + (ver_kk-ver_kk-1).^2)))/floor(R/blkSize)/sqrt(2);
    else
%        dist(kk) = 0;
    end

    axes(handles.axes1);
    imshow(uint8(I0kk));

    axes(handles.axes2);
    quiver(x,y,hor,ver);
    axis([0,R/blkSize,0,R/blkSize]);
    set(gca,'ydir','reverse');

    axes(handles.axes3);
    if kk>=2
    plot([0:kk-2],[dist(2:end)],'b-o');
    end
    xlim([0,length(files)-1]);

    xlabel('time (s)');
    ylabel('Sloshing Index');


    x_kk   = x;
    y_kk   = y;


    pause(0.001);
end


% --- Executes on button press in pushbutton3.
function pushbutton3_Callback(hObject, eventdata, handles)
% hObject    handle to pushbutton3 (see GCBO)
% eventdata  reserved - to be defined in a future version of MATLAB
% handles    structure with handles and user data (see GUIDATA)
parameter;
global dist;%

times = [1:length(files)-2]';
data1 = [dist'];
%构建数据组
data   = [times,data1];
[m, n] = size(data);
data_cell = mat2cell(data, ones(m,1), ones(n,1));

title  = 'Frame','Sloshing Index';

result = [title;data_cell];

NAME   = NAME+1;
%保存到excel中
s      = xlswrite(['Save',num2str(NAME),'.xls'], result);
msgbox('Save Success');

% --- Executes on button press in pushbutton4.
function pushbutton4_Callback(hObject, eventdata, handles)
% hObject    handle to pushbutton4 (see GCBO)
% eventdata  reserved - to be defined in a future version of MATLAB
% handles    structure with handles and user data (see GUIDATA)
parameter;
global x_;%
global y_;%
global hor_;%
global ver_;%
global R;%
global blkSize;%
global dist;%
%以下全部是保存图片语句
for kk = 1:length(files)-2
    figure(4);
    quiver(x_kk,y_kk,hor_kk,ver_kk);
    axis([0,R/blkSize,0,R/blkSize]);
    set(gca,'ydir','reverse');

    saveas(gcf,['flow_images/flow_images',num2str(kk),'.jpg'])

end
close(figure(4))

tt = 0:length(dist);
figure(5);
plot(tt(1:end-2),dist(2:end),'b-o');
 xlim([0,length(files)-1]);
    xlabel('time (s)');
    ylabel('Sloshing Index');
saveas(gcf,'sloshing_images/sloshing_images.jpg')
close(figure(5))


msgbox('Save Success');

% --- Executes on button press in pushbutton5.
function pushbutton5_Callback(hObject, eventdata, handles)
% hObject    handle to pushbutton5 (see GCBO)
% eventdata  reserved - to be defined in a future version of MATLAB
% handles    structure with handles and user data (see GUIDATA)
clc;
clear;
close all;
4.仿真结论


A09-55
 开发者涨薪指南
 48位大咖的思考法则、工作方式、逻辑体系
以上是关于基于光流的视频插帧算法 TOFlow 解读教程的主要内容,如果未能解决你的问题,请参考以下文章