2022-04-20 Unity入门7——物理系统之碰撞检测
Posted 蔗理苦
tags:
篇首语:本文由小常识网(cha138.com)小编为大家整理,主要介绍了2022-04-20 Unity入门7——物理系统之碰撞检测相关的知识,希望对你有一定的参考价值。
文章目录
一、刚体 Rigid Body
刚体利用体积(碰撞器 Collider)进行碰撞计算,模拟真实的碰撞效果,产生力的作用
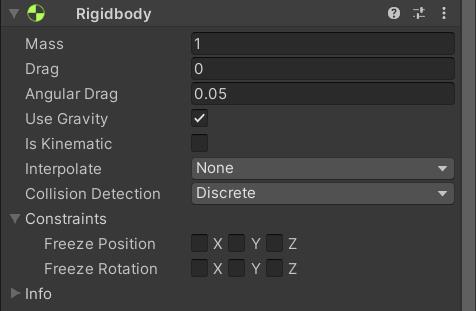
碰撞产生的必要条件:
- 两个物体都有碰撞器 Collider
- 至少一个物体有刚体
-
Mass:质量
默认为千克,质量越大惯性越大
-
Drag:空气阻力
根据力移动对象时影响空气阻力大小
0 表示没有空气阻力
-
Augular Drag:旋转阻力
根据扭矩旋转对象时影响对象的空气阻力大小
0 表示没有阻力
-
Use Gravity:是否受重力影响
-
Is Kinematic:是否设置为运动学
如果启用,对象将不会被物理引擎驱动,只能通过 Transform 对其进行操作
对于移动平台,或者如果要动画附加了 HingeJoint 的刚体,此属性将非常有用
-
Interpolate:插值运算
-
None:不应用插值运算
-
Interpolate:根据前一帧的变换来平滑变换
-
Extrapolate:插值运算
根据下一帧的估计变换来平滑变换,若物理帧时间过长,此效果将不好
-
-
Collison Detection:碰撞检测模式
-
Discrete:离散检测
对场景中的所有其他碰撞体使用离散碰撞检测,其他碰撞体在测试碰撞时会使用离散检测。
用于正常碰撞(默认值)
-
Continuous:连续检测
对动态碰撞体(具有刚体)使用离散碰撞检测
对静态碰撞体(没有刚体)使用连续碰撞检测
设置为连续动态的刚体,将在测试与该刚体的碰撞时使用连续碰撞检测(物理性能消耗较大,物体运动缓慢时请设置为 Discrete)
其他刚体将使用离散碰撞检测
-
Continuous Dynamic:连续动态检测
对设置为连续和连续动态碰撞的对象使用连续碰撞检测
对静态碰撞体(没有刚体)使用连续碰撞检测
对其他碰撞体使用离散碰撞检测
用于快速移动的对象
-
Continuous Speculative:连续推测检测
对刚体和碰撞体使用推测性连续碰撞检测
通常比连续碰撞检测的成本更低
无刚体碰撞盒 Discrete Continuous Continuous Dynamic Continuous Speculative 无刚体碰撞盒 不检测碰撞 Discrete Continuous Continuous Continuous Speculative Discrete Discrete Discrete Discrete Discrete Continuous Speculative Continuous Continuous Discrete Discrete Continuous Continuous Speculative Continuous Dynamic Continuous Discrete Continuous Continuous Continuous Speculative Continuous Speculative Continuous Speculative Continuous Speculative Continuous Speculative Continuous Speculative Continuous Speculative 性能消耗关系:Continuous Dynamic > Continuous Speculative > Continuous > Discrete
-
-
Constrains:对刚体运动的约束
- Freeze Position:限制刚体在世界坐标轴下 X、Y、Z 轴的移动
- Freeze Rotation:限制刚体在世界坐标轴下 X、Y、Z 轴的旋转
-
Info:用于显示参数的面板,不修改里面的值
二、碰撞器 Collider
碰撞器表示物体的体积(形状)
碰撞器种类一共有 6 种:
- 盒状碰撞器 Box Collider
- 球状碰撞器 Sphere Collider
- 胶囊碰撞器 Capsule Collider
- 网格碰撞器 Mesh Collider
- 轮胎碰撞器 Wheel Collider
- 地形碰撞器 Terrain Collider
常用的为前 3 种
(一)共同参数
-
Edit Collider:编辑碰撞器的大小
-
Is Trigger:是否为触发器
如果启用,则该碰撞体用于触发事件,并被物理引擎所忽略
主要用于进行没有物理效果的碰撞检测
-
Material:物理材质
可以确定碰撞体和其他对象碰撞时的交互(表现)方式
-
Center:碰撞体的中心偏移位置
(二)常用碰撞器
- Box Collider
- Size:碰撞体在 X、Y、Z 方向上的大小
- Sphere Collider
- Radius:球形碰撞体的半径大小
- Capsule Collider
- Radius:胶囊体的半径
- Height:胶囊体的高度
- Direction:胶囊体在对象局部空间中的轴向
(三)异形物体使用多种碰撞器组合
刚体对象的子对象碰撞信息参与碰撞检测
即父物体添加 Rigid Body,子物体设置 Collider。
(四)不常用碰撞器
-
Mesh Collider
-
Convex:是否为凸面的
勾选后,该 Mesh Collider 将会与其他 Mesh Collider 发生碰撞,最多支持 255 个三角面片
如果该对象添加了刚体 Rigid Body,则该选项必须勾选,否则会报错
-
Cooking Options:物理引擎对网格的处理方式
不常用
-
Mesh:引用需要用于碰撞的网格
-
-
Wheel Collider
赛车游戏中使用,其他时候不常用
注意:添加 Wheel Collider 后一定要添加 Rigid Body(或在父物体添加),否则将失效
-
Terrain Collider
地形系统中使用
性能较为低下,很少使用
三、物理材质
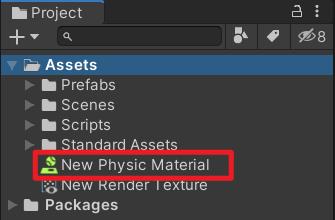
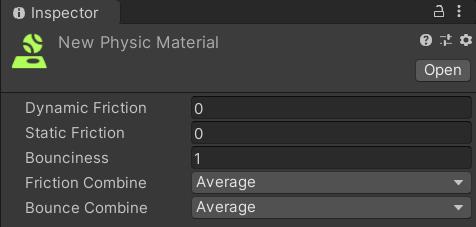
在 Project 中创建物理材质 Physics Material
-
Dynamic Friction:滑动摩擦力
0 表示绝对光滑,1 表示迅速静止
-
Static Frction:静摩擦力
0 表示绝对光滑,1 表示无法移动
-
Bounciness:表面弹性
0 表示不会反弹,1 表示反弹没有能量损失,甚至可能会增加少量能量
-
Friction Combine:摩擦力组合方式
- Average:取平均值
- Minimum:取最小值
- Maximum:取最大值
- Multiply:相乘
-
Bounce Combine:弹性组合方式
- Average:取平均值
- Minimum:取最小值
- Maximum:取最大值
- Multiply:相乘
四、碰撞检测函数
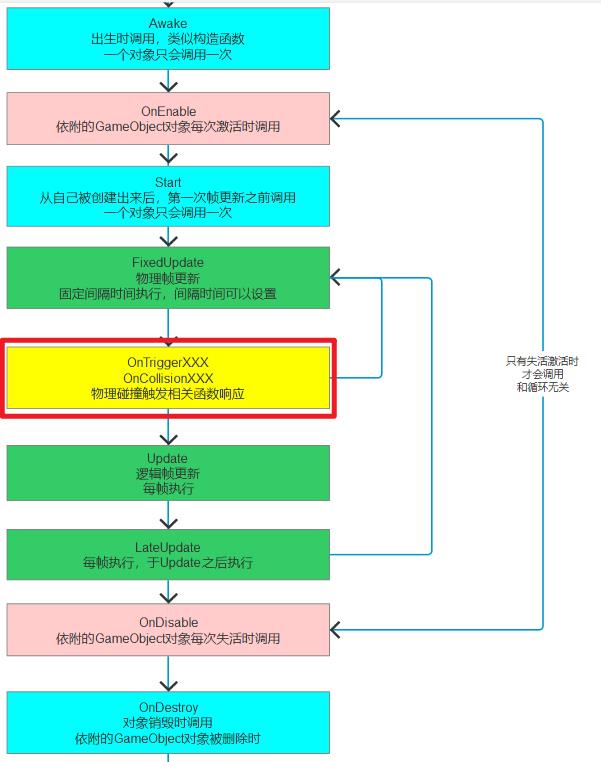
碰撞和触发响应函数属于特殊的生命周期函数,也是通过反射调用
碰撞和触发器函数都可以写成虚函数,在子类去重写逻辑
(一)物理碰撞检测响应函数
// 碰撞触发接触时会 自动执行这个函数
private void OnCollisionEnter(Collision collision)

    // Collision类型的 参数 包含了 碰到自己的对象的相关信息

    // 关键参数
    // 1.碰撞到的对象碰撞器的信息
    collision.collider

    // 2.碰撞对象的依附对象(GameObject)
    collision.gameObject

    // 3.碰撞对象的依附对象的位置信息
    collision.transform

    // 4.触碰点数相关
    collision.contactCount
    // 接触点 具体的坐标
    ContactPoint[] pos = collision.contacts;

    // 只要得到了 碰撞到的对象的 任意一个信息 就可以得到它的所有信息

    print(this.name + "被" + collision.gameObject.name + "撞到了");


// 碰撞结束分离时  会自动执行的函数
private void OnCollisionExit(Collision collision)

    print(this.name + "被" + collision.gameObject.name + "结束碰撞了");


// 两个物体相互接触摩擦时 会不停的调用该函数
private void OnCollisionStay(Collision collision)

    print(this.name + "一直在和" + collision.gameObject.name + "接触");
(二)触发器检测响应函数
// 触发开始的函数 当第一次接触时 会自动调用
protected virtual void OnTriggerEnter(Collider other)

    print(this.name + "被" + other.gameObject.name + "触发了");


// 触发结束的函数 当水乳相融的状态结束时 会调用一次
private void OnTriggerExit(Collider other)

    print(this.name + "被" + other.gameObject.name + "结束水乳相融的状态了");


// 当两个对象 水乳相融的时候 会不停调用
private void OnTriggerStay(Collider other)

    print(this.name + "和" + other.gameObject.name + "正在水乳相融");
-
只要挂载的对象能和别的物体产生碰撞或者触发,那么对应的这 6 个函数就能够被响应
-
6 个函数不是说都得写,一般根据需求来进行选择书写,一般用 Enter 函数较多
-
如果是一个异形物体,刚体在父对象上,如果你想通过子对象上挂脚本检测碰撞是不行的,必须挂载到这个刚体父对象上才行
五、刚体加力
(一)刚体自带添加力的方法
- 获取刚体组件
rigidBody = this.GetComponent<Rigidbody>();
- 添加力
// 相对世界坐标
// 世界坐标系 Z轴正方向加了一个力
// 加力过后 对象是否停止移动 是由阻力决定的
// 如果阻力为0 那给了一个力过后 始终 是不会停止运动
rigidBody.AddForce(Vector3.forward * 10);

// 如果想要在 世界坐标系方法中 让对象 相对于自己的面朝向动
rigidBody.AddForce(this.transform.forward * 10);

// 相对本地坐标
rigidBody.AddRelativeForce(Vector3.forward * 10);

//如果你希望即使有阻力 也希望对象一直动 那你就把下面代码放在Update函数中 一直“推”就行了
rigidBody.AddForce(Vector3.forward * 10);
- 添加扭矩力
// 相对世界坐标
// 绕y轴旋转
rigidBody.AddTorque(Vector3.up * 10);

// 相对本地坐标
rigidBody.AddRelativeTorque(Vector3.up * 10);
- 直接改变速度
// 这个速度方向 是相对于 世界坐标系的
// 如果要直接通过改变速度 来让其移动 一定要注意这一点
rigidBody.velocity = Vector3.forward * 5;
- 模拟爆炸效果
// 模拟爆炸的力 一定是 所有希望产生爆炸效果影响的对象
// 都需要得到他们的刚体 来执行这个方法 才能都有效果
// 参数一 爆炸力
// 参数二 爆炸位置
// 参数三 爆炸半径范围
rigidBody.AddExplosionForce(100, Vector3.zero, 10);
(二)力的模式
// 第二个参数 力的模式 主要的作用 就是 计算方式不同而已
// 由于4中计算方式的不同 最终的移动速度就会不同
rigidBody.AddForce(Vector3.forward * 10, ForceMode.Acceleration);
速度计算公式:v = F * t / m(动量定理)
-
Acceleration
给物体增加一个持续的加速度,忽略其质量
F = (0, 0, 10)、t = 0.02 s、m = 默认为 1
v = 10 * 0.02 / 1 = 0.2 m/s
每物理帧移动 0.2 m/s * 0.02 = 0.004 m -
Force
给物体添加一个持续的力,与物体的质量有关
F = (0, 0, 10)、t = 0.02 s、m = 2 kg
v = 10 * 0.02 / 2 = 0.1 m/s
每物理帧移动 0.1 m/s * 0.02 = 0.002 m -
Impulse
给物体添加一个瞬间的力,与物体的质量有关,忽略时间,t 默认为1
F = (0, 0, 10)、t = 1 s、m = 2 kg
v = 10 * 1 / 2 = 5 m/s
每物理帧移动 5 m/s * 0.02 = 0.1 m -
VelocityChange
给物体添加一个瞬时速度,忽略质量,忽略时间
F = (0, 0, 10)、t = 1 s、m = 默认为 1
v = 10 * 1 / 1 = 10 m/s
每物理帧移动 10 m/s * 0.02 = 0.2 m
(三)力场
为物体添加 Constant Force,若物体之前没有 Rigid Body,则会为其自动添加
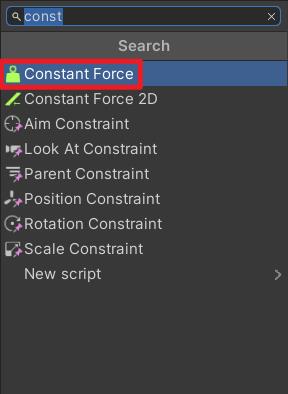
进行参数设置

(四)刚体休眠
Unity 为了节约性能,为刚体添加了休眠机制:
Rigidbody sleeping happens completely automatically. Whenever a rigidbody is slower than the sleepAngularVelocity and sleepVelocity it will start falling asleep. After a few frames of resting it will then be set to sleep. When the body is sleeping, no collision detection or simulation will be performed anymore. This saves a lot of CPU cycles.
刚体休眠完全自动发生。只要刚体的速度低于 sleepAngularVelocity 和 sleepVelocity,该刚体就会开始休眠。其空闲一些帧后,就会被设置成休眠状态。处于休眠状态中的物体,不会再对其进行碰撞检测和模拟。这会节约大量的 CPU 开销。
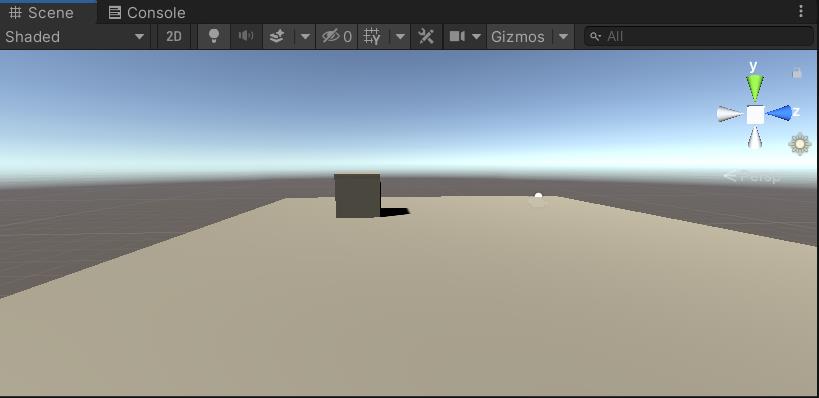
例如,在为 Cube 添加 Rigid Body 后其下落静止在平面上
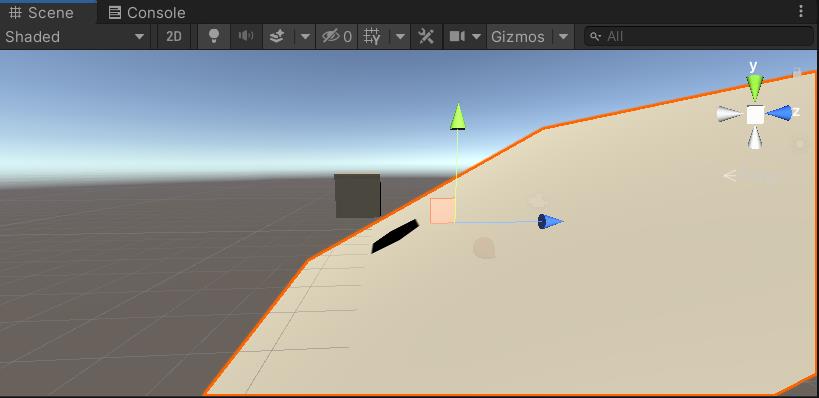
将平面旋转一定角度后,发现 Cube 悬空,说明此时 Cube 的刚体休眠了
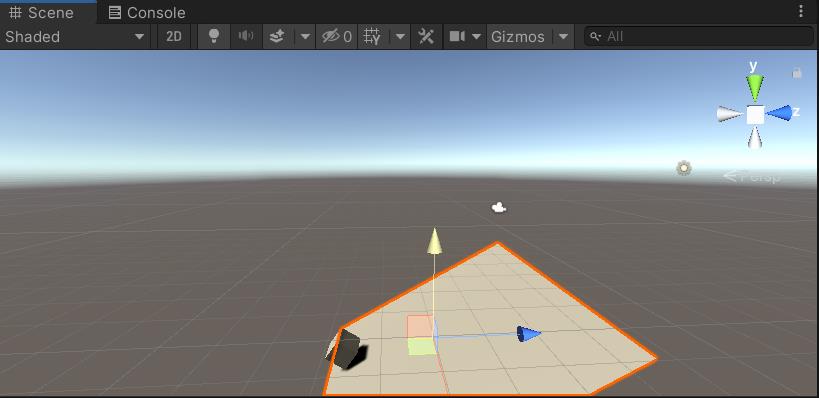
将平面向下以一定速度拖动,则 Cube 下落,刚体被激活
使用代码控制:
// 获取刚体是否处于休眠状态 如果是
if (rigidBody.IsSleeping())

    // 就唤醒它
    rigidBody.WakeUp();
Unity3D入门篇
相关网址汇总
文章目录
1.Unity官网(外网):https://unity.com
2.Unity官网(内网):https://unity.cn
3.Unity学习:
https://learn.unity.com
https://learn.unity.com/projects
4.Unity官方商店:https://assetstore.unity.com
基本操作以及模块简介
视角操作以及组件
组件设置
1.导航器Gizmo:表示世界坐标的方向
2.栅格Grid:表示XZ坐标平面
3.天空盒Skybox:表示游戏世界的背景
3D视图:
1.旋转视图:右键 / Alt+左键
2.视角缩放:滚轮 / Alt+右键
导航器:
1.按住Shift,点击中间的小方块,恢复方向
2.点Y轴,顶视图
3.点X轴,右视图
4.点Z轴,前视图
视野中心:
1.将某物体放置于世界中心:选中一个物体,长按住F键
此时旋转视图,似是绕着物体旋转。
2.出生点:添加一个新物体,其位于视图中心。并不是(0,0,0)。
透视和正交:
透视视图Perspective:近大远小
正交视图Orthographic:等距视图Isometric,物体显示与距离无关
在导航器下方的persp处调节。
透视,广角设定:
摄像机的广角Field默认为60°。广角越大,透视畸变太厉害。可以设为30~40°。
物体操作
Unity自带的基础模型
- Cube,立方体
- Sphere,球体
- Capsule,胶囊体
- Cylinder,圆柱体
- Plane,平面
旋转工具Rotate Tools:
在Unity中,顺时针旋转,对应方向参量为负方向。
逆时针旋转,对应方向参量为正方形。
此外,按住ctrl键旋转使其每次角增量为15°。
缩放工具Scale Tools:
*AF扩展插件:AfSimpleExtension
扩展功能:
1.输出物体的尺寸Scale
2.聚焦到事业重心 G键
3.快速切换正交视图与等距视图。
模型操作
网格Mesh:存储了模型的形状数据(面,顶点坐标,法向坐标等)。
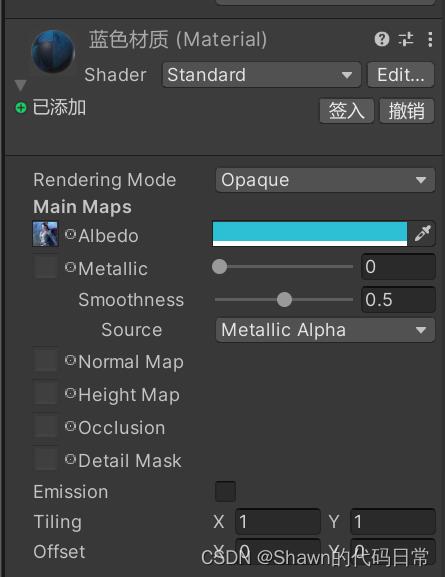
材质Material:需添加到物体上,定义了物体的表面细节(颜色,是否金属,粗糙程度,是否透明…)
纹理Textures:需添加到材质上,可以是贴图。
模型建好以后一般导出为 fbx文件格式。
在Unity中,
- 一个平面是没有厚度的
- 正面可见,背面透明
或者说,平面的背面不会被渲染。
※ FBX文件的使用方式:
1.材质替换
- 选中 *.fbx 文件
- 在Inspector 中切到 Materials属性—>Use Embeded Materials,On Demand Remap:映射新的材质
- 点Apply 应用
2.使用外部材质 Use External Materials - 选中fbx文件
- Location:Use External Materials使用外部材质
- 点Apply应用,将内嵌材质解压缩到Materials目录下
- 直接修改Materials目录下的材质文件。
资源文件
资源文件:Assets目录下的文件,被称为资源。
常见类型:
- 模型文件Model
*.fbx - 图片文件Texture
*.jpg/png/psd/tif - 音频文件AudioClip
*.mp3/wav/aiff - 脚本文件Script
*.cs - 材质文件,场景文件
*.mat,*.unity
轴心,父子关系,空物体
Global全局坐标系:绝对坐标,其X Y Z 指向世界的上下东西南北
Local本地坐标系:相对坐标,其X Y Z 指向模型的前后左右上下
坐标轴的含义:
- X:Right 向右
- Y:up 向上
- Z:forward 向前,一般要求模型直面与Z轴方向一致。
组件Component
常见组件:
- Light:光照
- Mesh Filter:网格过滤器,加载网格数据
- Mesh Renderer:网格渲染器,无渲染物体无法显示
组件的增添与删除…
AudioSource组件的使用方式:
1.添加一个音乐文件 *.mp3/wav/aiff
2.创建一个物体
- Add Component,Audio | Audio Source
- 将音乐文件拖到AudioSource.AudioClip属性
- 在3D窗口上方选 Toggle Audio On
Transform变换组件:
- Position:方位
- Rotation:旋转
- Scale:尺寸
摄像机组件
实用操作:
Align with View:调整摄像机角度使其与3D视图对齐。
预制体简述
预制体:预先规定好信息的一些游戏对象。以便于下次使用。
一些细节:
- 预制体导出时需要勾选其依赖(材质,脚本等),否则无法正常使用。
- 预制体仅仅记录了结点信息
- prefab
不包含材质贴图数据,仅包含引用
脚本与编程
给游戏对象挂载脚本的步骤:
- 创建Scripts文件夹,在其中创建一个C#文件
- 进入C#,编写代码,并保存
- 将脚本文件挂载到游戏对象中(拖拽 or AddComponent)即可
Tips:
- C#文件名必须和类名一致,否则无法挂载
- 脚本必须被挂载到物体上,才会被调用
常用的信息代码:
GameObject obj = this.gameObject; //获取到当前脚本挂载游戏对象
string name = obj.name; //获取到游戏对象名字
Transform tr = obj.transform; // 获取到Transform属性
Vector3 pos = tr.position; //获取到Transfrom中的position值(返回值是三维向量)

Debug.Lo("物体当前的位置:"+pos.ToString("F3")); //保留三位小数

//世界坐标和本地坐标
//this.gameObject.transform 可等效写为 this.transform
tr.localPosition; //本地坐标
tr.position; //世界坐标


//修改某物体的坐标
this.transform.localPosition = new Vector3(1.5f, 2.5f, 0);
帧更新与物体运动
C#代码中的Update()方法:
void Update()

        //Debug.Log("帧更新 Time:" + Time.time); // 获取游戏时间,测试帧率
        //Debug.Log("帧更新 时间差:" + Time.deltaTime); // 每次刷新的时间差

        //物体移动
        //设置小车运动的速度
        float speed = 100;
        float distance = speed * Time.deltaTime;
        Vector3 pos = this.transform.localPosition;
        pos.z += distance;
        this.transform.localPosition = pos;

        //使用Translate方法实现物体移动
        this.transform.Translate(0, 0, distance);

        //dx,dy,dz分别为三个方向的增量,space可选择相对于哪个坐标系
        this.transform.Translate(dx,dy,dz,space);
        //例子
        this.transfrom.Translate(distance,0,distance,Space.Self/World)
物体转向
void Start()

    //转向(在途中加入一个红旗,获取到红旗方向,让小车向红旗方向运行)
    GameObject flag = GameObject.Find("红旗");
    this.transform.LookAt(flag.transform);


void Update()
    float speed  = 100;
    float distance = speed * Time.deltaTime;

    this.transform.Translate(0,0,distance,Space.Self);
小练习:当车到达旗子时,停止运动
public class SimpleLogic : MonoBehaviour

    GameObject flag;
    // Start is called before the first frame update
    void Start()

        flag = GameObject.Find("红旗");
        this.transform.LookAt(flag.transform);


    // Update is called once per frame
    void Update()

        //让小车到达红旗时停下来
        Vector3 p1 = this.transform.position;
        Vector3 p2 = flag.transform.position;
        Vector3 p = p2 - p1;
        //求得两个向量的模值
        float length1to2 = p.magnitude;

        if (length1to2 >= 30)

            //设置小车运动的速度
            float speed = 100;
            float distance = speed * Time.deltaTime;

            this.transform.Translate(0, 0, distance, Space.Self);
物体的旋转
方式一:采用传统的改Rotation值的方式
//不易操作,官方不建议使用
transform.rotation=...

//建议使用欧拉角的方式
方式二:采用欧拉角的计算方法
transform.eulerAngles = new Vector3(0,45,0)
transform.localEulerAngles = new Vector3(0,45,0);
案例:将游戏对象 风扇 转起来
方案一:使用传统欧拉角
void Update()

        //旋转速度(1800°/s)
        float rotateSpeed = 1800;
        float rotateValue = rotateSpeed * Time.deltaTime;

        Vector3 angles = this.transform.localEulerAngles;

        angles.y += rotateValue;

        this.transform.localEulerAngles = angles;
方案二:使用Rotate() API直接调用
void Update()
    //设置旋转速度
    float rotateSpeed = 1800;

    this.transform.Rotate(0,rotateSpeed * Time.deltaTime,0,Space.Self);
脚本与编程的实质:
//unity框架会自动创建游戏对象为一个结点
GameObject obj = new GameObject();
//紧接着创建该游戏结点下挂载的脚本,并由框架挂载到该游戏结点下
SimpleLogic sl = new SimpleLogic();
//并由Unity自动调用Start和Update方法实现初始化和帧更新
消息函数
在c#语言中,所有的脚本类都 应该继承于 MonoBehavior 类,其作用类比于Java中的 Object 类。
消息函数(事件函数):是指一些回调函数。比如Start()方法会在脚本初始化的时候被调用,而Update()会在帧更新的时候被调用。
常见的消息函数:
- Awake:初始化,仅执行一次,组件被禁用时也会调用
- Start:初始化,仅执行一次,组件被禁用时不会调用
- Update:帧更新,每帧调用一次
- OnEnable:当组件启用的时候调用
- OnDisable:当组件禁用时被调用
脚本的执行顺序
- 脚本的执行顺序与Hierarchy中层级顺序无关
- 一般的,可以在Project Setting中的Scripts Execution Order中设置脚本执行的优先级。但没必要!!!
脚本参数:
给脚本添加一个参数:
[ Tooltip("这个是Y轴向的角速度") ]
public float rotateSpeed = 30f;
//在Unity中,脚本参数多了一栏Rotate Speed,值为30
注意事项:
- 修饰符必须为
public - 参数名称必须采用驼峰式命名
- 可采用Tooltip给参数名称添加解释
- 代码中的规定数值为参数的默认值,通过reset按钮可重置
值类型和引用类型:
值类型:
- 值类型本身是一个值,可直接赋值,若未赋值,则默认为0
- 不能为null
结构体类型:
- 本质也是值类型,不能设置为null
- 设置初始值时必须采用new的方式
- 典例:Vector3
public int intValue ; //0
public float floatValue = 0.5f;
public bool boolValue = true;
public string stringValue = "Hello C-Sharp";
public Vector3 rotateSpeed = new Vector3(1,1,1);
引用类型:
案例:如果一个平面内有两个红旗,我们需要手动规定小车向哪个红旗移动,就可以采用引用类型的属性
public GameObject target; //目标物体

void Start ()
    this.transform.LookAt(target.transform);
注意:一定要给引用类型赋值,否则会报 空指针异常。
鼠标的输入
旋转飞车实例:
void Update()

        /*
            0:鼠标左键
            1:鼠标右键
            2:鼠标中键
         */
        if (Input.GetMouseButtonDown(0))

            Debug.Log("鼠标按下");
            rotateSpeed = 900f;
            moveSpeed = 300f;

        if (Input.GetMouseButtonUp(0))

            Debug.Log("鼠标抬起");
            rotateSpeed = 0f;
            moveSpeed = 0f;

        this.transform.Rotate(0, rotateSpeed * Time.deltaTime, 0, Space.Self);
        this.transform.Translate(0, 0, moveSpeed * Time.deltaTime, Space.World);
相关API:
GetMouseButtonDown:鼠标按下GetMouseButtonUp:鼠标抬起GetMouseButton:状态探测,只要鼠标按下,会一直调用。
旋转飞车实例2:
void Update()

        /*
            0:鼠标左键
            1:鼠标右键
            2:鼠标中键
         */
        if (Input.GetMouseButton(0))

            rotateSpeed = 900f;
            moveSpeed = 300f;

        else

            rotateSpeed = 0;
            moveSpeed = 0;

        this.transform.Rotate(0, rotateSpeed * Time.deltaTime, 0, Space.Self);
        this.transform.Translate(0, 0, moveSpeed * Time.deltaTime, Space.World);
&一些补充的工具函数
//获取到鼠标点击的位置坐标
Vector3 mousePos = Input.mousePosition;
//获取到屏幕的尺寸
int screenWidth = Screen.width;
int screenHeight = Screen.height;

//获取物体的屏幕坐标
Vector3 pos = this.transform.position;
Vector3 screenPos = Camera.main.WorldToScreenPoint(pos);
键盘的输入
常用API:
Input.GetKeyDown(key):按键事件,按下Input.GetKeyUp(key):按键事件,抬起Input.GetKey(key):案件状态,是否正被按下
代码来操作组件
操作AudioSource组件
//获取到AudioSource组件(泛型)
AudioSource audio = this.GetComponent<AudioSource>();
//播放
audio.Play();
引用别的组件:
应用场景:在主控结点中操作背景音乐的组件
public class MainLogic : MonoBehaviour

    //public GameObject bgmNode;
    //引用扬声器组件
    public AudioSource bgm;
    //引用脚本组件
    public FanLogic fan;
    //风扇转速
    public float rotateSpeed;

    void Start()
        //AudioSource audio = bgmNode.GetComponent<AudioSource>();
        //audio.Play();
        bgm.Play();


    void Update()
        if(Input.GetMouseButtonDown(0))

            rotateSpeed = 800;
            //旋转代码在FanLogic脚本下
获取物体API
案例:主控结点下找到无人机目录下的旋翼对象,并调用它的脚本组件
//主控结点
//方式二:(在Unity中拖入)
public GameObject wingNode;
//方式一:
void Start()
    GameObject node = GameObject.Find(无人机/旋翼);
    RotateLogic rotateLogic = node.GetComponent<RotateLogic>();
获取游戏节点的父级与子级:
//获取当前组件的父结点与父方位
Transform parent = this.transform.parent;
GameObject parentNode = this.transform.parent.gameObject;

//获取子结点的方位
//方式一:通过foreach遍历
foreach (Transform child in transform)

    Debug.Log("子物体" + child.name); //child


//方式二:通过GetChild()索引API
Transform child = this.transform.GetChild(0);

//方式三:通过名字查找子项
Transform child = this.transform.Find("子项名或路径");
给物体设置新的父级:
this.transform.SetParent(null/GameObject);
切换物体的显示状态:
Transform child = this.transform.Find("xxx");
if(child.gameObject.activeSelf)

    //隐藏
    child.gameObject.SetActive(false);

else

    //显示
    child.gameObject.SetActive(true);
资源的使用API
用户按下A,D键播放音效成功与失败
//成功音效
public AudioClip audioSuccess;
//失败音效
public AudioClip audioFail;

void Update()

    if (Input.GetKeyDown(KeyCode.A))

        AudioSource audio = GetComponent<AudioSource>();
        audio.PlayOneShot(audioSuccess);

    if (Input.GetKeyDown(KeyCode.D))

       AudioSource audio = GetComponent<AudioSource>();
       audio.PlayOneShot(audioFail);
制作随机音乐盒程序
using System.Collections;
using System.Collections.Generic;
using UnityEngine;

public class MusicBox : MonoBehaviour

    public AudioClip[] songs;

    // Start is called before the first frame update
    void Start()

        if (songs == null || songs.Length == 0)

            Debug.Log("当前歌单列表为空!");


    // Update is called once per frame
    void Update()

        if (Input.GetKeyDown(KeyCode.Space))

            NextSong();


    private void NextSong()

        //随机播放
        int randomIndex = Random.Range(0, songs.Length);

        //取到AudioSource组件
        AudioSource audio = GetComponent<AudioSource>();

        audio.clip = this.songs[randomIndex];
        audio.Play();
        Debug.Log("正在播放第" + (randomIndex+1) + "首歌,歌名为:" + audio.clip.name);
定时调用与线程
Unity是单线程核心,暂时不必考虑线程,调度,并发。
//延迟调用API
this.Invoke("函数名",延迟时间);

//循环调用API
this.InvokeRepeating("函数名",循环时间间隔);

//查看当前线程的ID
int ThreadId = Thread.CurrentThread.ManagedThreadId;

//判断函数是否正在被调用
bool isInvoking = IsInvoking("函数名");
//取消该函数的调用
CancelInvoke("函数名");
//取消当前脚本所有Invoke调用
CancelInvoke();
向量的基本运算
//定义一个三维向量
Vector3 v1 = new Vector3(3,0,4);
//求向量的模长
float length = v1.magnitude;
//向量标准化
Vector3 v2 = v1.normalized;

//物体运动的优化写法
//定义一个三维向量来表示不同方向的速度
public Vector3 speed;

//优化物体移动写法
void Update()

     this.transform.Translate(speed * Time.deltaTime,Space.Self);
预制体与实例
通过API创建实例:
- 首先准备子弹的预制体prefab
- 添加火控脚本 FireLogic.cs
//子弹预制体
public GameObject bulletPrefab;
//子弹目录
public Transform bulletFolder;
//子弹出生点
public Transform firePoint;
//炮塔的引用(为了获取到炮塔发射子弹的方向)
public Transform cannon;

void Update()

    //创建实例
    GameObject node = Object.Instantiate(bulletPrefab,bulletFolder);
    //指定出生点
    node.transform.position = this.firePoint.position;
    //指定初始角度
    node.transform.localEulerAngles = this.cannon.eulerAngles;
    //子弹脚本参数的设置(子弹飞行速度)
    node.GetComponent<BulletLogic>().setSpeed(0.5f);
- 销毁子弹
//销毁自身结点的API
Object.Destroy(this.gameObject);
//注意不要写错,写为⬇,该写法是销毁组件,而并非结点
Object.Destroy(this);
物理系统与组件
刚体组件
Physic—>RigidBody:刚体组件
常用属性:
- Mass:质量
- Drag:摩擦力
- AngularDrag:角摩擦力
…
Physic—>Collider:碰撞模型
常用类型:BoxCollider,SphereCollider
物理材质Phsicas Material:
- 在Assets中添加一个Physics Material
- 在里面设置全局性的摩擦力Friction,弹性系数等等
碰撞检测
实现 碰撞检测的步骤:
- RigidBody–>is Kinematic 勾选标记为 运动学刚体
- Collider–>is Tragger 勾选 标记为触发器
- 挂一个脚本,添加消息函数⬇
void OnTriggerEnter(Collider other)

    //拿到被碰撞物体的名字
    string name = other.name;
    //销毁被碰撞物体
    Object.Destroy(other.gameObject);
    Object.Destroy(this.gameObject);
3D 射击游戏实战
- 1.导入模型
- 2.更改天空盒
Window--->Rendering--->lighting--->environment--->Skybox Material - 3.添加子弹,模型,材质,脚本等
- 4.给子弹和怪兽添加碰撞检测
- 5.子弹的自动发射,自毁与预制体
- 6.玩家的按键操作
- 7.怪兽的走位移动
- 8.怪兽生成器
- 9.子弹和爆炸特效
源码展示:
子弹BulletLogic:
using System.Collections;
using System.Collections.Generic;
using UnityEngine;

/*
    子弹相关逻辑:
        准备工作:子弹的预制体以及导入工程
        1.子弹的Z轴移动
        2.子弹的自毁
        3.子弹的特效导入
 */
public class BulletLogic : MonoBehaviour

    //设置子弹的运动速度
    [Tooltip("子弹飞行速度")]
    public Vector3 speed;
    [Tooltip("子弹飞行时长")]
    public float lifetime = 5f;
    [Tooltip("子弹爆炸特效预制体")]
    public GameObject explosionEffect;

    // Start is called before the first frame update
    void Start()

        Invoke("SelfDestroy", lifetime);


    // Update is called once per frame
    void Update()

        this.transform.Translate(speed, Space.Self);


    //触发器函数
    private void OnTriggerEnter(Collider other)

        Debug.Log("发生碰撞了");
        //如果碰撞到怪兽
        if (!other.name.StartsWith("怪兽")) return;

        Destroy(this.gameObject);
        Destroy(other.gameObject);

        //创建一个爆炸粒子特效对象
        GameObject node = Object.Instantiate(explosionEffect,null);
        node.transform.position = this.transform.position;
        //当粒子特效播放完成时自动销毁


    //子弹自毁函数
    private void SelfDestroy()

        Debug.Log("子弹已自毁");
        Destroy(this.gameObject);
玩家PlayerLogic:
using System.Collections;
using System.Collections.Generic;
using UnityEngine;

/*
    玩家相关逻辑:
        准备工作:导入玩家模型的预制体资源
        1.设置子弹发射点,并实现从该点定时发射子弹
        2.添加玩家的按键控制移动
 */
public class PlayerLogic : MonoBehaviour

    //预制体资源
    public GameObject bulletPrefab;
    //子弹生成目录
    public Transform bulletFolder;
    //子弹发射点
    public Transform firePoint;
    //子弹发射间隔
    public float fireInterval;
    //玩家移动速度
    public float playerSpeed;

    // Start is called before the first frame update
    void Start()

        InvokeRepeating("fire", fireInterval, fireInterval);


    // Update is called once per frame
    void Update()

        float speedX = 0;
        //按键控制
        if (Input.GetKey(KeyCode.A))

            speedX = -playerSpeed;

        else if (Input.GetKey(KeyCode.D))

            speedX = playerSpeed;

        else

            speedX = 0;

        this.transform.Translate(speedX * Time.deltaTime, 0, 0, Space.Self);


    //发射子弹的函数
    private void fire()

        //生成一个子弹实例
        GameObject bullet = Object.Instantiate(bulletPrefab, bulletFolder);
        //设置子弹的出生点
        bullet.transform.position = this.firePoint.position;
怪兽EnemyLogic:
using System.Collections;
using System.Collections.Generic;
using UnityEngine;

/*
    怪兽相关逻辑:
        准备工作:导入怪兽的预制体进工程
        1.水平速度的蛇皮走位逻辑
        2.前后速度的固定逻辑
 */
public class EnemyLogic : MonoBehaviour

    //水平速度
    float speedX = 0;
    //前后速度
    public float speedZ;

    // Start is called before the first frame update
    void Start()

        //重复周期调用蛇皮走位
        InvokeRepeating("move", 0.1f, 0.5f);


    // Update is called once per frame
    void Update()

        this.transform.Translate(speedX * Time.deltaTime, 0, speedZ * Time.deltaTime, Space.Self);


    //怪兽的蛇皮走位
    private void move()

        //设置一个随机速度数组
        float[] speed =  -5, -10, -20,-30, 5, 10, 20 ,30;
        //随机选取一个速度作为水平速度
        int rnum = Random.Range(0, speed.Length);
        //设置速度
        speedX = speed[rnum];
怪兽生成器EnemyCreator:
using System.Collections;
using System.Collections.Generic;
using UnityEngine;

/*
    怪兽生成器相关逻辑:
        1.定时生成怪兽即可
 */
public class EnemyCreator : MonoBehaviour

    //要创建的怪兽预制体
    public GameObject enemyPrefab;
    //创建怪物间隔时长
    public float enemyInterval = 0.5f;


    // Start is called before the first frame update
    void Start()

        InvokeRepeating("creatEnemy", 0.1f, enemyInterval);


    // Update is called once per frame
    void Update()


    private void creatEnemy()

        GameObject node = GameObject.Instantiate(enemyPrefab, this.transform);
        node.transform.position = this.transform.position;

        //调整随机出生点
        int rnum = Random.Range(-50, 50);
        node.transform.Translate(rnum, 0, 0, Space.Self);
恭喜未来的游戏开发工程师,正式入门!!!后会有期!!!
以上是关于2022-04-20 Unity入门7——物理系统之碰撞检测的主要内容,如果未能解决你的问题,请参考以下文章