九springboot
Posted 不会飞的小飞侠24
tags:
篇首语:本文由小常识网(cha138.com)小编为大家整理,主要介绍了九springboot相关的知识,希望对你有一定的参考价值。
Springboot
- 一 Spring Boot是什么
- 二 SpringBoot的特点1.独立运行的spring项目
- 三 配置开发环境
- 四 配置开发环境
- 五 创建 Spring Boot 项目
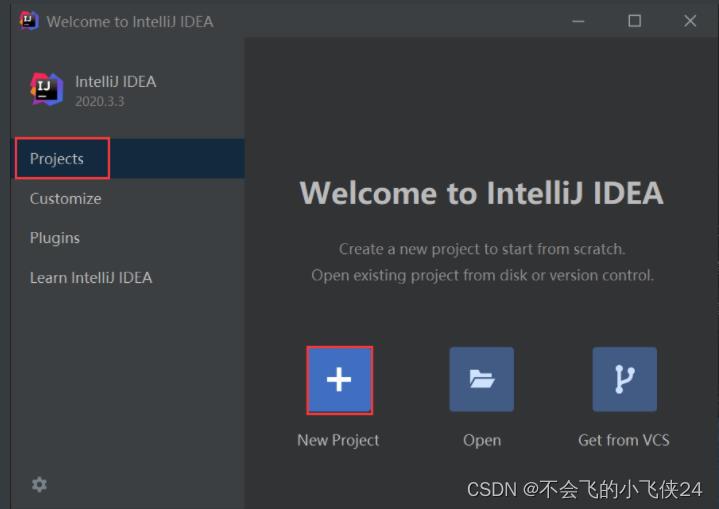
- 1.在 IntelliJ IDEA 欢迎页面左侧选择 Project ,然后在右侧选择 New Project,如下图
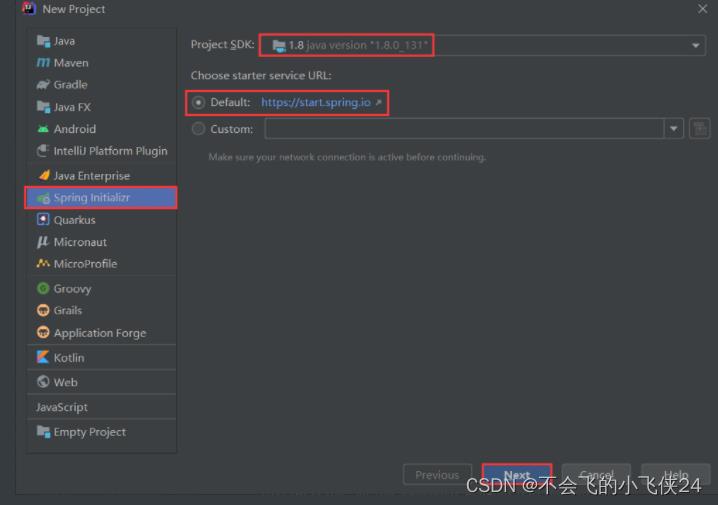
- 2.在新建工程界面左侧,选择 Spring Initializr,选择项目的 SDK 为 1.8,选择 starter service URL 为 http://start.spring.io(默认),最后点击下方的 Next 按钮进行下一步,
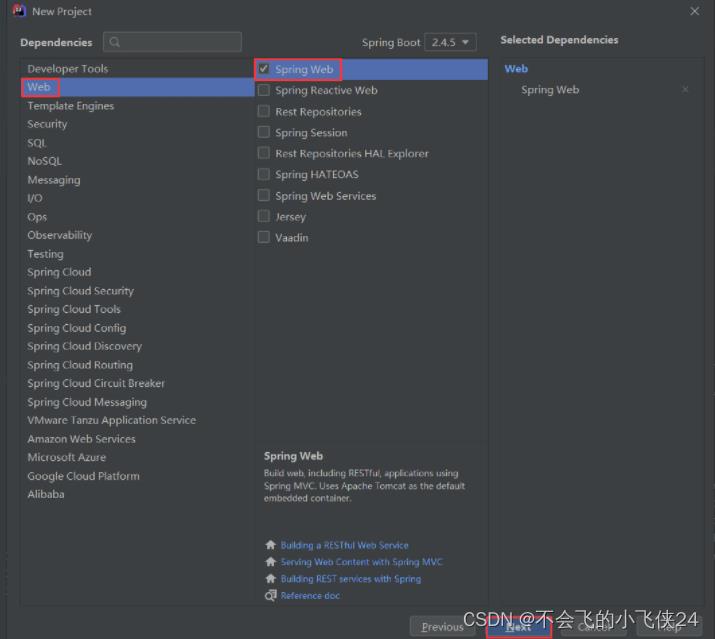
- 3.在 dependencise 界面中,选择 Spring Boot 的版本及所依赖的 Spring Boot 组件(例如 Spring Boot 的版本为 2.4.5, Spring Boot 组件为 Web),然后点击下方的 Next 按钮
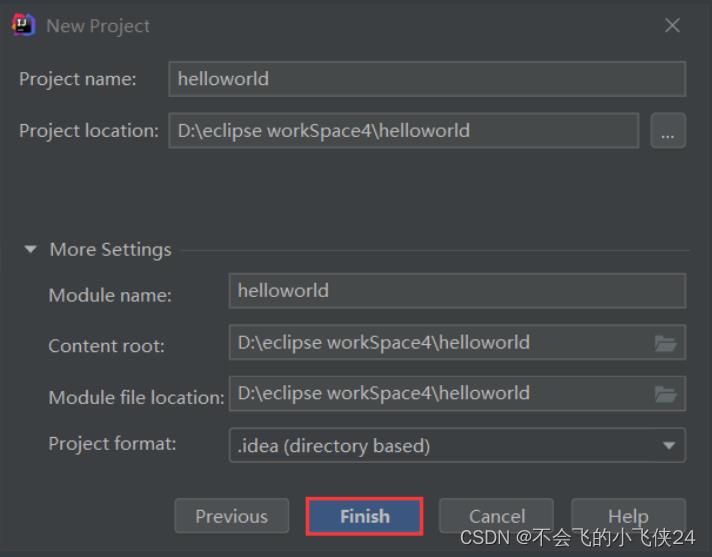
- 4.根据需要修改项目名称及项目存储位置等信息,最后点击 Finish 按钮,完成 Spring Boot 项目的创建,如下图
- 5.返回 IDEA 工作区,可以看到 Spring Boot 项目 helloworld 已经创建完成。该项目不但具有完整的目录结构,还有完整的 Maven 配置,并默认生成了一个名为 HelloworldApplication 的主启动程序
✅作者简介:后端开发者
🥭公认外号:球场上的黑曼巴🍎个人主页:不会飞的小飞侠24
🍊个人信条:谨 · 信
💞当前专栏:高级内容
🥭本文内容: Springboot框架
更多内容点击👇
小飞侠的博客>>>>欢迎大家!!!

一 Spring Boot是什么
为了简化Sprin的搭建和开发过程,在spring的基础上 提供了一套全新的开源框架-SpringBoot。
springBoot具有spring的一切功能,且更加简单,稳定 丰富 健壮 实现零配置。
二 SpringBoot的特点1.独立运行的spring项目
 1.Spring Boot 可以以 jar 包的形式独立运行
     Spring Boot 项目只需通过命令“ java–jar xx.jar” 即可运行。
 2.内嵌servlet容器
     无需对项目进行手动部署
 3.提供starter简化Maven配置
      Spring Boot 提供了一系列的“starter”项目对象模型(POMS)来简化 Maven 配置。
  4.提供大量的自动配置
  5.自带应用监控
  6.无代码生成和xml的配置
三 配置开发环境
在使用 Spring Boot 进行开发之前,第一件事就是配置好开发环境。工欲善其事,必先利其器,IDE(集成开发环境)的选择相当重要,目前市面上有很多优秀的 IDE 开发工具,例如 IntelliJ IDEA、Spring Tools、Visual Studio Code 和 Eclipse 等等,那么我们该如何选择呢?
这里我们极力推荐大家使用 IntelliJ IDEA,因为相比于与其他 IDE,IntelliJ IDEA 对 Spring Boot 提供了更好的支持。Spring Boot 版本及其环境配置要求如下表
四 配置开发环境

五 创建 Spring Boot 项目
开发环境配置完成后,接下来,我们就可以通过 Intellij IDEA 创建一个 Spring Boot 项目了。 Intellij IDEA 一般可以通过两种方式创建 Spring Boot 项目:
Spring Initializr 创建SpringBoot项目
IntelliJ IDEA 支持用户使用 Spring 项目创建向导(Spring Initializr )快速地创建一个 Spring Boot 项目,步骤如下
1.在 IntelliJ IDEA 欢迎页面左侧选择 Project ,然后在右侧选择 New Project,如下图
2.在新建工程界面左侧,选择 Spring Initializr,选择项目的 SDK 为 1.8,选择 starter service URL 为 http://start.spring.io(默认),最后点击下方的 Next 按钮进行下一步,
或者在 IntelliJ IDEA 工作区上方的菜单栏中选择 File ,在下拉菜单中选则 New,然后选择 Project,如下图
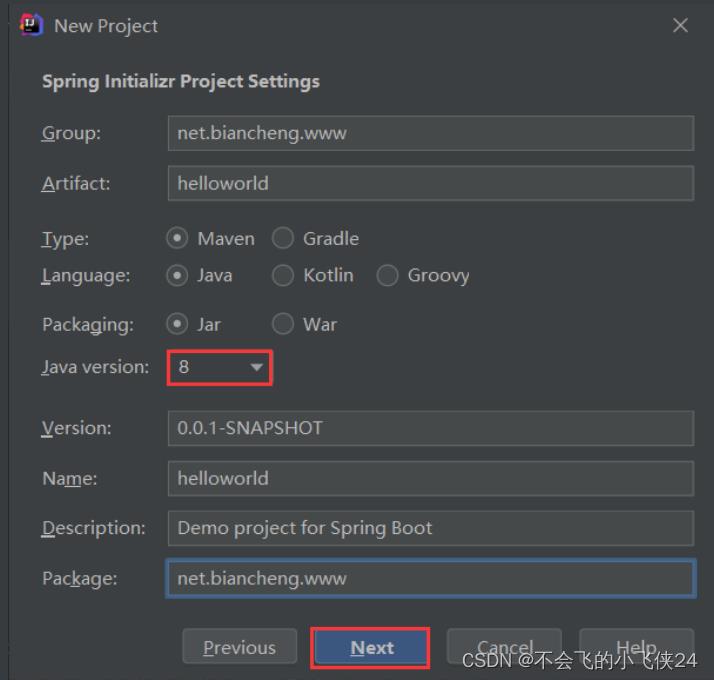
在 Spring Initializr Project Settings 中,输入项目的 GroupId、ArtifactId 等内容,注意 Type 为 Maven,packaging 为 jar,Java version 切换为 8(默认为 11),最后点击下方的 Next 按钮,进行下一步
3.在 dependencise 界面中,选择 Spring Boot 的版本及所依赖的 Spring Boot 组件(例如 Spring Boot 的版本为 2.4.5, Spring Boot 组件为 Web),然后点击下方的 Next 按钮
4.根据需要修改项目名称及项目存储位置等信息,最后点击 Finish 按钮,完成 Spring Boot 项目的创建,如下图
5.返回 IDEA 工作区,可以看到 Spring Boot 项目 helloworld 已经创建完成。该项目不但具有完整的目录结构,还有完整的 Maven 配置,并默认生成了一个名为 HelloworldApplication 的主启动程序
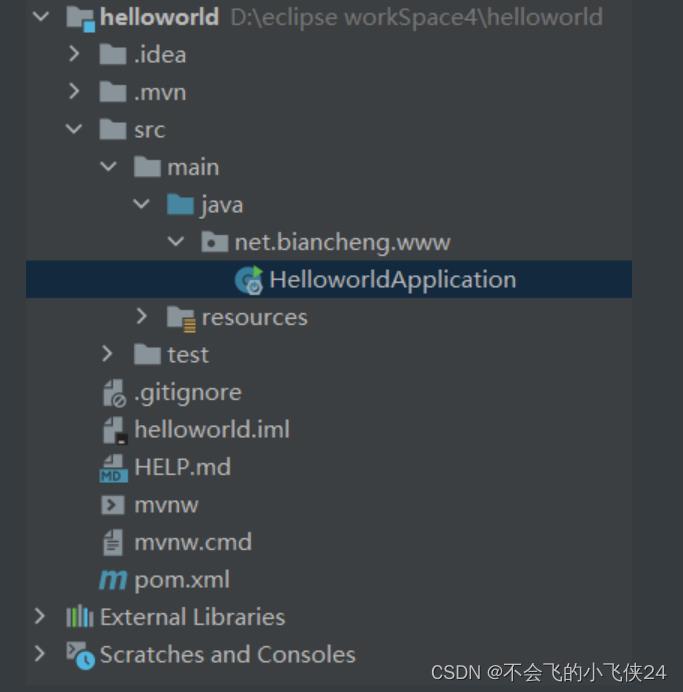
此时,几乎所有的准备工作都已经准备就绪,我们可以在没有编写任何代码的情况下,直接将该 Spring Boot 项目运行起来。
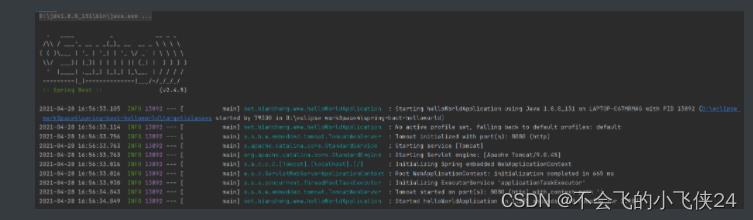
6.启动 Spring Boot
默认情况下,Spring Boot 项目会创建一个名为 ***Application 的主程序启动类 ,该类中使用了一个组合注解 @SpringBootApplication,用来开启 Spring Boot 的自动配置,另外该启动类中包含一个 main() 方法,用来启动该项目。直接运行启动类 HelloworldApplication 中的 main() 方法,便可以启动该项目,结果如下图
为了能比较的清楚的看到效果,我们在 cn.kgc.springboot 包下又创建一个 controller 包,并在该包内创建一个名为 HelloController 的 Controller,代码如下
@Controller
public class HelloController
    @ResponseBody
    @RequestMapping("/hello")
    public String hello()
        return "Hello World!";
非常感谢你阅读到这里,如果这篇文章对你有帮助,希望能留下你的点赞👍 关注❤️ 分享👥 留言💬thanks!!!
#yyds干货盘点#jackson学习之九:springboot整合(配置文件)
欢迎访问我的GitHub
关于springboot整合jackson
- 本文是《jackson学习》系列的第九篇,学习如何在springboot项目中使用jackson,以springboot-2.3.3版本为例,jackson是springboot的默认json处理工具,如下图红框所示,jackson在maven配置中被spring-boot-starter-web间接依赖,可直接使用:

- 在springboot项目中常用的配置方式有两种:
- 用properties或yml配置文件来配置,即本篇的内容;
- 用配置类来配置,这是下一篇文章的主题;
本篇概览
今天实战内容如下:
- 开发springboot应用,体验springboot默认支持jackson,包括jackson注解和ObjectMapper实例的注入;
- 在==application.yml==中添加jackson配置,验证是否生效;
源码下载
- 如果您不想编码,可以在GitHub下载所有源码,地址和链接信息如下表所示(https://github.com/zq2599/blog_demos):
| 名称 | 链接 | 备注 |
|---|---|---|
| 项目主页 | https://github.com/zq2599/blog_demos | 该项目在GitHub上的主页 |
| git仓库地址(https) | https://github.com/zq2599/blog_demos.git | 该项目源码的仓库地址,https协议 |
| git仓库地址(ssh) | git@github.com:zq2599/blog_demos.git | 该项目源码的仓库地址,ssh协议 |
-
这个git项目中有多个文件夹,本章的应用在==jacksondemo==文件夹下,如下图红框所示:

- ==jacksondemo==是父子结构的工程,本篇的代码在==springbootproperties==子工程中,如下图:

开始实战
-
由于同属于《jackson学习》系列文章,因此本篇的springboot工程作为==jacksondemo==的子工程存在,pom.xml如下,需要注意的是parent不能使用spring-boot-starter-parent,而是通过dependencyManagement节点来引入springboot依赖:
<?xml version="1.0" encoding="UTF-8"?>
<project xmlns="http://maven.apache.org/POM/4.0.0" xmlns:xsi="http://www.w3.org/2001/XMLSchema-instance"
     xsi:schemaLocation="http://maven.apache.org/POM/4.0.0 https://maven.apache.org/xsd/maven-4.0.0.xsd">
<modelVersion>4.0.0</modelVersion>
<parent>
    <artifactId>jacksondemo</artifactId>
    <groupId>com.bolingcavalry</groupId>
    <version>1.0-SNAPSHOT</version>
    <relativePath>../pom.xml</relativePath>
</parent>
<groupId>com.bolingcavalry</groupId>
<artifactId>springbootproperties</artifactId>
<version>0.0.1-SNAPSHOT</version>
<name>springbootproperties</name>
<description>Demo project for Spring Boot</description>

<properties>
    <java.version>1.8</java.version>
</properties>

<!--不用spring-boot-starter-parent作为parent时的配置-->
<dependencyManagement>
    <dependencies>
        <dependency>
            <groupId>org.springframework.boot</groupId>
            <artifactId>spring-boot-dependencies</artifactId>
            <version>2.3.3.RELEASE</version>
            <type>pom</type>
            <scope>import</scope>
        </dependency>
    </dependencies>
</dependencyManagement>

<dependencies>
    <dependency>
        <groupId>org.springframework.boot</groupId>
        <artifactId>spring-boot-starter-web</artifactId>
    </dependency>

    <dependency>
        <groupId>org.springframework.boot</groupId>
        <artifactId>spring-boot-starter-test</artifactId>
        <scope>test</scope>
        <exclusions>
            <exclusion>
                <groupId>org.junit.vintage</groupId>
                <artifactId>junit-vintage-engine</artifactId>
            </exclusion>
        </exclusions>
    </dependency>

    <!-- swagger依赖 -->
    <dependency>
        <groupId>io.springfox</groupId>
        <artifactId>springfox-swagger2</artifactId>
    </dependency>
    <!-- swagger-ui -->
    <dependency>
        <groupId>io.springfox</groupId>
        <artifactId>springfox-swagger-ui</artifactId>
    </dependency>
</dependencies>

<build>
    <plugins>
        <plugin>
            <groupId>org.springframework.boot</groupId>
            <artifactId>spring-boot-maven-plugin</artifactId>
        </plugin>
    </plugins>
</build>
</project>
2. 启动类很平常:
```java
package com.bolingcavalry.springbootproperties;

import org.springframework.boot.SpringApplication;
import org.springframework.boot.autoconfigure.SpringBootApplication;

@SpringBootApplication
public class SpringbootpropertiesApplication

    public static void main(String[] args)
        SpringApplication.run(SpringbootpropertiesApplication.class, args);
- 由于用到了swagger,因此要添加swagger配置:
package com.bolingcavalry.springbootproperties;
import org.springframework.context.annotation.Bean;
import org.springframework.context.annotation.Configuration;
import springfox.documentation.builders.ApiInfoBuilder;
import springfox.documentation.builders.PathSelectors;
import springfox.documentation.builders.RequestHandlerSelectors;
import springfox.documentation.service.ApiInfo;
import springfox.documentation.service.Contact;
import springfox.documentation.service.Tag;
import springfox.documentation.spi.DocumentationType;
import springfox.documentation.spring.web.plugins.Docket;
import springfox.documentation.swagger2.annotations.EnableSwagger2;
@Configurationbr/>@EnableSwagger2
public class SwaggerConfig
@Bean
public Docket createRestApi()
    return new Docket(DocumentationType.SWAGGER_2)
            .apiInfo(apiInfo())
            .tags(new Tag("JsonPropertySerializationController", "JsonProperty相关测试"))
            .select()
            // 当前包路径
            .apis(RequestHandlerSelectors.basePackage("com.bolingcavalry.springbootproperties.controller"))
            .paths(PathSelectors.any())
            .build();


//构建 api文档的详细信息函数,注意这里的注解引用的是哪个
private ApiInfo apiInfo()
    return new ApiInfoBuilder()
            //页面标题
            .title("SpringBoot整合Jackson(基于配置文件)")
            //创建人
            .contact(new Contact("程序员欣宸", "https://github.com/zq2599/blog_demos", "zq2599@gmail.com"))
            //版本号
            .version("1.0")
            //描述
            .description("API 描述")
            .build();
4. 序列化和反序列化用到的Bean类,可见使用了==JsonProperty==属性来设置序列化和反序列化时的json属性名,field0字段刻意没有get方法,是为了验证JsonProperty的序列化能力:
```java
package com.bolingcavalry.springbootproperties.bean;

import com.fasterxml.jackson.annotation.JsonProperty;
import io.swagger.annotations.ApiModel;
import io.swagger.annotations.ApiModelProperty;

import java.util.Date;

@ApiModel(description = "JsonProperty注解测试类")
public class Test

    @ApiModelProperty(value = "私有成员变量")
    @JsonProperty(value = "json_field0", index = 1)
    private Date field0 = new Date();

    public void setField0(Date field0)
        this.field0 = field0;


    @ApiModelProperty(value = "来自get方法的字符串")
    @JsonProperty(value = "json_field1", index = 0)
    public String getField1()
        return "111";


    @Override
    public String toString()
        return "Test" +
                "field0=" + field0 +
                ;
- 测试用的Controller代码如下,很简单只有两个接口,serialization返回序列化结果,deserialization接受客户端请求参数,反序列化成实例,通过toString()来检查反序列化的结果,另外,还通过Autowired注解从spring容器中将ObjectMapper实例直接拿来用:
package com.bolingcavalry.springbootproperties.controller;
import com.bolingcavalry.springbootproperties.bean.Test;
import com.fasterxml.jackson.core.JsonProcessingException;
import com.fasterxml.jackson.databind.ObjectMapper;
import io.swagger.annotations.Api;
import io.swagger.annotations.ApiOperation;
import org.slf4j.Logger;
import org.slf4j.LoggerFactory;
import org.springframework.beans.factory.annotation.Autowired;
import org.springframework.web.bind.annotation.RequestBody;
import org.springframework.web.bind.annotation.RequestMapping;
import org.springframework.web.bind.annotation.RequestMethod;
import org.springframework.web.bind.annotation.RestController;
@RestControllerbr/>@RequestMapping("/jsonproperty")
@Api(tags = "JsonPropertySerializationController")
public class JsonPropertySerializationController
private static final Logger logger = LoggerFactory.getLogger(JsonPropertySerializationController.class);

@Autowired
ObjectMapper mapper;

@ApiOperation(value = "测试序列化", notes = "测试序列化")
@RequestMapping(value = "/serialization", method = RequestMethod.GET)
public Test serialization() throws JsonProcessingException

    Test test = new Test();
    logger.info(mapper.writeValueAsString(test));

    return test;


@ApiOperation(value = "测试反序列化", notes="测试反序列化")
@RequestMapping(value = "/deserialization",method = RequestMethod.PUT)
public String deserialization(@RequestBody Test test)
    return test.toString();
### 验证(不用配置文件)
1. 先来看看没有配置文件时,默认的jackson配置的表现,直接在IDEA上运行SpringbootpropertiesApplication;
2. 浏览器访问http://localhost:8080/swagger-ui.html ,如下图红框1,json_field0和json_field1都是JsonProperty注释,出现在了swagger的model中,这证明jackson注解已经生效:

3. 点击上图的红框2,看看springboot引用返回的序列化结果,如下图:

4. 另外,上述红框中的json格式,每个属性单独一行,像是做了格式化调整的,这是springboot做的?还是swagger展示的时候做的?用浏览器访问http://localhost:8080/jsonproperty/serialization ,结果如下,可见==springboot返回的是未经过格式化的json==:

- 接下来咱们添加jackson相关的配置信息并验证是否生效;
### 添加配置文件并验证
1. 在==resources==目录新增==application.yml==文件,内容如下:
```yml
spring:
jackson:
# 日期格式化
date-format: yyyy-MM-dd HH:mm:ss
# 序列化相关
serialization:
# 格式化输出
indent_output: true
# 忽略无法转换的对象
fail_on_empty_beans: true
# 反序列化相关
deserialization:
# 解析json时,遇到不存在的属性就忽略
fail_on_unknown_properties: false
# 设置空如何序列化
defaultPropertyInclusion: NON_EMPTY
parser:
# 允许特殊和转义符
allow_unquoted_control_chars: true
# 允许单引号
allow_single_quotes: true-
将鼠标放置下图红框位置,再按住Ctlr键,IDEA会弹出一个浮层,提示该配置对应的jackson代码,如下图:

- 在上图中,按住Ctlr键,用鼠标点击红框位置即可打开此配置对应的jackson源码,如下图:

- 重新运行springboot应用,用浏览器访问:http://localhost:8080/jsonproperty/serialization ,结果如下图,可见==json_field0==的格式变成了==yyyy-MM-dd HH:mm:ss==,而且json输出也做了格式化,证明application.yml中的配置已经生效:

- 再来试试反序列化,打开swagger页面,操作和响应如下图所示,注意红框1里面请求参数的格式:

- 至此,在springboot中通过yml配置jackson的操作实战就完成了,接下来的章节,咱们在配置类中用代码来完成yml的配置;
欢迎关注51CTO博客:程序员欣宸
以上是关于九springboot的主要内容,如果未能解决你的问题,请参考以下文章