目标检测YOLOv5在Android上的部署
Posted zstar-_
tags:
篇首语:本文由小常识网(cha138.com)小编为大家整理,主要介绍了目标检测YOLOv5在Android上的部署相关的知识,希望对你有一定的参考价值。
前言
本篇博文用来研究YOLOv5在android上部署的例程
主要参考的是Pytorch官方提供的Demo:https://github.com/pytorch/android-demo-app/tree/master/PyTorchDemoApp
功能简述
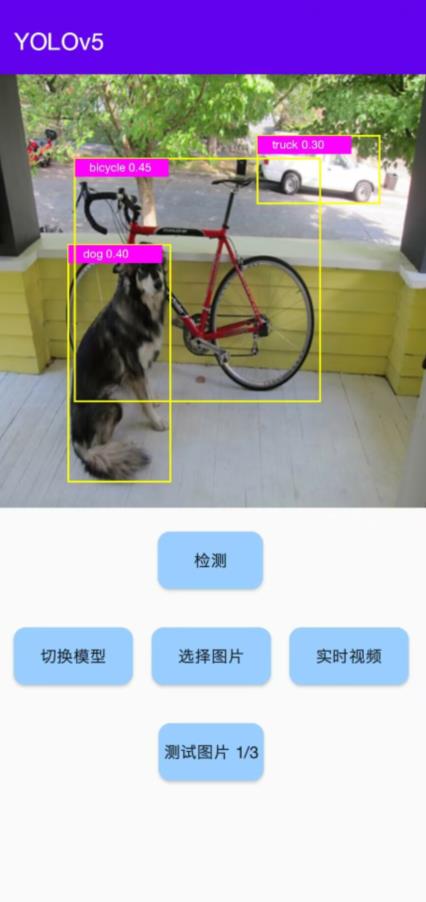
App主页如下图所示:

主要功能:
-
切换测试图片
在程序中直接指定三张(或任意张)图片,点击测试图片,可以切换图片 -
选择图片
点击选择图片,可以在相册中选择一张图片,也可以直接进行拍照 -
实时视频
点击实时视频,可以开启摄像头,直接在摄像预览中显示检测结果 -
切换模型(我添加的功能)
点击切换模型,可以选择不同的模型进行检测
快速上手
首先来跑通官方Demo,首先下载官方提供的yolov5s.torchscript.ptl
下载链接:https://pytorch-mobile-demo-apps.s3.us-east-2.amazonaws.com/yolov5s.torchscript.ptl
下载完放到assets文件夹下
直接运行,从相册中选择图片时会报错:
Unable to decode stream: java.io.FileNotFoundException:/…/open failed: EACCES (Permission denied)
此时需要在AndroidManifest.xml的application标签中添加一句:
android:requestLegacyExternalStorage="true"
然后就可以正常运行了
训练自己的模型
下面用YOLOv5-6.0版本训练自己的模型,怎么训练不做赘述,可以参考本专栏的往期博文。
然后修改export.py中的export_torchscript函数,主要添加三行代码,用以导出.torchscript.ptl后缀模型。
def export_torchscript(model, im, file, optimize, prefix=colorstr('TorchScript:')):
    # YOLOv5 TorchScript model export
    try:
        print(f'\\nprefix starting export with torch torch.__version__...')
        f = file.with_suffix('.torchscript.pt')
        f = str(f)
        fl = file.with_suffix('.torchscript.ptl')

        ts = torch.jit.trace(model, im, strict=False)
        (optimize_for_mobile(ts) if optimize else ts).save(f)
        (optimize_for_mobile(ts) if optimize else ts)._save_for_lite_interpreter(str(fl))
        print(f'prefix export success, saved as f (file_size(f):.1f MB)')
    except Exception as e:
        print(f'prefix export failure: e')
然后在终端运行:
python export.py --weights runs/train/exp/weights/best.pt --include torchscript
运行完得到best.torchscript.ptl模型
切换自己的模型
下面来添加一个切换模型的功能,并使用自己训练的模型。
首先修改pytorch依赖版本,修改build.gradle中的依赖:
implementation 'org.pytorch:pytorch_android_lite:1.9.0'
implementation 'org.pytorch:pytorch_android_torchvision:1.9.0'
这里的版本尽量和后面训练用的pytorch版本对应,比如后面自己用的pytorch版本是1.9.0,这里就写1.9.0。
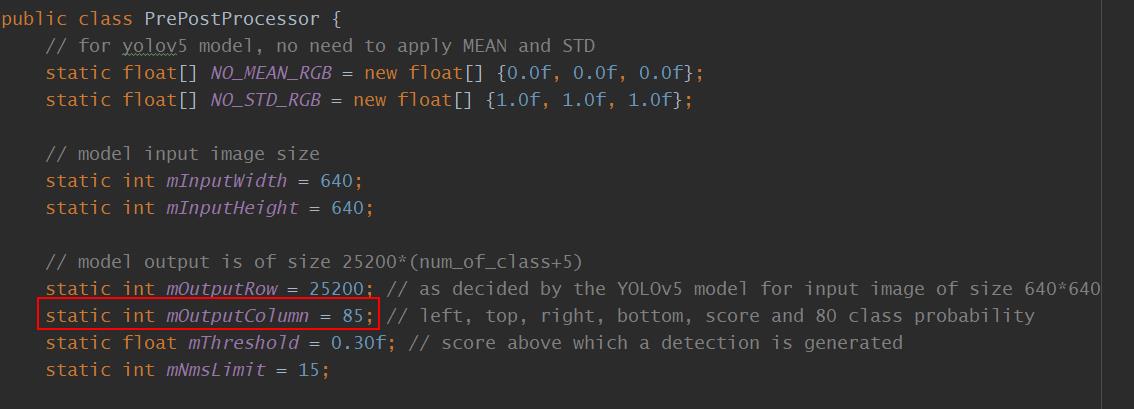
然后修改ObjectDetectionActivitys,java,这里将mOutputColumn的private修饰符去掉,使其可以在外部访问:

接下来修改xml界面,在activity_main.xml中添加切换模型按钮,并调整布局
<Button
    android:id="@+id/select"
    android:layout_width="100dp"
    android:layout_height="wrap_content"
    android:layout_marginTop="32dp"
    android:textAllCaps="false"
    android:text="@string/select_model"
    app:layout_constraintEnd_toEndOf="parent"
    app:layout_constraintEnd_toStartOf="@+id/selectButton"
    app:layout_constraintHorizontal_bias="0.5"
    app:layout_constraintStart_toStartOf="parent"
    app:layout_constraintTop_toBottomOf="@+id/detectButton"
    android:background="@drawable/button_selector"/>


<Button
    android:id="@+id/testButton"
    android:layout_width="wrap_content"
    android:layout_height="wrap_content"
    android:layout_marginTop="180dp"
    android:textAllCaps="false"
    app:layout_constraintEnd_toEndOf="parent"
    app:layout_constraintHorizontal_bias="0.5"
    app:layout_constraintStart_toStartOf="parent"
    app:layout_constraintTop_toBottomOf="@+id/imageView"
    android:background="@drawable/button_selector"/>
然后修改MainActivity.java,添加以下三个属性
private String model_name = "yolov5s.torchscript.ptl";
private String model_class = "classes.txt";
private int num_class = 80;
添加选择模型按钮响应:
private void ShowChoise()

    AlertDialog.Builder builder = new AlertDialog.Builder(MainActivity.this);
    // builder.setIcon(R.drawable.ic_launcher_foreground);
    builder.setTitle("选择一个模型");
    //    指定下拉列表的显示数据
    final String[] cities = "YOLOv5s", "王者荣耀模型";
    //    设置一个下拉的列表选择项
    builder.setItems(cities, new DialogInterface.OnClickListener()

        @Override
        public void onClick(DialogInterface dialog, int which)

            Toast.makeText(MainActivity.this, "选择的模型为:" + cities[which], Toast.LENGTH_SHORT).show();
            if (which==0)
                model_name = "yolov5s.torchscript.ptl";
                model_class = "classes.txt";
                num_class = 80;

            else
                model_name = "mymodel.ptl";
                model_class = "classes_wzry.txt";
                num_class = 10;

            // 重新加载
            try
                mModule = LiteModuleLoader.load(MainActivity.assetFilePath(getApplicationContext(), model_name));
                BufferedReader br = new BufferedReader(new InputStreamReader(getAssets().open(model_class)));
                String line;
                List<String> classes = new ArrayList<>();
                while ((line = br.readLine()) != null)
                    classes.add(line);

                PrePostProcessor.mClasses = new String[classes.size()];
                PrePostProcessor.mOutputColumn = num_class + 5;
                classes.toArray(PrePostProcessor.mClasses);
             catch (IOException e)
                Log.e("Object Detection", "Error reading assets", e);
                finish();


    );
    builder.show();
这里选择的模型数量添加if分支,model_class为模型对应的类别标签,需要仿照classes.txt单独创建,num_class为类别数量。
最后将之上一步得到的best.torchscript.ptl复制到assets文件夹下,注意需要手动修改文件名mymodel.ptl,这里不改名会发生文件找不到的报错,最后再运行即可。
完整代码
除了上面这部分,还对界面进行了汉化,图片加载做了微调,几个修改过的文件的完整源码如下:
activity_main.xml
<?xml version="1.0" encoding="utf-8"?>
<androidx.constraintlayout.widget.ConstraintLayout xmlns:android="http://schemas.android.com/apk/res/android"
    xmlns:app="http://schemas.android.com/apk/res-auto"
    xmlns:tools="http://schemas.android.com/tools"
    android:layout_width="match_parent"
    android:layout_height="match_parent"
    tools:context="org.pytorch.demo.objectdetection.MainActivity">

    <ImageView
        android:id="@+id/imageView"
        android:layout_width="0dp"
        android:layout_height="0dp"
        android:layout_marginTop="0dp"
        android:background="#FFFFFF"
        android:contentDescription="@string/image_view"
        app:layout_constraintDimensionRatio="1:1"
        app:layout_constraintEnd_toEndOf="parent"
        app:layout_constraintStart_toStartOf="parent"
        app:layout_constraintTop_toTopOf="parent" />

    <org.pytorch.demo.objectdetection.ResultView
        android:id="@+id/resultView"
        android:layout_width="0dp"
        android:layout_height="0dp"
        android:layout_marginTop="0dp"
        app:layout_constraintDimensionRatio="1:1"
        app:layout_constraintEnd_toEndOf="parent"
        app:layout_constraintStart_toStartOf="parent"
        app:layout_constraintTop_toTopOf="parent" />

    <Button
        android:id="@+id/detectButton"
        android:layout_width="wrap_content"
        android:layout_height="wrap_content"
        android:layout_marginTop="20dp"
        android:text="@string/detect"
        android:textAllCaps="false"
        app:layout_constraintEnd_toEndOf="parent"
        app:layout_constraintHorizontal_bias="0.498"
        app:layout_constraintStart_toStartOf="parent"
        app:layout_constraintTop_toBottomOf="@+id/imageView"
        android:background="@drawable/button_selector"/>


    <ProgressBar
        android:id="@+id/progressBar"
        android:layout_width="wrap_content"
        android:layout_height="wrap_content"
        android:layout_marginTop="20dp"
        android:visibility="invisible"
        app:layout_constraintEnd_toEndOf="parent"
        app:layout_constraintHorizontal_bias="0.498"
        app:layout_constraintStart_toStartOf="parent"
        app:layout_constraintTop_toBottomOf="@+id/imageView" />


    <Button
        android:id="@+id/selectButton"
        android:layout_width="100dp"
        android:layout_height="wrap_content"
        android:text="@string/select"
        android:textAllCaps="false"
        app:layout_constraintEnd_toEndOf="parent"
        app:layout_constraintEnd_toStartOf="@+id/liveButton"
        app:layout_constraintHorizontal_bias="0.5"
        app:layout_constraintStart_toEndOf="@+id/select"
        app:layout_constraintTop_toTopOf="@+id/select"
        android:background="@drawable/button_selector"/>

    <Button
        android:id="@+id/liveButton"
        android:layout_width="100dp"
        android:layout_height="wrap_content"
        android:text="@string/live"
        android:textAllCaps="false"
        app:layout_constraintEnd_toEndOf="parent"
        app:layout_constraintHorizontal_bias="0.5"
        app:layout_constraintStart_toEndOf="@+id/selectButton"
        app:layout_constraintTop_toTopOf="@+id/selectButton"
        android:background="@drawable/button_selector"/>

    <Button
        android:id="@+id/select"
        android:layout_width="100dp"
        android:layout_height="wrap_content"
        android:layout_marginTop="32dp"
        android:textAllCaps="false"
        android:text="@string/select_model"
        app:layout_constraintEnd_toEndOf="parent"
        app:layout_constraintEnd_toStartOf="@+id/selectButton"
        app:layout_constraintHorizontal_bias="0.5"
        app:layout_constraintStart_toStartOf="parent"
        app:layout_constraintTop_toBottomOf="@+id/detectButton"
        android:background="@drawable/button_selector"/>


    <Button
        android:id="@+id/testButton"
        android:layout_width="wrap_content"
        android:layout_height="wrap_content"
        android:layout_marginTop="180dp"
        android:textAllCaps="false"
        app:layout_constraintEnd_toEndOf="parent"
        app:layout_constraintHorizontal_bias="0.5"
        app:layout_constraintStart_toStartOf="parent"
        app:layout_constraintTop_toBottomOf="@+id/imageView"
        android:background="@drawable/button_selector"/>

</androidx.constraintlayout.widget.ConstraintLayout>
MainActivity.java
// Copyright (c) 2020 Facebook, Inc. and its affiliates.
// All rights reserved.
//
// This source code is licensed under the BSD-style license found in the
// LICENSE file in the root directory of this source tree.

package org.pytorch.demo.objectdetection;

import androidx.appcompat.app.AlertDialog;
import androidx.appcompat.app.AppCompatActivity;
import androidx.core.app.ActivityCompat;
import androidx.core.content.ContextCompat;

import android.Manifest;
import android.content.Context;
import android.content.DialogInterface;
import android.content.Intent;
import android.content.pm.PackageManager;
import android.database.Cursor;
import android.graphics.Bitmap;
import android.graphics.BitmapFactory;
import android.graphics.Matrix;
import android.net.Uri;
import android.os.Bundle;
import android.provider.MediaStore;
import android.util.Log;
import android.view.View;
import android.widget.Button;
import android.widget.ImageView;
import android.widget.ProgressBar;
import android.widget.Toast;

import org.pytorch.IValue;
import org.pytorch.LiteModuleLoader;
import org.pytorch.Module;
import org.pytorch.Tensor;
import org.pytorch.torchvision.TensorImageUtils;

import java.io.BufferedReader;
import java以上是关于目标检测YOLOv5在Android上的部署的主要内容,如果未能解决你的问题,请参考以下文章