框架中集成swoole扩展怎么使用
Posted
tags:
篇首语:本文由小常识网(cha138.com)小编为大家整理,主要介绍了框架中集成swoole扩展怎么使用相关的知识,希望对你有一定的参考价值。
参考技术Aswoole扩展是php扩展。php swoole扩展,PHP语言的高性能网络通信框架,提供了PHP语言的异步多线程服务器,异步TCP/UDP网络客户端,异步mysql,数据库连接池,AsyncTask,消息队列,毫秒定时器,异步文件读写,异步DNS查询。
1、下载swoole源码包
[root@nginx ~]# wget
2、解压进入swoole文件夹
[root@nginx ~]# tar -zxvf swoole-1.7.17-stable
[root@nginx ~]# cd swoole-src-swoole-1.7.17-stable/
3、编译安装swoole
[root@nginx swoole-src-swoole-1.7.17-stable]# phpize
[root@nginx swoole-src-swoole-1.7.17-stable]# ./configure
[root@nginx swoole-src-swoole-1.7.17-stable]# make && make install
4、php.ini配置文件加载swoole.so模块
[root@nginx swoole-src-swoole-1.7.17-stable]# vi /usr/local/php/lib/php.ini
注意 php命令行运行和浏览器运行的配置文件不一样。
php 命令行的配置:
[root@nginx swoole-src-swoole-1.7.17-stable]# php --ini
Configuration File (php.ini) Path: /usr/local/lib
Loaded Configuration File: /usr/local/lib/php.ini//配置文件
Scan for additional .ini files in: (none)
Additional .ini files parsed: (none)
5、查看swoole模块是否已经安装成功
[root@nginx swoole-src-swoole-1.7.17-stable]# php -m
6、编写服务端httpServer.php文件并运行
$serv = new swoole_server("127.0.0.1", 9501);
$serv->on(\'connect\', function ($serv, $fd)
echo "Client:Connect.\\n";
);
$serv->on(\'receive\', function ($serv, $fd, $from_id, $data)
$serv->send($fd, \'Swoole: \'.$data);
);
$serv->on(\'close\', function ($serv, $fd)
echo "Client: Close.\\n";
);
$serv->start();
运行httpServer.php
[root@nginx swoole-src-swoole-1.7.17-stable]# php httpServer.php
7、用telnet测试
[root@nginx ~]# telnet 127.0.0.1 9501
Trying 127.0.0.1...
Connected to 127.0.0.1.
Escape character is \'^]\'.
hello 客户端
Swoole: hello 服务端
来源:PHP swoole扩展安装和使用-
20170819 13:57
在laravel5.8中集成swoole组件----用协程实现的服务端和客户端---静态文件如何部署
目前,较为成熟的技术是采用laravelS组件,注意和laravel 区别laravelS多了一个大写的S,由于laravelS默认监听5200端口,所以laravel项目要做一些调整
例如:
- 静态文件引入的方式-----从静态资源服务器加载
我们熟悉的js和css引入方式还是通过相对路径引入到标签中,但是如果集成了laravelS组件,这种技术方案就行不通了,网页不会加载样式或js文件,所以我们最好采用从静态服务器加载
相关文件的方法。文件laravel5.8官方手册给出了URL::asset()方法引入,但是例子都过于简单,如果我们静态文件的目录发生改变,则官方文档中的案例就不再奏效
不过放心,虽然“从静态资源服务器加载“听起来要写一些代码实现跨域加载似的,但实践起来并没那么麻烦
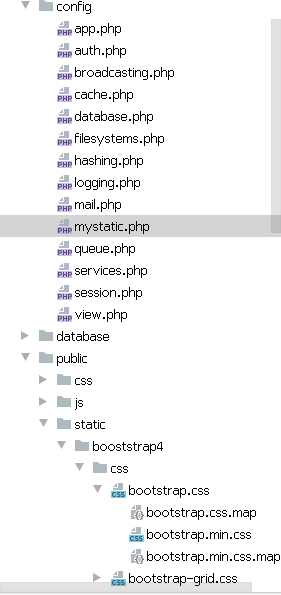
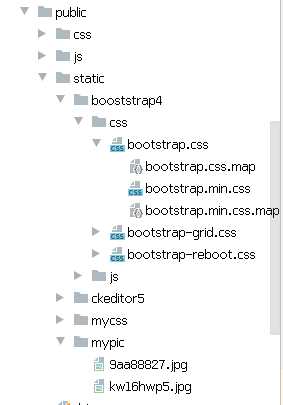
- 项目结构


- ngixn 分站点设置
server
    listen       88;
    server_name yinti.com;
    root  /dingshub2/yinti/public;
    index index.html index.htm index.php;

    location /
        # WordPress固定链接URL重写
     #这段显得尤为重要---如果没有,laravel路由方式访问会提示404
        try_files $uri $uri/ /index.php?$query_string;
        if (!-e $request_filename)
            rewrite (.*) /index.php;


    # PHP配置
    location ~ \\.php$
            fastcgi_pass   127.0.0.1:9000;
            fastcgi_index  index.php;
            fastcgi_param  SCRIPT_FILENAME $document_root$fastcgi_script_name;
            include        fastcgi_params;

    #静态文件服务器的实现
    location ~ .*\\.(gif|jpg|jpeg|png|js|css)$
expires 24h;
root /dingshub2/yinti/public/static;
proxy_store on;
proxy_store_access user:rw group:rw all:rw;
proxy_temp_path /dingshub2/yinti/public/static;#静态文件访问路径,比起域名下的根路径多了一层/static,没错,遇到诸如.css结尾的请求,会到这个路径下搜寻
proxy_redirect off;
proxy_set_header Host 127.0.0.1;
client_max_body_size 10m;
client_body_buffer_size 1280k;
proxy_connect_timeout 900;
proxy_send_timeout 900;
proxy_read_timeout 900;
proxy_buffer_size 40k;
proxy_buffers 40 320k;
proxy_busy_buffers_size 640k;
proxy_temp_file_write_size 640k;
if ( !-e $request_filename)
proxy_pass http://127.0.0.1;#默认80端口
- blade模版文件中的引入
官方文档没有给i出详细交代,不过我们可以利用一些laravel的配置功能达到我们的目的,实现静态文件引入的“动态”化,以应对静态文件路径发生改变的业务场景;例如我们知道laravel
在config文件夹下定义了若干php文件,每个php文件中都返回了一个关联数组,每个数组的键都对应了一个配置方案,例如,我们可以在config下定义一个名为(名称随意)
staticfiles.php文件,内容如下:
#staticfiles.php

<?php
return [
    ‘_css_‘=>‘http://yinti.com:88/mycss‘,
    ‘_bstr_‘=>‘http://yinti.com:88/booststrap4/css‘,
    ‘_pic_‘=>‘http://yinti.com:88/mypic‘
];
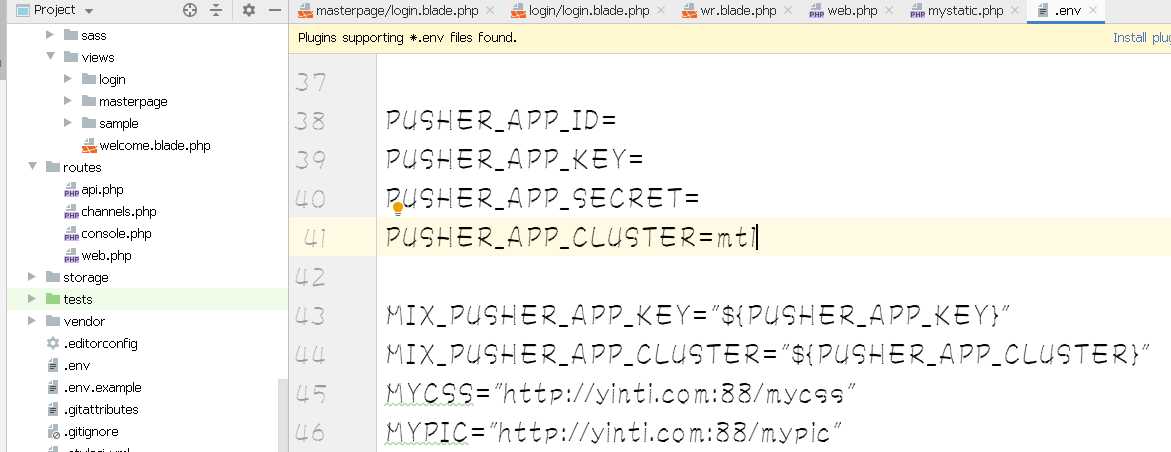
或者,我们可以在.env文件中定义添加
MYCSS="http://yinti.com:88/mycss"
MYPIC="http://yinti.com:88/mypic"
blade文件中这样引入:
母版文件(局部)
<!doctype html>
<html lang="en">
<head>
    <meta charset="utf-8">
    <meta name="viewport" content="width=device-width, initial-scale=1, shrink-to-fit=no">
    <meta name="description" content="">
    <meta name="author" content="">
    <link rel="icon" href="../../../../favicon.ico">
    @section(‘title‘)
    <title>Sticky Footer Navbar Template for Bootstrap</title>
    @show
    <!-- Bootstrap core CSS -->
#从config文件夹下的staticfiles.php文件中加载
<link href="asset(config(‘mystatic._bstr_‘).‘/bootstrap.min.css‘)" rel="stylesheet">
#从.env文件中加载
<!-- Custom styles for this template -->

 <link href="asset(env(‘MYCSS‘)).‘/sticky-footer-navbar.css‘" rel="stylesheet">
........................剩余部分略去不表
模板继承文件
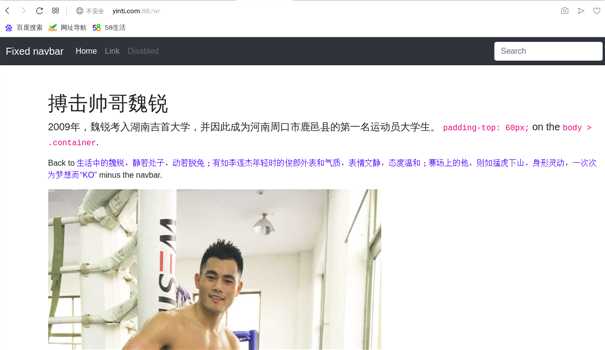
@extends(‘masterpage.login‘) @section(‘title‘) <title>搏击运动员之家</title> @endsection @section(‘h1‘) <h1 class="mt-5">搏击帅哥魏锐</h1> @endsection @section(‘plead‘) <p class="lead">2009年,魏锐考入湖南吉首大学,并因此成为河南周口市鹿邑县的第一名运动员大学生。 <code>padding-top: 60px;</code> on the <code>body
> .container</code>.</p> <p>Back to <a href="../sticky-footer">生活中的魏锐,静若处子,动若脱兔;有如李连杰年轻时的俊郎外表和气质,表情文静,态度温和;赛场上的他,则如猛虎下山,
身形灵动,一次次为梦想而“KO”</a> minus the navbar.</p> <p>
#从.env文件中加载
<img width="60%" src="asset(env(‘MYPIC‘).‘/9aa88827.jpg‘)">
    </p>
@endsection
- 路由定义
Route::get(‘wr‘,function()
    return view(‘sample.wr‘);
);
- 效果

以上是关于框架中集成swoole扩展怎么使用的主要内容,如果未能解决你的问题,请参考以下文章