iOS UITableView-Cell拖动更改排序
Posted itdali
tags:
篇首语:本文由小常识网(cha138.com)小编为大家整理,主要介绍了iOS UITableView-Cell拖动更改排序相关的知识,希望对你有一定的参考价值。
本文主要内容:
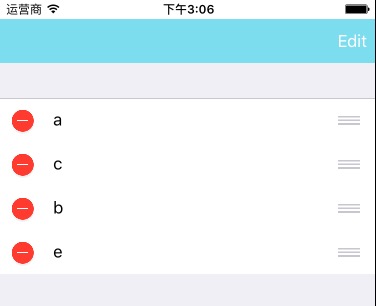
1.更改cell顺序;
2.UITableview的一些小细节。
2017-03-17更新:代码更新到 Swift 3
1.更改cell顺序
效果图:

实现方式:
1.创建一个数组,存放UITableView的数据
Swift:
var dataArray: NSMutableArray = ["a", "b", "c", "e"]Objective-C:
@property (nonatomic, strong) NSMutableArray *dataArray;2.实现UITableView的数据源
Swift:
func tableView(_ tableView: UITableView, numberOfRowsInSection section: Int) -> Int
    return dataArray.count
Objective-C:
-(NSInteger)tableView:(UITableView *)tableView numberOfRowsInSection:(NSInteger)section
    return self.dataArray.count;
3.实现cell排序的代理方法
Swift:
// 设置 cell 是否允许移动
func tableView(_ tableView: UITableView, canMoveRowAt indexPath: IndexPath) -> Bool
    return true

// 移动 cell 时触发
func tableView(_ tableView: UITableView, moveRowAt sourceIndexPath: IndexPath, to destinationIndexPath: IndexPath)
    // 移动cell之后更换数据数组里的循序
    dataArray.exchangeObject(at: (sourceIndexPath as NSIndexPath).row, withObjectAt: (destinationIndexPath as NSIndexPath).row)
Objective-C:
// 设置 cell 是否允许移动
- (BOOL)tableView:(UITableView *)tableView canMoveRowAtIndexPath:(NSIndexPath *)indexPath
    return true;

// 移动 cell 时触发
- (void)tableView:(UITableView *)tableView moveRowAtIndexPath:(NSIndexPath *)sourceIndexPath toIndexPath:(NSIndexPath *)destinationIndexPath
    // 移动cell之后更换数据数组里的循序
    [self.dataArray exchangeObjectAtIndex:sourceIndexPath.row withObjectAtIndex:destinationIndexPath.row];
4.开始编辑模式的代码:
Swift:
// 开启编辑模式
tableView.isEditing = true

// 结束编辑模式
tableView.isEditing = false
Objective-C:
// 开启编辑模式
self.tableView.editing = true;

// 结束编辑模式
self.tableView.editing = false;
2.UITableview的一些小细节
1.设置 cell 中间的间隔线
Swift
// 没有间隔线
tableView.separatorStyle = .none

// 默认的
tableView.separatorStyle = .singleLine
Objective-C:
// 没有间隔线
tableView.separatorStyle = UITableViewCellSeparatorStyleNone;

// 默认的
tableView.separatorStyle = UITableViewCellSeparatorStyleSingleLine;
2.设置右侧滑动进度条
Swift
// 显示或隐藏:true/false
tableView.showsVerticalScrollIndicator = true
Objective-C:
// 显示或隐藏:true/false
tableView.showsVerticalScrollIndicator = true;
3.去除UITableview底部空白的cell
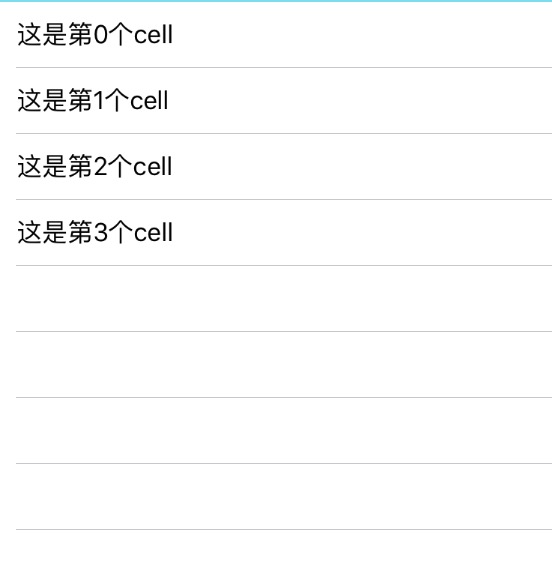
如果UITableview中cell铺不满屏,底部会自动补充空白的cell,如图:

去除底部的空白cell,可以采取如下方式:
Swift
tableView.tableFooterView = UIView()Objective-C:
tableView.tableFooterView = [[UIView alloc] init];4.选中Cell时的样式
Swift
// 默认的,点击灰色
cell.selectionStyle = .default

// 去除选中时的颜色
cell.selectionStyle = .none
Objective-C:
// 默认的,点击灰色
cell.selectionStyle = UITableViewCellSelectionStyleDefault;

// 去除选中时的颜色
cell.selectionStyle = UITableViewCellSelectionStyleNone;
注:上面代码只是去掉了cell选中时的颜色,不会去掉点击触发的时间。
以上,就是UITableview的一些小细节。
UITableView的内容到此结束了。
以上是关于iOS UITableView-Cell拖动更改排序的主要内容,如果未能解决你的问题,请参考以下文章