iOS 组件化
Posted xiaoxiaobukuang
tags:
篇首语:本文由小常识网(cha138.com)小编为大家整理,主要介绍了iOS 组件化相关的知识,希望对你有一定的参考价值。
一、为什么需要组件化
随着公司业务的不断发展,项目的功能越来越复杂,各个业务代码耦合越来越多,代码量急剧增加,传统的 MVC 或者 MVVM 架构已经无法高效的管理工程代码,因此需要用一种技术来更好地管理工程,而组件化是一种能够解决代码耦合的技术。项目经过组件化的拆分,不仅可以解决代码耦合的问题,还可以增强代码的复用性,工程的易管理性等。
组件化的优势
- 有利于代码模块的封装和复用。
- 对不同的业务模块可以进行物理隔离(通过git私有 仓库权限控制),进一步提升代码的稳定性和安全性。
- 项目整体结构层次分明,便于后期维护。
- 便于项目功能细分,颗粒划分更细,分配工作更合理,项目时间节点更容易掌控,便于进行敏捷开发。
- 便于进行单元测试。
二、组件化开发过程
- 基于路由 URL 的 UI 页面统跳管理(url-block)。
- 基于反射的远程接口调用封装(target-action)。
- 基于面向协议思想的服务注册方案(protocol-class)。
- 基于通知的广播方案(NSNotification)。
三、url-block
1 、JLRoutes原理
JLRoutes 本质可以理解为:保存一个全局的字典,key 是 URL,value 是对应存放 block 的数组,URL 和 block 都会常驻在内存中,当打开一个 URL 时,JLRoutes 就可以遍历这个全局的字典,通过 URL 来执行对应的 block。
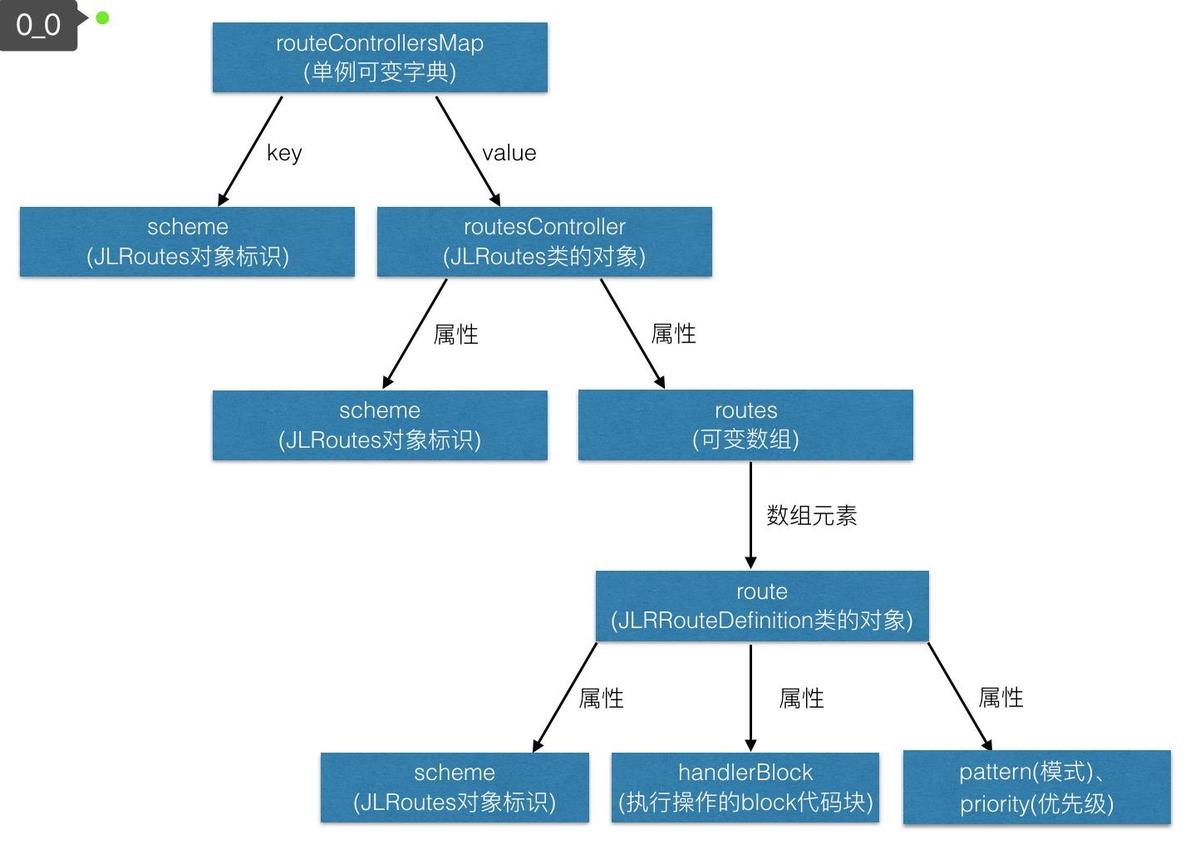
①、routeControllersMap 是全局的单例可变字典
②、这个字典的 key 值对应一个标识,源码中称之为 scheme,为了不混淆,咱们就叫其为 JLRoutes 对象标识。这个标识对应的value 值为 routesController(JLRoutes类的对象:JLRoutes *routesController)。
③、JLRoutes的对象(routesController)有很多属性,常用的有两个属性:
NSString *scheme:也就是上面所说的 JLRoutes对象标识,也就是说,此 value 值记录了自己的 key 值。
NSMutableArray *routes:此数组中存放了JLRRouteDefinition 对象。
④、JLRRouteDefinition 对象为最终的具体模型,也就是说你注册的跳转逻辑的所有信息,都存在于这个模型中,包括要实施操作的handlerBlock(执行操作的block代码块)、scheme(JLRoutes对象标识)、pattern(模式)、priority(优先级)。
2、配置 URL Schemes
一个 app 可以对应多个 URL Schemes,如下图 info.plist 配置,在 Safari 中,只要输入 JLRouteSchemeOne:// 或 JLRouteSchemeTwo:// 都可以打开该 app,而 URL identifier 最好是保证其唯一性,这里咱们为app设置了2个 URL Schemes,是为了后面手动解析URL而做的准备。

3、注册 JLRoutes
①、全局JLRoutes注册(注册Scheme默认值为:JLRoutesGlobalRoutesScheme)
    [[JLRoutes globalRoutes] addRoute:@"取url内容值的标识" handler:^BOOL(NSDictionary<NSString *,id> * _Nonnull parameters)
        return YES; // 一旦匹配,立即返回 YES
    ];
②、自定义命名空间注册
    [[JLRoutes routesForScheme:@"模块的标识"] addRoute:@"取url内容值的标识" handler:^BOOL(NSDictionary<NSString *,id> * _Nonnull parameters)

        return YES; // 一旦匹配,立即返回 YES
    ];
③、定义优先级注册
前两种注册方式的优先级priority都为0
    [[JLRoutes globalRoutes] addRoute:@"url标识符" priority:1 handler:^BOOL(NSDictionary<NSString *,id> * _Nonnull parameters)
        return YES;
    ];
④、自定义url注册
注册方法
    [[JLRoutes globalRoutes] addRoute:@"/:toVC/:userID/:pwd" priority:1 handler:^BOOL(NSDictionary<NSString *,id> * _Nonnull parameters)
        NSLog(@"parameters = %@",parameters);
        return YES;
    ];
调用方法
    NSString *url = @"/OneNextViewController/我是userID/我是pwd";
    //中文传输需要进行转义
    url = [url stringByAddingPercentEncodingWithAllowedCharacters:[NSCharacterSet URLQueryAllowedCharacterSet]];
    [[JLRoutes globalRoutes]routeURL:[NSURL URLWithString:url]];
⑤、自定义路径注册
注册方法
    [[JLRoutes globalRoutes] addRoute:@"push/:toVC/:userID/:pwd" priority:1 handler:^BOOL(NSDictionary<NSString *,id> * _Nonnull parameters)
        NSLog(@"parameters = %@",parameters);
        return YES;
    ];
调用方法
    NSString *url = @"push/OneNextViewController/我是userID/我是pwd";
    //中文传输需要进行转义
    url = [url stringByAddingPercentEncodingWithAllowedCharacters:[NSCharacterSet URLQueryAllowedCharacterSet]];
    [[JLRoutes globalRoutes]routeURL:[NSURL URLWithString:url]];
⑥、url多参数注册
注册方法
    [[JLRoutes globalRoutes] addRoute:@"/:toVC/:userID/:pwd" priority:1 handler:^BOOL(NSDictionary<NSString *,id> * _Nonnull parameters)
        NSLog(@"parameters = %@",parameters);
        return YES;
    ];
调用方法
    NSString *url = @"/OneNextViewController/我是userID/我是pwd?name=buer&age=18";
    //中文传输需要进行转义
    url = [url stringByAddingPercentEncodingWithAllowedCharacters:[NSCharacterSet URLQueryAllowedCharacterSet]];
    [[JLRoutes globalRoutes]routeURL:[NSURL URLWithString:url]];
⑦、带参数注册
注册方法
    [[JLRoutes globalRoutes] addRoute:@"/:toVC/:userID/:pwd" priority:1 handler:^BOOL(NSDictionary<NSString *,id> * _Nonnull parameters)
        NSLog(@"parameters = %@",parameters);
        return YES;
    ];
调用方法
    NSString *url = @"/OneNextViewController/我是userID/我是pwd?name=buer&age=18";
    //中文传输需要进行转义
    url = [url stringByAddingPercentEncodingWithAllowedCharacters:[NSCharacterSet URLQueryAllowedCharacterSet]];
    [[JLRoutes globalRoutes]routeURL:[NSURL URLWithString:url] withParameters:@@"class":@"二年级"];
4、点击跳转
在开始这两个 URL scheme 都添加进了 info.plist,并用第二种注册方法(自定义命名空间注册)进行注册,接下来这两个方法就可以进行跳转:
- (void)clickBtn
    NSString *customURL = @"JLRouteSchemeOne://OneDetailViewController";
    [[UIApplication sharedApplication] openURL:[NSURL URLWithString:customURL]];


- (void)clickBtn
    NSString *customURL = @"JLRouteSchemeTwo://TwoDetailViewController";
    [[UIApplication sharedApplication] openURL:[NSURL URLWithString:customURL]];
5、实现 openURL 方法
// ios 9.0前方法
- (BOOL)application:(UIApplication *)application openURL:(NSURL *)url sourceApplication:(NSString *)sourceApplication annotation:(id)annotation

    NSLog(@"Calling Application Bundle ID: %@", sourceApplication);
    NSLog(@"URL scheme: %@", [url scheme]);
    NSLog(@"URL query: %@", [url query]);

    // 从浏览器打开时候会自动全部转成小写,而从应用内调用的话大小写不会变化
    // 为了方便判断所以统一转成小写来判断

    NSString *urlSchemeStr = [[url scheme] lowercaseString]; // url scheme 转换为小写的字符串
    NSLog(@"urlSchemeStr: %@",urlSchemeStr);

    if ([urlSchemeStr isEqualToString:@"jlrouteschemeone"])

        // 要和 info.plist 的 URL types 里面的一致
        return [[JLRoutes routesForScheme:@"JLRouteSchemeOne"]routeURL:url];

     else if ([urlSchemeStr isEqualToString:@"jlrouteschemetwo"])

        // 要和 info.plist 的 URL types 里面的一致
        return [[JLRoutes routesForScheme:@"JLRouteSchemeTwo"]routeURL:url];


    return YES;


// iOS 9.0后方法
- (BOOL)application:(UIApplication *)app openURL:(nonnull NSURL *)url options:(nonnull NSDictionary<UIApplicationOpenURLOptionsKey,id> *)options

    NSLog(@"options: %@", options);

    NSLog(@"Calling Application Bundle ID: %@", [options objectForKey:@"UIApplicationOpenURLOptionsSourceApplicationKey"]);

    NSLog(@"URL scheme: %@", [url scheme]);
    NSLog(@"URL  host : %@", [url host]);
    NSLog(@"URL  query: %@", [url query]);

    // 从浏览器打开时候会自动全部转成小写,而从应用内调用的话大小写不会变化
    // 为了方便判断所以统一转成小写来判断

    NSString *urlSchemeStr = [[url scheme] lowercaseString]; // url scheme 转换为小写的字符串
    NSLog(@"urlSchemeStr: %@",urlSchemeStr);

    if ([urlSchemeStr isEqualToString:@"jlrouteschemeone"])

        // 要和 info.plist 的 URL types 里面的一致
        return [[JLRoutes routesForScheme:@"JLRouteSchemeOne"]routeURL:url];

     else if ([urlSchemeStr isEqualToString:@"jlrouteschemetwo"])

        // 要和 info.plist 的 URL types 里面的一致
        return [[JLRoutes routesForScheme:@"JLRouteSchemeTwo"]routeURL:url];


    return YES;
6、存在问题
使用 url-block 的方案的确可以组件间解耦,但是还是存在其它明显的问题,比如:
- 需要在内存中维护 url-block 的表,组件多了可能会有内存问题;
- url 的参数传递受到限制,只能传递常规的字符串参数,无法传递非常规参数,如 UIImage、NSData 等类型;
- 没有区分本地调用和远程调用的情况,尤其是远程调用会因为 url 参数受限,导致一些功能受限;
- 组件本身依赖了中间件,且分散注册使的耦合较多
四、target-action
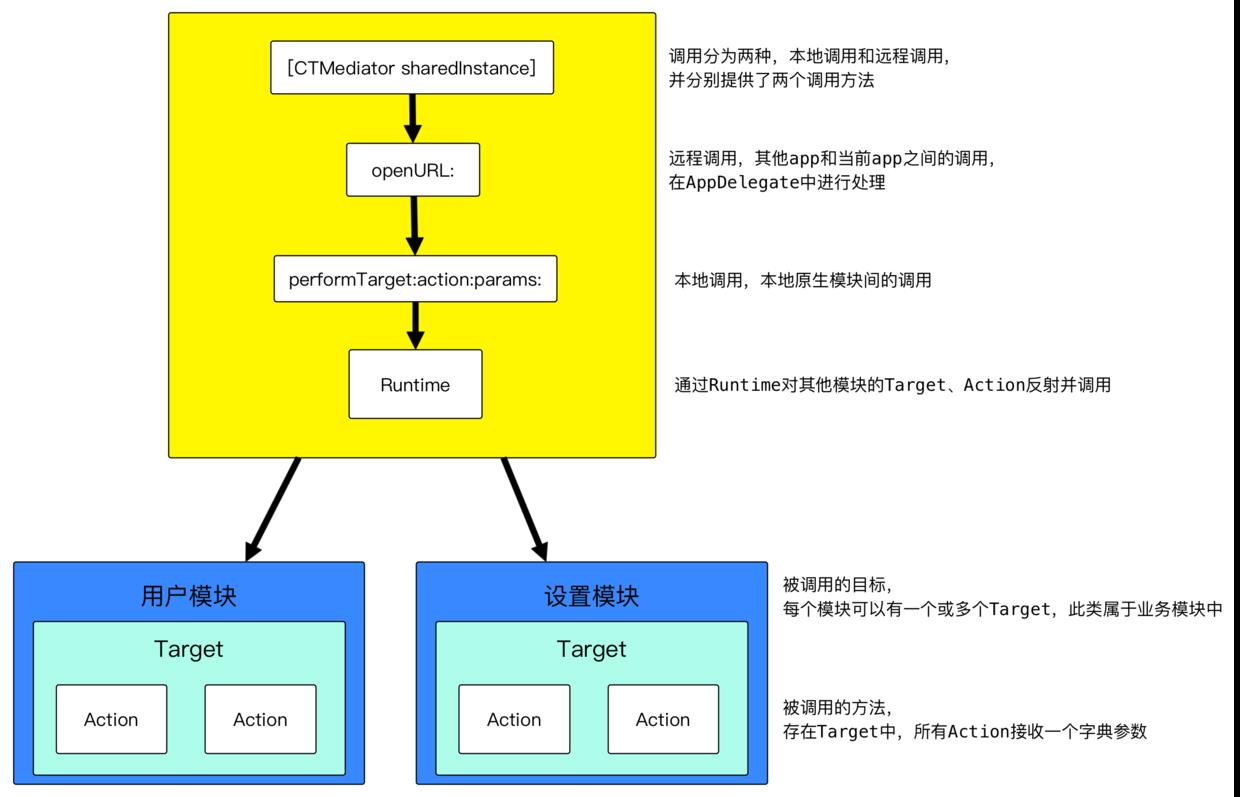
1、CTMediator原理
CTMediator
target-action 的方案是通过给组件包装一层 wrapper 来给外界提供服务,然后调用者通过依赖中间件来使用服务;其中,中间件是通过 runtime 来调用组件的服务,是真正意义上的解耦,也是该方案最核心的地方。具体实施过程是给组件封装一层 target 对象来对外提供服务,不会对原来组件造成入侵;然后,通过实现中间件的 category 来提供服务给调用者,这样使用者只需要依赖中间件,而组件则不需要依赖中间件。
target-action 的架构图:
2、调用方式
①、本地调用方式
// 本地组件调用入口
- (id _Nullable )performTarget:(NSString * _Nullable)targetName action:(NSString * _Nullable)actionName params:(NSDictionary * _Nullable)params shouldCacheTarget:(BOOL)shouldCacheTarget;
CTMediator根据获得的target和action信息,通过objective-C的runtime转化生成target实例以及对应的action选择子,然后最终调用到目标业务提供的逻辑,完成需求。
②、远程app调用方式
// 远程App调用入口
- (id _Nullable)performActionWithUrl:(NSURL * _Nullable)url completion:(void(^_Nullable)(NSDictionary * _Nullable info))completion;
在远程应用调用中,远程应用通过openURL的方式,由iOS系统根据info.plist里的scheme配置找到可以响应URL的应用(在当前我们讨论的上下文中,这就是你自己的应用),应用通过AppDelegate接收到URL之后,调用CTMediator的openUrl:方法将接收到的URL信息传入。当然,CTMediator也可以用openUrl:options:的方式顺便把随之而来的option也接收,这取决于你本地业务执行逻辑时的充要条件是否包含option数据。传入URL之后,CTMediator通过解析URL,将请求路由到对应的target和action,随后的过程就变成了上面说过的本地应用调用的过程了,最终完成响应。
③、其他的调用
CTMediator分类CTMediator+CTMediatorModuleAActions
// CTMediator+CTMediatorModuleAActions.h

@interface CTMediator (CTMediatorModuleAActions)

- (UIViewController *)CTMediator_viewControllerForDetail;

- (void)CTMediator_showAlertWithMessage:(NSString *)message cancelAction:(void(^)(NSDictionary *info))cancelAction confirmAction:(void(^)(NSDictionary *info))confirmAction;

- (void)CTMediator_presentImage:(UIImage *)image;

- (UITableViewCell *)CTMediator_tableViewCellWithIdentifier:(NSString *)identifier tableView:(UITableView *)tableView;

- (void)CTMediator_configTableViewCell:(UITableViewCell *)cell withTitle:(NSString *)title atIndexPath:(NSIndexPath *)indexPath;

- (void)CTMediator_cleanTableViewCellTarget;

@end

// CTMediator+CTMediatorModuleAActions.m

NSString * const kCTMediatorTargetA = @"A";

NSString * const kCTMediatorActionNativeFetchDetailViewController = @"nativeFetchDetailViewController";
NSString * const kCTMediatorActionNativePresentImage = @"nativePresentImage";
NSString * const kCTMediatorActionNativeNoImage = @"nativeNoImage";
NSString * const kCTMediatorActionShowAlert = @"showAlert";
NSString * const kCTMediatorActionCell = @"cell";
NSString * const kCTMediatorActionConfigCell = @"configCell";

@implementation CTMediator (CTMediatorModuleAActions)

- (UIViewController *)CTMediator_viewControllerForDetail

    UIViewController *viewController = [self performTarget:kCTMediatorTargetA
                                                    action:kCTMediatorActionNativeFetchDetailViewController
                                                    params:@@"key":@"value"
                                         shouldCacheTarget:NO
                                        ];
    if ([viewController isKindOfClass:[UIViewController class]])
        // view controller 交付出去之后,可以由外界选择是push还是present
        return viewController;
     else
        // 这里处理异常场景,具体如何处理取决于产品
        return [[UIViewController alloc] init];


- (void)CTMediator_presentImage:(UIImage *)image

    if (image)
        [self performTarget:kCTMediatorTargetA
                     action:kCTMediatorActionNativePresentImage
                     params:@@"image":image
          shouldCacheTarget:NO];
     else
        // 这里处理image为nil的场景,如何处理取决于产品
        [self performTarget:kCTMediatorTargetA
                     action:kCTMediatorActionNativeNoImage
                     params:@@"image":[UIImage imageNamed:@"noImage"]
          shouldCacheTarget:NO];


- (void)CTMediator_showAlertWithMessage:(NSString *)message cancelAction:(void(^)(NSDictionary *info))cancelAction confirmAction:(void(^)(NSDictionary *info))confirmAction

    NSMutableDictionary *paramsToSend = [[NSMutableDictionary alloc] init];
    if (message)
        paramsToSend[@"message"] = message;

    if (cancelAction)
        paramsToSend[@"cancelAction"] = cancelAction;

    if (confirmAction)
        paramsToSend[@"confirmAction"] = confirmAction;

    [self performTarget:kCTMediatorTargetA
                 action:kCTMediatorActionShowAlert
                 params:paramsToSend
      shouldCacheTarget:NO];


- (UITableViewCell *)CTMediator_tableViewCellWithIdentifier:(NSString *)identifier tableView:(UITableView *)tableView

    return [self performTarget:kCTMediatorTargetA
                        action:kCTMediatorActionCell
                        params:@
                                 @"identifier":identifier,
                                 @"tableView":tableView

             shouldCacheTarget:YES];


- (void)CTMediator_configTableViewCell:(UITableViewCell *)cell withTitle:(NSString *)title atIndexPath:(NSIndexPath *)indexPath

    [self performTarget:kCTMediatorTargetA
                 action:kCTMediatorActionConfigCell
                 params:@
                          @"cell":cell,
                          @"title":title,
                          @"indexPath":indexPath

      shouldCacheTarget:YES];


- (void)CTMediator_cleanTableViewCellTarget

    NSString *fullTargetName = [NSString stringWithFormat:@"Target_%@", kCTMediatorTargetA];
    [self releaseCachedTargetWithFullTargetName:fullTargetName];


@end
五、protocol-class
1、原理
通过 protocol 定义服务接口,组件通过实现该接口来提供接口定义的服务,具体实现就是把 protocol 和 class 做一个映射,同时在内存中保存一张映射表,使用的时就通过 protocol 找到对应的 class 来获取需要的服务。
protocol-class 的架构图:
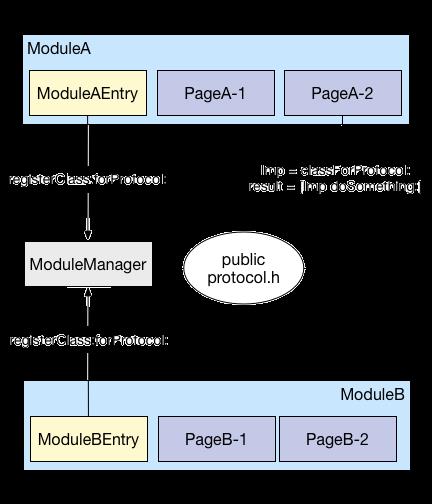
1、注册
[ModuleManager registerClass:ClassA forProtocol:ProtocolA];
2、调用
[ModuleManager classForProtocol:ProtocolA]
蘑菇街的这种方案确实解决了方案 1 中无法传递非常规参数的问题,使得组件间的调用更为方便,但是它依然没有解决组件依赖中间件、内存中维护映射表、组件的分散调用的问题。设计思想和方案 1 类似,都是通过给组件加了一层 wrapper,然后给使用者调用。
六、demo下载
文章
iOS 组件化 —— 路由设计思路分析
iOS应用架构谈 组件化方案
以上是关于iOS 组件化的主要内容,如果未能解决你的问题,请参考以下文章