Java中的Future是如何实现的
Posted 热爱编程的大忽悠
tags:
篇首语:本文由小常识网(cha138.com)小编为大家整理,主要介绍了Java中的Future是如何实现的相关的知识,希望对你有一定的参考价值。
Java中的Future是如何实现的
前言
在上一篇文章ThreadPoolExecutor线程池设计思路中,我们已经详细分析了JUC线程池设计架构,那么本篇文章我们将着眼于线程池扩展服务ExecutorService接口的实现源码,同时会重点分析Future的底层实现。
ExecutorService接口
ExecutorService接口是线程池扩展功能服务接口,它的定义如下:
public interface ExecutorService extends Executor

    // 停止线程池
    void shutdown();

    // 立即停止线程池,返回尚未执行的任务列表
    List<Runnable> shutdownNow();

    // 线程池是否停止
    boolean isShutdown();

    // 线程池是否终结
    boolean isTerminated();

    // 等待线程池终结
    boolean awaitTermination(long timeout, TimeUnit unit)
        throws InterruptedException;

    // 提交Callable类型任务
    <T> Future<T> submit(Callable<T> task);

    // 提交Runnable类型任务,预先知道返回值
    <T> Future<T> submit(Runnable task, T result);

    // 提交Runnable类型任务,对返回值无感知
    Future<?> submit(Runnable task);

    // 永久阻塞 - 提交和执行一个任务列表的所有任务
    <T> List<Future<T>> invokeAll(Collection<? extends Callable<T>> tasks)
        throws InterruptedException;

    // 带超时阻塞 - 提交和执行一个任务列表的所有任务
    <T> List<Future<T>> invokeAll(Collection<? extends Callable<T>> tasks,
                                  long timeout, TimeUnit unit)
        throws InterruptedException;

    // 永久阻塞 - 提交和执行一个任务列表的某一个任务
    <T> T invokeAny(Collection<? extends Callable<T>> tasks)
        throws InterruptedException, ExecutionException;

    // 带超时阻塞 - 提交和执行一个任务列表的某一个任务
     <T> T invokeAny(Collection<? extends Callable<T>> tasks,
                    long timeout, TimeUnit unit)
        throws InterruptedException, ExecutionException, TimeoutException;
ExecutorService继承自Executor,主要提供了线程池的关闭、状态查询查询、可获取返回值的任务提交、整个任务列表或者执行任务列表中任意一个任务(返回执行最快的任务的结果)等功能。
简易版本Future实现
ExecutorService接口的扩展方法都是返回Future相关的实例。java.util.concurrent.Future(中文翻译就是未来,还是挺有意思的),代表着一次异步计算的结果,它提供了检查计算是否已经完成、等待计算完成、获取计算结果等一系列方法。笔者之前强调过:线程池ThreadPoolExecutor的顶级接口Executor只提供了一个无状态的返回值类型为void的execute(Runnable command)方法,无法感知异步任务执行的完成时间和获取任务计算结果。如果我们需要感知异步任务执行的返回值或者计算结果,就必须提供带返回值的接口方法去承载计算结果的操作。这些方法上一节已经介绍过,而Future就是一个担任了承载计算结果(包括结果值、状态、阻塞等待获取结果操作等)的工具。这里举一个模拟Future实现过程的例子,例子是伪代码和真实代码的混合实现,不需要太较真。
首先,假设我们定义了一个动作函数式接口Action:
package com.mockFuture;


/**
 * @param <V>
 */
public interface Action<V>

    /**
     * 泛型的动作接口,可以返回一个泛型结果
     * @return
     */
    V doAction() throws InterruptedException;
我们可以尝试实现一下Action接口:
        Action<String> action1 = () ->
            // 模拟随机耗时
            int sleepTime = ThreadLocalRandom.current().nextInt(10);
            System.out.println("睡眠: "+sleepTime+"秒");
            Thread.sleep(TimeUnit.SECONDS.toMillis(sleepTime));
            return "SUCCESS!!!";
        ;
由于Action没有实现Runnable接口,上面的两个动作无法通过Executor#execute()方法提交异步任务,所以我们需要添加一个适配器ActionAdapter:
public class ActionAdapter<V> implements Runnable

    private Action<V> action;

    private ActionAdapter(Action<V> action)
        this.action = action;


    public static <V> ActionAdapter<V> newActionAdapter(Action<V> action)
        return new ActionAdapter<>(action);


    @Override
    public void run()
        action.doAction();
这里只做了简单粗暴的适配,虽然可以提交到线程池中执行,但是功能太过简陋。很多时候,我们还需要添加任务执行状态判断和获取结果的功能,于是新增一个接口ActionFuture:
public interface ActionFuture<V> extends Runnable

    V get() throws Exception;

    boolean isDone();
然后ActionAdapter实现ActionFuture接口,内部添加简单的状态控制:
package com.mockFuture;

import java.util.Stack;
import java.util.concurrent.ExecutionException;
import java.util.concurrent.locks.LockSupport;

/**
 * @author zdh
 * @param <V>
 */
public class ActionAdapter<V> implements ActionFuture<V>

    private static final int NEW = 0;
    private static final int DONE = 1;
    private int state;
    private final Action<V> action;
    private Object result;
    /**
     * 等待队列
     */
    private Stack<Thread> waitQueue=new Stack<>();

    private ActionAdapter(Action<V> action)
        this.action = action;
        this.state = NEW;


    public static <V> ActionAdapter<V> newActionAdapter(Action<V> action)
        return new ActionAdapter<>(action);


    @Override
    public void run()
        try
            result = action.doAction();
         catch (Throwable e)
            result = e;
         finally
            state = DONE;
            wakeUpWaiter();


    private void wakeUpWaiter()
        while (!waitQueue.empty())
            Thread thread = waitQueue.pop();
            LockSupport.unpark(thread);


    @Override
    public V get() throws Exception
        while (state < DONE)
            awaitDone();

        if (result instanceof Throwable)
            throw new ExecutionException((Throwable) result);
        else
            return (V) result;


    /**
     * 等待直到被唤醒
     */
    private void awaitDone()
        waitQueue.push(Thread.currentThread());
        LockSupport.park();


    @Override
    public boolean isDone()
        return state == DONE;
这里有个技巧是用Object类型的对象存放Action执行的结果或者抛出的异常实例,这样可以在ActionFuture#get()方法中进行判断和处理。最后一步,依赖Executor#execute()新增一个提交异步任务的方法:
package com.mockFuture;

import java.math.BigDecimal;
import java.sql.Time;
import java.util.concurrent.Executor;
import java.util.concurrent.Executors;
import java.util.concurrent.ThreadLocalRandom;
import java.util.concurrent.TimeUnit;

/**
 * @author zdh
 */
public class ActionPool

    private final Executor executor;

    public ActionPool(Executor executor)
        this.executor = executor;


    public <V> ActionFuture<V> submit(Action<V> action)
        ActionFuture<V> actionFuture = ActionAdapter.newActionAdapter(action);
        executor.execute(actionFuture);
        return actionFuture;


    public static void main(String[] args) throws Exception
        ActionPool pool = new ActionPool(Executors.newFixedThreadPool(3));

        Action<String> action1 = () ->
            // 模拟随机耗时
            int sleepTime = ThreadLocalRandom.current().nextInt(10);
            System.out.println("睡眠: "+sleepTime+"秒");
            Thread.sleep(TimeUnit.SECONDS.toMillis(sleepTime));
            return "SUCCESS!!!";
        ;

        ActionFuture<String> actionFuture = pool.submit(action1);

        pool.submit(()->
            try
                getAsyncResult(actionFuture);
             catch (Exception e)
                e.printStackTrace();

            return "";
        );

        pool.submit(()->
            try
                getAsyncResult(actionFuture);
             catch (Exception e)
                e.printStackTrace();

            return "";
        );

        getAsyncResult(actionFuture);


    private static void getAsyncResult(ActionFuture<String> actionFuture) throws Exception
        String res = actionFuture.get();
        System.out.println("异步任务执行结果");
上面例子提到的虚拟核心组件,在JUC包中有对应的实现(当时,JUC包对逻辑和状态控制会比虚拟例子更加严谨),对应关系如下:

Tip:
实际上,Future的实现使用的是Promise模式,具体可以查阅相关的资料。
FutureTask源码实现
提供回调的Runnable类型任务实际最终都会包装为FutureTask再提交到线程池中执行,而FutureTask是Runnable、Future和Callable三者的桥梁。先看FutureTask的类继承关系:
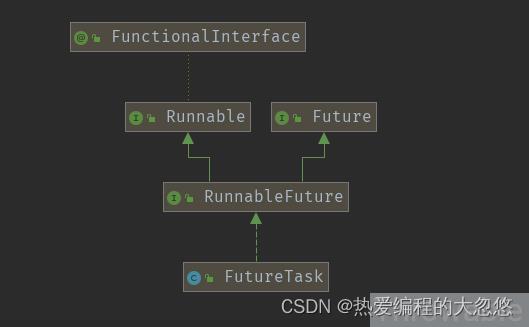
利用接口可以多继承的特性,RunnableFuture接口继承自Runnable和Future接口:
public interface RunnableFuture<V> extends Runnable, Future<V>

    void run();


@FunctionalInterface
public interface Runnable

    public abstract void run();


public interface Future<V>

    // 取消,mayInterruptIfRunning用于控制是否中断,实际上这个方法并不能终止已经提交的任务,后面会详细说明
    boolean cancel(boolean mayInterruptIfRunning);

    // 是否取消
    boolean isCancelled();

    // 是否完成,包括正常和异常的情况
    boolean isDone();

    // 永久阻塞获取结果,响应中断
    V get() throws InterruptedException, ExecutionException;

    // 带超时的阻塞获取结果,响应中断
    V get(long timeout, TimeUnit unit)
        throws InterruptedException, ExecutionException, TimeoutException;
而FutureTask实现了RunnableFuture接口,本质就是实现Runnable和Future接口的方法。先看FutureTask的重要属性:
// 状态
private volatile int state;
// 初始化状态
private static final int NEW          = 0;
// 完成中状态
private static final int COMPLETING   = 1;
// 正常情况下的完成状态
private static final int NORMAL       = 2;
// 异常情况下的完成状态
private static final int EXCEPTIONAL  = 3;
// 取消状态
private static final int CANCELLED    = 4;
// 中断中状态
private static final int INTERRUPTING = 5;
// 已中断状态
private static final int INTERRUPTED  = 6;

// 底层的Callable实现,执行完毕后需要置为null
private Callable<V> callable;

// 输出结果,如果是正常执行完成,get()方法会返回此结果,如果是异常执行完成,get()方法会抛出outcome包装为ExecutionException的异常
private Object outcome;

// 真正的执行Callable对象的线程实例,运行期间通过CAS操作此线程实例
private volatile Thread runner;

// 等待线程集合,Treiber Stack实现
private volatile WaitNode waiters;

// 下面是变量句柄,底层是基于Unsafe实现,通过相对顶层的操作原语,如CAS等
private static final VarHandle STATE;
private static final VarHandle RUNNER;
private static final VarHandle WAITERS;
static
    try
        MethodHandles.Lookup l = MethodHandles.lookup();
        STATE = l.findVarHandle(FutureTask.class, "state", int.class);
        RUNNER = l.findVarHandle(FutureTask.class, "runner", Thread.class);
        WAITERS = l.findVarHandle(FutureTask.class, "waiters", WaitNode.class);
     catch (ReflectiveOperationException e)
        throw new ExceptionInInitializerError(e);


    // Reduce the risk of rare disastrous classloading in first call to
    // LockSupport.park: https://bugs.openjdk.java.net/browse/JDK-8074773
    Class<?> ensureLoaded = LockSupport.class;

// ... 省略其他代码
上面的主要属性中,有两点比较复杂,但却是最重要的:
- FutureTask生命周期的状态管理或者跃迁。
- 等待(获取结果)线程集合WaitNode基于Treiber Stack实现,需要彻底弄清楚Treiber Stack的工作原理。
FutureTask的状态管理
FutureTask的内建状态包括了七种,也就是属性state有七种可选状态值,总结成表格如下:
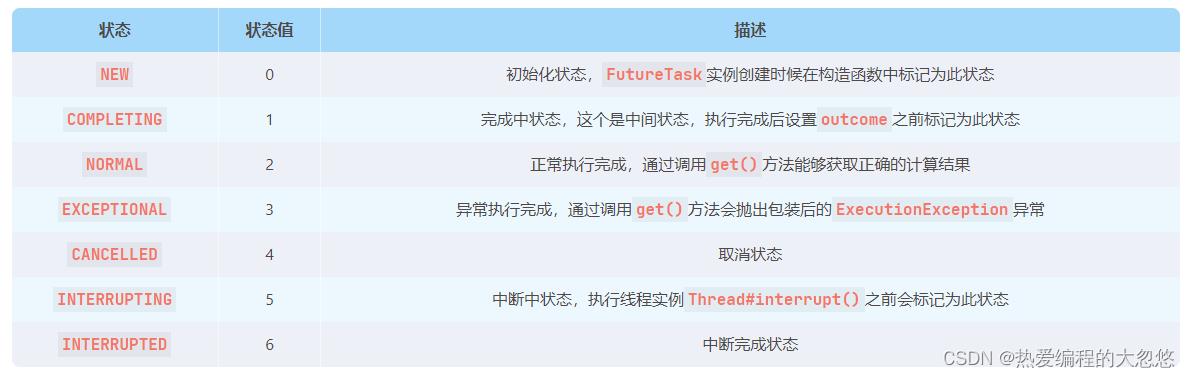
这些状态之间的跃迁流程图如下:

每一种状态跃迁都是由于调用或者触发了某个方法,下文的一个小节会分析这些方法的实现。
等待线程集合数据结构Treiber Stack的原理
Treiber Stack,中文翻译是驱动栈,听起来比较怪。实际上,Treiber Stack算法是R. Kent Treiber在其1986年的论文Systems Programming: Coping with Parallelism中首次提出,这种算法提供了一种可扩展的无锁栈,基于细粒度的并发原语CAS(Compare And Swap)实现。笔者并没有花时间去研读Treiber的论文,因为在Doug Lea大神参与编写的《Java Concurrency in Practice(Java并发编程实战)》中的第15.4.1小节中有简单分析非阻塞算法中的非阻塞栈。
在实现相同功能的前提下,非阻塞算法通常比基于锁的算法更加复杂。创建非阻塞算法的关键在于,找出如何将原子修改的范围缩小到单个变量上,同时还要维护数据的一致性。下面的ConcurrentStack是基于Java语言实现的Treiber算法:
public class ConcurrentStack<E>

    private AtomicReference<Node<E>> top = new AtomicReference<>();

    public void push(E item)
        Node<E> newHead = new Node<>(item);
        Node<E> oldHead;
        以上是关于Java中的Future是如何实现的的主要内容,如果未能解决你的问题,请参考以下文章