FISCO BCOS Go-sdk 配置文件
Posted 瘦身小蚂蚁
tags:
篇首语:本文由小常识网(cha138.com)小编为大家整理,主要介绍了FISCO BCOS Go-sdk 配置文件相关的知识,希望对你有一定的参考价值。
0、参考文档
GitHub - FISCO-BCOS/go-sdk: golang SDK of FISCO BCOS
1、环境配置
操作系统:CentOS7
Golang版本:1.17.2
WeBASE版本:1.5.2(已开启)可参见:WeBASE部署 - 搭建FISCO节点_ling1998的博客-CSDN博客
Git版本:1.8.3.1
2、下载go-sdk
(1)进入工程目录
[root@localhost ~]# cd /home/tracy/GoContract/(2)下载Go-sdk
[root@localhost GoContract]# git clone https://github.com/FISCO-BCOS/go-sdk.git
Cloning into 'go-sdk'...
remote: Enumerating objects: 1739, done.
remote: Counting objects: 100% (258/258), done.
remote: Compressing objects: 100% (174/174), done.
remote: Total 1739 (delta 107), reused 145 (delta 62), pack-reused 1481
Receiving objects: 100% (1739/1739), 1.01 MiB | 634.00 KiB/s, done.
Resolving deltas: 100% (930/930), done.
(3)进入go-sdk目录
[root@localhost gosdkdemo]# cd ../go-sdk(4)下载依赖
[root@localhost go-sdk]# go mod tidy(5)编译生成abigen工具
[root@localhost go-sdk]# go build ./cmd/abigen/编译时间有些长,耐心等待
(6)创建工程目录并移动abigen至工程目录
[root@localhost go-sdk]# cd ..                  #返回上一级目录
[root@localhost GoContract]# mkdir gosdkdemo    #创建工程目录
[root@localhost GoContract]# cd gosdkdemo       #进入工程目录
[root@localhost gosdkdemo]# mkdir tools         #创建目录,存放ABI工具及相关文件
[root@localhost gosdkdemo]# cp ../go-sdk/abigen tools/  #拷贝上一步生成的abigen到此目录中
3、配置文件config.toml
(1)进入工程目录
[root@localhost GoContract]# cd gosdkdemo(2)创建配置文件(config.toml)
[root@localhost gosdkdemo]# vi config.toml配置文件内容
[Network]
#type rpc or channel
Type="channel"
CAFile="ca.crt"
Cert="sdk.crt"
Key="sdk.key"
[[Network.Connection]]
NodeURL="127.0.0.1:20200"
GroupID=1
# [[Network.Connection]]
# NodeURL="127.0.0.1:20200"
# GroupID=2

[Account]
# only support PEM format for now
KeyFile=".ci/0x83309d045a19c44dc3722d15a6abd472f95866ac.pem"

[Chain]
ChainID=1
SMCrypto=false
按Esc退出编辑,输入:wq保存即出。
(3)拷贝配置文件中的证书及密钥文件
配置文件中如下三个文件
CAFile="ca.crt"
Cert="sdk.crt"
Key="sdk.key"
在webase-deploy/nodes/127.0.0.1/sdk中存在三个文件
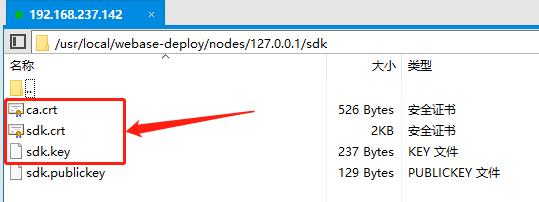
将以上三个文件copy至工程目录中
[root@localhost gosdkdemo]# mkdir sdk  #创建目录,保存证书及密钥文件
[root@localhost gosdkdemo]# cp /usr/local/webase-deploy/nodes/127.0.0.1/sdk/ca.crt sdk/
[root@localhost gosdkdemo]# cp /usr/local/webase-deploy/nodes/127.0.0.1/sdk/sdk.crt sdk/
[root@localhost gosdkdemo]# cp /usr/local/webase-deploy/nodes/127.0.0.1/sdk/sdk.key sdk/
更改配置文件config.toml
[root@localhost gosdkdemo]# vi config.toml 内容如下,加上路径:
CAFile="sdk/ca.crt"
Cert="sdk/sdk.crt"
Key="sdk/sdk.key"
按Esc退出编辑,输入:wq保存即出。
(4)生成私钥文件
生成配置文件config.toml中的私钥文件,如下:
KeyFile=".ci/0x83309d045a19c44dc3722d15a6abd472f95866ac.pem"
下载console
[root@localhost gosdkdemo]# cd .. #返回上一级目录
[root@localhost GoContract]# git clone https://github.com/FISCO-BCOS/console.git
使用get_account.sh脚本生成私钥文件
[root@localhost GoContract]# cd console/
[root@localhost console]# ls
build.gradle  CONTRIBUTING.md  gradle   gradlew.bat  README.md         settings.gradle  tools
Changelog.md  doc              gradlew  LICENSE      release_note.txt  src
[root@localhost console]# ./tools/get_account.sh
[INFO] Account Address   : 0xde54d4143e33780c5cb5eed919ce25d2608789ce
[INFO] Private Key (pem) : accounts/0xde54d4143e33780c5cb5eed919ce25d2608789ce.pem
[INFO] Public  Key (pem) : accounts/0xde54d4143e33780c5cb5eed919ce25d2608789ce.pem.pub
将生成私钥文件目录移动至工程目录
[root@localhost console]# cp -r accounts/ ../gosdkdemo/查看工程目录结构
[root@localhost console]# cd ../gosdkdemo/  #进入工程目录
[root@localhost gosdkdemo]# tree
.
├── accounts
│   ├── 0xde54d4143e33780c5cb5eed919ce25d2608789ce.pem
│   └── 0xde54d4143e33780c5cb5eed919ce25d2608789ce.pem.pub
├── config.toml
└── sdk
    ├── ca.crt
    ├── sdk.crt
    └── sdk.key

2 directories, 6 files
(5)更改配置文件config.toml中的KeyFile值
[root@localhost gosdkdemo]# vi config.toml KeyFile值修改为上面生成的私钥账户文件
KeyFile="accounts/0xde54d4143e33780c5cb5eed919ce25d2608789ce.pem"或
KeyFile=".accounts/0xde54d4143e33780c5cb5eed919ce25d2608789ce.pem"
accounts前面加点是为了隐藏文件。
按Esc退出编辑,输入:wq保存即出。
4、使用ABI工具生成go文件
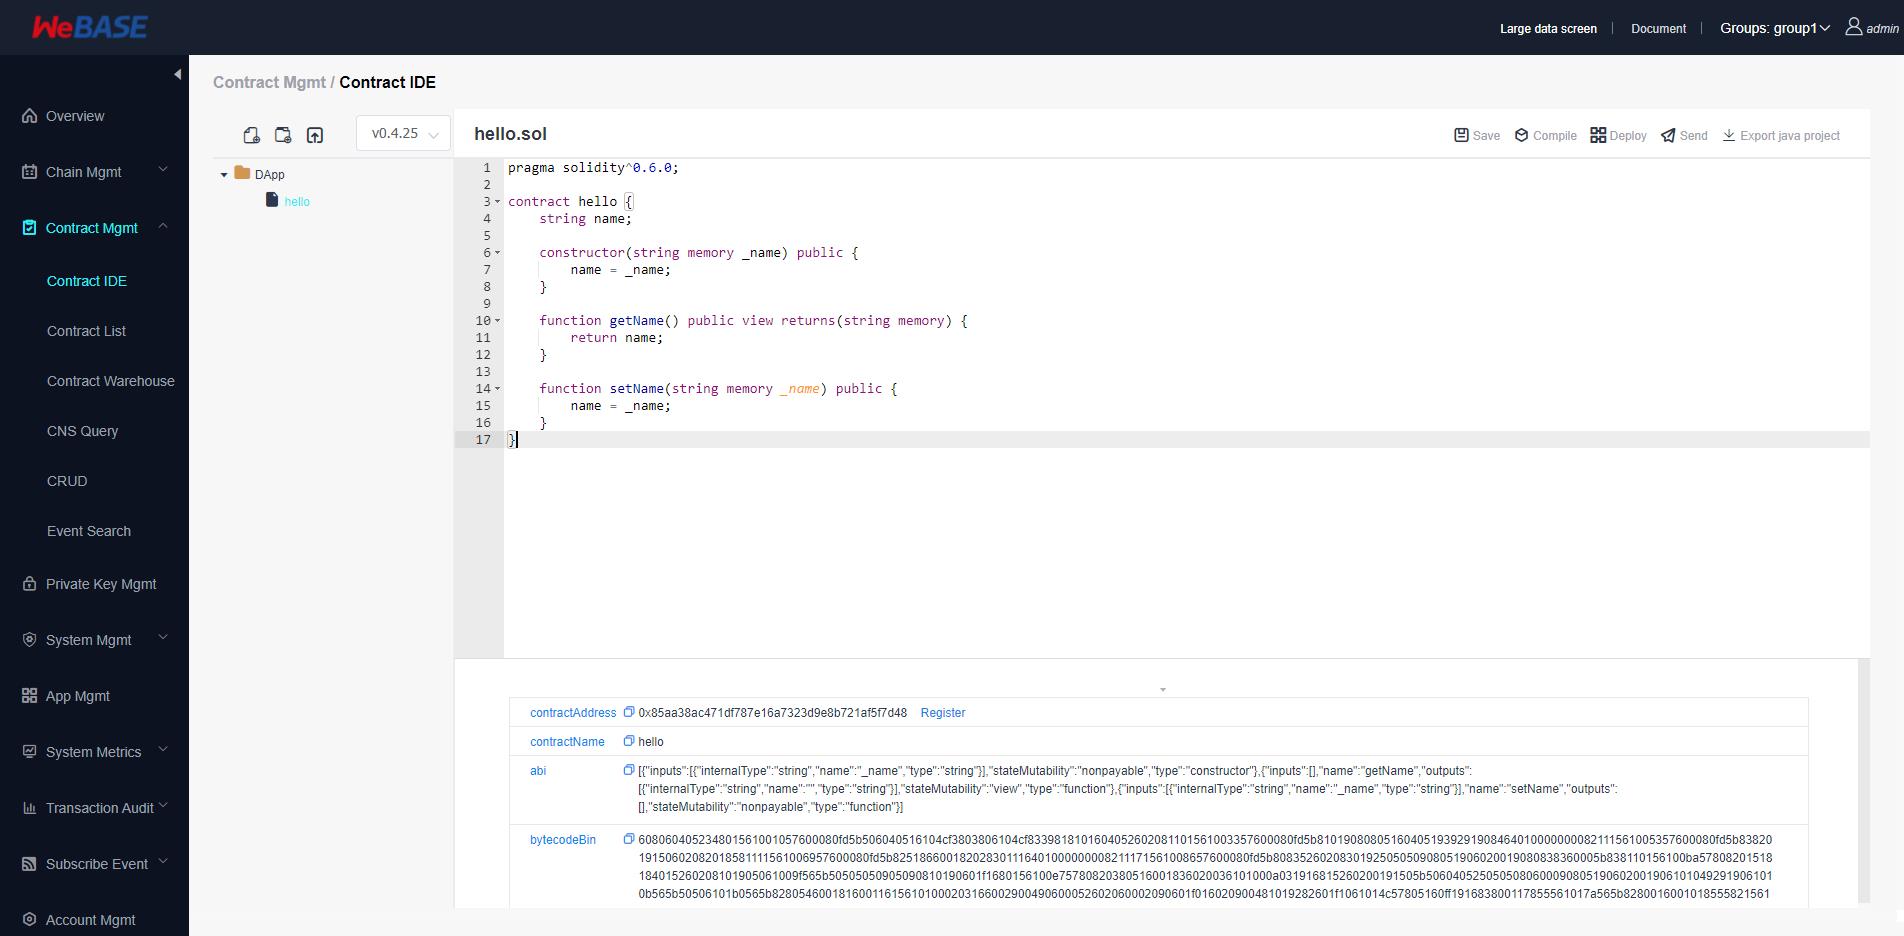
注:在WebASE中已写好一个智能合约并编译部署,如下图所示
(1)生成智能合约.abi文件
[root@localhost gosdkdemo]# cd tools #进入tools目录
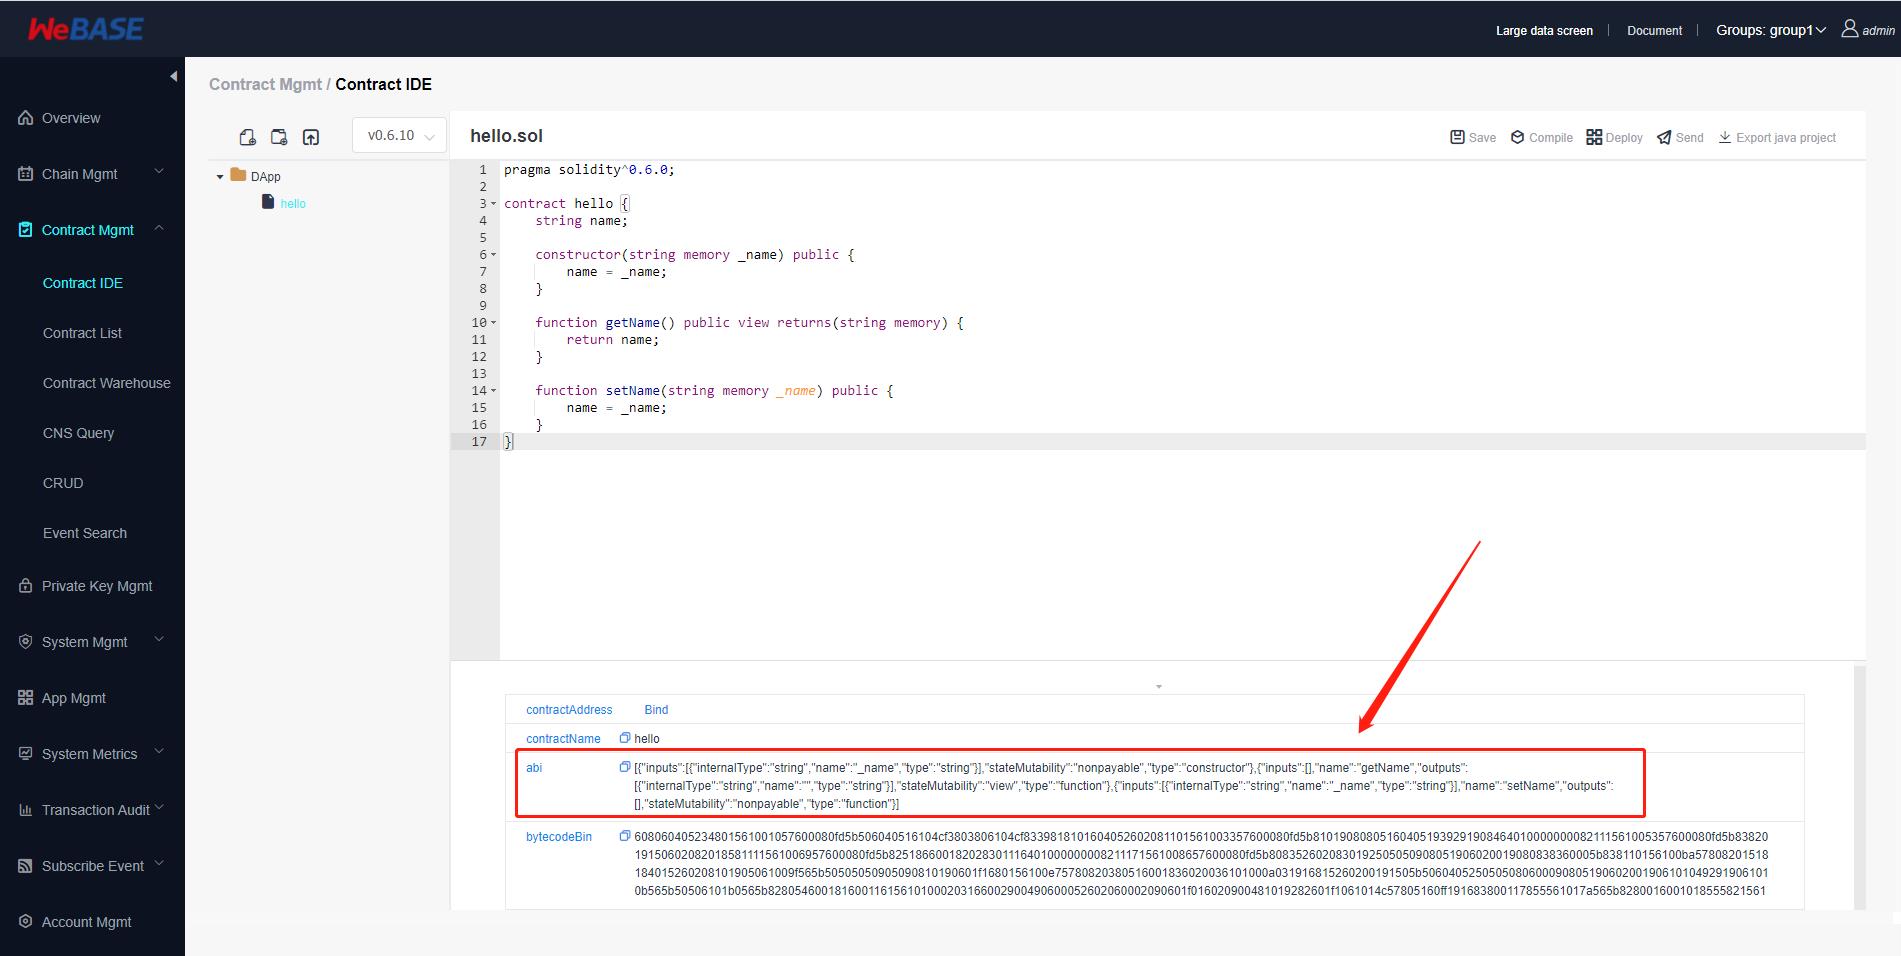
[root@localhost tools]# vi hello.abiabi内容在WeBASE的合约IDE中可查看,并拷贝到hello.abi文件中
按Esc退出编辑,输入:wq保存即出。
(2)生成智能合约.bin文件
[root@localhost tools]# vi hello.binbin内容在WeBASE的合约IDE中可查看,并拷贝到hello.bin文件中
 按Esc退出编辑,输入:wq保存即出。
(3)使用abigen生成go文件
[root@localhost tools]# ./abigen -abi hello.abi -bin hello.bin -type hello -pkg main -out ../hello.go
[root@localhost tools]# cd ..  #返回上一级目录
[root@localhost gosdkdemo]# ls #查看已经生成的hello.go文件
accounts config.toml hello.go sdk tools注:如果安装过Geth并配置环境变量,因Geth下有一个同名的abigen会依赖ethereum相关包生成GO文件,若不指定abigen,则默认使用Geth中的abigen,之后编译会报错。因此需要指定abigen为 刚刚通过go-sdk生成的abigen。如上面在tools目录下使用./abigen,指定是当前目前的abigen工具。
Geth中abigen生成的GO文件导入包为:
// Code generated - DO NOT EDIT.
// This file is a generated binding and any manual changes will be lost.

package main

import (
	"errors"
	"math/big"
	"strings"

	ethereum "github.com/ethereum/go-ethereum"
	"github.com/ethereum/go-ethereum/accounts/abi"
	"github.com/ethereum/go-ethereum/accounts/abi/bind"
	"github.com/ethereum/go-ethereum/common"
	"github.com/ethereum/go-ethereum/core/types"
	"github.com/ethereum/go-ethereum/event"
)
go-sdk生成的abigen工具,再生成的GO文件导入包为:
// Code generated - DO NOT EDIT.
// This file is a generated binding and any manual changes will be lost.

package main

import (
	"math/big"
	"strings"

	"github.com/FISCO-BCOS/go-sdk/abi"
	"github.com/FISCO-BCOS/go-sdk/abi/bind"
	"github.com/FISCO-BCOS/go-sdk/core/types"
	"github.com/FISCO-BCOS/go-sdk/event"
	ethereum "github.com/ethereum/go-ethereum"
	"github.com/ethereum/go-ethereum/common"
)
5、调用智能合约
进入CentOS可视化界面,打开VSCode,在这里编写、执行代码
(1)编写代码(main.go)
package main

import (
	"fmt"
	"log"

	"github.com/FISCO-BCOS/go-sdk/client"
	"github.com/FISCO-BCOS/go-sdk/conf"
	"github.com/ethereum/go-ethereum/common"
)

func main()
	//parse config
	configs, err := conf.ParseConfigFile("config.toml")
	if err != nil
		log.Fatal(err)

	config := &configs[0]

	//connect peer
	cli, err := client.Dial(config)
	if err != nil
		log.Fatal(err)


	//create a contract instance
	contractAddr := "0x85aa38ac471df787e16a7323d9e8b721af5f7d48"
	instance, err := NewHello(common.HexToAddress(contractAddr), cli)
	if err != nil
		log.Fatal(err)


	//call function of smart contract
	name, err := instance.GetName(cli.GetCallOpts())
	if err != nil
		log.Panic(err)


	fmt.Println(name)
(2)生成go.mod
[tracy@localhost gosdkdemo]$ go mod init gosdkdemo(3)下载依赖包
[tracy@localhost gosdkdemo]$ go mod tidy
go: finding module for package github.com/FISCO-BCOS/go-sdk/conf
go: finding module for package github.com/FISCO-BCOS/go-sdk/client
go: found github.com/FISCO-BCOS/go-sdk/client in github.com/FISCO-BCOS/go-sdk v0.11.0
go: found github.com/FISCO-BCOS/go-sdk/conf in github.com/FISCO-BCOS/go-sdk v0.11.0
gosdkdemo imports
github.com/FISCO-BCOS/go-sdk/client imports
github.com/ethereum/go-ethereum/crypto imports
github.com/btcsuite/btcd/btcec/v2/ecdsa tested by
github.com/btcsuite/btcd/btcec/v2/ecdsa.test imports
github.com/btcsuite/btcd/chaincfg/chainhash: ambiguous import: found package github.com/btcsuite/btcd/chaincfg/chainhash in multiple modules:
github.com/btcsuite/btcd v0.21.0-beta (/home/tracy/gopath/pkg/mod/github.com/btcsuite/btcd@v0.21.0-beta/chaincfg/chainhash)
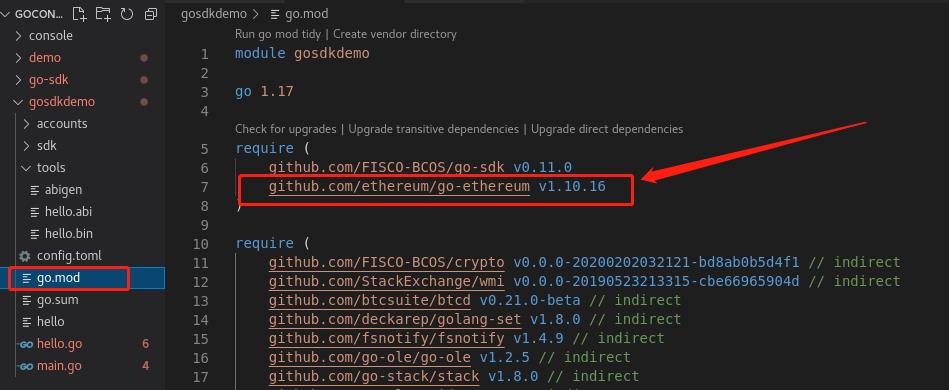
github.com/btcsuite/btcd/chaincfg/chainhash v1.0.0 (/home/tracy/gopath/pkg/mod/github.com/btcsuite/btcd/chaincfg/chainhash@v1.0.0)如遇到以上错误,将go.mod文件中的github.com/ethereum/go-ethereum v1.10.17 改为
github.com/ethereum/go-ethereum v1.10.16(修改版本号即可),如下图所示:
(4)编译
[tracy@localhost gosdkdemo]$ go build *.go
# command-line-arguments
./main.go:28:47: cannot use cli (type *client.Client) as type "github.com/ethereum/go-ethereum/accounts/abi/bind".ContractBackend in argument to NewHello:
        *client.Client does not implement "github.com/ethereum/go-ethereum/accounts/abi/bind".ContractBackend (missing EstimateGas method)
./main.go:34:32: undefined: client.GetCallOpts
若出现上面错误,是因为默认使用了Geth的abigen生成Go文件所导致,否则编译成功。
(5)运行
[tracy@localhost gosdkdemo]$ go run *.go
tracy
总结
以上通过go-sdk生成的abigen工具(即第2步),与console中get_account.sh脚本生成私钥文件(即第3 -(4)步),无需再次配置,之后直接使用即可。
FISCO BCOS 日志设置配置
FISCO BCOS支持多账本,每条链包括多个独立账本,账本间数据相互隔离,群组间交易处理相互隔离,每个节点包括一个主配置config.ini和多个账本配置group.group_id.genesis、group.group_id.ini。
config.ini:主配置文件,主要配置RPC、P2P、SSL证书、账本配置文件路径、兼容性等信息。group.group_id.genesis:群组配置文件,群组内所有节点一致,节点启动后,不可手动更改该配置。主要包括群组共识算法、存储类型、最大gas限制等配置项。group.group_id.ini:群组可变配置文件,包括交易池大小等,配置后重启节点生效。
配置日志信息
FISCO BCOS支持功能强大的boostlog,日志配置主要位于config.ini的[log]配置项中。
日志通用配置
FISCO BCOS通用日志配置项如下:
enable: 启用/禁用日志,设置为true表示启用日志;设置为false表示禁用日志,默认设置为true,性能测试可将该选项设置为false,降低打印日志对测试结果的影响log_path:日志文件路径。level: 日志级别,当前主要包括trace、debug、info、warning、error五种日志级别,设置某种日志级别后,日志文件中会输大于等于该级别的日志,日志级别从大到小排序error > warning > info > debug > trace。max_log_file_size:每个日志文件最大容量,计量单位为MB,默认为200MB。flush:boostlog默认开启日志自动刷新,若需提升系统性能,建议将该值设置为false。
boostlog示例配置如下:
[log]
    ; 是否启用日志,默认为true
    enable=true
    log_path=./log
    level=info
    ; 每个日志文件最大容量,默认为200MB
    max_log_file_size=200
    flush=true
统计日志配置
考虑到实时监控系统资源使用情况在实际生产系统中非常重要,FISCO BCOS v2.4.0引入了统计日志,统计日志配置项位于config.ini中。
配置统计日志开关
考虑到并非所有场景都需要网络流量和Gas统计功能,FISCO BCOS在config.ini中提供了enable_statistic选项来开启和关闭该功能,默认关闭该功能。
log.enable_statistic配置成true,开启网络流量和Gas统计功能log.enable_statistic配置成false,关闭网络流量和Gas统计功能
配置示例如下:
[log]
    ; enable/disable the statistics function
    enable_statistic=false
配置网络统计日志输出间隔
由于网络统计日志周期性输出,引入了log.stat_flush_interval来控制统计间隔和日志输出频率,单位是秒,默认为60s,配置示例如下:
[log]
    ; network statistics interval, unit is second, default is 60s
    stat_flush_interval=60
以上是关于FISCO BCOS Go-sdk 配置文件的主要内容,如果未能解决你的问题,请参考以下文章