架构大合集,轻松面对工作需求(下)
Posted 初一十五啊
tags:
篇首语:本文由小常识网(cha138.com)小编为大家整理,主要介绍了架构大合集,轻松面对工作需求(下)相关的知识,希望对你有一定的参考价值。
前言
本文讲述:
- 数据结构和算法,23种设计模式,
- OKhttp,Retrofit,
- Glide,
- Dagger2,
- MVP,MVC,MVVM,MVI,
- Jetpack Room,
关注公众号:初一十五a
解锁 《Android十大板块文档》,让学习更贴近未来实战。已形成PDF版
内容如下:
1.2022最新Android11位大厂面试专题,128道附答案
2.音视频大合集,从初中高到面试应有尽有
3.Android车载应用大合集,从零开始一起学
4.性能优化大合集,告别优化烦恼
5.Framework大合集,从里到外分析的明明白白
6.Flutter大合集,进阶Flutter高级工程师
7.compose大合集,拥抱新技术
8.Jetpack大合集,全家桶一次吃个够
9.架构大合集,轻松应对工作需求
10.Android基础篇大合集,根基稳固高楼平地起
整理不易,关注一下吧。开始进入正题,ღ( ´・ᴗ・` ) 🤔
五丶架构师必备设计思想
1.MVC
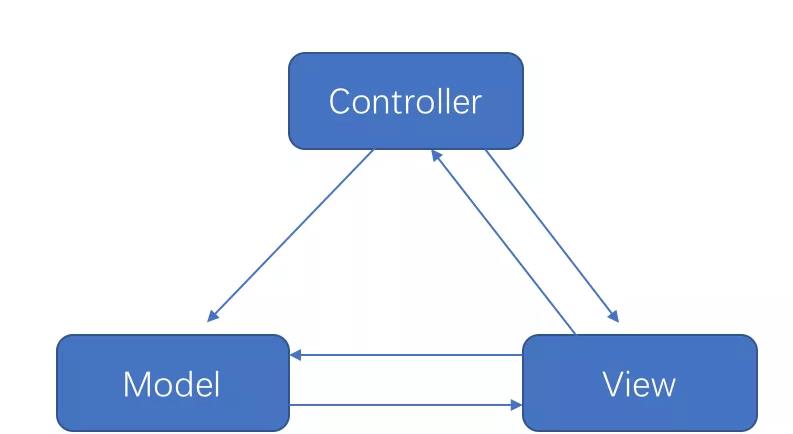
在 android 中,三者的关系如下:
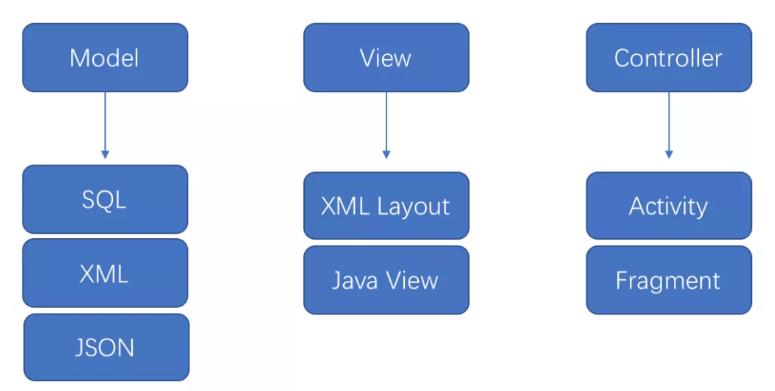
由于在 Android 中 xml 布局的功能性太弱,所以 Activity 承担了绝大部分的工作,所以在 Android 中 mvc 更像:

总结:
- 具有一定的分层,model 解耦,controller 和 view 并没有解耦
- controller 和 view 在 Android 中无法做到彻底分离,Controller 变得臃肿不堪
- 易于理解、开发速度快、可维护性高
2.MVP

通过引入接口 BaseView,让相应的视图组件如 Activity,Fragment去实现 BaseView,把业务逻辑放在 presenter 层中,弱化 Model 只有跟 view 相关的操作都由 View 层去完成。
总结:
- 彻底解决了 MVC 中 View 和 Controller 傻傻分不清楚的问题
- 但是随着业务逻辑的增加,一个页面可能会非常复杂,UI 的改变是非常多,会有非常多的 case,这样就会造成 View 的接口会很庞大
- 更容易单元测试
3.MVVM

在 MVP 中 View 和 Presenter 要相互持有,方便调用对方,而在 MVP 中 View 和 ViewModel 通过 Binding 进行关联,他们之前的关联处理通过 DataBinding 完成。
总结:
- 很好的解决了 MVC 和 MVP 的问题
- 视图状态较多,ViewModel 的构建和维护的成本都会比较高
- 但是由于数据和视图的双向绑定,导致出现问题时不太好定位来源
六丶数据库管理框架
1.Jetpack Room使用入门
1.1.前言
这是一篇之前的文章,记录在看云文档中。还是决定将其整理到Jetpack这个专栏中,构成一套。下面的文章也是根据之前的开发记录来的,做了一个简单的事件记录条目的保存,下面开始正题。
当然,我们所使用的就是之前使用过的SQLite数据库。可以简单回顾一下在java中是如何操作数据库的:
- 继承自
SQLiteOpenHelper类,复写对应的方法,可以得到一个Helper实例; - 通过
SQLiteOpenHelper的实例的getWritableDatabase()来得到一个数据库实例; - 然后就可以通过这个数据库实例进行
CRUD操作;
简单回顾一下在Java中的流程:
// 构建一个子类Helper
public class mysqliteOpenHelper extends SQLiteOpenHelper
    private Context context;
    private String name;
    private String bookSql = "create table Book (id integer primary key autoincrement, " +
            "name text, pages integer)";
    private String userSql = "create table User (name text, age integer)";

    public MySQLiteOpenHelper(@Nullable Context context,
                              @Nullable String name,
                              @Nullable SQLiteDatabase.CursorFactory factory,
                              int version)
        super(context, name, factory, version);
        this.context = context;
        this.name = name;


    @Override
    public void onCreate(SQLiteDatabase db)
        // 创建数据库表
        db.execSQL(bookSql);
        db.execSQL(userSql);


    @Override
    public void onUpgrade(SQLiteDatabase db, int oldVersion, int newVersion)
        db.execSQL("drop table if exists Book");
        db.execSQL("drop table if exists User");
        onCreate(db); // 重新执行一下onCreate方法


// 获取db对象
mySQLiteOpenHelper = new MySQLiteOpenHelper(getApplicationContext(),
                "BookDatabase.db", null, 3);
SQLiteDatabase db= mySQLiteOpenHelper.getWritableDatabase();


// CRUD
db.insert("Book", null, values);
1.2.Kotlin中的数据库操作
虽然在Kotlin中也可以像上面的那种方式一样来进行数据库的操作,但是Google推出了一款数据库框架,即:Room。下面就使用这个框架进行完成操作。
依赖
首先需要添加依赖:
// Room
def room_version = "2.2.6"
implementation "androidx.room:room-runtime:$room_version"
// For Kotlin use kapt instead of annotationProcessor (注意这个注释)
kapt "androidx.room:room-compiler:$room_version"
implementation "androidx.room:room-ktx:$room_version"
testImplementation "androidx.room:room-testing:$room_version"
当然,这里在kotlin中使用kapt,我们需要导入这个插件:
plugins
    id 'com.android.application'
    id 'kotlin-android'
    id 'kotlin-kapt'
注释:如果项目是使用Kotlin语言来开发的,在添加room-compiler的时候使用kapt关键字,java语言开发的就使用annotationProcessor关键字。
基础概念
要想使用Room,必须要了解最基础的三个概念:
Entity:实体类,对应的是数据库的一张表结构。需要使用注解@Entity标记。默认实体类的类名为表名,字段名为数据库中的字段。Dao:包含访问一系列访问数据库的方法。需要使用注解 @Dao 标记。Database:数据库持有者,作为与应用持久化相关数据的底层连接的主要接入点。需要使用注解@Database标记。
使用@Database注解需满足以下条件:
- 定义的类必须是一个继承于
RoomDatabase的抽象类。 - 在注解中需要定义与数据库相关联的实体类列表。
- 包含一个没有参数的抽象方法并且返回一个带有注解的
@Dao
@Entity
从前面我们知道,@Entity作用在类上,该类对应数据库中的一个数据表。属性对应数据库中的字段,那么类似的我们可以指定主键和注释。同样也是使用注解:
@PrimaryKey注解用来标注表的主键,可以使用autoGenerate = true来指定了主键自增长;@ColumnInfo注解用来标注表对应的列的信息比如表名、默认值等等。@Ignore注解顾名思义就是忽略这个字段,使用了这个注解的字段将不会在数据库中生成对应的列信息。
@Dao
Dao类是一个接口,其中定义了一系列的操作数据库的方法。Room也为我们的提供了相关的注解,有@Insert、@Delete、@Update 和 @Query。
比如:
@Query("select * from user where userId = :id")
fun getUserById(id: Long): User
@Database
首先需要定义一个类,继承自RoomDatabase,并添加注解 @Database 来标识。
实战
这里我们需要一个数据库来存储用户记事本的数据,大致包括如下内容:
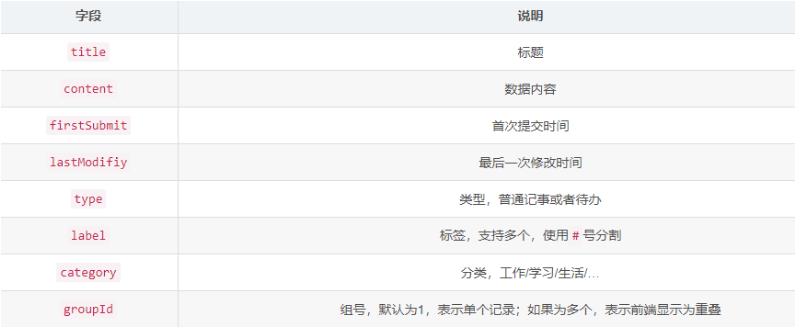
那么首先我们需要使用@Entity注解来生成逻辑的表(MFNote):
@Entity
class MFNote
    @PrimaryKey(autoGenerate = true)
    var noteId: Int = 0

    @ColumnInfo(defaultValue = "无标题")
    lateinit var title: String

    @ColumnInfo(defaultValue = "")
    lateinit var content: String

    @ColumnInfo(name = "first_submit")
    var submit: String? = null

    @ColumnInfo(name = "last_modify")
    var modify: String? = null

    var type: Int = 0

    @ColumnInfo(defaultValue = "默认")
    lateinit var label: String


    @ColumnInfo(defaultValue = "默认")
    lateinit var category: String

    @ColumnInfo(name = "group_id")
    var groupId: Int = 1
然后构建一个访问MFNote表的DAO接口(MFDao):
@Dao
interface MFDao
    @Insert(onConflict = OnConflictStrategy.REPLACE)
    fun insert(mfNote: MFNote?)

    @Delete
    fun delete(mfNote: MFNote): Int

    @Query("select * from MFNote")
    fun getAllNotes(): List<MFNote>

    @Query("select * from MFNote where type = :type")
    fun getNotesByType(type: Int): MFNote

    @Update
    fun updateNoteByNote(mfNote: MFNote)
参数onConflict,表示的是当插入的数据已经存在时候的处理逻辑,有三种操作逻辑:REPLACE、ABORT和IGNORE。如果不指定则默认为ABORT终止插入数据。这里我们将其指定为REPLACE替换原有数据。
最后需要构建Room使用的入口RoomDatabase。
@Database(entities = [MFNote::class], version = 1)
abstract class MFNoteDataBase : RoomDatabase()

    abstract fun mfDao(): MFDao

    companion object
        @Volatile
        private var mInstance: MFNoteDataBase? = null
        private const val DATABASE_NAME = "MFNote.db"

        @JvmStatic
        fun getInstance(context: Context): MFNoteDataBase?
            if (mInstance == null)
                synchronized(MFNoteDataBase::class.java)
                    if (mInstance == null)
                        mInstance = createInstance(context)


            return mInstance


        private fun createInstance(context: Context): MFNoteDataBase
            mInstance = Room.databaseBuilder(
                context.applicationContext,
                MFNoteDataBase::class.java,
                DATABASE_NAME
            ).build()
            return mInstance as MFNoteDataBase
在这里我们只需要对一个数据库表进行操作,所以就定义了一个抽象接口。如果需要定义多个,比如下面的写法:
@Database(entities = [User::class, Course::class, Teacher::class, UserJoinCourse::class, IDCard::class], version = 1)
abstract class AppDataBase : RoomDatabase()
    abstract fun userDao(): UserDao
    abstract fun teacherDao(): TeacherDao
    abstract fun courseDao(): CourseDao
    abstract fun userJoinCourseDao(): UserJoinCourseDao
    abstract fun idCardDao(): IDCardDao
@Database表示继承自RoomDatabase的抽象类,entities指定表的实现类列表,version指定了DB版本- 必须提供获取
DAO接口的抽象方法,比如上面定义的movieDao(),Room将通过这个方法实例化DAO接口
接下来就是调用了:
class TestActivity : AppCompatActivity()

    override fun onCreate(savedInstanceState: Bundle?)
        super.onCreate(savedInstanceState)
        setContentView(R.layout.activity_test)

        // 调用Room数据库
        val mfDao = MFNoteDataBase.getInstance(this)?.mfDao()
        mfDao?.insert(MFNote())

        mfDao?.getAllNotes()?.forEach
            Log.e("TAG", "onCreate: $it.title, $it.category" )
结果:

最终我在Dao层添加了如下方法:
@Dao
interface MFDao
    @Insert(onConflict = OnConflictStrategy.REPLACE)
    fun insert(mfNote: MFNote?)

    @Delete
    fun delete(mfNote: MFNote): Int

    @Query("select * from MFNote")
    fun getAllNotes(): List<MFNote>

    @Query("select * from MFNote where noteId = :id")
    fun getNoteByNoteId(id: Int): MFNote

    @Query("select * from MFNote where type = :type")
    fun getNotesByType(type: Int): List<MFNote>

    @Query("select * from MFNote where label like '%' || :label || '%'")
    fun getNotesByLabel(label: String): List<MFNote>

    @Query("select * from MFNote where category like '%' || :category || '%'")
    fun getNotesByCategory(category: String): List<MFNote>

    @Query("select * from MFNote where group_id = :groupId")
    fun getNotesByGroupId(groupId: Int): List<MFNote>

    @Query("select * from MFNote where first_submit >= :beginTime and first_submit <= :endTime")
    fun getNotesBySubmitTime(beginTime: String, endTime: String): List<MFNote>

    @Query("select * from MFNote where first_submit >= :beginTime")
    fun getNotesByStartSubmitTime(beginTime: String): List<MFNote>

    @Query("select * from MFNote where first_submit <= :endTime")
    fun getNotesByEndSubmitTime(endTime: String): List<MFNote>

    @Query("select * from MFNote where last_modify >= :beginTime and last_modify <= :endTime")
    fun getNotesByModifyTime(beginTime: String, endTime: String): List<MFNote>

    @Query("select * from MFNote where last_modify >= :beginTime")
    fun getNotesByStartModifyTime(beginTime: String): List<MFNote>

    @Query("select * from MFNote where last_modify <= :endTime")
    fun getNotesByEndModifyTime(endTime: String): List<MFNote>

    @Query("select * from MFNote where (title like '%' || :words || '%') or (content like '%' || :words || '%') or (first_submit like '%' || :words || '%') or (last_modify like '%' || :words || '%') or (label like '%' || :words || '%') or (category like '%' || :words || '%')")
    fun getNodesByKeyWords(words: String): List<MFNote>

    @Update
    fun updateNoteByNote(mfNote: MFNote)
测试代码:
class TestActivity : AppCompatActivity()

    override fun onCreate(savedInstanceState: Bundle?)
        super.onCreate(savedInstanceState)
        setContentView(R.layout.activity_test)

        // 调用Room数据库
        val mfDao = MFNoteDataBase.getInstance(this)?.mfDao()
        val mfNote = MFNote()
        mfNote.title = "测试"
        mfNote.content = "第一条测试"
        mfDao?.insert(mfNote)
        mfDao?.getAllNotes()?.forEach
            Log.e("TAG", "onCreate: $it.title, $it.category" )


        val notesByType = mfDao?.getNotesByType(0)
        notesByType?.forEach
            Log.e("TAG", "onCreate: $it.title, $it.category" )


        val entity = mfDao?.getNoteByNoteId(2)

        Log.e("TAG", "onCreate: $entity?.title, $entity?.firstSubmit" )

        entity?.title = "厉害"
        mfDao?.updateNoteByNote(entity!!)
以上代码均测试通过。
1.3.数据库版本升级(Migration)
正常升级
数据库版本升级,也就是在原来的表中加入一些字段内容。在Room中提供了比较便捷的数据库升级方式。直接使用Migration来可以完成。甚至可以完成跳版本的升级,比如当前用户版本为1,而最新的版本为3,那么Room可以依次执行1-2-3的过程。比如此时我有一个表User,如下:

当然,对应的Room的使用这里不再介绍。此时的需求为在表中新增一个字段:nickName。那么可以在创建数据库的时候进行添加Migration:
private fun createInstance(context: Context): UserDataBase
    mInstance = Room.databaseBuilder(
        context.applicationContext,
        UserDataBase::class.java,
        DATABASE_NAME
    ).addMigrations(Migration_1_2)  // 数据库版本升级
        .build()
    return mInstance as UserDataBase


// Migration(int startVersion, int endVersion)
private val Migration_1_2 = object : Migration(1, 2)
    override fun migrate(database: SupportSQLiteDatabase)
        database.execSQL("alter TABLE User add column nickName TEXT default '123' not null")
对应的,需要在@Entity注释的类中添加对应的字段:
@ColumnInfo(name = "nickName", typeAffinity = ColumnInfo.TEXT)
var nickname = ""
然后将之前的@Database注释的版本改为目标版本2:
@Database(entities = arrayOf(User::class), version = 2, exportSchema = false)
abstract class UserDataBase : RoomDatabase()
最后,就可以查看下数据库:
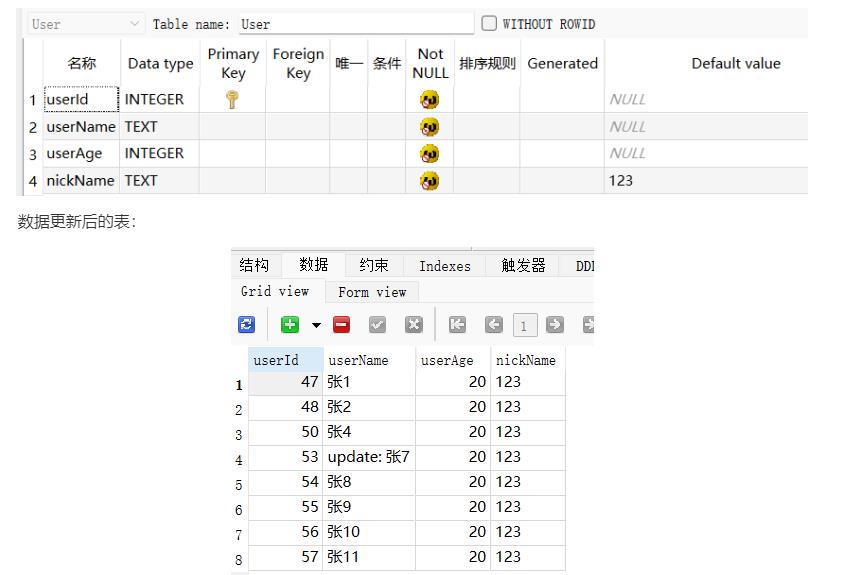
当然,如果需要从版本1升级到版本3,就可以对应的定义:
private val Migration_1_2 = object : Migration(1, 2)
private val Migration_2_3 = object : Migration(2, 3)
以及在表中的字段定义好,然后在创建数据库的时候进行使用:
mInstance = Room.databaseBuilder(
        context.applicationContext,
        UserDataBase::class.java,
        DATABASE_NAME
    ).addMigrations(Migration_1_2, Migration_2_3)  // 数据库版本升级
        .build()
异常升级
值得注意的是,有些时候可能敲错了,在@Database注解的参数中指定了一个不存在的版本,会导致程序的异常退出。比如此时我这里没有写2到3版本的升级Migration和添加对应的字段,当指定3后程序异常退出,报错为:
Caused by: java.lang.IllegalStateException: A migration from 2 to 3 was required but not found. Please provide the necessary Migration path via RoomDatabase.Builder.addMigration(Migration …) or allow for destructive migrations via one of the RoomDatabase.Builder.fallbackToDestructiveMigration* methods.
根据提示说明,知道要么添加一个新的Migration来指定添加的表字段,要么指定fallbackToDestructiveMigration方法。这里就添加一个fallbackToDestructiveMigration方法,即:
mInstance = Room.databaseBuilder(
    context.applicationContext,
    UserDataBase::class.java,
    DATABASE_NAME
).addMigrations(Migration_1_2)  // 数据库版本升级
    .fallbackToDestructiveMigration()
    .build()
最后,程序可以正常运行,但是用户数据库文件中的数据均会清空(破坏性地重新创建应用的数据库表,Room 在尝试执行没有定义迁移路径的迁移时会从数据库表中永久删除所有数据)。
Scheme文件
再次回顾一下@Database的注解:
@Database(entities = arrayOf(User::class), version = 3, exportSchema = false)
abstract class UserDataBase : RoomDatabase()
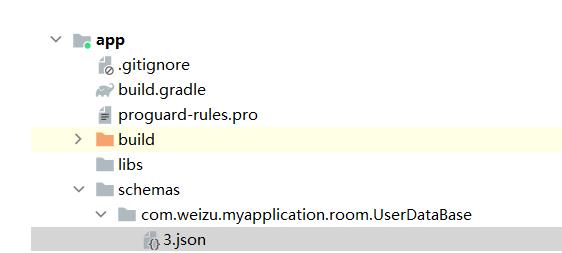
使用的时候, exportSchema指定为false,也就是不需要Schema文件。这里可以设置为true,然后在配置文件中指定一下生成的路径:
android
    ...
    defaultConfig
        ...
        javaCompileOptions
            annotationProcessorOptions
                arguments = ["room.schemaLocation": "$projectDir/schemas".toString()]
在项目路径下就可以看见生成的json文件:
2.Jetpack Room入坑详解
Room是Jetpack组件库一员,属于ORM库,主要是对Sqlite做了一层抽象,从而简化开发者对数据库操作。Room支持编译时的语法检查,并且支持返回LiveData。
添加依赖
在app的build.gradle中添加如下依赖:
def room_version = "2.2.0-rc01"


implementation "androidx.room:room-runtime:$room_version"
// For Kotlin use kapt instead of annotationProcessor (注意这个注释)
kapt "androidx.room:room-compiler:$room_version"
如果项目是使用Kotlin语言来开发的,在添加room-compiler的时候使用kapt关键字,java语言开发的就使用annotationProcessor关键。否则会导致访问出错。
重要概念
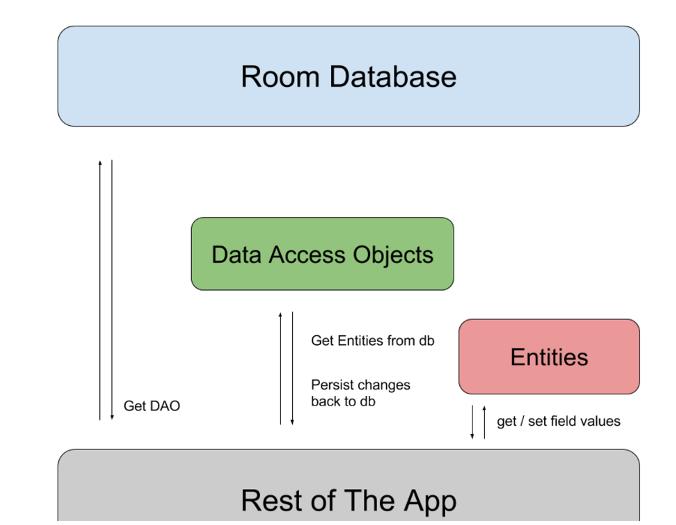
要想使用Room,必须要了解最基础的三个概念:
- Entity:实体类,对应的是数据库的一张表结构。需要使用注解 @Entity 标记。
- Dao:包含访问一系列访问数据库的方法。需要使用注解 @Dao 标记。
- Database:数据库持有者,作为与应用持久化相关数据的底层连接的主要接入点。需要使用注解 @Database 标记。
使用@Database注解需满足以下条件:
- 定义的类必须是一个继承于RoomDatabase的抽象类。
- 在注解中需要定义与数据库相关联的实体类列表。
- 包含一个没有参数的抽象方法并且返回一个带有注解的 @Dao。
三者之间和应用的对应关系如下图:
Entity
使用 @Entity注解定义的类会被映射为数据库中的一张表。默认实体类的类名为表名,字段名为表名。当然我们也是可以修改的。
@Entity(tableName = "users")
data class User(
    @PrimaryKey(autoGenerate = true) var userId: Long,


    @ColumnInfo(name = "user_name")var userName: String,

    @ColumnInfo(defaultValue = "china") var address: String,

    @Ignore var sex: Boolean
)
比如这里我们定义了一个User类。这里使用了@Entity、@PrimaryKey、@ColumnInfo和@Ignore
在@Entity注解中我们传入了一个参数 tableName用来指定表的名称。@PrimaryKey注解用来标注表的主键,并且使用autoGenerate = true 来指定了主键自增长。@ColumnInfo注解用来标注表对应的列的信息比如表名、默认值等等。@Ignore 注解顾名思义就是忽略这个字段,使用了这个注解的字段将不会在数据库中生成对应的列信息。也可以使用@Entity注解中的 ignoredColumns 参数来指定,效果是一样的。
除了以上使用的参数字段外,注解还有其他的参数,下面我来看下相关源码了解下其他的参数。
Entity注解:
@Target(ElementType.TYPE)
@Retention(RetentionPolicy.CLASS)
public @interface Entity


    String tableName() default "";

    Index[] indices() default ;

    boolean inheritSuperIndices() default false;

    String[] primaryKeys() default ;

    String[] ignoredColumns() default ;
PrimaryKey注解:
@Target(ElementType.FIELD, ElementType.METHOD)
@Retention(RetentionPolicy.CLASS)
public @interface PrimaryKey


    boolean autoGenerate() default false;
ColumnInfo注解:
@Target(ElementType.FIELD, ElementType.METHOD)
@Retention(RetentionPolicy.CLASS)
public @interface ColumnInfo
    String name() default INHERIT_FIELD_NAME;

    @SuppressWarnings("unused") @SQLiteTypeAffinity int typeAffinity() default UNDEFINED;

    boolean index() default false;
    @Collate int collate() default UNSPECIFIED;


    String defaultValue() default VALUE_UNSPECIFIED;

    String INHERIT_FIELD_NAME = "[field-name]";

    int UNDEFINED = 1;
    int TEXT = 2;
    int INTEGER = 3;
    int REAL = 4;
    int BLOB = 5;


    @IntDef(UNDEFINED, TEXT, INTEGER, REAL, BLOB)
    @Retention(RetentionPolicy.CLASS)
    @interface SQLiteTypeAffinity


    int UNSPECIFIED = 1;
    int BINARY = 2;
    int NOCASE = 3;
    int RTRIM = 4;


    @RequiresApi(21)
    int LOCALIZED = 5;


    @RequiresApi(21)
    int UNICODE = 6;


    @IntDef(UNSPECIFIED, BINARY, NOCASE, RTRIM, LOCALIZED, UNICODE)
    @Retention(RetentionPolicy.CLASS)
    @interface Collate


    String VALUE_UNSPECIFIED = "[value-unspecified]";
Ignore注解:
@Target(ElementType.METHOD, ElementType.FIELD, ElementType.CONSTRUCTOR)
@Retention(RetentionPolicy.CLASS)
public @interface Ignore
Dao
Dao类是一个 interface,其中定义了一系列的操作数据库的方法。通常我们操作数据库无非就是增删改查。Room也为我们的提供了相关的注解,有@Insert、@Delete、@Update 和 @Query。
@query
我们先来看下 @Query 查询注解,它的参数是String类型,我们直接写SQL语句进行执行,而且编译的时候可以进行语法检查。比如我们根据ID查询某个用户的信息:
@Query("select * from user where userId = :id")
fun getUserById(id: Long): User
SQL语句引用传递的参数直接使用 :符号进行引用。
@Insert
如果我们需要向表中插入一条数据,我们直接定义一个方法并用 @Insert注解标注就可以:
@Insert(onConflict = OnConflictStrategy.REPLACE)
fun addUser(user: User)
我们看到直接中有个参数onConflict,表示的是当插入的数据已经存在时候的处理逻辑,有三种操作逻辑:REPLACE、ABORT和IGNORE。如果不指定则默认为ABORT终止插入数据。这里我们将其指定为REPLACE替换原有数据。
@Delete
如果需要删除表的数据则使用 @Delete注解:
@Delete
fun deleteUserByUser(user: User)
使用主键来查找要删除的实体。
@Update
如果需要修改某一条数据则使用 @Update注解,和@Delete一样也是根据主键来查找要删除的实体。
@Update
fun updateUserByUser(user: User)
上面说的 @Query 查询接受的参数是一个字符串,所以像删除或者更新我们也可以使用 @Query 注解来使用SQL语句来直接执行。比如根据userid来查询某个用户或者根据userid更新某个用户的姓名:
@Query("delete  from user where userId = :id ")
 fun deleteUserById(id:Long)


@Query("update  user set userName = :updateName where userID =  :id")
fun update(id: Long, updateName: String)
效果是完全一样的。
Database
首先定义一个抽象类继承RoomDatabase类,并添加注解 @Database 来标识:
@Database(entities = [User::class], version = 1)
abstract class AppDatabase : RoomDatabase()


    abstract fun userDao(): UserDao


    companion object
        private var instance: AppDatabase? = null
        fun getInstance(context: Context): AppDatabase
            if (instance == null)
                instance = Room.databaseBuilder(
                    context.applicationContext,
                    AppDatabase::class.java,
                    "user.db" //数据库名称
                ).allowMainThreadQueries().build()

            return instance as AppDatabase
还记得上文中说Database需要满足的是那个要求吗?这里可以和上文联系起来对比看下。
使用entities来映射相关的实体类,version来指明当前数据库的版本号。这里使用了单例模式来返回Database,以防止新建过多的实例造成内存的浪费。Room.databaseBuilder(context,klass,name).build()来创建Database,其中第一个参数为上下文,第二个参数为当前Database的class字节码文件,第三个参数为数据库名称。
默认情况下Database是不可以在主线程中进行调用的。因为大部分情况,操作数据库都还算是比较耗时的动作。如果需要在主线程调用则使用allowMainThreadQueries进行说明。
使用
以上都定义好后,就是如何调用了。我们在Activity中使用:
class RoomActivity : AppCompatActivity()


    override fun onCreate(savedInstanceState: Bundle?)
        super.onCreate(savedInstanceState)


        val userDao = AppDatabase.getInstance(this).userDao()
        //insert数据
        for (i in (0 until 10))
            val user = User(userName = "李四$i", userPhone = "110$i")
            userDao.addUser(user)


        //query所有数据
        userDao.getAllUsers().forEach
            Log.e("room", "==query==$it.userId,$it.userName,$it.userPhone")

        //update数据
        userDao.updateUserById(2, "张三")
        val updateUser = userDao.getUserById(2)
        Log.e("room", "==update==$updateUser.userId,$updateUser.userName,$updateUser.userPhone")


        //Delete数据
        val row = userDao.deleteUserById(10)
        Log.e("room", "删除了 $row 行")
我们来看下数据:
插入的10条数据
room: ==query==1,李四0,1100
room: ==query==2,李四1,1101
room: ==query==3,李四2,1102
room: ==query==4,李四3,1103
room: ==query==5,李四4,1104
room: ==query==6,李四5,1105
room: ==query==7,李四6,1106
room: ==query==8,李四7,1107
room: ==query==9,李四8,1108
room: ==query==10,李四9,1109


更新了id为2的这条数据
room: ==update==2,张三,1101


删除了id为10的数据
room: 删除了 1 行
生成的数据库在data/data/packageName/databases 目录中。
Dao和Database相关文件在编译后会在build目录下生成 UserDao_Impl和AppDatabase_Impl文件,有兴趣的可以自己去看下。
数据库升级和降级
在使用数据库的时候避免不了的就是数据库的更新。数据库的升级或者降级使用addMigrations方法进行操作:
instance = Room.databaseBuilder(
            context.applicationContext,
            AppDatabase::class.java,
            "user.db"
        ).addMigrations(object :Migration(1,2)
            override fun migrate(database: SupportSQLiteDatabase)
               database.execSQL("ALTER TABLE user ADD age INTEGER Default 0 not null ")


        )allowMainThreadQueries().build()
其中Migration需要两个参数,startVersion表示的是升级开始的版本,endVersion表示要升级到的版本。同时需要将@Database注解中的version的值修改为和endVersion相同。
比如上面代码将数据库从版本1升级到版本2,并在版本2上增加了age一列:

数据库降级使用也是一样。也是使用addMigrations只是startVersion > endVersion 。
当在升级或者降级的过程中出现版本未匹配到的情况的时候,默认情况下会直接抛异常出来。当然我们也可以处理异常。
升级的时候可以添加fallbackToDestructiveMigration方法,当未匹配到版本的时候就会直接删除表然后重新创建。
降级的时候添加fallbackToDestructiveMigrationOnDowngrade方法,当未匹配到版本的时候就会直接删除表然后重新创建。
关注公众号:初一十五a
解锁 《Android十大板块文档》,让学习更贴近未来实战。已形成PDF版
内容如下:
1.2022最新Android11位大厂面试专题,128道附答案
2.音视频大合集,从初中高到面试应有尽有
3.Android车载应用大合集,从零开始一起学
4.性能优化大合集,告别优化烦恼
5.Framework大合集,从里到外分析的明明白白
6.Flutter大合集,进阶Flutter高级工程师
7.compose大合集,拥抱新技术
8.Jetpack大合集,全家桶一次吃个够
9.架构大合集,轻松应对工作需求
10.Android基础篇大合集,根基稳固高楼平地起
整理不易,关注一下吧。ღ( ´・ᴗ・` ) 🤔
以上是关于架构大合集,轻松面对工作需求(下)的主要内容,如果未能解决你的问题,请参考以下文章