Jenkins+SonarQube代码审查
Posted 大忽悠爱忽悠
tags:
篇首语:本文由小常识网(cha138.com)小编为大家整理,主要介绍了Jenkins+SonarQube代码审查相关的知识,希望对你有一定的参考价值。
Jenkins+SonarQube代码审查
引言
-
SonarQube是一个用于管理代码质量的开放平台,可以快速的定位代码中潜在的或者明显的错误。目前支持Java、C#、C++、Python、PL/SQL、Cobol、javascript、Groovy等二十几种编程语言的代码质量管理和检测。
-
官网。
-
环境要求:
| 软件 | 服务器 | 版本 |
|---|---|---|
| JDK | 192.168.18.101 | 11 |
| PostgreSQL | 192.168.18.101 | 5.7 |
| SonarQube | 192.168.18.101 | 8.6.0 |
安装PostgreSQL
- Docker安装:
# 用户名是 postgres  ,密码是123456
docker run --name postgres -v dv_pgdata:/var/lib/postgresql/data --restart=always -e POSTGRES_PASSWORD=123456 -p 5432:5432 -d postgres:12.1
安装SonarQube
- 在PostgreSQL中新建sonar数据库:
CREATE DATABASE sonar;
- 下载SonarQube
wget https://binaries.sonarsource.com/Distribution/sonarqube/sonarqube-8.6.0.39681.zip
- 解压sonar:
unzip -d /usr/local/ sonarqube-8.6.0.39681.zip
cd /usr/local
mv sonarqube-8.6.0.39681 sonarqube-8.6.0
- 创建用户,用于设置权限:
# 创建sonar用户,sonar不能用root启动,否则报错
useradd sonar
passwd sonar
chown -R sonar /usr/local/sonarqube-8.6.0
- 修改sonar的配置文件:
vim /usr/local/sonarqube-8.6.0/conf/sonar.properties
# 内容如下
sonar.jdbc.username=postgres
sonar.jdbc.password=123456
sonar.jdbc.url=jdbc:postgresql://localhost:5432/sonar
- sonar默认自带了ES,所以需要修改配置,防止启动报错:
vim /etc/security/limits.conf
# 追加内容
* soft nofile 65536
* hard nofile 65536
* soft nproc 4096
* hard nproc 4096
vim /etc/security/limits.d/90-nproc.conf
# 追加内容
* soft nproc 4096
vim /etc/sysctl.conf
# 追加内容
vm.max_map_count=655360
sysctl -p
reboot
- 启动sonar(sonar的默认端口是9000):
cd /usr/local/sonarqube-8.6.0/
# 启动
su sonar ./bin/linux-x86-64/sonar.sh start
# 查看状态
su sonar ./bin/linux-x86-64/sonar.sh status
# 停止
su sonar ./bin/linux-x86-64/sonar.sh stop
# 查看日志
tail -f logs/sonarxxx.logs
- 访问sonar:http://192.168.18.101:9000。
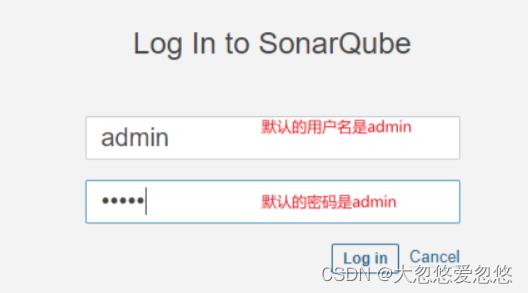
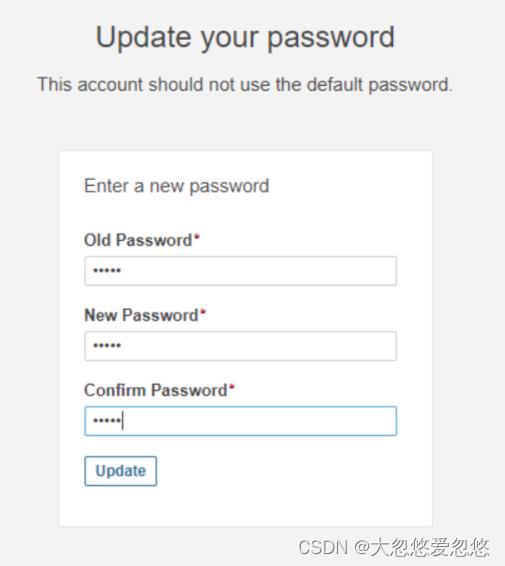
- 修改sonar的默认密码:
- 安装中文插件:
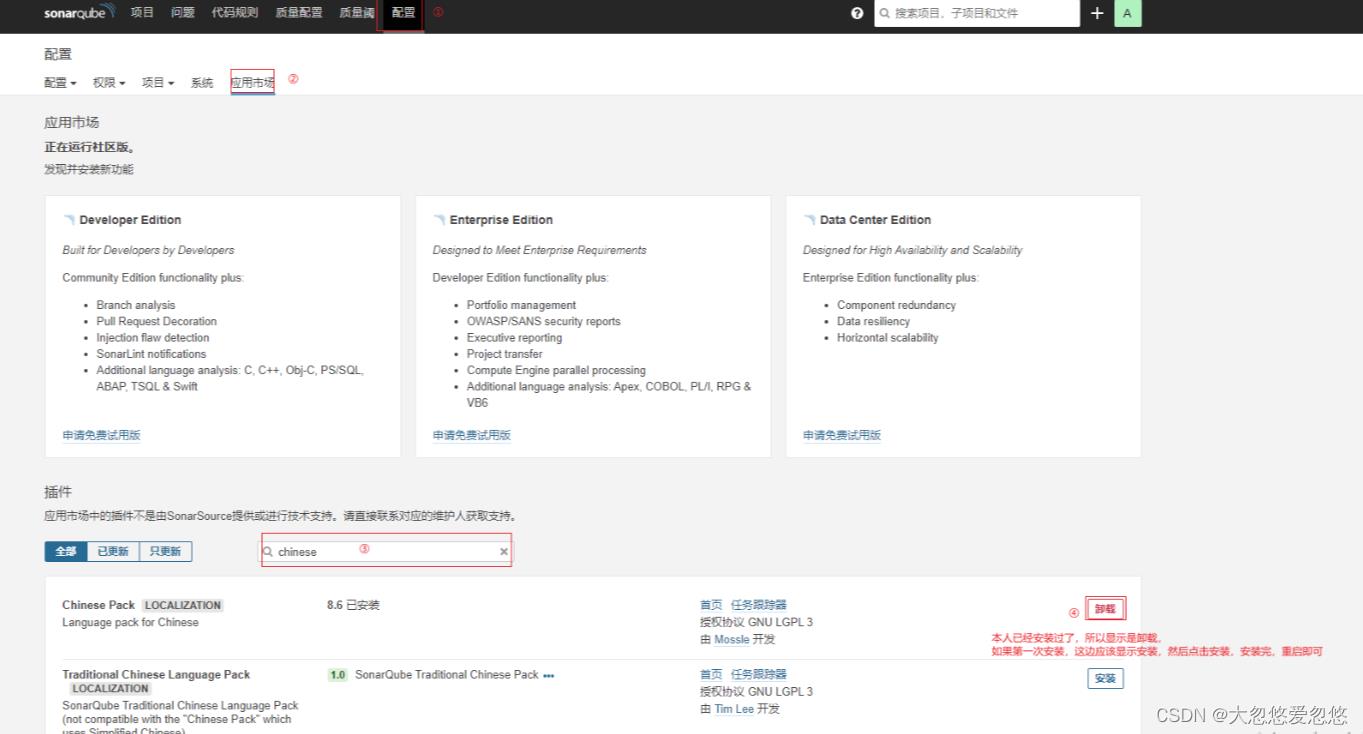
如果出现“Error while downloading plugin ‘l10nzhtw’ with version ‘1.0’. No compatible plugin found.”错误,那说明版本不兼容,可到官网查找对应版本的插件放到…/…/extensions/plugins目录下,重新启动sonar服务【使用命令…/…/sonar.sh start 也可以通过页面操作“配置->系统->重启服务器”】,即可生效。但如果安装的插件比当前版本低的话,会出现部分显示还是英文。
cd /usr/local/sonarqube-8.6.0/extensions/plugins
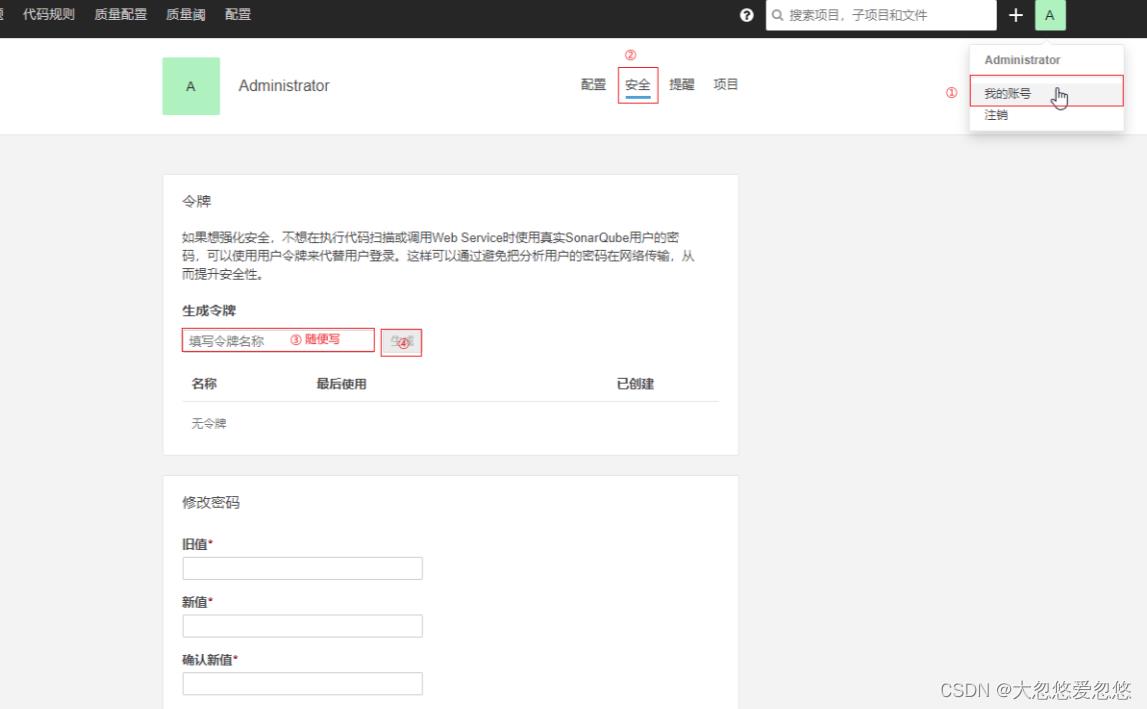
- 生成令牌(需要将生成的令牌复制下来):
实现代码审查
概述

Jenkins安装SonarQube Scanner插件
安装SonarQube Scanner
● 安装SonarQube Scanner有两种方式:
○ 在Linux所在的服务器上直接安装。
○ 通过Jenkins帮我们自动安装(本人选择这种)。
● Manage Jenkins–>Global Tool Configuration。
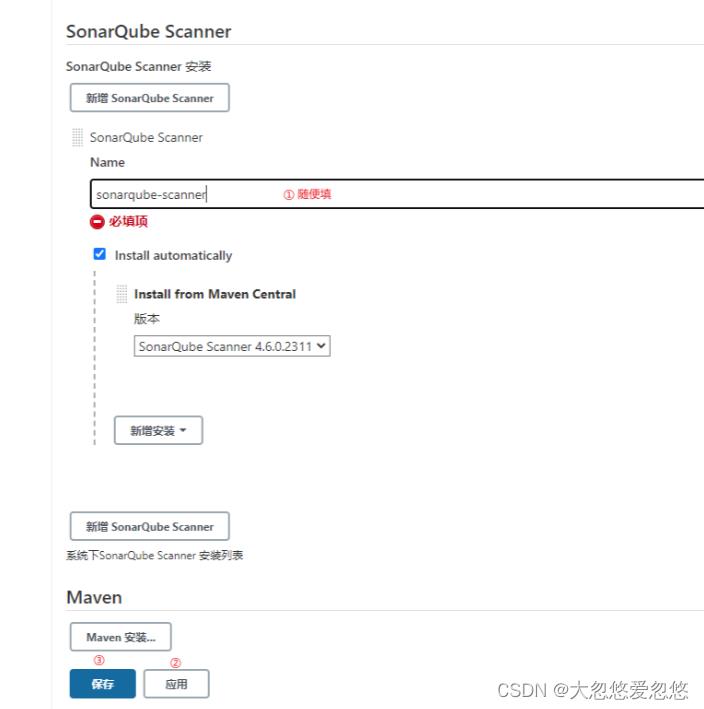
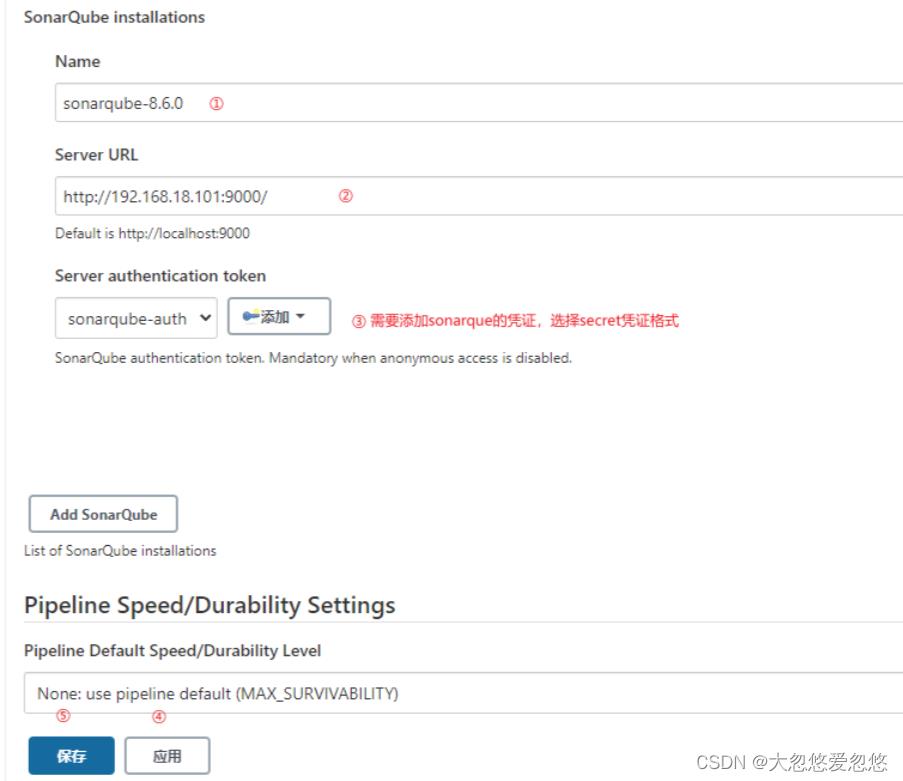
Jenkins配置Sonar Server
- Manage Jenkins->Configure System->SonarQube servers:
非流水线项目添加SonarQube代码审查
- 添加构建步骤:
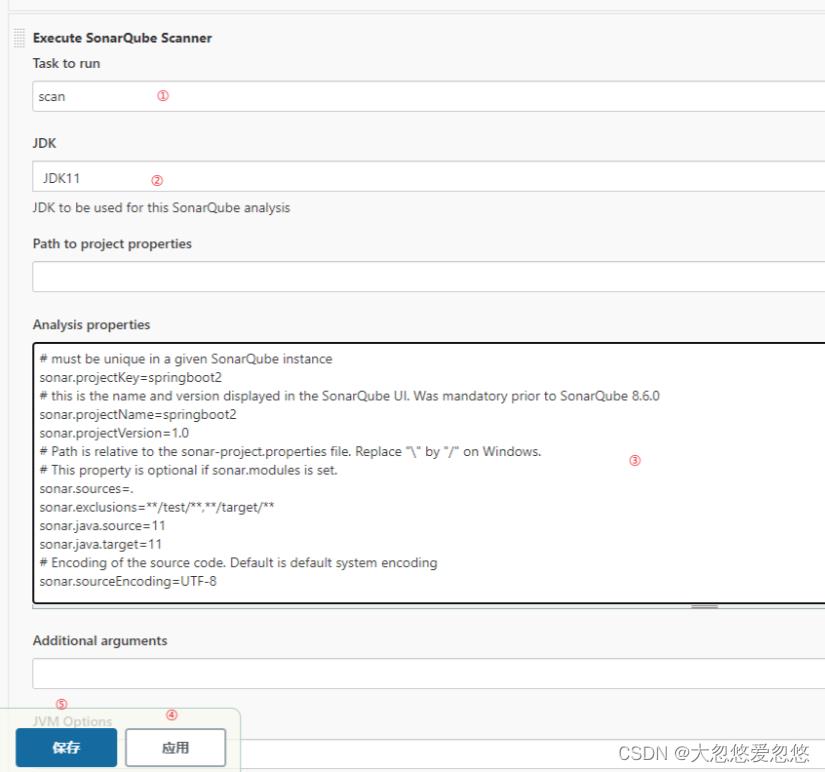
- 配置如下:
# must be unique in a given SonarQube instance
sonar.projectKey=springboot2
# this is the name and version displayed in the SonarQube UI. Was mandatory prior to SonarQube 8.6.0
sonar.projectName=springboot2
sonar.projectVersion=1.0
# Path is relative to the sonar-project.properties file. Replace "\\" by "/" on Windows.
# This property is optional if sonar.modules is set.
sonar.sources=.
sonar.exclusions=**/test/**,**/target/**
sonar.java.source=11
sonar.java.target=11
# Encoding of the source code. Default is default system encoding
sonar.sourceEncoding=UTF-8
sonar.java.binaries=**target/classes
流水线项目添加SonarQube代码审查
- 在项目的根目录中添加sonar-project.properties文件,内容如下:
# must be unique in a given SonarQube instance
sonar.projectKey=springboot2
# this is the name and version displayed in the SonarQube UI. Was mandatory prior to SonarQube 8.6.0
sonar.projectName=springboot2
sonar.projectVersion=1.0
# Path is relative to the sonar-project.properties file. Replace "\\" by "/" on Windows.
# This property is optional if sonar.modules is set.
sonar.sources=.
sonar.exclusions=**/test/**,**/target/**
sonar.java.source=11
sonar.java.target=11
# Encoding of the source code. Default is default system encoding
sonar.sourceEncoding=UTF-8
sonar.java.binaries=**target/classes
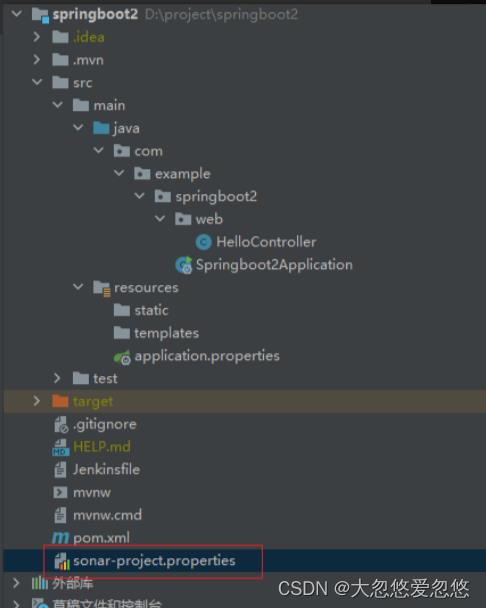
- Jenkinsfile:
pipeline
    agent any

    stages
        stage('拉取代码')
            steps
                checkout([$class: 'GitSCM', branches: [[name: '*/$branch']], doGenerateSubmoduleConfigurations: false, extensions: [], submoduleCfg: [], userRemoteConfigs: [[credentialsId: '7d5c4945-2533-41e2-bd47-5dd97eb37f38', url: 'git@192.168.18.100:develop_group/springboot2.git']]])


		stage('编译打包')
            steps
                sh '''echo "开始构建"
                mvn clean install -Dmaven.test.skip=true
                echo "构建结束"'''


        stage('代码检查')
            steps
                script
                   // 引入SonarQubeScanner工具
                   scannerHome = tool 'sonarqube-scanner'

                // 引入了 SonarQube服务器的环境
                withSonarQubeEnv('sonarqube-8.6.0')
                   sh "$scannerHome/bin/sonar-scanner"


		stage('远程部署')
            steps
                sshPublisher(publishers: [sshPublisherDesc(configName: '192.168.18.102', transfers: [sshTransfer(cleanRemote: false, excludes: '', execCommand: '''cd /usr/local
chmod 777 *.sh
./stop.sh
./start.sh''', execTimeout: 120000, flatten: false, makeEmptyDirs: false, noDefaultExcludes: false, patternSeparator: '[, ]+', remoteDirectory: '', remoteDirectorySDF: false, removePrefix: 'target', sourceFiles: 'target/*.jar')], usePromotionTimestamp: false, useWorkspaceInPromotion: false, verbose: false)])
以上是关于Jenkins+SonarQube代码审查的主要内容,如果未能解决你的问题,请参考以下文章