iOS经典面试题之深入分析图像的解码渲染与基本原理
Posted ╰つ栺尖篴夢ゞ
tags:
篇首语:本文由小常识网(cha138.com)小编为大家整理,主要介绍了iOS经典面试题之深入分析图像的解码渲染与基本原理相关的知识,希望对你有一定的参考价值。
一、ios 的图片加载
- 如下所示,加载图片的代码:
- (void)imageLoad
	UIImage *image = [UIImage imageNamed:@"xxxxxxx"];
	_imageView.image = image;
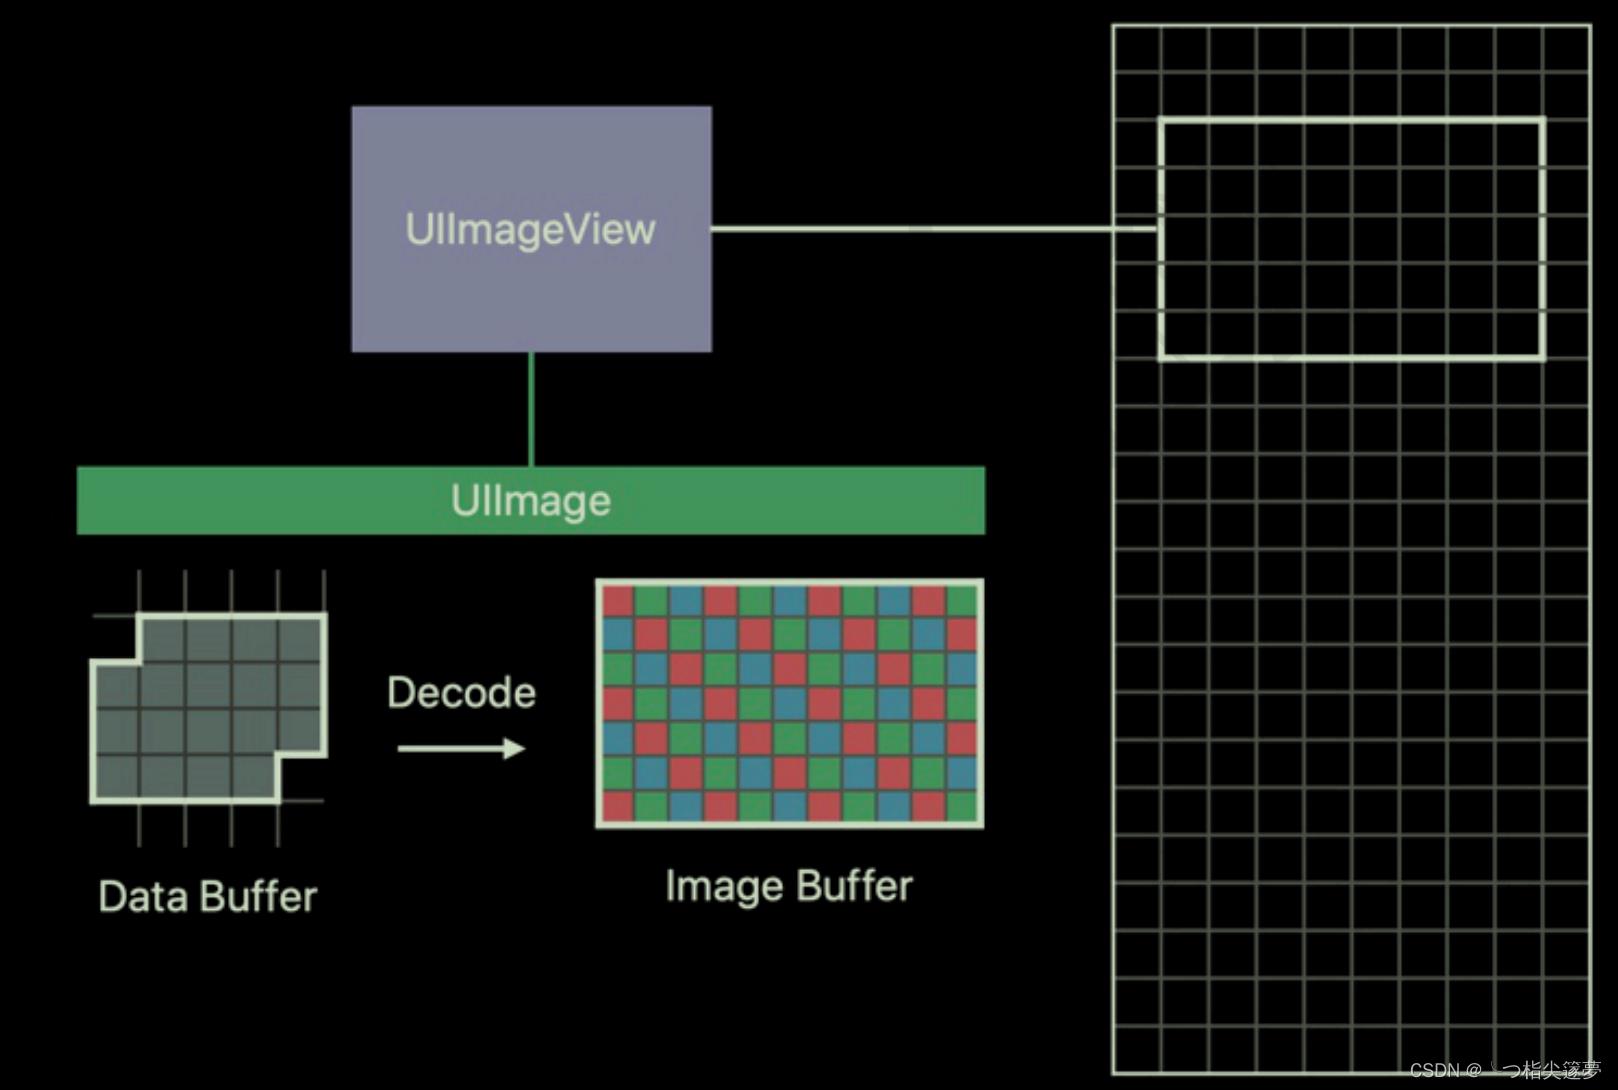
- UlImage 是 iOS 中处理图像的高级类,创建一个 UlImage 实例只会加载 Data Buffer,将图像显示到屏幕上才会触发解码,也就是 Data Buffer 解码为 Image Buffer,Image Buffer 也关联在 Ullmage 上。
- Ullmage 关联的图像是否已解码对外部是不透明的,没有办法判断,其实在日常的内存消耗来讲,图片的渲染是特别消耗内存的。接下来来探究一下究竟是为什么?
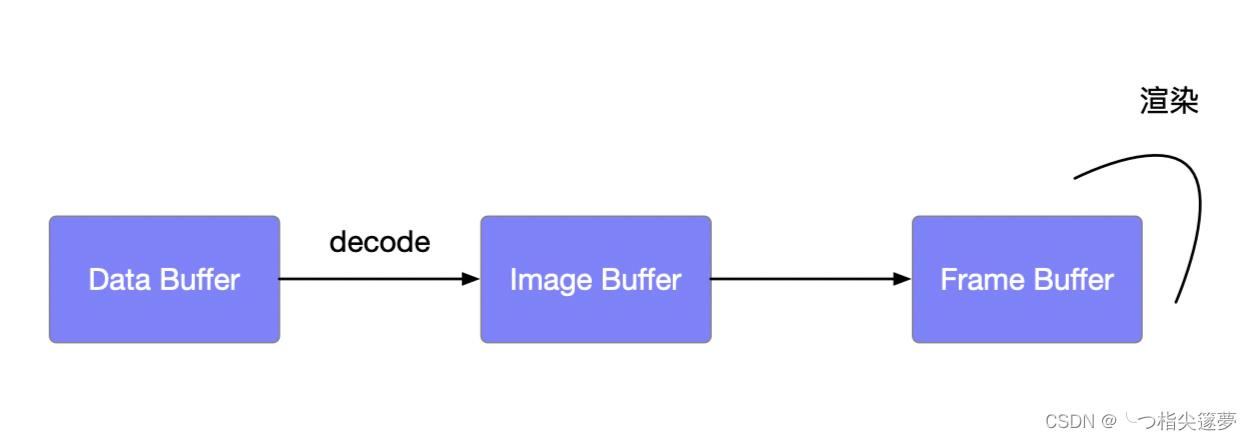
- 需要图片的加载其实分为两个方面:解码和渲染,如下所示:

- 这个过程中都有一个内存缓存区与之关联:
-
- Data Buffer 是存储在内存中的原始数据,图像可以使用不同的格式保存,如 jpg、png,Data Buffer 的信息不能用来描述图像的像素信息;
-
- Image Buffer 是图像在内存中的存在方式,其中每个元素描述了一个像素点,Image Buffer 的大小和图像的大小成正比;
-
- Frame Buffer 和 Image Buffer 内容不同,不过其存储在 vRAM(video RAM)中,而 Image Buffer 存储在 RAM 中。
- 解码就是从 Data Buffer 生成 Image Buffer 的过程,Image Buffer 会上传到 GPU 成为 Frame Buffer,GPU 以每秒 60 次的速度使用 Frame Buffer 更新屏幕。其中在解码阶段创建的 imageBuffer 是长期对内存占用产生较大的影响。
- 解码的意义在于将压缩的图像数据的内容转换为硬件能够解释的信息,例如,要加载 713 KB 的图片,那么当用使用 Ullmage 去显示图片的时候发生什么?首先这张图片的 width * height = 600 * 600 个像素点,但是计算一个图片的原始大小还需要考虑的一个因素就是 Color Space,当前每个像素点需要 32bits,也就是加载这样一张图片需要 600 * 600 * 4 bytes = 144000。
二、图像的基本原理
- 位图就是一个像素数组,数组中的每个像素就代表着图片中的一个点,在应用中经常用到的 JPEG 和 PNG 图片就是位图。
- 像素从字面意思上来说就是图像的基本元素,例如将一张图片放到 PS 中尽可能放大,那么可以看到一个个的小格式,其中每个小个子就是一个像素点, 每个像素点有且仅有一个颜色。那么可以看出,如果要在计算机上表示一个图像,只需要表示每个像素点的信息就行了。那么,一个像素点的 RGB 该如何表示呢?
- 常见的标识方式有以下几种:
-
- 浮点表示:取值范围为 0.0~1.0;
-
- 整数表示:取值范围为 0
~255 或者 00~FF,8 个比特表示一个子像素,32 个比特表示一个像素。
- 整数表示:取值范围为 0
- 对于一副图像,一般用整数方式标识方法进行描述,比如一张 1280*720 的图像大小,那么计算方式就是:
1280 * 720 * 4 = 3.516MB
- 这也是位图在内存中所占用的大小,所以每一张图像的裸数据都是很大的。因此就有了图像的压缩格式,比如 JPEG 压缩:
_imageView.image = [UIImage imageNamed:@"xxxxxxx"];
CFDataRef rawData = CGDataProviderCopyData(CGImageGetDataProvider(_imageView.image.CGImage));
NSLog(@"%ld",[(__bridge NSData *)rawData length]);
三、三种 Buffer
- Buffer 表示一片连续的内存空间,通常所说的 Buffer 是指一系列内部结构相同、大小相同的元素组成的内存区域。
- 如下所示,有三种 Buffer:Data Buffer、Image Buffer、Frame Buffer:

四、图像解码
① 隐式解码
- 将图像显示到屏幕上会触发隐式解码,必须同时满足图像被设置到 UlImageView 中、UllmageView 添加到视图,才会触发图像解码。
② Core Graphics
UIGraphicsBeginImageContextWithOptions(image.size, YES, [UIScreen mainScreen].scale);
[image drawAtPoint: CGPointZero];
UIImage *newImage = UIGraphicsGetImageFromCurrentImageContext();
UIGraphics EndImageContext();
③ Image/IO解码
- 解码,指的是将已经编码过的图像封装格式的数据,转换为可以进行渲染的图像数据。具体来说,iOS 平台上就指的是将一个输入的二进制 Data,转换为上层 UI 组件渲染所用的 Ullmage 对象。
- Image/IO 的解码,支持常见的图像格式,包括 PNG (包括 APNG) 、JPEG、 GIF、BMP、TIFF (具体可以通过 CGImageSourceC opyTypeldentifers 来打印出来,不同平台不完全一致)。在 iOS 11 之后另外支持 HEIC(即使用 HEVC 编码的 HEIF 格式)。
- 对于解码操作,可以分为静态图(比如 JPEG、PNG)和动态图(比如 GIF、APNG)的两种,分别进行说明一下解码的过程;
-
- 首先需要创建一个 ImageSource,相当于一个输入源,后续元数据的读取、解码都会依赖 Source;
-
- GCImageSource 可以通过不同的方法来创建:
-
-
- CGImageSourceCreateWithData:从一个内存中的二进制数据(CGData)中创建 ImageSource,相对来说最为常用的一个;
-
-
-
- CGImageSourceCreateWithURL:从一个 URL(支持网络图的 HTTP URL,或者是文件系统的 fleURL) 创建 ImageSource;
-
-
-
- CGImageSourceCreateWithDataProvider:从一个 DataProvide 中创建 ImageSourceDataProvider 提供了很多种输入,包括内存,文件,网络,流等,很多 CG 的接口会用到这个来避免多个额外的接口:
-
NSData *data = [NSData dataWithContentsOfFile: [[NSBundle mainBundle] pathForResource:@"logic" ofType:@"png"]];
CGImageSourceRef sourceRef = CGImageSourceCreateWithData((__bridge CFDataRef)data, NULL);
-
- 接下来可以对图片做解码的操作,但是解码的过程当中需要依据一些当前图片元数据的信息来做不同的处理方式,所以需要通过输入源来获取图片的元数据,比如图像的格式,图像数量,EXIF 元数据等,对于图像容器的属性(EXIF 等),需要使用 CGImageSourceCopyProperties 即可,然后根据不同的 Key 去获取对应的信息:
NSData *data = [NSData dataWithContentsOfFile: [[NSBundle mainBundle] pathForResource:@"logic" ofType:@"png"]];
CGImageSourceRef sourceRef = CGImageSourceCreateWithData((__bridge CFDataRef)data, NULL);
// 获取图片的类型
NSString *typeStr = (__bridge NSString *)CGImageSourceGetType(sourceRef);
// 获取图像的数量
NSUInteger count = CGImageSourceGetCount(sourceRef);
NSDictionary *imageProperties = (__bridge NSDictionary *)CGImageSourceCopyPropertiesAtIndex(sourceRef, 0,NULL);
NSUInteger width = [imageProperties[(__bridge NSString *)kCGImagePropertyPixelWidth] unsignedIntegerValue]; // 宽度,像素值
NSUInteger height = [imageProperties[(__bridge NSString *)kCGImagePropertyPixelHeight] unsignedIntegerValue]; // 高度,像素值
BOOL hasAlpha = [imageProperties[(__bridge NSString *)kCGImagePropertyHasAlpha] boolValue]; // 是否含有Alpha通道
CGImagePropertyOrientation exifOrientation = [imageProperties[(__bridge NSString *)kCGImagePropertyOrientation] integerValue]; // 这里也能直接拿到EXIF方向信息,和前面的一样,如果是 iOS7,就用 NSInteger 取)
-
- 图片的 EXIF 方向信息列表:
| Value | Oth Row | Oth Column |
|---|---|---|
| 1 | top | left side |
| 2 | top | right side |
| 3 | bottom | right side |
| 4 | bottom | left side |
| 5 | left side | top |
| 6 | right side | top |
| 7 | right side | bottom |
| 8 | left side | bottom |
-
- 通过 Image/ IO 解码到 CGImage 确实非常简单,整个解码只需要一个方法 CGImageSourceCreatelmageAtIndex。对于静态图来说,index 始终是 0,调用之后会立即开始解码,直到解码完成。值得注意的是,Image/IO 所有的方法都是线程安全的,而且基本上也都是同步的,因此确保大图像文件的解码最好不要放到主线程。
CGImageRef imageRef = CGImageSourceCreateImageAtIndex(sourceRef, 0, NULL);
-
- 解码得到 CGImage 后,就基本完成,可以直接构造对应的 Ullmage 用于 Ul 组件渲染。其中 Ullmage 的 orientation, 可以通过之前的 EXIF 元信息获得(注意,需要转换 EXIF 的方向,到 UllmageOrientation 的方向),然后就完成了,比较简单。
NSData *data = [NSData dataWithContentsOfFile: [[NSBundle mainBundle] pathForResource:@"logic" ofType:@"png"]];
CGImageSourceRef sourceRef = CGImageSourceCreateWithData((__bridge CFDataRef)data, NULL);
// 获取图片的类型
NSString *typeStr = (__bridge NSString *)CGImageSourceGetType(sourceRef);
// 获取图像的数量
NSUInteger count = CGImageSourceGetCount(sourceRef);
NSDictionary *imageProperties = (__bridge NSDictionary *)CGImageSourceCopyPropertiesAtIndex(sourceRef, 0,NULL);
NSUInteger width = [imageProperties[(__bridge NSString *)kCGImagePropertyPixelWidth] unsignedIntegerValue]; // 宽度,像素值
NSUInteger height = [imageProperties[(__bridge NSString *)kCGImagePropertyPixelHeight] unsignedIntegerValue]; // 高度,像素值
BOOL hasAlpha = [imageProperties[(__bridge NSString *)kCGImagePropertyHasAlpha] boolValue]; // 是否含有Alpha通道
CGImagePropertyOrientation exifOrientation = [imageProperties[(__bridge NSString *)kCGImagePropertyOrientation] integerValue]; // 这里也能直接拿到 EXIF 方向信息,和前面的一样,如果是 iOS7,就用 NSInteger 取)

CGImageRef imageRef = CGImageSourceCreateImageAtIndex(sourceRef, 0, NULL);

// UIImageOrientation和CGImagePropertyOrientation
UIImageOrientation imageOrientation = YYUIImageOrientationFromEXIFValue(exifOrientation);
UIImage *image = [UIImage imageWithCGImage: imageRef scale: [UIScreen mainScreen].scale orientation: imageOrientation];
// 清理,都是C指针,避免内存泄漏
CGImageRelease(imageRef);
CFRelease(sourceRef);
_imageView.image = image;
五、动态图片的播放
- 前文中,主要介绍了静态图(也即为 index 都为 0 的情况下),对于动态图来说,可以通过 CGImageSourceGetCount 来获取动图的帧数,之后就比较简单了,可以通过循环遍历每一帧,重复以上步骤生成对应的 UIlmage,最后通过 UIlmage 自带的 animatedlmageWithlmages:duration: 来生成一张动图即可:
- (void)loadGIFImage
	NSData *data = [NSData dataWithContentsOfFile: [[NSBundle mainBundle] pathForResource :@"test" ofType:@"gif"]];
	CGImageSourceRef source = CGImageSourceCreateWithData((__bridge CFDataRef)data, NULL);

	NSUInteger frameCount = CGImageSourceGetCount(source);
	// 帧数
	NSMutableArray <UIImage *> *images = [NSMutableArray array];
	double totalDuration = 0;
	for (size_t i = 0; i < frameCount: i++)
		// 不断遍历获取当前每一帧的图片
		NSDictionary *frameProperties = (__bridge NSDictionary *)CGImageSourceCopyPropertiesAtIndex(source, i, NULL);
		// GIF 属性字典
		NSDictionary *gifProperties = frameProperties[(NSString *)kCGImagePropertyGIFDictionary];
		// GIF 原始的帧持续时长,秒数
		double duration = [gifProperties[(NSString *)kCGImageProper tyGIFUnclampedDelayTime] doubleValue];
		// 方向
		CGImagePropertyOrientation exifOrientation = [frameProperties[(__bridge NSString *)kCGImagePropertyOrientation] integerValue];
		CGImageRef imageRef = CGImageSourceCreateImageAtIndex(source, i, NULL); // CGImage
		UIImageorlentatlon lmageOrlentation = YYUIImageorlentationFromEXIFvalue(exiforlentatlon);
		UIImage *image = [UIImage imageWithCGImage: imageRef scale: [UIScreen mainScreen].scale orientation: image0rientation];
		totalDuration += duration;
		// 计算时间
		[images add0bject: image];


	// 生成动图
	UIImage *animatedImage = [UIImage animatedImageWithImages: images duration: totalDuration];
	_imageView.image = animatedImage ;
- 对于 Image/IO 的渐进式解码,其实和静态图解码的过程类似,但是创建 CGImageSource 时,需要使用专门的 CGImageSourceCreateIncremental 方法,之后每次有新的数据(下载或者其它流输入)输入后,需要使用 CGImageSourceUpdateData(或者 CGImageSourceUpdateDataProvider)来更新数据。注意这个方法需要每次传入所有至今为止解码的数据,不仅仅是当前更新的数据。
六、减少内存占用
- 内存和 CPU 是 App 运行最宝贵的资源,处理和使用图像从减少内存占用和优化 CPU 使用入手。大的图像会占用较多的内存资源,解码和传输到 GPU 也会耗费较多时间,实际需要显示的图像尺寸可能并不是很大,如果能将大图缩小,便能达到优化的目的。
// 大图缩小为显示尺寸的图
- (UIImage *)downsampleImageAt:(NSURL *)imageURL to: (CGSize)pointSize Scale: (CGFloat)scale
	// 利用图像文件地址创建 image source
	NSDictionary * imageSourceOptions = @(__ bridge NSString *)kCGImageSourceShouldCache: @N0;
	CGImageSourceRef imageSource = CGImageSourceCreateWithURL((__bridge CFURLRef)imageURL, (__bridge CFDict ionaryRef)imageSourceOptions);
	// 下采样
	CGFloat maxDimensionInPixels = MAX(pointSize.width, pointSize.height) * scale;
	NSDictionary *downsampleOptions = @(__bridge NSString *)kCGImageSourceCreateThumbnailFromImageAlways : @YES,
										(__bridge NSString *)kCGImageSourceShouldCacheImmediately: @YES,
										(__bridge NSString *)kCGImageSourceCreateThumbnailWithTransform: @YES,
										(__bridge NSString *)kCGImageSourceThumbnailMaxPixelSize: @(maxDimens ionInPixels);
	CGImageRef downsampledImage = CGImageSourceCreateThumbnailAtIndex(imageSource, 0, (__ bridge CFDictionaryRef)downsampleoptions);
	UIImage *image = [[UIImage alloc] initWithCGImage: downsampledImage];
	CGImageRelease(downsampledImage);
	CFRelease(imageSource);
	return image;
以上是关于iOS经典面试题之深入分析图像的解码渲染与基本原理的主要内容,如果未能解决你的问题,请参考以下文章