Vue组件间通信 全局事件总线订阅与发布
Posted 小余努力搬砖
tags:
篇首语:本文由小常识网(cha138.com)小编为大家整理,主要介绍了Vue组件间通信 全局事件总线订阅与发布相关的知识,希望对你有一定的参考价值。
目录
一、全局事件总线
作用
一种组件间通信的方式 适用于任意组件间通信。
安装
安装全局事件总线:在入口文件main.js中,给VM添加$bus,任意组件都可以在原型中调用。
new Vue(
  render: h => h(App),

  beforeCreate()
  	  Vue.prototype.$bus  = this


).$mount('#app')
组件使用案例
案例分析
创建两个子组件,如下组件,其中注释内容是演示订阅与发布无视即可
下面代码所演示的是,小明组件给小红组件姓名“小明”,小红组件给小明组件“年龄”,主要通过自定义事件,其中小明组件自定义“getName”,需要传递给小红组件,小红组件就需要“getName”来接收,也可以销毁传递
发送代码如下
this.$bus.$emit('getName',this.name)//this.name是所要传递的值,接收代码如下
this.$bus.$on('getName',(name)=>
            console.log( '小红得到的名字',name);
          )
销毁代码如下
需要一个点击事件来触发
this.$bus.$off('getName')组件一(小明)
<template>
	<div>
		姓名:name年龄:age<button @click="sendMsg">给小红组件传姓名</button> <button @click="del">销毁传递</button>

	</div>
</template>

<script>
	// import pubsub from 'pubsub-js'
	export default
	  name: 'XiaoMing',
	  data()
		return
			name:'小明',
			age:20

	  ,
	  methods:
		  sendMsg()
			//   pubsub.publish('usname',this.name)

			  this.$bus.$emit('getName',this.name)
		  ,
		  del()
			this.$bus.$off('getName')
			console.log('已销毁');

	  ,
	mounted()
		// pubsub.subscribe('age',(e,page)=>
		// 	console.log('小明得到小红',e,page);
		// )
		this.$bus.$on('getAge',(age)=>
			console.log('小明得到的年龄',age);
		)


</script>

<style>
</style>
组件二(小红)
<template>
	<div>
		姓名:name年龄:age <button @click="sendAge">给小明组件传年龄</button><button >取消订阅</button>
	</div>
</template>

<script>
	// import pubsub from 'pubsub-js'
	export default
	  name:'XiaoHong',
	  data()
		return
			name:'小红',
			age:18

	  ,
	  methods:
		sendAge()
			// pubsub.publish('age',this.age)

			this.$bus.$emit('getAge',this.age)
		,
		// noRead()
		// 	pubsub.unsubscribe(this.del)
		//
	  ,
	  mounted()
		//   this.del=pubsub.subscribe('usname',(q,msg)=>
		// 	  console.log('小红得到小明',q,msg)
		//   ),


		  this.$bus.$on('getName',(name)=>
			console.log( '小红得到的名字',name);
		  )
	  ,

</script>
<style>
</style>
效果展示

二、订阅与发布
安装
一种组件间通信的方式,适用于任意组件间通信,如今有很多消息订阅与发布的包,在这里只介绍一种,pubsub-js。
打开终端输入命令:npm i pubsub-js
组件使用案例
案例分析
通过订阅与发布的方式,小明组件给小红组件姓名,小红组件给小明组件年龄
第一步我们需要引入: import pubsub from 'pubsub-js'
第二步通过在小明组件发布
pubsub.publish('usname',this.name) //usname:发布消息的名称,第二个参数:为发布内容第三步在小红组件订阅
 this.del=pubsub.subscribe('usname',(q,msg)=>
			  console.log('小红得到小明',q,msg)
		  )
第四步想要取消订阅,自定义事件,绑定销毁,通过第三步的this.del
pubsub.unsubscribe(this.del)组件一(小明)
<template>
	<div>
		姓名:name年龄:age<button @click="sendMsg">给小红组件传姓名</button> <button >销毁传递</button>

	</div>
</template>

<script>
	import pubsub from 'pubsub-js'
	export default
	  name: 'XiaoMing',
	  data()
		return
			name:'小明',
			age:20

	  ,

	  methods:
		  sendMsg()
			  pubsub.publish('usname',this.name)

			//   this.$bus.$emit('getName',this.name)
		  ,
		//   del()
		// 	this.$bus.$off('getName')
		// 	console.log('已销毁');
		//
	  ,
	mounted()
		pubsub.subscribe('age',(e,page)=>
			console.log('小明得到小红',e,page);
		)

		// this.$bus.$on('getAge',(age)=>
		// 	console.log('小明得到的年龄',age);
		// )


</script>

<style>
</style>
组件二(小红)
<template>
	<div>
		姓名:name年龄:age <button @click="sendAge">给小明组件传年龄</button><button @click="noRead">取消订阅</button>
	</div>
</template>

<script>
	import pubsub from 'pubsub-js'
	export default
	  name:'XiaoHong',
	  data()
		return
			name:'小红',
			age:18

	  ,
	  methods:
		sendAge()
			pubsub.publish('age',this.age)

			// this.$bus.$emit('getAge',this.age)
		,
		noRead()
			pubsub.unsubscribe(this.del)

	  ,
	  mounted()
		  this.del=pubsub.subscribe('usname',(q,msg)=>
			  console.log('小红得到小明',q,msg)
		  )


		//   this.$bus.$on('getName',(name)=>
		// 	console.log( '小红得到的名字',name);
		//   )
	  ,


</script>

<style>
</style>
效果展示

vue的全局事件总线
我们使用 vue 的过程中,会有很多时候要用到组件间的通信, 组件间的通信也有很多种, 比如 父子组件通信, 兄弟组件通信,任意组件间的通信
解决组件间的通信也有很多方法,
$emit 父子组件的通信可用
事件的订阅与发布(npm i pubsub-js) 订阅发布文档 任意组件通信可用
vuex 任意组件通信可用 比较重
全局事件总线 任意组件通信可用
这里我们来介绍一下,全局事件总线的用法,它相对来说轻量一点, 使用比较方便
先来说一下, 全局事件总线的设计思路
我们知着, 在 vueComponet 上面可以使用 $on $emit $off 来绑定, 触发, 和解绑事件, 同样的 我们在 mian.js 中的 vm = new Vue(…) , 这个vm 身上也具有这样的功能, 而 vm 身上的所有方法和属性, vue 的组件中都是可以使用的,所有, 我们想的是把所有的事件, 都绑定在 vm 的身上, 同样的, 每一个 组件 (VueComponent) 也可以使用 $emit $off $on 在 vm 的身上来动态的绑定 , 触发事件
	...
	var vm =new Vue({
		  router,
		  store,
		  render:h=>h(App)
		}).$mount('#app')
	// 注意, 这样写是一个错误的
	//我们来分析一下代码, 我们在 Vue的原型上面添加一个$bus 其值是vm
	//但是我们看, vm 在前面已经new 过了, 它的里面没有 $bus ,
	//所以这样写的结果就是  vueComponet 子组件中, 根本就没有 $bus 的属性
	Vue.prototype.$bus = vm;

-=-------------------------------------------------------------
	//上面的写法错误的原因是因为  Vue.prototype.$bus = vm;   写在了  new Vue(....)的后面, 那么我们把它写在前面可以吗

		Vue.prototype.$bus = vm;
		var vm =new Vue({
		  router,
		  store,
		  render:h=>h(App)
		}).$mount('#app')

	//这样做也是不对的, vm 对象还没有 new 出来, 你就要拿着它信原型上面加, 肯定也是不行的
正确的写法 是利用了vue 的一个 生命周期钩子 beforeCreate
...
new Vue({
	router,
	store,
	render:h=>h(App),
	beforeCreate(){
	    Vue.prototype.$bus = this;
	}
}).$mount('#app')
有了上面的 事件总线, 我们就可以把所有的事件,都注册到 vm 的上面, 实现组件间的通信
下面是一个兄弟组件的通信
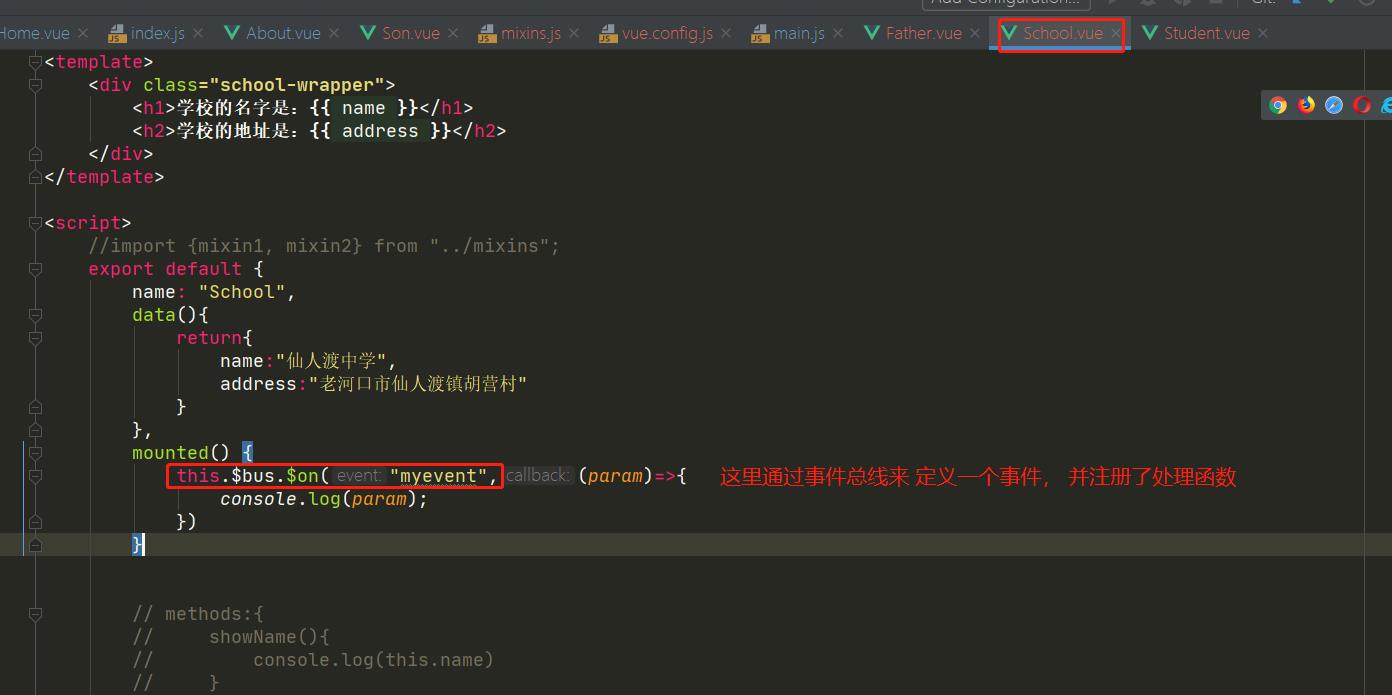
这是一个 School 组件, 它想接收到 student 组件传送过来的数据

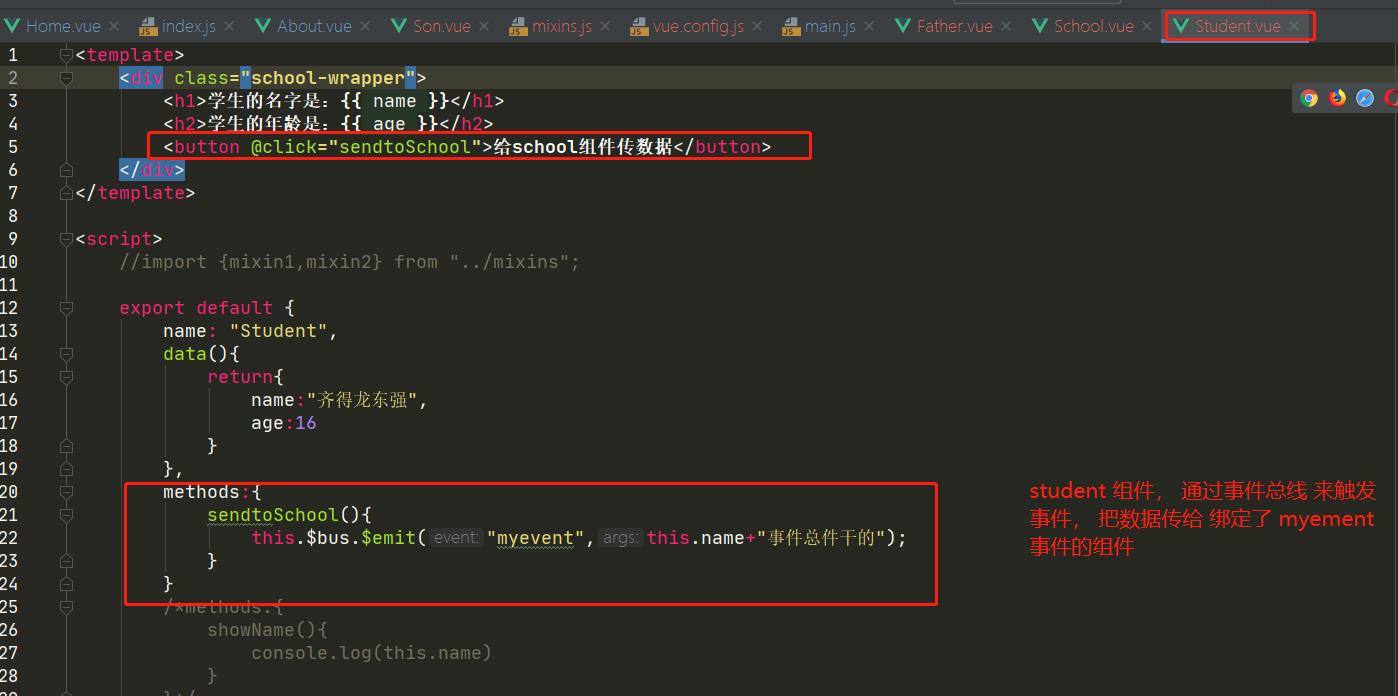
这是一个student 组件, 它要给 School 组件发送数据

以上就是全局事件总线的使用方法
以上是关于Vue组件间通信 全局事件总线订阅与发布的主要内容,如果未能解决你的问题,请参考以下文章