三层架构综合实验
Posted love_by
tags:
篇首语:本文由小常识网(cha138.com)小编为大家整理,主要介绍了三层架构综合实验相关的知识,希望对你有一定的参考价值。
一、实验内容
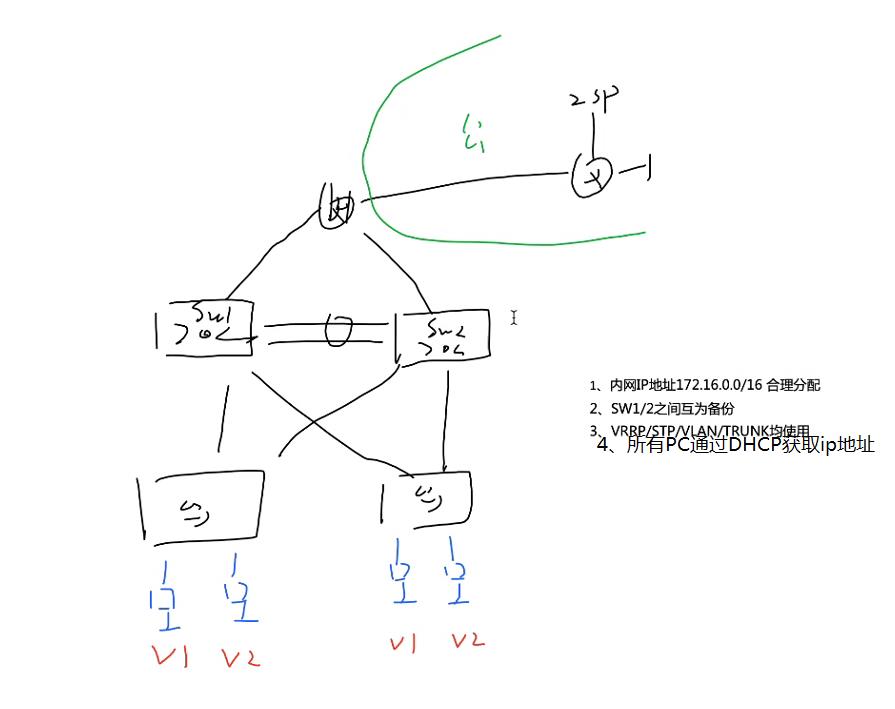
1、内网IP地址172.16.0.0/16
2、sw1/2之间互为备份
3、VRRP/STP/VLAN/Trunk均使用
4、所有PC通过DHCP获取IP地址
二、拓扑设计
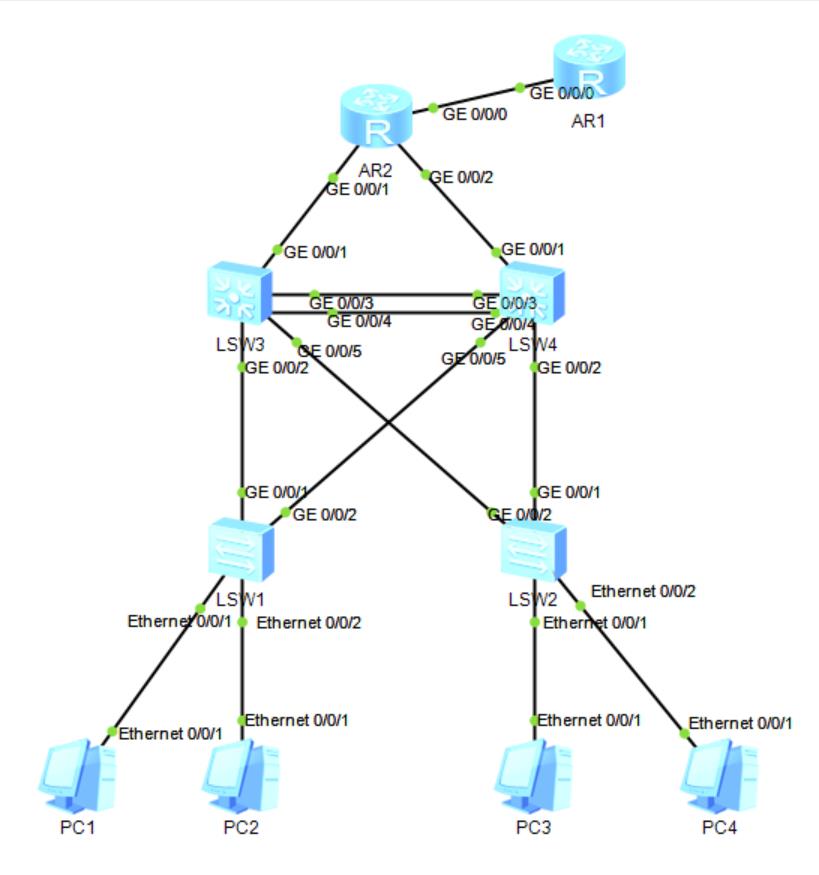
IP地址规划
172.16.0.0/16 总网
172.16.0.0/24 点到点骨干链路
172.16.0.0/30——172.16.0.252/30
172.16.1.0/24 MA骨干链路
172.16.1.0/29——192.16.1.248/29
172.16.2.0/24——172.16.255.0/24 PC网段
三、实施
1、汇聚层
(1)创建VLAN
(2)配置Eth-trunk
[sw3]int Eth-Trunk 0
[sw3-Eth-Trunk0]q
[sw3]int GigabitEthernet 0/0/3
[sw3-GigabitEthernet0/0/3]eth-trunk 0
[sw3-GigabitEthernet0/0/3]int g0/0/4
[sw3-GigabitEthernet0/0/4]eth-trunk 0
[sw4]int Eth-Trunk 0
[sw4-Eth-Trunk0]q
[sw4]int g0/0/3
[sw4-GigabitEthernet0/0/3]eth-trunk 0
[sw4-GigabitEthernet0/0/3]int g 0/0/4
[sw4-GigabitEthernet0/0/4]eth-trunk 0
(3)配置trunk干道
[sw3]int Eth-Trunk 0
[sw3-Eth-Trunk0]port link-type trunk
[sw3-Eth-Trunk0]port trunk allow-pass vlan 1 to 2
[sw3]port-group group-member GigabitEthernet 0/0/2 GigabitEthernet 0/0/5
[sw3-port-group]port link-type trunk
[sw3-GigabitEthernet0/0/2]port link-type trunk
[sw3-GigabitEthernet0/0/5]port link-type trunk
[sw3-port-group]port trunk allow-pass vlan 1 to 2
[sw3-GigabitEthernet0/0/2]port trunk allow-pass vlan 1 to 2
[sw3-GigabitEthernet0/0/5]port trunk allow-pass vlan 1 to 2
[sw4]int Eth-Trunk 0
[sw4-Eth-Trunk0]port link-type trunk
[sw4-Eth-Trunk0]port trunk allow-pass vlan 1 to 2
[sw4]int g 0/0/2
[sw4-GigabitEthernet0/0/2]port link-type trunk
[sw4-GigabitEthernet0/0/2]port trunk allow-pass vlan 1 to 2
[sw4-GigabitEthernet0/0/2]int g 0/0/5
[sw4-GigabitEthernet0/0/5]port link-type trunk
[sw4-GigabitEthernet0/0/5]port trunk allow-pass vlan 1 to 2
[sw1]port-group group-member GigabitEthernet 0/0/1 to GigabitEthernet 0/0/2
[sw1-port-group]port link-type trunk
[sw1-GigabitEthernet0/0/1]port link-type trunk
[sw1-GigabitEthernet0/0/2]port link-type trunk
[sw1-port-group]port trunk allow-pass vlan 1 to 2
[sw1-GigabitEthernet0/0/1]port trunk allow-pass vlan 1 to 2
[sw1-GigabitEthernet0/0/2]port trunk allow-pass vlan 1 to 2
[sw2]interface GigabitEthernet0/0/1
[sw2-GigabitEthernet0/0/1] port link-type trunk
[sw2-GigabitEthernet0/0/1] port trunk allow-pass vlan 2
[sw2-GigabitEthernet0/0/1]interface GigabitEthernet0/0/2
[sw2-GigabitEthernet0/0/2] port link-type trunk
[sw2-GigabitEthernet0/0/2] port trunk allow-pass vlan 2
(4)配置STP(生成树)
[sw3]stp mode mstp
[sw3]stp enable
[sw3]stp region-configuration
[sw3-mst-region]region-name a
[sw3-mst-region]instance 1 vlan 1
[sw3-mst-region]instance 2 vlan 2
[sw3-mst-region]active region-configuration
[sw3-mst-region]q
[sw3]stp instance 1 root primary
[sw3]stp instance 2 root secondary
[sw4]stp mode mstp
[sw4]stp enable
[sw4]stp region-configuration
[sw4-mst-region]region-name b
[sw4-mst-region]instance 1 vlan 1
[sw4-mst-region]instance 2 vlan 2
[sw4-mst-region]active region-configuration
[sw4-mst-region]q
[sw4]stp instance 1 root secondary
[sw4]stp instance 2 root primary
[sw1]stp enable
[sw1]stp region-configuration
[sw1-mst-region]region-name a
[sw1-mst-region]instance 1 vlan 1
[sw1-mst-region]instance 2 vlan 2
[sw1-mst-region]active region-configuration
[sw2]stp enable
[sw2]stp region-configuration
[sw2-mst-region]region-name a
[sw2-mst-region]instance 1 vlan 1
[sw2-mst-region]instance 2 vlan 2
[sw2-mst-region]active region-configuration
(5)配置svi
[sw3]int vlan 1
[sw3-Vlanif1]ip address 172.16.2.1 24
[sw3-Vlanif1]int vlan 2
[sw3-Vlanif2]ip address 172.16.3.2 24
[sw4]int vlan 1
[sw4-Vlanif1]ip address 172.16.2.2 24
[sw4-Vlanif1]int vlan 2
[sw4-Vlanif2]ip address 172.16.3.1 24
(6)VRRP
[sw3]int vlanif 1
[sw3-Vlanif1]vrrp vrid 1 virtual-ip 172.16.2.254
[sw3-Vlanif1]vrrp vrid 1 priority 101
[sw3-Vlanif1]vrrp vrid 1 track interface GigabitEthernet 0/0/1 reduced 5
[sw3-Vlanif1]int vlanif 2
[sw3-Vlanif2]vrrp vrid 1 virtual-ip 172.16.3.254
[sw4]int Vlanif 1
[sw4-Vlanif1]vrrp vrid 1 virtual-ip 172.16.2.254
[sw4-Vlanif1]int vlanif 2
[sw4-Vlanif2]vrrp vrid 1 virtual-ip 172.16.3.254
[sw4-Vlanif2]vrrp vrid 1 priority 101
[sw4-Vlanif2]vrrp vrid 1 track interface GigabitEthernet 0/0/1 reduced 5
(7)DHCP
[sw3]dhcp enable
[sw3]ip pool a
[sw3-ip-pool-a]network 172.16.2.0 mask 24
[sw3-ip-pool-a]gateway-list 172.16.2.254
[sw3-ip-pool-a]dns-list 114.114.114.114
[sw3-ip-pool-a]q
[sw3]ip pool b
[sw3-ip-pool-b]network 172.16.3.0 mask 24
[sw3-ip-pool-b]gateway-list 172.16.3.254
[sw3-ip-pool-b]dns-list 114.114.114.114
[sw3-ip-pool-b]q
[sw3]int vlan 1
[sw3-Vlanif1]dhcp select global
[sw3-Vlanif1]int vlanif 2
[sw3-Vlanif2]dhcp select global
[sw4]dhcp enable
[sw4]ip pool a
[sw4-ip-pool-a]network 172.16.2.0 mask 24
[sw4-ip-pool-a]gateway-list 172.16.2.254
[sw4-ip-pool-a]dns-list 114.114.114.114
[sw4-ip-pool-a]q
[sw4]ip pool b
[sw4-ip-pool-b]network 172.16.3.0 mask 24
[sw4-ip-pool-b]gateway-list 172.16.3.254
[sw4-ip-pool-b]dns-list 114.114.114.114
[sw4-ip-pool-b]q
[sw4]interface vlanif 1
[sw4-Vlanif1]dhcp select global
[sw4-Vlanif1]int vlanif 2
[sw4-Vlanif2]dhcp select global
2、接入层
(1)创建VLAN并划分VLAN
[sw1-Ethernet0/0/1]port link-type access
[sw1-Ethernet0/0/1]port default vlan 1
[sw1-Ethernet0/0/1]stp edged-port enable
[sw1-Ethernet0/0/1]int eth0/0/2
[sw1-Ethernet0/0/2]port link-type access
[sw1-Ethernet0/0/2]port default vlan 2
[sw1-Ethernet0/0/2]stp edged-port enable
[sw2]int Eth0/0/1
[sw2-Ethernet0/0/1]port link-type access
[sw2-Ethernet0/0/1]port default vlan 1
[sw2-Ethernet0/0/1]stp edged-port enable
[sw2-Ethernet0/0/1]int eth0/0/2
[sw2-Ethernet0/0/2]port link-type access
[sw2-Ethernet0/0/2]port default vlan 2
[sw2-Ethernet0/0/2]stp edged-port enable
(2)PC端启动DHCP
3、核心层
(1)配置公网
测试:

(2)路由器和三层交换机的连通
[sw3]vlan 10
[sw3-vlan10]int vlan 10
[sw3-Vlanif10]ip address 172.16.0.1 30
[sw3-Vlanif10]int g0/0/1
[sw3-GigabitEthernet0/0/1]port link-type access
[sw3-GigabitEthernet0/0/1]port default vlan 10
[sw3]ip route-static 0.0.0.0 0 172.16.0.2
[sw4]vlan 20
[sw4-vlan20]int vlanif 20
[sw4-Vlanif20]ip add 172.16.0.6 30
[sw4-Vlanif20]int g0/0/1
[sw4-GigabitEthernet0/0/1]port link-type access
[sw4-GigabitEthernet0/0/1]port default vlan 20
[sw4]ip route-static 0.0.0.0 0 172.16.0.5
[r2]int g0/0/1
[r2-GigabitEthernet0/0/1]ip add 172.16.0.2 30
[r2-GigabitEthernet0/0/1]int g 0/0/2
[r2-GigabitEthernet0/0/2]ip add 172.16.0.5 30
[r2]ip route-static 172.16.2.0 24 172.16.0.1
[r2]ip route-static 172.16.2.0 24 172.16.0.6
[r2]ip route-static 172.16.3.0 24 172.16.0.6
[r2]ip route-static 172.16.3.0 24 172.16.0.1
(3)DNS
[r2-acl-basic-2000]rule permit source 172.16.0.0 0.0.255.255
[r2-acl-basic-2000]q
[r2]int g0/0/0
[r2-GigabitEthernet0/0/0]nat o
[r2-GigabitEthernet0/0/0]nat outbound 2000
四、测试
(1)测试PC端是否可以通过DHCP获取到正确的IP地址

(2)在所有设备正常运行下,测试PC端能否正常通信
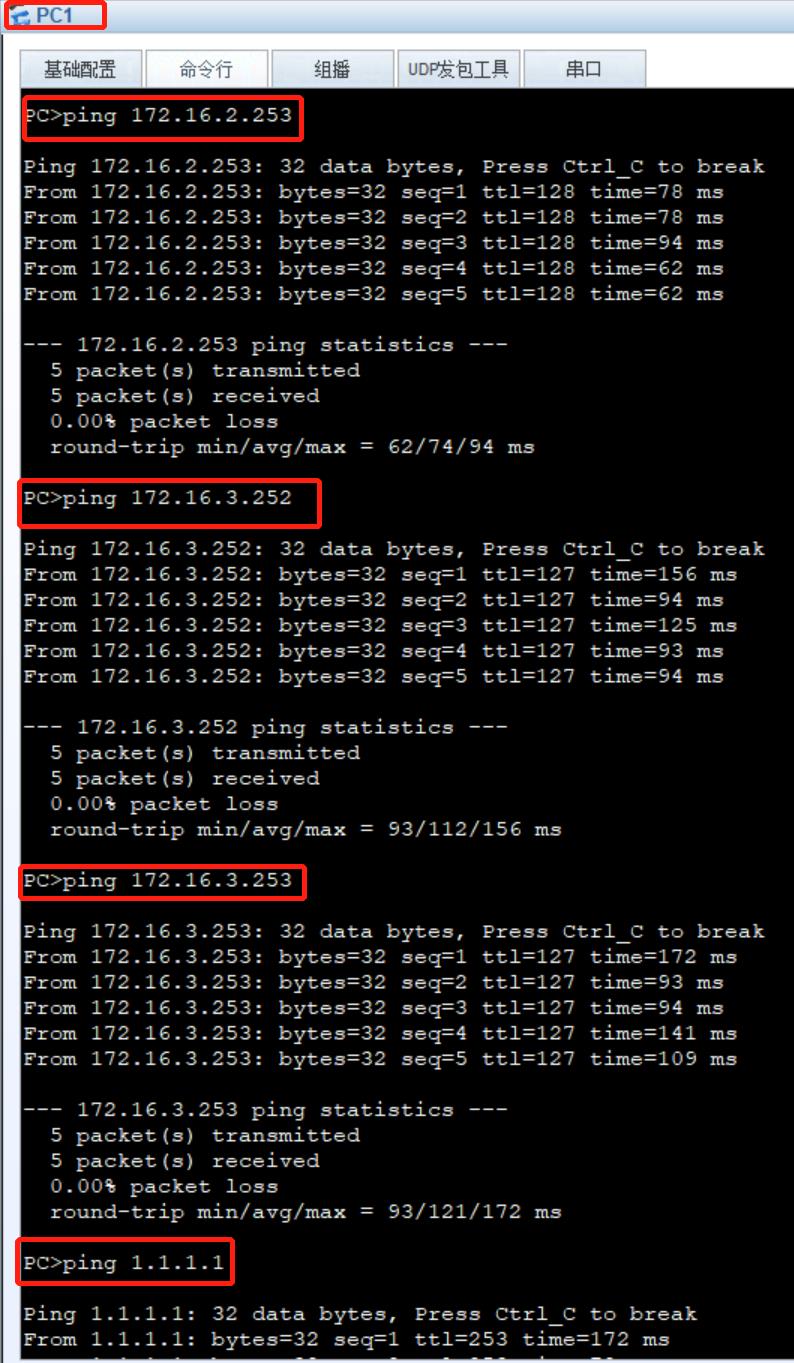
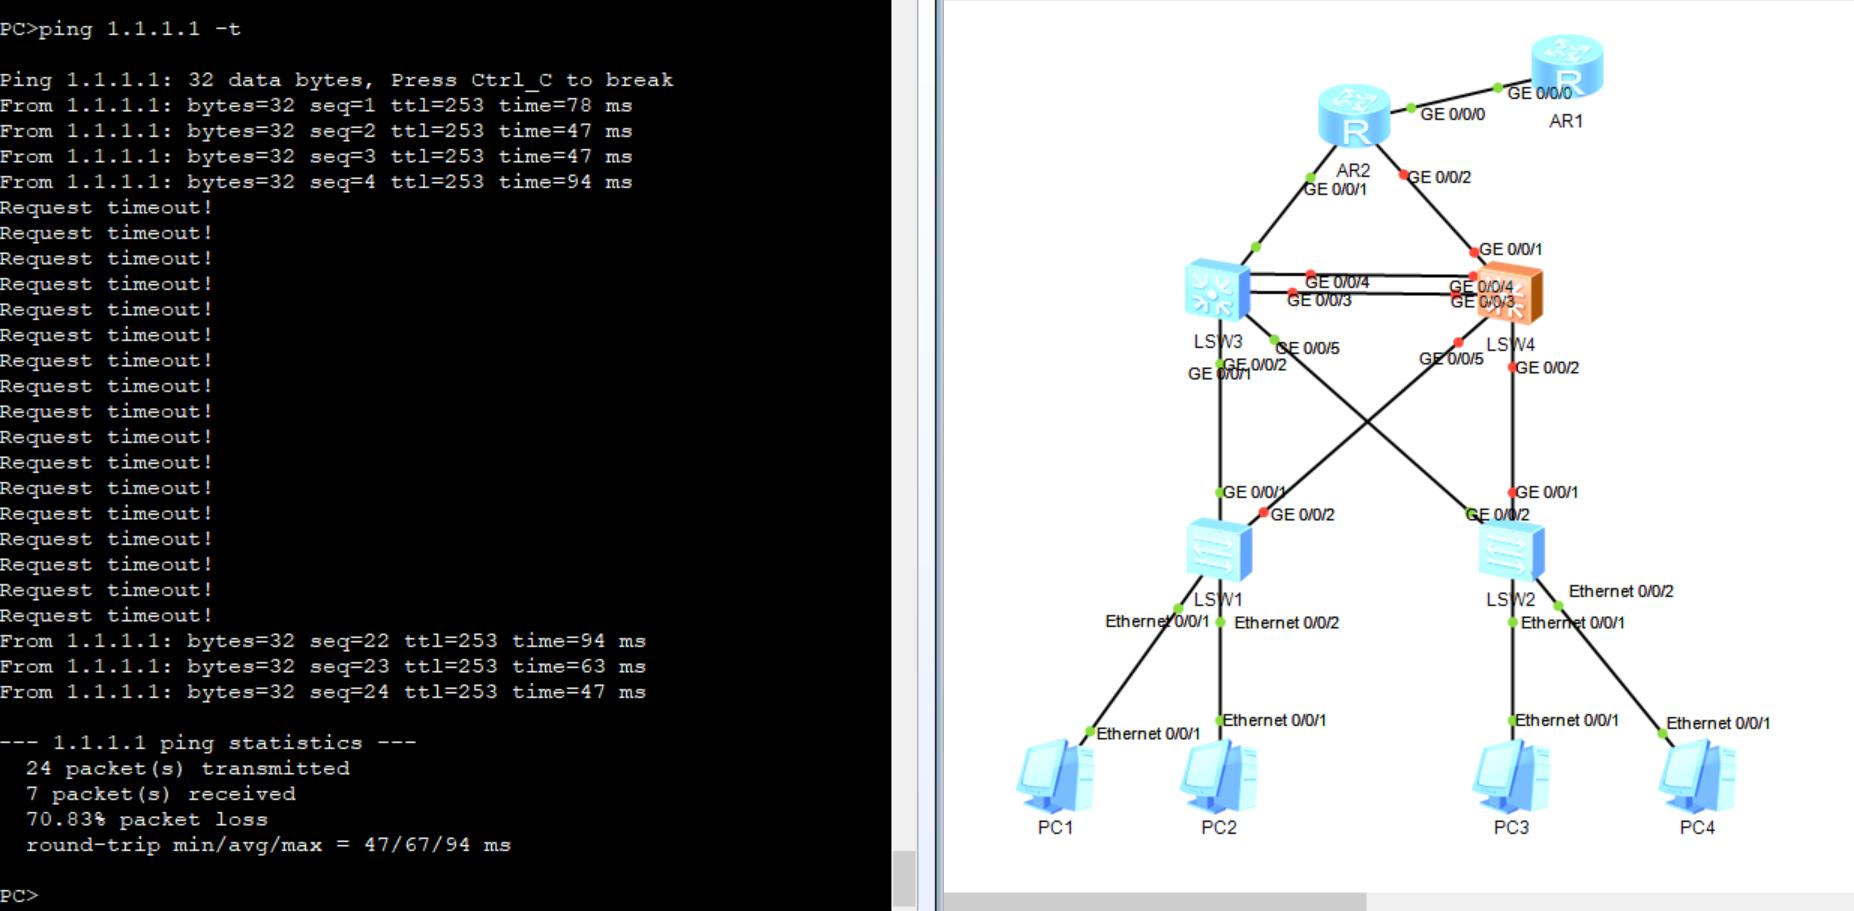
(3)关闭sw3,测试PC端是否能够正常通信

(4)关闭sw4,打开sw3,测试PC端是否能够正常通信
企业三层架构综合实验
目录

实验要求:
1. 内网IP地址 172.16.0.0/16 合理分配
2. SW1/2之间互为备份
3. VRRP/STP/VLAN/TRUNK 均使用
4. 所有PC通过DHCP获取IP地址
分析:
地址规划:
VLAN1:172.16.1.0/24
VLAN2:172.16.128.0/24
两个与路由器连接的LSW1和LSW2之间的网段分别为
172.16.0.0/30、172.16.0.4/30
交换机所用到技术的配置顺序:
eth-trunk、trunk干道、vlan、STP、SVI、VRRP、DHCP
配置:
1、eth-trunk
将SW1和2之间的两条链路建立通道,两台交换机上都要配置

查看:
 添加了eth-trunk接口,g0/0/0和 g0/0/1接口消失
2、配置trunk干道
所有交换机之间的链路全为trunk干道


3、创建和划分VLAN
这里只需要创建 vlan 2,在所有交换机上创建
![]()
查看上一步trunk所允许的VLAN:
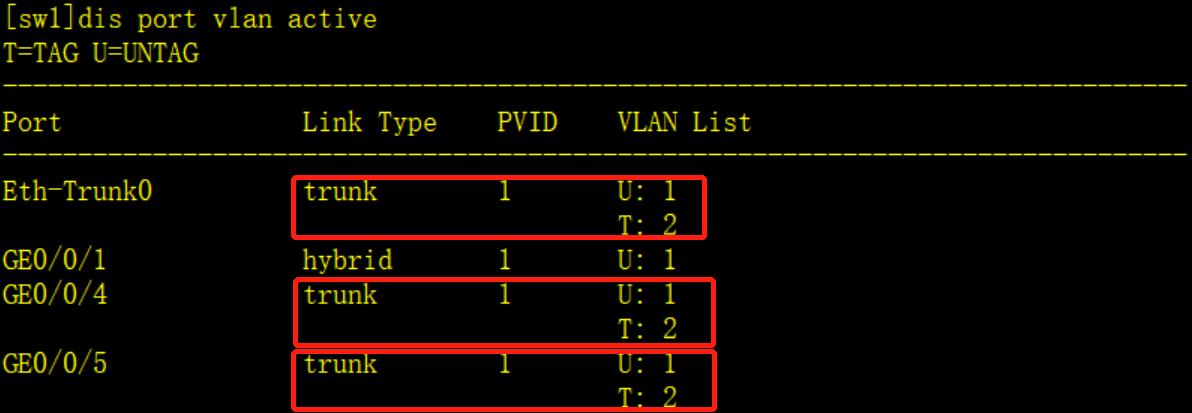
在接入层所有连接终端设备的交换机接口划分VLAN

4、启用STP
配置STP
所有交换机上的STP配置必须完全一致


STP查看
先查看SW1的STP:

可以看到G0/0/5在两个VLAN中都是根端口,即SW4的E0/0/3端口为两个VLAN的指定端口
SW4的STP:

可以看到所有端口均为指定端口,即SW4为汇聚层交换机的根网桥;所以SW2的 eth-trunk 0端口可能被阻塞
SW2的STP:

和猜测的一样,SW2的 eth-trunk 0 端口被阻塞掉了,因为现在还有环,所以SW3也有个端口会被阻塞
SW3的STP:

组一和组二的主、备根配置
SW1:

SW2:

然后查看STP:

发现在分流后阻塞端口发生了改变,SW3和SW4的E0/0/3被阻塞
STP优化
在接入层的边缘接口启用STP,可以提高终端设备的运行效率,在连接终端的所有端口配置


5、SVI 三层交换
网关配置
SW1:
![]()
![]()
SW2:
![]()
![]()
与路由器连接的三层交换配置:
在下边两台交换机上创建 valn 100,并设置连接路由器的接口模式为 access,允许 vlan 100 通过
SW1:

SW2:

6、VRRP 配置网关冗余
SW1
主根:
备根:

查看:

SW2
主根:

备根:

查看:

7、DHCP自动下方地址
在SW1和SW2上配置,两台交换机的配置几乎一致
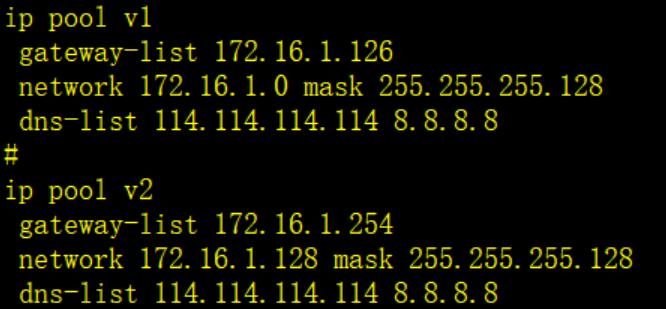
然后分别在接口进行调用就可以在终端获取地址
8、路由配置
(1)根据网段给路由器的所有接口配置地址
(2)启用OSPF,将网段宣告
R1:

SW1:

SW2:
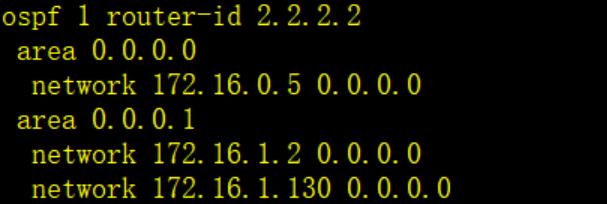
(3)3类路由汇总
SW1:
![]() SW2:
SW2:
![]()
(4)沉默接口
将不需要接收 hello包的接口设置为沉默接口,在启用OSPF的两台交换机上都要配置

(5)给OSPF区域和运营商ISP分别下放缺省:
![]()
![]()
(6)在R2的公网端口配置NAT进行地址转换

![]()
(7)测试
用终端的任何一台设备去上网,如果能上网,说明设备配置成功;
将SW1和SW2的命令分别保存,关闭其中的一台设备,然后用终端再去上网,如果能,说明汇聚层交换机冗余配置成功
以上是关于三层架构综合实验的主要内容,如果未能解决你的问题,请参考以下文章