基于OPenCV的视频播放变慢
Posted 地推
tags:
篇首语:本文由小常识网(cha138.com)小编为大家整理,主要介绍了基于OPenCV的视频播放变慢相关的知识,希望对你有一定的参考价值。
分别使用tkinter,pygame,OpenCV播放视频,发现均有视频播放变慢的现象,源码如下:
使用tkinter,OpenCV播放视频:
from tkinter import *
import cv2
from PIL import Image, ImageTk
def video_play():
while video.isOpened():
ret, frame = video.read() # 读取照片
# print(‘读取成功’)
if ret == True:
img = cv2.cvtColor(frame, cv2.COLOR_BGR2RGBA) # 转换颜色使播放时保持原有色彩
current_image = Image.fromarray(img).resize((1920,1080)) # 将图像转换成Image对象
imgtk = ImageTk.PhotoImage(image=current_image)
movieLabel.imgtk = imgtk
movieLabel.config(image=imgtk)
movieLabel.update() # 每执行以此只显示一张图片,需要更新窗口实现视频播放
else:
break
root = Tk()
root.overrideredirect(True)
root.state(“zoomed”)
movieLabel = Label(root,width=1920,height=1080) # 创建一个用于播放视频的label容器
movieLabel.pack()
while True:
video = cv2.VideoCapture(r"E:\\放松\\xjj\\掠影\\原神\\1612179174bfee75ebffaca79a.mp4_last.mp4") # 使用opencv打开本地视频文件
video_play() # 调用video_play实现视频播放
mainloop()
使用pygame,OpenCV播放视频:
import pygame
import sys
import cv2
import numpy as np
import os
import moviepy.editor as mpy
if name == ‘main’:
# 截取背景音乐
# audio_background = mpy.AudioFileClip(‘cs1.mp4’)
#
# audio_background.write_audiofile(‘cs1.mp3’)
pygame.init() # 初始化pygame
FPS = 100
#设置窗口位置
os.environ[‘SDL_VIDEO_WINDOW_POS’]=“%d,%d” % (5,30)
FPSClock = pygame.time.Clock()
size = width, height = 960, 540 # 设置窗口大小
screen = pygame.display.set_mode(size) # 显示窗口
color = (255, 255, 255) # 设置颜色
ogg=pygame.mixer.Sound(“cs1.mp3”)
#pygame.mixer.music.load(“”)
videoCapture = cv2.VideoCapture("cs2.mp4")
ogg.play()

while True:
    a=pygame.time.get_ticks()

    if videoCapture.isOpened():
        #从opncv读一段视频进来
        ret, frame = videoCapture.read()
        if ret :
            frame = cv2.cvtColor(frame, cv2.COLOR_BGR2RGB)
            # frame = np.asarray(frame.resize((1920, 1080)))
            frame = cv2.resize(frame,(960,540),interpolation=cv2.INTER_CUBIC)
            frame = np.rot90(frame, k=-1)
            frame = pygame.surfarray.make_surface(frame)

            frame=pygame.transform.flip(frame,False,True)

            screen.blit(frame, (0,0))

    for event in pygame.event.get():  # 遍历所有事件
        if event.type == pygame.QUIT:  # 如果单击关闭窗口,则退出
            sys.exit()
    pygame.display.flip()  # 更新全部显示
    FPSClock.tick(FPS)
    pygame.time.get_ticks()
使用OpenCV播放视频:
import cv2
import numpy as np
import moviepy.editor as mpy
import pygame
pygame.init()
ogg=pygame.mixer.Sound(“cs1.mp3”)
背景音乐
cap = cv2.VideoCapture(“cs1.mp4”)
fps = cap.get(cv2.CAP_PROP_FPS)
ogg.play()
while (True):
# 读帧
ret, frame = cap.read()
# 显示图像
cv2.imshow(“video”, cv2.resize(frame,(960,540),interpolation=cv2.INTER_CUBIC))
# 图像的按比例压缩,
if cv2.waitKey(int(1000/fps)) & 0xFF == ord(‘q’):
break
cap.release()
cv2.destroyAllWindows()
.................................................................................................
基于python + opencv的视频播放调节功能
1.主要功能介绍
- 视频亮度调节,可以播放更亮或者更暗的视频
- 视频播放速度调节
- 通过键盘调节视频播放的快慢以及亮度
2.思路简说
对于亮度调节,是先做好亮度不同的视频,在播放过程中,调节亮度时,通过不同亮度的视频之间在同一帧处进行跳转,实现不同亮度的连续播放功能。视频是可以在指定帧位置进行播放的。(感觉不合理且脑残对吧,先这样吧,小视频还是没问题的,对于电影肯定不能这么干,就当是练习吧,至少是一种思路)
通过加快或降低帧与帧之间的时间,来调节播放速度调节。
3.功能实现
(需要安装一些库,这里就不详细介绍了,百度一下大家肯定都可以完成)
我们先一段段讲解代码。
3.1 获得不同亮度的视频
首先,有一个需要播放的视频。那么可以直接通过代码来获得不同亮度的视频,代码也很简单,不需要去和一些视频转换器的VIP斗智斗勇。
#安装moviepy库
pip install moviepy
from moviepy.editor import*
clip = VideoFileClip(r"D:/python_test/opao_timeX1.0.mp4")
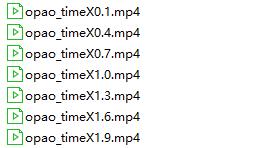
clipColorx = clip.fx(vfx.colorx,0.1) #通过调节数字来获得导入视频亮度的n倍新视频
clipColorx.write_videofile (r"D:/python_test/opao_timeX0.1.mp4")
结果:

3.2 安装CV库
在cmd的命令框下输入:
pip install opencv-python3.3 视频播放
注释写的很详细,不再赘述太多。
这段代码让视频能够正常播放,能播放是后面调节的基础。
#——————————————————————————————播放视频——————————————————————
#————————添加自己的视频播放路径———————————
video_path="D:/python_test/opao_timeX0.1.mp4"

# 创建一个视频读写类
video_capture=cv2.VideoCapture(video_path)

#读取视频的fps,  大小   每秒传输帧数
fps=video_capture.get(cv2.CAP_PROP_FPS)
size=(video_capture.get(cv2.CAP_PROP_FRAME_WIDTH),video_capture.get(cv2.CAP_PROP_FRAME_HEIGHT))
#print("fps: {}\\nsize: {}".format(fps,size))

#读取视频时长(帧总数)
total = int(video_capture.get(cv2.CAP_PROP_FRAME_COUNT))
#print("[INFO] {} total frames in video".format(total))

#设定从视频的第几帧开始读取
frameToStart = 00
video_capture.set(cv2.CAP_PROP_POS_FRAMES, frameToStart);

#显示视频
current_frame=frameToStart
while  True:
    success, frame = video_capture.read()
    time.sleep(0.0267)
   # cv2.waitKey(40)
    if  success == False:
        break

#设置延时,降低播放速度
#    time.sleep(0.0188)

#自定义图像大小
    h, w = frame.shape[:2]  # 三通道
    size = (int(w * 1.0), int(h * 1.0))
    frame = cv2.resize(frame, size)

#显示当前视频已播放时间和总时间
#计算当前时间
    now_seconds=int(current_frame /fps%60)
    now_minutes=int(current_frame/fps/60)
    total_second=int(total /fps%60)
    total_minutes=int(total/fps/60)
#   { <参数序号> : <填充> <对齐)> <宽度> <,> <.精度> <类型>}.
    Time_now_vs_total="Time:{:>3}:{:>02}|{:>3}:{:0>2}".format(now_minutes,now_seconds,total_minutes,total_second)
    print(Time_now_vs_total)
3.4 键盘控制视频的快放、慢放、暂停、退出
#--------键盘控制视频的快放、慢放、暂停、退出---------------
    #读取键盘值
    key = cv2.waitKey(1) & 0xff

    #按键z增长延时,j减少延时。“zeng”、“jian”,实现在增长到值开始建
    if key == ord("z"):
        count_keyz += 1
        delay_time = 0 + 0.02 * count_keyz
        if(delay_time>1.0):
            delay_time = 1.0

    if key == ord("j"):
            count_keyj += 1
            delay_time = delay_time - 0.02 * count_keyj
            if(delay_time<0):
                delay_time = 0
            time.sleep(delay_time)

#    print(delay_time)
    time.sleep(delay_time)


    #设置空格按下时暂停
    if key == ord(" "):
        cv2.waitKey(1)
    #设置Q按下时退出
    if key == ord("q"):
        break
3.5 视频亮度调节
我用按键u来表示“up”,即上调亮度,“d”即“down”,来降低亮度。因为前面文件名就是0.1、0.4、0.7、1.0、1.3等,所以亮度每次都是加0.3或减0.3。当brightness大于2(最多也就1.9倍亮度)或者小于0(最小也就0.1倍亮度),对count_keyd或者count_keyu 进行归零,并且将brightness设置为阈值。
特别提醒:更换不同路径下的文件时,要修改video_path[:25]的数25
new_video_path = video_path[:25]+brightness_str+'.mp4'
#按下U,上升计数器加1,表示亮度增加,即UP
    if key == ord("u"):
        count_keyu +=1
     #   print(count_keyu)
        brightness  = start_brightness + count_keyu * 0.3
      #  print(brightness)
        if(brightness>2):
            brightness = 1.9
            count_keyu = 0
        #确保brightness的结果是保留一位小数,计算时经常出现0.00000000000000009或0.00000000000000001的误差
        brightness_str =format(brightness, '.1f')
        new_video_path = video_path[:25]+brightness_str+'.mp4'
        video_capture = cv2.VideoCapture(new_video_path)
        frameToStart = now_seconds * fps
        video_capture.set(cv2.CAP_PROP_POS_FRAMES, frameToStart);
        print(new_video_path)

    #按下D,下降计数器加1,表示亮度下调,即down
    if key == ord("d"):
         count_keyd += 1
         brightness = start_brightness + count_keyu * 0.3 - count_keyd * 0.3  #表示亮度的变量
         if(brightness<start_brightness):
             brightness = 0.1
             count_keyd = 0
         #确保brightness的结果是保留一位小数,计算时经常出现0.00000000000000009或0.00000000000000001的误差
         brightness_str = format(brightness, '.1f')
         new_video_path = video_path[:25]+brightness_str+'.mp4'
         video_capture=cv2.VideoCapture(new_video_path)
         frameToStart = now_seconds * fps
         video_capture.set(cv2.CAP_PROP_POS_FRAMES, frameToStart);
#         print(new_video_path)

    #  putText(img, text, org, fontFace, fontScale, color, thickness=None, lineType=None, bottomLeftOrigin=None):
    cv2.putText(frame,Time_now_vs_total,(300,50),cv2.FONT_HERSHEY_SIMPLEX,2,(0,0,255),3)
    cv2.imshow("frame",frame)
    #人工对视频帧数进行计数
    current_frame += 1
4.完整代码
import numpy as np
import cv2
import time

start_brightness = 0.1
count_keyu = 0
count_keyd = 0

count_keyz = 0
count_keyj = 0

delay_time = 0
#——————————————————————————————播放视频——————————————————————
#————————添加自己的视频播放路径———————————
video_path="D:/python_test/opao_timeX0.1.mp4"

# 创建一个视频读写类
video_capture=cv2.VideoCapture(video_path)

#读取视频的fps,  大小   每秒传输帧数
fps=video_capture.get(cv2.CAP_PROP_FPS)
size=(video_capture.get(cv2.CAP_PROP_FRAME_WIDTH),video_capture.get(cv2.CAP_PROP_FRAME_HEIGHT))
#print("fps: {}\\nsize: {}".format(fps,size))

#读取视频时长(帧总数)
total = int(video_capture.get(cv2.CAP_PROP_FRAME_COUNT))
#print("[INFO] {} total frames in video".format(total))

#设定从视频的第几帧开始读取
#From :  https://blog.csdn.net/luqinwei/article/details/87973472
frameToStart = 00
video_capture.set(cv2.CAP_PROP_POS_FRAMES, frameToStart);

#显示视频
current_frame=frameToStart
while  True:
    success, frame = video_capture.read()
    time.sleep(0.0267)
   # cv2.waitKey(40)
    if  success == False:
        break

#设置延时,降低播放速度
#    time.sleep(0.0188)

#自定义图像大小
    h, w = frame.shape[:2]  # 三通道
    size = (int(w * 1.0), int(h * 1.0))
    frame = cv2.resize(frame, size)

#显示当前视频已播放时间和总时间
#计算当前时间
    now_seconds=int(current_frame /fps%60)
    now_minutes=int(current_frame/fps/60)
    total_second=int(total /fps%60)
    total_minutes=int(total/fps/60)
#   { <参数序号> : <填充> <对齐)> <宽度> <,> <.精度> <类型>}.
    Time_now_vs_total="Time:{:>3}:{:>02}|{:>3}:{:0>2}".format(now_minutes,now_seconds,total_minutes,total_second)
    print(Time_now_vs_total)

#--------键盘控制视频---------------
    #读取键盘值
    key = cv2.waitKey(1) & 0xff

    #按键z增长延时,j减少延时。“zeng”、“jian”,实现在增长到值开始建
    if key == ord("z"):
        count_keyz += 1
        delay_time = 0 + 0.02 * count_keyz
        if(delay_time>1.0):
            delay_time = 1.0

    if key == ord("j"):
            count_keyj += 1
            delay_time = delay_time - 0.02 * count_keyj
            if(delay_time<0):
                delay_time = 0
            time.sleep(delay_time)

#    print(delay_time)
    time.sleep(delay_time)


    #设置空格按下时暂停
    if key == ord(" "):
        cv2.waitKey(1)
    #设置Q按下时退出
    if key == ord("q"):
        break


    #按下U,上升计数器加1,表示亮度增加,即UP
    if key == ord("u"):
        count_keyu +=1
     #   print(count_keyu)
        brightness  = start_brightness + count_keyu * 0.3
      #  print(brightness)
        if(brightness>2):
            brightness = 1.9
            count_keyu = 0
        #确保brightness的结果是保留一位小数,计算时经常出现0.00000000000000009或0.00000000000000001的误差
        brightness_str =format(brightness, '.1f')
        new_video_path = video_path[:25]+brightness_str+'.mp4'
        video_capture = cv2.VideoCapture(new_video_path)
        frameToStart = now_seconds * fps
        video_capture.set(cv2.CAP_PROP_POS_FRAMES, frameToStart);
        print(new_video_path)

    #按下D,下降计数器加1,表示亮度下调,即down
    if key == ord("d"):
         count_keyd += 1
         brightness = start_brightness + count_keyu * 0.3 - count_keyd * 0.3  #表示亮度的变量
         if(brightness<start_brightness):
             brightness = 0.1
             count_keyd = 0
         #确保brightness的结果是保留一位小数,计算时经常出现0.00000000000000009或0.00000000000000001的误差
         brightness_str = format(brightness, '.1f')
         new_video_path = video_path[:25]+brightness_str+'.mp4'
         video_capture=cv2.VideoCapture(new_video_path)
         frameToStart = now_seconds * fps
         video_capture.set(cv2.CAP_PROP_POS_FRAMES, frameToStart);
#         print(new_video_path)

    #  putText(img, text, org, fontFace, fontScale, color, thickness=None, lineType=None, bottomLeftOrigin=None):
    cv2.putText(frame,Time_now_vs_total,(300,50),cv2.FONT_HERSHEY_SIMPLEX,2,(0,0,255),3)
    cv2.imshow("frame",frame)
    #人工对视频帧数进行计数
    current_frame += 1


video_capture.release()
以上是关于基于OPenCV的视频播放变慢的主要内容,如果未能解决你的问题,请参考以下文章