极智AI | 多模态新姿势 详解 BLIP 算法实现
Posted 极智视界
tags:
篇首语:本文由小常识网(cha138.com)小编为大家整理,主要介绍了极智AI | 多模态新姿势 详解 BLIP 算法实现相关的知识,希望对你有一定的参考价值。
欢迎关注我的公众号 [极智视界],获取我的更多笔记分享
大家好,我是极智视界,本文详细介绍一下 BLIP 算法的设计与实现。
多模态一定不是一个新鲜的话语,随着 AI 的发展,也正成为一种趋势。 Vision-Language Pre-training (VLP) + Fine-tuning => Zero Shot / Few Shot 的模式是 快速 解决 多下游任务 的一个好的模式,VLP 是这个模式的开端,所以对于 VLP 的相关研究也很多。BLIP 是一个新的 VLP 架构,可以灵活、快速的应用到下游任务,如:图像-文本检索、图像翻译、以及 VQA 等。
本文不止会介绍 BLIP 的原理,还会介绍 BLIP 的实现,包括代码。下面开始。
参考 Paper:《BLIP: Bootstrapping Language-Image Pre-training for Unifified Vision-Language Understanding and Generation》。
文章目录
1 BLIP 算法原理
因为之前看过像 CLIP 这样的工作,所以在看完 BLIP 后,很自然的会进行一个对比。列一下一些对比:
(1) 模型方面

- CLIP 采用了 image-encoder (ViT / ResNet) & text-encoder (transformer),然后直接拿 图片特征 和 文本特征 做余弦相似度对比,得到结果;
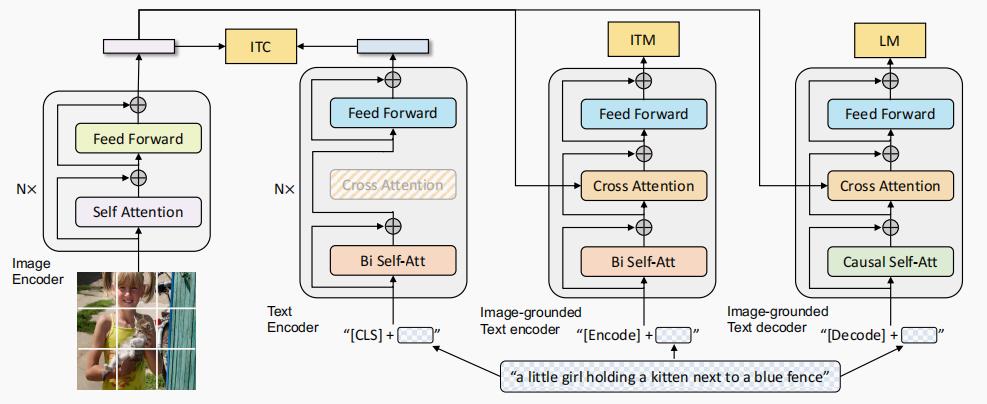
- BLIP 的模型结构看上图,BLIP 的做法要复杂挺多,会涉及四个结构:
- Image Encoder (ViT) :首先进行图像特征的提取,这个前向过程相对较重;
- Text Encoder (BERT) :这是一个标准的 BERT,这里用 ITC (Image-Text Contrastive Loss) 目标函数激活 Text Encoder 模块,目标是对齐 Image Encoder Transformer 和 Text Encoder Transformer 的特征空间;
- Image-grounded Text Encoder (变种 BERT):在标准 BERT 的结构里,于 Bi Self-Att 和 Feed Forward 之间插入 Cross Attention (CA) 模块,以引入视觉特征。这里用 ITM (Image-Text Matching Loss) 目标函数激活,ITM 是一个二分类任务,用来预测 image-text pair 的 正匹配 还是 负匹配,目的是学习 image-text 的多模态表示,调整视觉和语言之间的细粒度对齐;
- Image-grounded Text Decoder (变种 BERT): 将 Image-grounded Text Encoder 结构中的 Bi Self-Att 替换为 Causal Self-Att。这里用 Language Modeling Loss (LM) 目标函数激活,目标是生成给定图像的文本描述。
(2) 数据方面

- CLIP 的数据来源于 Web 上爬来的 图像-文本对,所以数据集很容易扩充的很大,而且采用 对比学习 的方式,基本属于自监督了,不太需要做数据标注;
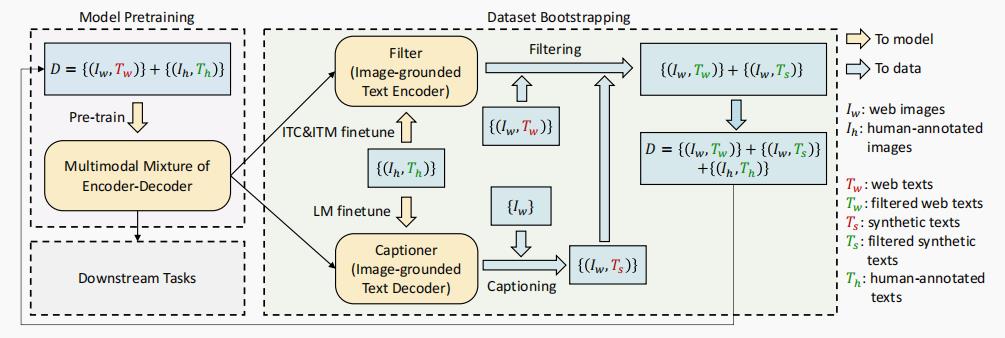
- BLIP 改进了 CLIP 直接从 Web 取数据 噪声大 的缺点,提出了 Captioning and Filtering (CapFilt) 模块,这个模块就是用来 减小噪声、丰富数据 的,主要包括两个模块:
- Captioner 字幕器:一个用于生成给定 web 图像字幕的字幕器,字幕器是一个基于图像的文本解码器,用 LM 目标函数激活,对给定图像的文本进行解码;
- Filter 过滤器:一个用于去除噪声 image-text pair 的过滤器,过滤器是一个基于图像的文本编码器,用 ITC 和 ITM 目标函数激活,通过判断 原始文本 / 生成文本 和 图像是否匹配,用以过滤噪声文本,提高文本语料库的质量;
- 来看个 CapFilt 的示例,其中 Tw 表示 Web Text,Ts 表示 合成文本;绿色 文本是被 filter 认可的,而 红色 文本是被 filter 拒绝的:

当把 BLIP 和 CLIP 从 模型角度 和 数据角度 方法进行对比分析后,其实 CLIP 大部分的原理也都讲完了,还有些如训练的方式 => 把图片随机裁剪到 224 x 224 进行预训练,然后提升到 384 x 384 进行 finetuning;prompt;parameter sharing;Nucleus Sampling / Beam Sampling 等技术就不多说了,这些大多是引用了其他工作的方法。
下面贴两个实验数据。
首先是 BLIP 与 COCO 和 Flickr30K 数据集上 SOTA 的 图像-文本 检索方法进行比较,如下:

然后是 BLIP Zero-shot 能力的展现:

从以上的实验数据可以看出,CLIP 的 能力 非常的优秀。
下面来看 CLIP 的实现。
2 BLIP 算法实现
首先下载工程:
git clone https://github.com/salesforce/BLIP.git
安装依赖:
pip install -i https://pypi.douban.com/simple \\
timm==0.4.12 \\
transformers==4.15.0 \\
fairscale==0.4.4 \\
pycocoevalcap

# 或者直接一键安装
pip install -i https://pypi.douban.com/simple -r requirements.txt
接着咱们下载 预训练权重:
# Download the weights in ./checkpoints beforehand for fast inference
wget https://storage.googleapis.com/sfr-vision-language-research/BLIP/models/model*_base_caption.pth

wget https://storage.googleapis.com/sfr-vision-language-research/BLIP/models/model*_vqa.pth

wget https://storage.googleapis.com/sfr-vision-language-research/BLIP/models/model_base_retrieval_coco.pth
咱们这里拿 Zero-shot video-text 检索来讲实现把,若你想进行 Zero-shot video-text 检索,可以这样:
# 1. Download MSRVTT dataset following the instructions from https://github.com/salesforce/ALPRO, and set 'video_root' accordingly in configs/retrieval_msrvtt.yaml.

# 2. Install decord with
pip install -i https://pypi.douban.com/simple decord

# 3. To perform zero-shot evaluation, run
python -m torch.distributed.run --nproc_per_node=8 eval_retrieval_video.py
接着我们看 eval_retrieval_video.py:
## eval_retrieval_video.py
# 导入很多依赖
import .....

# 后处理不管它
def evaluation(model, data_loader, tokenizer, device, config):
  ...

def main(args, config):
    ...
    #### Dataset ####
    print("Creating retrieval dataset")
    test_dataset = VideoDataset(config['video_root'],config['ann_root'],num_frm=config['num_frm_test'],
                                max_img_size=config['image_size'], frm_sampling_strategy='uniform')

    test_loader = DataLoader(
        test_dataset,
        batch_size=config['batch_size'],
        num_workers=4,
        pin_memory=True,
        drop_last=False,
        shuffle=False,
    )
    # 主要讲构建 Model
    #### Model ####
    print("Creating model")
    model = blip_retrieval(pretrained=config['pretrained'], image_size=config['image_size'], vit=config['vit'])

    model = model.to(device)
    ...
来看 BLIP_Retrieval:
## blip_retrieval.py
class BLIP_Retrieval(nn.Module):
    # init
    def __init__(self,
                 med_config = 'configs/med_config.json',
                 image_size = 384,
                 vit = 'base',
                 vit_grad_ckpt = False,
                 vit_ckpt_layer = 0,
                 embed_dim = 256,
                 queue_size = 57600,
                 momentum = 0.995,
                 negative_all_rank = False,
                 ):
       ...

    def forward(self, image, caption, alpha, idx):
        ...
        # Image 编码 ViT
        image_embeds = self.visual_encoder(image)
        ...
        # Text 编码 BERT
        text_output = self.text_encoder(text.input_ids, attention_mask = text.attention_mask, return_dict = True, mode = 'text')
        ...
        # Text 编码 变种BERT 融入视觉特征 CA
        output_pos = self.text_encoder(encoder_input_ids,
                                       attention_mask = text.attention_mask,
                                       encoder_hidden_states = image_embeds,
                                       encoder_attention_mask = image_atts,
                                       return_dict = True,
                                      )
        ...
以上可以看到用 Vit/B 来构建了 Image transformer 模块,而用 configs/med_config.json 来配置 BERT 及其变种,可以看下 med_config.json:
## configs/med_config.json

  "architectures": [
    "BertModel"
  ],
  "attention_probs_dropout_prob": 0.1,
  "hidden_act": "gelu",
  "hidden_dropout_prob": 0.1,
  "hidden_size": 768,
  "initializer_range": 0.02,
  "intermediate_size": 3072,
  "layer_norm_eps": 1e-12,
  "max_position_embeddings": 512,
  "model_type": "bert",
  "num_attention_heads": 12,
  "num_hidden_layers": 12,
  "pad_token_id": 0,
  "type_vocab_size": 2,
  "vocab_size": 30524,
  "encoder_width": 768,
  "add_cross_attention": true     # 控制是否加入 CA 结构
以上展示了 CLIP 模型的构建实现,如果你想玩,可以自己 clone 下工程去跑一跑。
好了,以上分享了 多模态新姿势 BLIP 的算法原理和实现。希望我的分享能对你的学习有一点帮助。
【公众号传送】

扫描下方二维码即可关注我的微信公众号【极智视界】,获取我的更多经验分享,让我们用极致+极客的心态来迎接AI !

以上是关于极智AI | 多模态新姿势 详解 BLIP 算法实现的主要内容,如果未能解决你的问题,请参考以下文章