我的NVIDIA开发者之旅 - 极智AI | TensorRT 中 Layer 和 Tensor 的区别
Posted 极智视界
tags:
篇首语:本文由小常识网(cha138.com)小编为大家整理,主要介绍了我的NVIDIA开发者之旅 - 极智AI | TensorRT 中 Layer 和 Tensor 的区别相关的知识,希望对你有一定的参考价值。
欢迎关注我的公众号 [极智视界],获取我的更多笔记分享
大家好,我是极智视界,本文介绍一下 TensorRT 中 Layer 和 Tensor 的区别。
TensorRT 模型构建由一层层的 Layer 计算节点 和 一层层的 Tensor 数据节点组织而成,那么什么是计算节点,什么是数据节点,以及计算节点和数据节点有什么区别呢,这里我们进行介绍。
文章目录
1 区分 Layer 和 Tensor
区分 Layer 和 Tensor,可以理解为区分 计算节点 和 数据节点 ,这和 ONNX 中的 node 和 tensor 的概念比较类似,用过 ONNX 的同学可能比较清楚一些。来看 TensorRT 中如何定义一个 Layer,以及如何从一个 Layer 获取它的输出 Tensor:
# output is a layer
oneLayer = network.add_identity(inputTensor)

# get tensor from the layer
oneTensor = oneLayer.get_output(0)

# take the tensor into next layer
nextLayer = network.add_identity(oneTensor)
可以看到 TensorRT 中,添加一个 Layer 或者说 构造一个 Layer,一般就用 network.add_xxx,而从 Layer 获取一个 Tensor 一般可以用 xxxLayer.get_output(i) 。两者的区别,用通俗一些的话,Layer 构建了一个骨架,而 Tensor 填满了它。
2 Layer 和 Tensor 的常用方法
这里介绍 TensorRT 中 Layer 和 Tensor 的一些常用方法,以便于在构建网络或者调试的时候有更多的方法可以去定位 / 解决问题。
Layer 的常用成员和方法:
- oneLayer.name = ‘one’: 获取或指定 Layer 的名字;
- oneLayer.type: 获取该层的种类;
- oneLayer.precision: 指定该层计算精度 (需配合 builder.strict_type_constraints);
- oneLayer.get_output(i): 获取该层第i个输出张量;
Tensor 的常用成员和方法:
- oneTensor.name = ‘one’: 获取指定 tensor 的名字;
- oneTensor.shape: 获取 tensor 的形状,可用于 print 检查或作为后续层的参数;
- oneTensor.dtype: 获取或设定 tensor 的数据类型 (可用于配合 identity 层实现数据类型转换);
3 示例演示
从 Network 中打印所有层和张量的信息
- 外层循环遍历所有 Layer;
- 内层循环遍历该 Layer 的所有 input / output;
来看示例:
import os
import numpy as np
import tensorrt as trt

logger = trt.Logger(trt.Logger.ERROR)
builder = trt.Builder(logger)
network = builder.create_network(1 << int(trt.NetworkDefinitionCreationFlag.EXPLICIT_BATCH))
profile = builder.create_optimization_profile()
config = builder.create_builder_config()
config.max_workspace_size = 3 << 30
print(config.flags)

inputTensor = network.add_input('inputT0', trt.DataType.FLOAT, [-1, 1, 28, 28])
profile.set_shape(inputTensor.name, (1, 1, 28, 28), (4, 1, 28, 28), (8, 1, 28, 28))
config.add_optimization_profile(profile)

w = np.random.rand(32,1,5,5).astype(np.float32).reshape(-1)
b = np.random.rand(32).astype(np.float32).reshape(-1)
_0 = network.add_convolution_nd(inputTensor, 32, [5, 5], w, b)
_0.padding_nd = [2, 2]
_1 = network.add_activation(_0.get_output(0), trt.ActivationType.RELU)
_2 = network.add_pooling_nd(_1.get_output(0), trt.PoolingType.MAX, [2, 2])
_2.stride_nd = [2, 2]

w = np.random.rand(64,32,5,5).astype(np.float32).reshape(-1)
b = np.random.rand(64).astype(np.float32).reshape(-1)
_3 = network.add_convolution_nd(_2.get_output(0), 64, [5, 5], w, b)
_3.padding_nd = [2, 2]
_4 = network.add_activation(_3.get_output(0), trt.ActivationType.RELU)
_5 = network.add_pooling_nd(_4.get_output(0), trt.PoolingType.MAX, [2, 5])
_5.stride_nd = [2, 2]

_6 = network.add_shuffle(_5.get_output(0))
_6.first_transpose = (0, 2, 3, 1)
_6.reshape_dims = (-1, 64 * 7 * 7, 1, 1)

w = np.random.rand(1024,64 * 7 * 7).astype(np.float32).reshape(-1)
b = np.random.rand(1024).astype(np.float32).reshape(-1)
_7 = network.add_fully_connected(_6.get_output(0), 1024, w, b)
_8 = network.add_activation(_7.get_output(0), trt.ActivationType.RELU)

w = np.random.rand(10,1024).astype(np.float32).reshape(-1)
b = np.random.rand(10).astype(np.float32).reshape(-1)
_9 = network.add_fully_connected(_8.get_output(0), 10, w, b)
_10 = network.add_activation(_9.get_output(0), trt.ActivationType.RELU)

_11 = network.add_shuffle(_10.get_output(0))
_11.reshape_dims = [-1, 10]

_12 = network.add_softmax(_11.get_output(0))
_12.axes = 1 << 1

_13 = network.add_topk(_12.get_output(0), trt.TopKOperation.MAX, 1, 1 << 1)

network.mark_output(_13.get_output(1))

# 打印逐层信息
for i in range(network.num_layers):
    layer = network.get_layer(i)
    print(i,"%s,in=%d,out=%d,%s"%(str(layer.type)[10:],layer.num_inputs,layer.num_outputs,layer.name))
    for j in range(layer.num_inputs):
        tensor  =layer.get_input(j)
        if tensor == None:
            print("\\tInput  %2d:"%j,"None")
        else:
            print("\\tInput  %2d:%s,%s,%s"%(j,tensor.shape,str(tensor.dtype)[9:],tensor.name))
    for j in range(layer.num_outputs):
        tensor  =layer.get_output(j)
        if tensor == None:
            print("\\tOutput %2d:"%j,"None")
        else:
            print("\\tOutput %2d:%s,%s,%s"%(j,tensor.shape,str(tensor.dtype)[9:],tensor.name))

engineString = builder.build_serialized_network(network, config)
if engineString == None:
    print("Failed building engine!")
else:
    print("Succeeded building engine!")
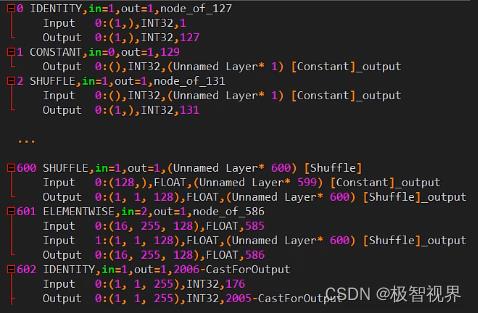
以上构建了一个网络,并使用循环遍历 network.layers,打印 layer type、layer num_inputs、layer num_outputs、layer name、layer input tensor、layer output tensor 等信息,层信息打印输出如下:

好了,以上分享了 TensorRT 中 Layer 和 Tensor 的区别。希望我的分享能对你的学习有一点帮助。
【公众号传送】

扫描下方二维码即可关注我的微信公众号【极智视界】,获取我的更多经验分享,让我们用极致+极客的心态来迎接AI !

以上是关于我的NVIDIA开发者之旅 - 极智AI | TensorRT 中 Layer 和 Tensor 的区别的主要内容,如果未能解决你的问题,请参考以下文章