图像风格迁移实战(代码可跑通)
Posted 双木的木
tags:
篇首语:本文由小常识网(cha138.com)小编为大家整理,主要介绍了图像风格迁移实战(代码可跑通)相关的知识,希望对你有一定的参考价值。
上一章《深度学习之pytorch实战计算机视觉》第7章 迁移学习(代码可跑通)介绍了迁移学习。本章将完成一个有趣的应用,基于卷积神经网络实现图像风格迁移(Style Transfer)。和之前基于卷积神经网络的图像分类有所不同,这次是神经网络与艺术的碰撞,再一次证明卷积神经网络对图像特征的提取是如此给力(自己操作体会更深,很有意思!)。神经网络和艺术的结合不仅是技术领域的创新,还在艺术领域引起了相关人员的高度关注。该项技术也被集成到了相关应用软件中,吸引了大量的用户参与和体验。下面先来了解下图像风格迁移技术的原理和实现方法。
8.1 风格迁移入门
其实图像风格迁移算法的实现逻辑并不复杂,首先选取一张图像作为基准图像(内容图像),然后选取另一幅或者多副作为我们希望获取相应风格的图像(风格图像),即在保证内容图像的内容完整性的前提下,将风格图像的风格融入内容图像中。
图像风格迁移实现的难点就是如何有效提取一张图像的风格。我们通过卷积神经网络的卷积层获取图像的重要特征,然后组合提取的特征。
其实,图像风格迁移成功与否对于不同的人而言评判标准也存在很大的差异,所以在数学上也并没有对怎样才算完成了图像风格迁移做出严格的定义。图像的风格包含了丰富的内容,比如图像的颜色、图像的纹理、图像的线条、图像本身想要表达的内在含义,等等。对于普通人他们觉得两种图像在某些特征上看起来很相似,就会认为它们属于同一个风格体系;但是对于专业人士而言,他们更关注图像深层次的境界是否相同。所以图像风格是否完成了迁移也和每个人的认知相关,我们在实例中更注重图像在视觉的展现上是否完成了风格迁移。
早在20世纪初就有很多学者开始研究图像风格迁移了,当时更多是通过获取风格图像的纹理颜色、边角之类的特征来完成风格迁移,更高级一些是结合数学中各种图像变换的统计方法来完成风格迁移,不过最后的效果都不理想。直到2015年以后,受到深度神经网络在计算机视觉领域的优异表现的启发,人们借助卷积神经网络中强大的图像特征提取功能,让图像风格迁移的问题得到了看似更好的解决。
8.2 PyTorch图像风格迁移实战
实现步骤:
- ①首先,我们要获取一张内容图片和一张风格图片;
- ②然后定义两个度量值:内容度量值(衡量图片之间内容差异程度)和风格度量值(衡量图片之间的风格差异程度);
- ③最后,建立神经网络模型,对内容图片中的内容和风格图片的风格进行提取,以内容图片为基准将其输入建立的模型中,并不断调整内容度量值和风格度量值,让它们趋近于最小,最后输出图片就是内容与风格融合的图片
先导入相关的包:
import torch
from torch.autograd import Variable
import torchvision
from torchvision import transforms, models
import copy
from PIL import Image
import matplotlib.pyplot as plt
接着读取两张图片(内容图片和风格图片),图片展示如下:


loadimg()函数的入参是你存放图片的路径,代码如下:
#--------------------------1.数据预处理,加载数据
transform = transforms.Compose([transforms.Resize([224,224]),
                               transforms.ToTensor()])

def loadimg(path = None):
    img = Image.open(path)
    img = transform(img)
    img = img.unsqueeze(0)
    return img

content_img = loadimg('images/1.jpg')  #入参是自己存放图片的位置
content_img = Variable(content_img).cuda()
style_img = loadimg('images/2.jpg')
style_img = Variable(style_img).cuda()
8.2.1 图像的内容损失
内容度量值可以使用均方误差作为损失函数,在代码中定义的图像内容损失如下:
class Content_loss(torch.nn.Module):
    def __init__(self,weight,target):
        super(Content_loss,self).__init__()
        self.weight = weight
        self.target = target.detach()*weight
        self.loss_fn = torch.nn.MSELoss()

    def forward(self,in_put):
        self.loss = self.loss_fn(in_put*self.weight,self.target)
        return in_put

    def backward(self):
        self.loss.backward(retain_graph = True)
        return self.loss
以上代码中的参数:
- target是通过卷积获取到的输入图像中的内容;
- weight是我们设置的一个权重参数,用来控制内容和风格对最后合成图像的影响程度;
- in_put代表输入图像;
- target.detach()用于对提取到的内容进行锁定,不需要进行梯度;
- forward函数用于计算输入图像和内容图像之间的损失值;
- backward函数根据计算得到的损失值进行后向传播,并返回损失值
8.2.2 图像的风格损失
风格度量同样使用均方误差作为损失函数,代码如下:
class Style_loss(torch.nn.Module):
    def __init__(self,weight,target):
        super(Style_loss,self).__init__()
        self.weight = weight
        self.target = target.detach()*weight
        self.loss_fn = torch.nn.MSELoss()
        self.gram = Gram_matrix()

    def forward(self,in_put):
        self.Gram = self.gram(in_put.clone())
        self.Gram.mul_(self.weight)
        self.loss = self.loss_fn(self.Gram,self.target)
        return in_put

    def backward(self):
        self.loss.backward(retain_graph = True)
return self.loss风格损失计算的代码基本和内容损失计算的代码相似,不同之处是在代码中引入了Gram_matrix类定义的实例参与了风格损失的计算。代码实现的是格拉姆矩阵(Gram matrix)的功能。我们通过卷积神经网络提取了风格图片的风格,这些风格其实是由数字组成的,数字的大小代表了图片中风格的突出程度,而Gram矩阵是矩阵的内积运算,在运算过后输入到该矩阵的特征图中大的数字会变得更大,这就相当于图片的风格被放大了,放大的风格再参与损失计算,便能够对最后的合成图片产生更大的影响。这个类的代码如下:
class Gram_matrix(torch.nn.Module):
    def forward(self,in_put):
        a,b,c,d = in_put.size()
        feature = in_put.view(a*b,c*d)
        gram = torch.mm(feature,feature.t())
        return gram.div(a*b*c*d)
8.2.3 模型搭建和参数优化
定义好内容损失和风格损失之后,我们还需要搭建一个自定义模型(这里使用VGG16模型),并将这两部分融入模型中。我们首先要做的是迁移一个卷积神经网络的特征提取部分(卷积相关部分),代码如下:
cnn = models.vgg16(pretrained = True).features  #迁移VGG16架构的特征提取部分
# if use_gpu:
#     cnn = cnn.cuda()
#指定整个卷积过程中分别在哪一层提取内容和风格
content_layer = ["Conv_3"]
style_layer = ["Conv_1","Conv_2","Conv_3","Conv_4"]
#定义保存内容损失和风格损失的列表
content_losses = []
style_losses = []
#指定内容损失和风格损失对最后得到的融合图片的影响权重
content_weight = 1
style_weight = 1000接下来是重头戏,搭建图像风格迁移模型!代码如下:
new_model = torch.nn.Sequential() #建立空的模型
model = copy.deepcopy(cnn)
#deepcopy深复制,将被复制对象完全再复制一遍作为独立的新个体单独存在,改变原有被复制对象不会对已经复制出来的新对象产生影响。
#copy浅复制,并不会产生一个独立的对象单独存在,他只是将原有的数据块打上一个新标签
#所以当其中一个标签被改变的时候,数据块就会发生变化,另一个标签也会随之改变。
gram = Gram_matrix()

use_gpu = torch.cuda.is_available()
if use_gpu:
    model = model.cuda()
    new_model = new_model.cuda()
    gram = gram.cuda()


index = 1
#只使用迁移模型特征提取部分的前8层
for layer in list(model)[:8]:
    if isinstance(layer,torch.nn.Conv2d):
        name = "Conv_" + str(index)
        #使用add_module方法向空的模型加入指定的层次模块
        new_model.add_module(name,layer)
        if name in content_layer:
            target = new_model(content_img).clone()
            content_loss = Content_loss(content_weight,target)
            new_model.add_module("content_loss_"+str(index),content_loss)
            content_losses.append(content_loss)

        if name in style_layer:
            target = new_model(style_img).clone()
            target = gram(target)
            style_loss = Style_loss(style_weight,target)
            new_model.add_module("style_loss_"+str(index),style_loss)
            style_losses.append(style_loss)

    if isinstance(layer,torch.nn.ReLU):
        name = "ReLU_"+str(index)
        new_model.add_module(name,layer)
        index = index + 1

    if isinstance(layer,torch.nn.MaxPool2d):
        name = "MaxPool_"+str(index)
new_model.add_module(name,layer)以上代码中,for layer in list(model)[:8]指明了我们仅仅用到迁移模型特征提取部分的前8层,因为我们的内容提取和风格提取在前8层就已经完成了。然后建立一个空的模型,使用 torch.nn.Module 类的add_module方法向空的模型中加入指定的层次模块,最后得到我们自定义的图像风格迁移模型。add_module方法传递的参数分别是层次的名字和模块,该模块是使用 isinstance 实例检测函数得到的,而名字是对应的层次。在定义好模型之后对其进行打印输出。
print(new_model)输出的结果如下:
Sequential(
  (Conv_1): Conv2d(3, 64, kernel_size=(3, 3), stride=(1, 1), padding=(1, 1))
  (style_loss_1): Style_loss(
    (loss_fn): MSELoss()
    (gram): Gram_matrix()
  )
  (ReLU_1): ReLU(inplace=True)
  (Conv_2): Conv2d(64, 64, kernel_size=(3, 3), stride=(1, 1), padding=(1, 1))
  (style_loss_2): Style_loss(
    (loss_fn): MSELoss()
    (gram): Gram_matrix()
  )
  (ReLU_2): ReLU(inplace=True)
  (MaxPool_3): MaxPool2d(kernel_size=2, stride=2, padding=0, dilation=1, ceil_mode=False)
  (Conv_3): Conv2d(64, 128, kernel_size=(3, 3), stride=(1, 1), padding=(1, 1))
  (content_loss_3): Content_loss(
    (loss_fn): MSELoss()
  )
  (style_loss_3): Style_loss(
    (loss_fn): MSELoss()
    (gram): Gram_matrix()
  )
  (ReLU_3): ReLU(inplace=True)
  (Conv_4): Conv2d(128, 128, kernel_size=(3, 3), stride=(1, 1), padding=(1, 1))
  (style_loss_4): Style_loss(
    (loss_fn): MSELoss()
    (gram): Gram_matrix()
  )
)接下来就是参数优化的代码:
input_img = content_img.clone()
parameter = torch.nn.Parameter(input_img.data)

# 在这个模型中需要优化的损失值有多个并且规模较大,使用该优化函数可以取得更好的效果。
optimizer = torch.optim.LBFGS([parameter])
8.2.4 训练新定义的卷积神经网络
在完成模型的搭建和优化函数的定义后,就可以开始进行模型的训练和参数的优化了,代码如下:
# 接下来进行模型训练和参数优化
epoch_n = 300
epoch = [0]
while epoch[0] <= epoch_n:

    def closure():
        optimizer.zero_grad()
        style_score = 0
        content_score = 0
        parameter.data.clamp_(0,1)
        new_model(parameter)
        for sl in style_losses:
            style_score += sl.backward()

        for cl in content_losses:
            content_score += cl.backward()

        epoch[0] += 1
        if epoch[0] % 50 == 0:
            print('Epoch: Style_loss: :4f Content_loss: :.4f'.format(epoch[0], style_score.data.item(),
                                                                           content_score.data.item()))
        return style_score + content_score

    optimizer.step(closure)
输出结果如下:
Epoch:50 Style_loss: 8.816691 Content_loss: 1.8809
Epoch:100 Style_loss: 3.377805 Content_loss: 1.7790
Epoch:150 Style_loss: 0.531610 Content_loss: 1.8476
Epoch:200 Style_loss: 0.143326 Content_loss: 1.7222
Epoch:250 Style_loss: 0.107568 Content_loss: 1.6353
Epoch:300 Style_loss: 0.099968 Content_loss: 1.6046
上述代码定义训练次数为300次,使用 sl.backward和cl.backward实现了前向传播和后向传播算法。每进行 50 次训练,便对损失值进行一次打印输出,最后的输出结果如下:
#对风格迁移图片输出
output = parameter.data
unloader = transforms.ToPILImage()

plt.ion()
plt.figure()
def imshow(tensor, title=None):
    image = tensor.clone().cpu()
    image = image.view(3, 224, 224)
    image = unloader(image)
    plt.imshow(image)
    if title is not None:
        plt.title(title)
    plt.pause(0.001) # pause方便图像更新
imshow(output, title='Output Image')

#设置sphinx_gallery_thumbnail_number = 4
plt.ioff()
plt.show()
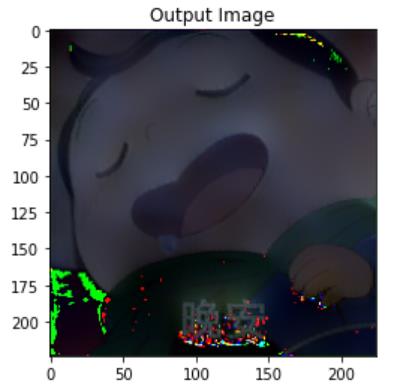
完成之后的图片如下:

效果还行(可以自行输入图片进行尝试),内容图片具有了风格图片的风格,不过有些地方的RGB通道处理不太行,还有优化空间。比较好的输出图片无论是在颜色的基调上还是在图像的轮廓上,都和风格图片极为相似,但是整个图像的内容仍然没有发生太大的变化。
实现图像风格迁移的完整代码如下(可运行):
#--------------------------导包
import torch
from torch.autograd import Variable
import torchvision
from torchvision import transforms, models
import copy
from PIL import Image
import matplotlib.pyplot as plt

#--------------------------1.数据预处理,加载数据
transform = transforms.Compose([transforms.Resize([224,224]),
                               transforms.ToTensor()])

def loadimg(path = None):
    img = Image.open(path)
    img = transform(img)
    img = img.unsqueeze(0)
    return img

content_img = loadimg('images/1.jpg')  #入参是自己存放图片的位置
content_img = Variable(content_img).cuda()
style_img = loadimg('images/2.jpg')
style_img = Variable(style_img).cuda()

#--------------------------2.定义内容损失和风格损失
class Content_loss(torch.nn.Module):
    def __init__(self,weight,target):
        super(Content_loss,self).__init__()
        self.weight = weight
        self.target = target.detach()*weight
        self.loss_fn = torch.nn.MSELoss()

    def forward(self,in_put):
        self.loss = self.loss_fn(in_put*self.weight,self.target)
        return in_put

    def backward(self):
        self.loss.backward(retain_graph = True)
        return self.loss

class Gram_matrix(torch.nn.Module):
    def forward(self,in_put):
        a,b,c,d = in_put.size()
        feature = in_put.view(a*b,c*d)
        gram = torch.mm(feature,feature.t())
        return gram.div(a*b*c*d)

class Style_loss(torch.nn.Module):
    def __init__(self,weight,target):
        super(Style_loss,self).__init__()
        self.weight = weight
        self.target = target.detach()*weight
        self.loss_fn = torch.nn.MSELoss()
        self.gram = Gram_matrix()

    def forward(self,in_put):
        self.Gram = self.gram(in_put.clone())
        self.Gram.mul_(self.weight)
        self.loss = self.loss_fn(self.Gram,self.target)
        return in_put

    def backward(self):
        self.loss.backward(retain_graph = True)
        return self.loss

#--------------------------3.模型搭建
cnn = models.vgg16(pretrained = True).features  #迁移VGG16架构的特征提取部分
#指定整个卷积过程中分别在哪一层提取内容和风格
content_layer = ["Conv_3"]
style_layer = ["Conv_1","Conv_2","Conv_3","Conv_4"]
#定义保存内容损失和风格损失的列表
content_losses = []
style_losses = []
#指定内容损失和风格损失对最后得到的融合图片的影响权重
content_weight = 1
style_weight = 1000

#搭建图像风格迁移模型的代码如下:
new_model = torch.nn.Sequential() #建立空的模型
model = copy.deepcopy(cnn)
#deepcopy深复制,将被复制对象完全再复制一遍作为独立的新个体单独存在,改变原有被复制对象不会对已经复制出来的新对象产生影响。
#copy浅复制,并不会产生一个独立的对象单独存在,他只是将原有的数据块打上一个新标签
#所以当其中一个标签被改变的时候,数据块就会发生变化,另一个标签也会随之改变。
gram = Gram_matrix()

use_gpu = torch.cuda.is_available()
if use_gpu:
    model = model.cuda()
    new_model = new_model.cuda()
    gram = gram.cuda()

index = 1
#只使用迁移模型特征提取部分的前8层
for layer in list(model)[:8]:
    if isinstance(layer,torch.nn.Conv2d):
        name = "Conv_" + str(index)
        #使用add_module方法向空的模型加入指定的层次模块
        new_model.add_module(name,layer)
        if name in content_layer:
            target = new_model(content_img).clone()
            content_loss = Content_loss(content_weight,target)
            new_model.add_module("content_loss_"+str(index),content_loss)
            content_losses.append(content_loss)

        if name in style_layer:
            target = new_model(style_img).clone()
            target = gram(target)
            style_loss = Style_loss(style_weight,target)
            new_model.add_module("style_loss_"+str(index),style_loss)
            style_losses.append(style_loss)

    if isinstance(layer,torch.nn.ReLU):
        name = "ReLU_"+str(index)
        new_model.add_module(name,layer)
        index = index + 1

    if isinstance(layer,torch.nn.MaxPool2d):
        name = "MaxPool_"+str(index)
        new_model.add_module(name,layer)
#构造优化器
input_img = content_img.clone()
parameter = torch.nn.Parameter(input_img.data)
optimizer = torch.optim.LBFGS([parameter])

#--------------------------4.模型训练和参数优化
epoch_n = 300
epoch = [0]
while epoch[0] <= epoch_n:

    def closure():
        optimizer.zero_grad()
        style_score = 0
        content_score = 0
        parameter.data.clamp_(0,1)
        new_model(parameter)
        for sl in style_losses:
            style_score += sl.backward()

        for cl in content_losses:
            content_score += cl.backward()

        epoch[0] += 1
        if epoch[0] % 50 == 0:
            print('Epoch: Style_loss: :4f Content_loss: :.4f'.format(epoch[0], style_score.data.item(),
                                                                           content_score.data.item()))
        return style_score + content_score

    optimizer.step(closure)

#--------------------------5.对风格迁移图片输出
output = parameter.data
unloader = transforms.ToPILImage()  # 重新转化成PIL图像格式

plt.ion()
plt.figure()
def imshow(tensor, title=None):
    image = tensor.clone().cpu()  # 克隆tensor,改变时不影响被克隆的tensor
    image = image.view(3, 224, 224)  # 转换维度
    image = unloader(image)
    plt.imshow(image)
    if title is not None:
        plt.title(title)
    plt.pause(0.001) # 稍作停顿,以便更新图表
imshow(output, title='Output Image')

# 设置sphinx_gallery_thumbnail_number = 4
plt.ioff()
plt.show()
8.3 小结
本章展示了基础的图像风格迁移算法,这个图像风格迁移过程的实现存在一个比较明显的缺点,就是每次训练只能对其中的一种风格进行迁移,如果需要进行其他风格的迁移,要重新对模型进行训练,而且需要通过对内容和风格设置不同的权重来控制风格调节的方式,这种方式在实际应用中不太理想,我们需要更高效、智能的实现方式。若有兴趣,则可以深度了解这方面的内容。
说明:记录学习笔记,如果错误欢迎指正!写文章不易,转载请联系我。
以上是关于图像风格迁移实战(代码可跑通)的主要内容,如果未能解决你的问题,请参考以下文章