mariadb数据库的主从复制
Posted jks212454
tags:
篇首语:本文由小常识网(cha138.com)小编为大家整理,主要介绍了mariadb数据库的主从复制相关的知识,希望对你有一定的参考价值。
mariadb数据库的主从复制
- 一、互联网三层架构
- 二、mariadb的主从复制原理
- 三、半同步复制
- 四、环境介绍
- 五、各节点安装mariadb
- 六、主从库初始配置
- 七、master节点配置
- 八、slave节点配置
- 九、验证salve状态
- 十、同步主库数据
- 十一、查看主从数据同步
一、互联网三层架构
三层架构:
1.视图层
2.控制层
3.数据层
所有节点全部做高可用,双机主备
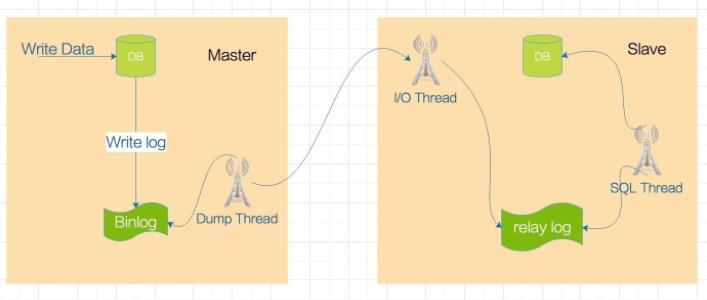
二、mariadb的主从复制原理
1.mariadb的主从复制基本原理
数据同时写入的处理方法——
第一种:锁机制

1.分布式锁:当多数据库时,3个节点起步,对于在多台数据库同时请求修改同一个数据,这个数据上锁,这把锁在多台数据库服务器之间传递,
有专门节点管理锁,在第一个到达数据库修改数据的请求时,这个请求获得锁,修改数据,其他请求到达申请获得锁,发现被占用,无法修改。
2.只有当第一个请求修改完时,后续请求才能获得这把锁。
3.锁得到机制先来后到。
4.只解决了读的问题,写的速度慢了。


第二种:
主从
2.mariadb的主从复制原理图
三、半同步复制
解决主据不一致原因,主库数据挂掉,从库数据不一致的问题。
解决方法:半同步复制
半同步复制场景中,master会监视所有的slave,确保其中至少一台数据完全同步成功,master才会返回客户端信息,此数据写成功。
四、环境介绍
1.节点规划
mster-k8s mysqlr: 192.16.3.50 主节点
node01-k8s: 192.168.3.51 从节点
node02-k8s: 192.168.3.52从节点
2.节点及mariadb版本
[root@node02-k8s ~]# cat /etc/redhat-release
CentOS Linux release 7.6.1810 (Core)
[root@node02-k8s ~]# mariadb -v
Welcome to the MariaDB monitor.  Commands end with ; or \\g.
Your MariaDB connection id is 3
Server version: 10.6.7-MariaDB MariaDB Server
五、各节点安装mariadb
安装mariadb教程链接——
Mariadb数据库基本操作之用户管理
六、主从库初始配置
1.主从库初始化
[root@node01-k8s yum.repos.d]# mariadb-secure-installation

NOTE: RUNNING ALL PARTS OF THIS SCRIPT IS RECOMMENDED FOR ALL MariaDB
      SERVERS IN PRODUCTION USE!  PLEASE READ EACH STEP CAREFULLY!

In order to log into MariaDB to secure it, we'll need the current
password for the root user. If you've just installed MariaDB, and
haven't set the root password yet, you should just press enter here.

Enter current password for root (enter for none):
OK, successfully used password, moving on...

Setting the root password or using the unix_socket ensures that nobody
can log into the MariaDB root user without the proper authorisation.

You already have your root account protected, so you can safely answer 'n'.

Switch to unix_socket authentication [Y/n] n
 ... skipping.

You already have your root account protected, so you can safely answer 'n'.

Change the root password? [Y/n] n
 ... skipping.

By default, a MariaDB installation has an anonymous user, allowing anyone
to log into MariaDB without having to have a user account created for
them.  This is intended only for testing, and to make the installation
go a bit smoother.  You should remove them before moving into a
production environment.

Remove anonymous users? [Y/n] y
 ... Success!

Normally, root should only be allowed to connect from 'localhost'.  This
ensures that someone cannot guess at the root password from the network.

Disallow root login remotely? [Y/n] y
 ... Success!

By default, MariaDB comes with a database named 'test' that anyone can
access.  This is also intended only for testing, and should be removed
before moving into a production environment.

Remove test database and access to it? [Y/n] y
 - Dropping test database...
 ... Success!
 - Removing privileges on test database...
 ... Success!

Reloading the privilege tables will ensure that all changes made so far
will take effect immediately.

Reload privilege tables now? [Y/n] y
 ... Success!

Cleaning up...

All done!  If you've completed all of the above steps, your MariaDB
installation should now be secure.

Thanks for using MariaDB!
2.修改主库配置
[root@mster-k8s mysql]# grep -Ev "^$|^#" /etc/my.cnf.d/server.cnf
[server]
[mysqld]
character-set-server=utf8
collation-server=utf8_general_ci
server_id = 13    #  一组主从组里的每个id必须是唯一值。推荐用ip位数
log-bin= mysql-bin # 二进制日志,后面指定存放位置。如果只是指定名字,默认存放在/var/lib/mysql下
lower_case_table_names=1 # 不区分大小写
binlog-format=ROW    # 二进制日志文件格式
log-slave-updates=True    # slave更新是否记入日志
sync-master-info=1    # 值为1确保信息不会丢失
slave-parallel-threads=3 #同时启动多少个复制线程,最多与要复制的数据库数量相等即可
binlog-checksum=CRC32    # 效验码
master-verify-checksum=1    # 启动主服务器效验
slave-sql-verify-checksum=1   # 启动从服务器效验
[galera]
[embedded]
[mariadb]
[mariadb-10.6]
[root@mster-k8s mysql]#
3.修改从库配置
[mysqld]
character-set-server=utf8
collation-server=utf8_general_ci
server_id=14
#log-bin= mysql-bin #log-bin是二进制文件
relay_log = relay-bin    # 中继日志, 后面指定存放位置。如果只是指定名字,默认存放在/var/lib/mysql下
lower_case_table_names=1
4.重启主库和从库服务
systemctl restart mariadb
七、master节点配置
MariaDB [huawei]> grant replication slave, replication client on *.* to 'repl'@'%' identified by 'replpass';
Query OK, 0 rows affected (0.001 sec)

MariaDB [huawei]> show master status;
+------------------+----------+--------------+------------------+
| File             | Position | Binlog_Do_DB | Binlog_Ignore_DB |
+------------------+----------+--------------+------------------+
| mysql-bin.000003 |     4992 |              |                  |
+------------------+----------+--------------+------------------+
1 row in set (0.000 sec)

MariaDB [huawei]> select binlog_gtid_pos('mysql-bin.000003', 4992);
+-------------------------------------------+
| binlog_gtid_pos('mysql-bin.000003', 4992) |
+-------------------------------------------+
| 0-13-85                                   |
+-------------------------------------------+
1 row in set (0.000 sec)

MariaDB [huawei]>  flush privileges;
八、slave节点配置
MariaDB [(none)]> set global gtid_slave_pos='0-13-85';
Query OK, 0 rows affected (0.004 sec)

MariaDB [(none)]>  change master to master_host='192.168.3.50',master_user='repl',master_password='replpass',master_use_gtid=slave_pos;
Query OK, 0 rows affected (0.008 sec)

MariaDB [(none)]> start slave;
Query OK, 0 rows affected (0.005 sec)

MariaDB [(none)]>
九、验证salve状态
MariaDB [(none)]> show slave status\\G
*************************** 1. row ***************************
                Slave_IO_State: Queueing master event to the relay log
                   Master_Host: 192.168.3.50
                   Master_User: repl
                   Master_Port: 3306
                 Connect_Retry: 60
               Master_Log_File: mysql-bin.000003
           Read_Master_Log_Pos: 5119
                Relay_Log_File: relay-bin.000835
                 Relay_Log_Pos: 303
         Relay_Master_Log_File: mysql-bin.000003
              Slave_IO_Running: Connecting
             Slave_SQL_Running: Yes
               Replicate_Do_DB:
           Replicate_Ignore_DB:
            Replicate_Do_Table:
        Replicate_Ignore_Table:
       Replicate_Wild_Do_Table:
   Replicate_Wild_Ignore_Table:
                    Last_Errno: 0
                    Last_Error:
                  Skip_Counter: 0
           Exec_Master_Log_Pos: 4
               Relay_Log_Space: 2146
十、同步主库数据
1.导出主库数据
mysqldump --all-databases > all_databases_backup.sql
2.拷贝文件到从库
①停用从库
MariaDB [(none)]> stop slave;
Query OK, 0 rows affected (0.993 sec)
②导入数据
MariaDB [mysql]> source ./all_databases_backup.sql;
③开启从库
MariaDB [mysql]> start slave;
Query OK, 0 rows affected (0.301 sec)

MariaDB [mysql]>
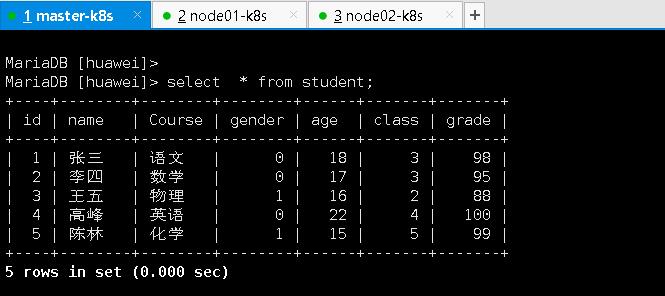
3.查看从库导入的数据
MariaDB [mysql]> select * from huawei.student;
+----+--------+--------+--------+------+-------+-------+
| id | name   | Course | gender | age  | class | grade |
+----+--------+--------+--------+------+-------+-------+
|  1 | 张三   | 语文   |      0 |   18 |     3 |    98 |
|  2 | 李四   | 数学   |      0 |   17 |     3 |    95 |
|  3 | 王五   | 物理   |      1 |   16 |     2 |    88 |
|  4 | 高峰   | 英语   |      0 |   22 |     4 |   100 |
|  5 | 陈林   | 化学   |      1 |   15 |     5 |    99 |
+----+--------+--------+--------+------+-------+-------+
5 rows in set (0.000 sec)

MariaDB [mysql]>
十一、查看主从数据同步
1.主库数据表内容
2.主库修改数据
MariaDB [(none)]> use huawei;
Reading table information for completion of table and column names
You can turn off this feature to get a quicker startup with -A

Database changed
MariaDB [huawei]> insert into student ( name, gender, age, class, Course, grade ) values ( "陈宫", "0", "25", "6", "数学", "100"), ( "万岁", "1", "16", "6", "地理", "49" );
Query OK, 2 rows affected (0.022 sec)
Records: 2  Duplicates: 0  Warnings: 0

MariaDB [huawei]>
3.查看从库数据
MariaDB [mysql]> select * from huawei.student;
+----+--------+--------+--------+------+-------+-------+
| id | name   | Course | gender | age  | class | grade |
+----+--------+--------+--------+------+-------+-------+
|  1 | 张三   | 语文   |      0 |   18 |     3 |    98 |
|  2 | 李四   | 数学   |      0 |   17 |     3 |    95 |
|  3 | 王五   | 物理   |      1 |   16 |     2 |    88 |
|  4 | 高峰   | 英语   |      0 |   22 |     4 |   100 |
|  5 | 陈林   | 化学   |      1 |   15 |     5 |    99 |
+----+--------+--------+--------+------+-------+-------+
5 rows in set (0.000 sec)

MariaDB [mysql]> select * from huawei.student;
+----+--------+--------+--------+------+-------+-------+
| id | name   | Course | gender | age  | class | grade |
+----+--------+--------+--------+------+-------+-------+
|  1 | 张三   | 语文   |      0 |   18 |     3 |    98 |
|  2 | 李四   | 数学   |      0 |   17 |     3 |    95 |
|  3 | 王五   | 物理   |      1 |   16 |     2 |    88 |
|  4 | 高峰   | 英语   |      0 |   22 |     4 |   100 |
|  5 | 陈林   | 化学   |      1 |   15 |     5 |    99 |
|  6 | 陈宫   | 数学   |      0 |   25 |     6 |   100 |
|  7 | 万岁   | 地理   |      1 |   16 |     6 |    49 |
+----+--------+--------+--------+------+-------+-------+
7 rows in set (0.000 sec)

MariaDB [mysql]>
以上是关于mariadb数据库的主从复制的主要内容,如果未能解决你的问题,请参考以下文章