Unity脚本生成图片
Posted 御雪妃舞
tags:
篇首语:本文由小常识网(cha138.com)小编为大家整理,主要介绍了Unity脚本生成图片相关的知识,希望对你有一定的参考价值。
学习shader,刚开始,记下一些自己的解读,如果有其它意见或者建议的欢迎交流。
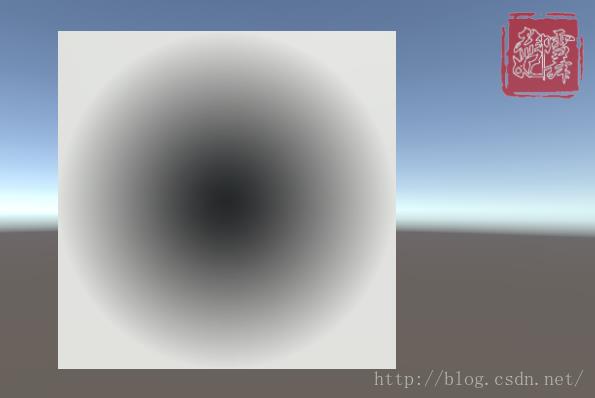
首先先上脚本生成图片的效果图:
当然还可以根据参数有所改变。
下面开始逐步分析:
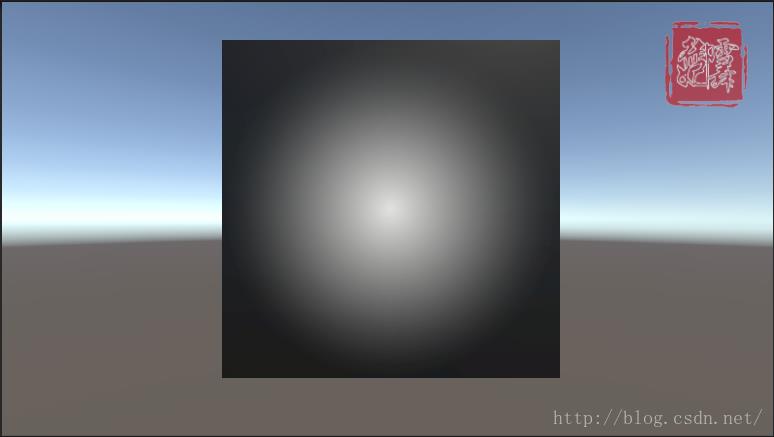
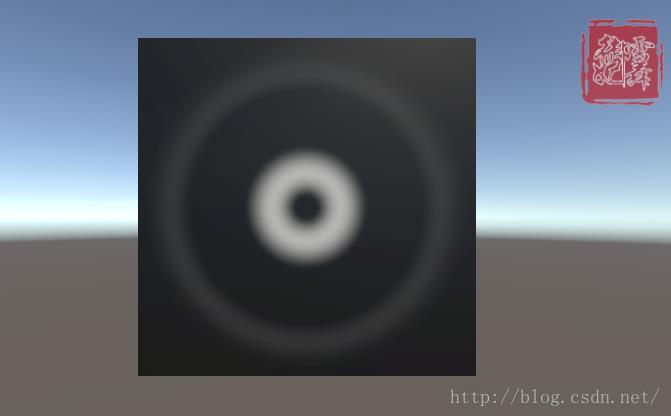
1.线性变化,颜色控制在黑白(y=|1-x|,1>=x>=0)
首先,贴下代码: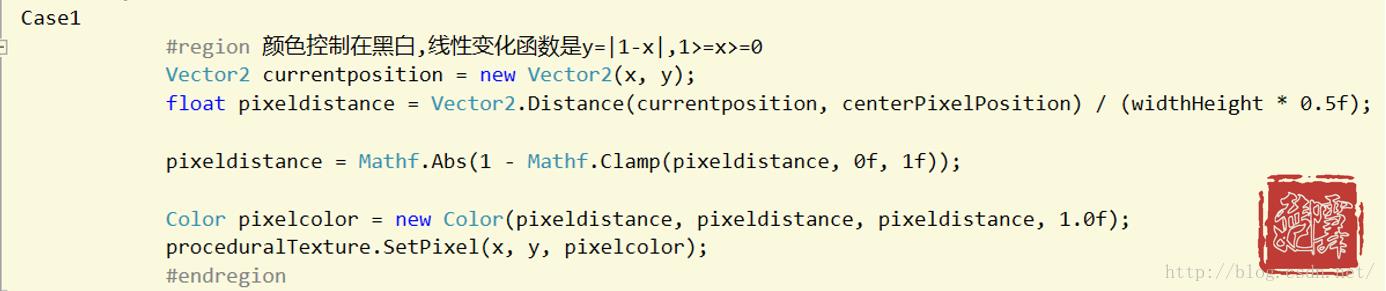
直接看代码可能不大好理解,下面我们具体化一下:
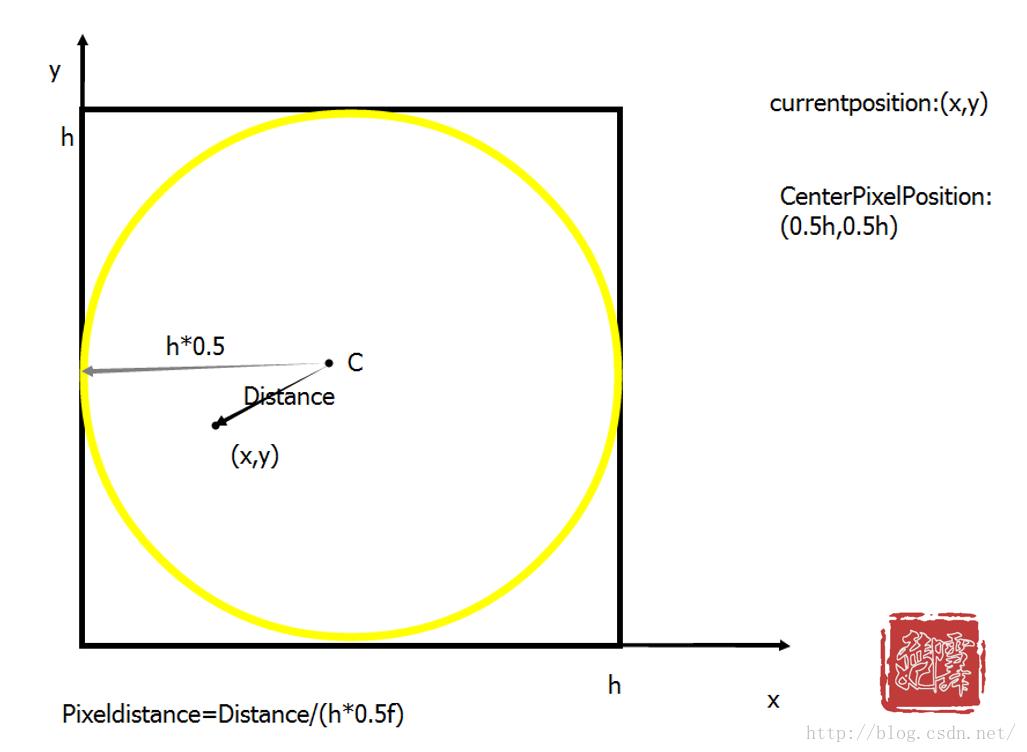
如上图所示,这个原理就是以图片的中心为原点,图片的高为h,0.5h作为半径的圆的分部,从圆心到圆周的颜色减暗。
我们代码一句一句分析, Vector2 currentposition = new Vector2(x, y): 这一句就是遍历的图片大小像素点钟的任意一点。 float pixeldistance = Vector2.Distance(currentposition, centerPixelPosition) / (widthHeight * 0.5f): 这一句就是图中表示的Distance/(h*0.5),就是点到圆心的距离除以半径,圆内的点值是0-1,圆外的大于1,假设这个值为x pixeldistance = Mathf.Abs(1 - Mathf.Clamp(pixeldistance, 0f, 1f)): 这一句,首先clamp是把x的值控制在0-1内,(1-x)是取相反,为啥呢,这里因为颜色表里,0代表黑色,1代表白色,圆心距离圆心距离为0,但是直接给0就是黑色,1-0的话就是白色,这样圆心就是白色,书中代码是由abs绝对值的,我认为没必要,x在0-1,1-x肯定大于等于0的。 下图实例,不是1-x的效果,就是直接用x的效果:就是黑变白了
 Color pixelcolor = new Color(pixeldistance, pixeldistance, pixeldistance, 1.0f):
这是设置颜色,颜色rgb值一样是都是黑白色,这个具体可以看下图,沿着箭头那条边的rgb的三个值都是一样的,然后看出显然是黑白色:
Color pixelcolor = new Color(pixeldistance, pixeldistance, pixeldistance, 1.0f):
这是设置颜色,颜色rgb值一样是都是黑白色,这个具体可以看下图,沿着箭头那条边的rgb的三个值都是一样的,然后看出显然是黑白色:
 proceduralTexture.SetPixel(x, y, pixelcolor):
设置像素点的颜色。
proceduralTexture.SetPixel(x, y, pixelcolor):
设置像素点的颜色。
最终运行效果如图:
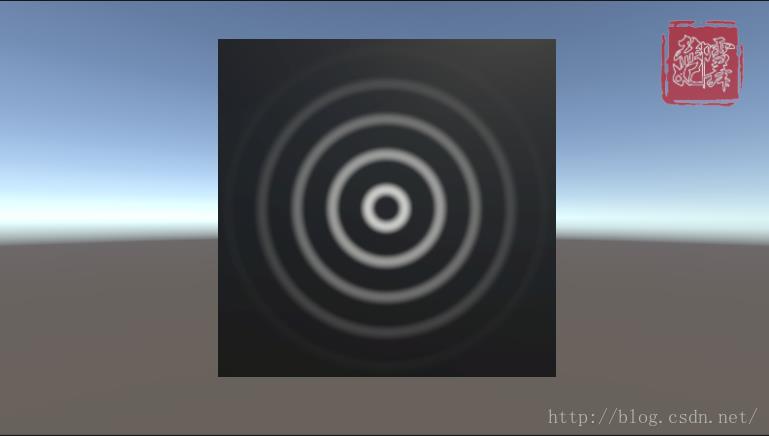
2.随sin周期变化,颜色控制在黑白(y=sin(nx)*x)
首先,贴下代码:

这个跟1的代码几乎一样,只有一行不同 pixelDistance = (Mathf.Sin(pixelDistance * 30.0f) * pixelDistance): 这个函数出来的效果就是水波纹,函数图如图:
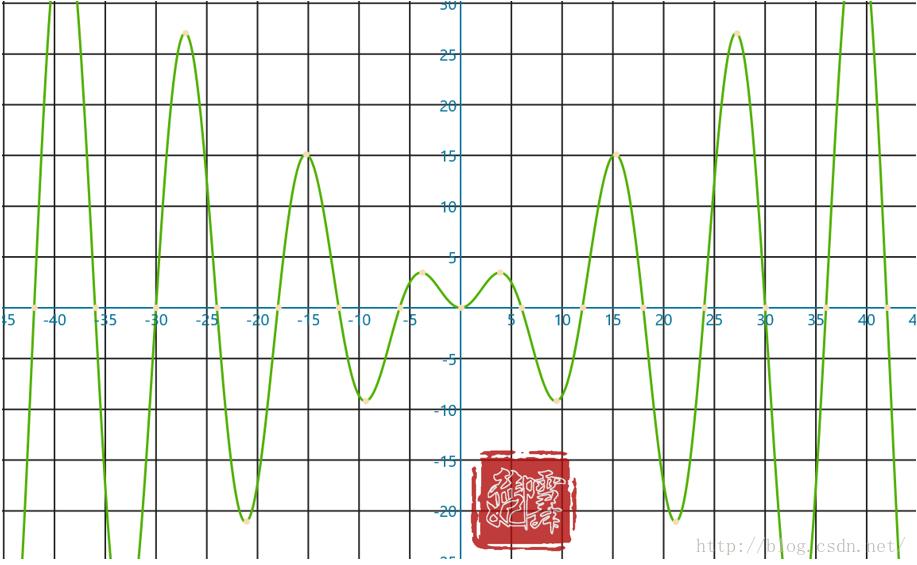 于是颜色就随圆黑白变化,n越大,白色圈越多
一下是几个视图:
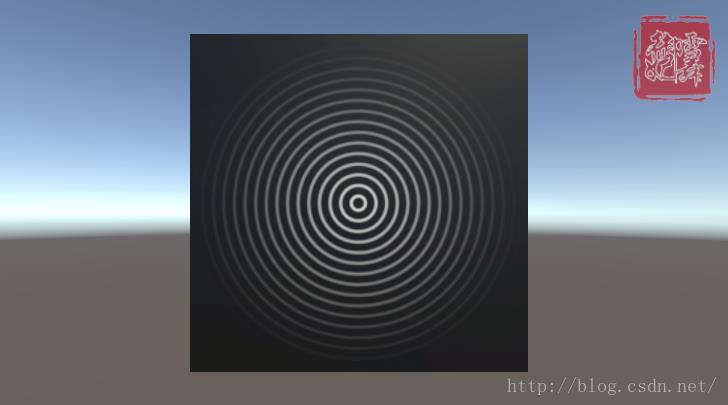
n=10:
于是颜色就随圆黑白变化,n越大,白色圈越多
一下是几个视图:
n=10:
n=30:
n=100:
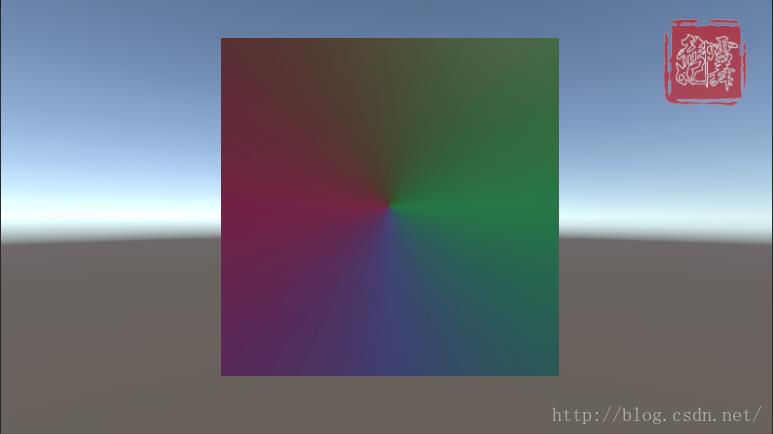
3.颜色根据方向向量偏移角度控制
首先,贴上代码: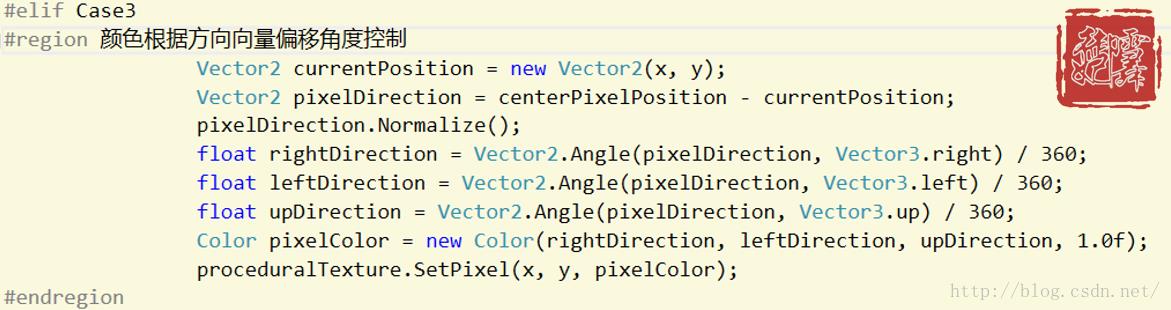
代码示意图如下:
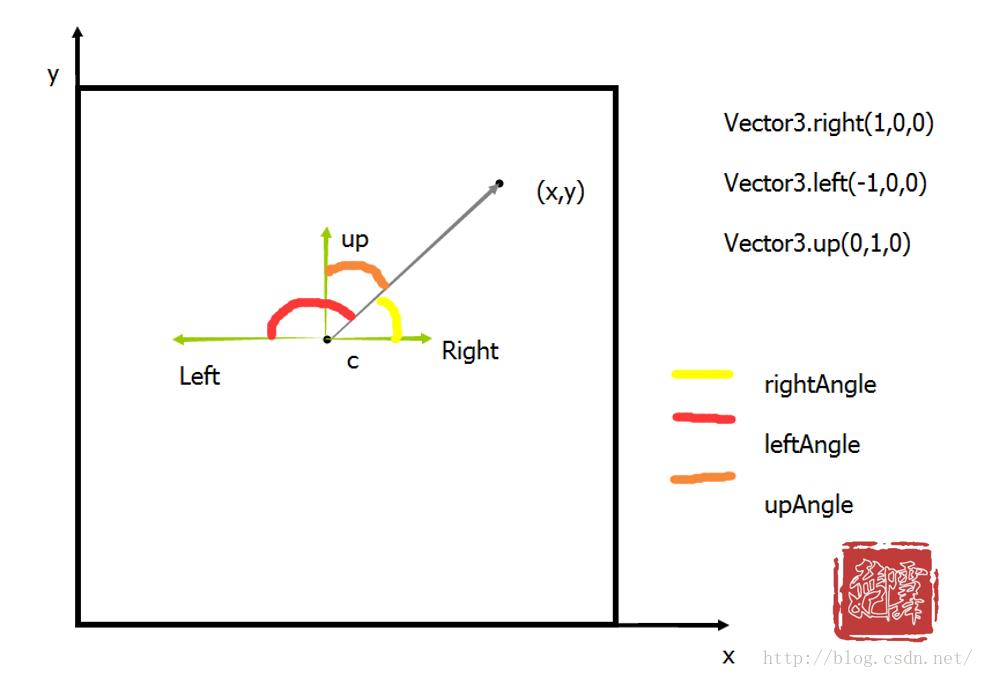 rgb三个值,对应三个方向的夹角值,这样的话是发散的,中心点出来的同一条线颜色是一样的。
效果图如下:
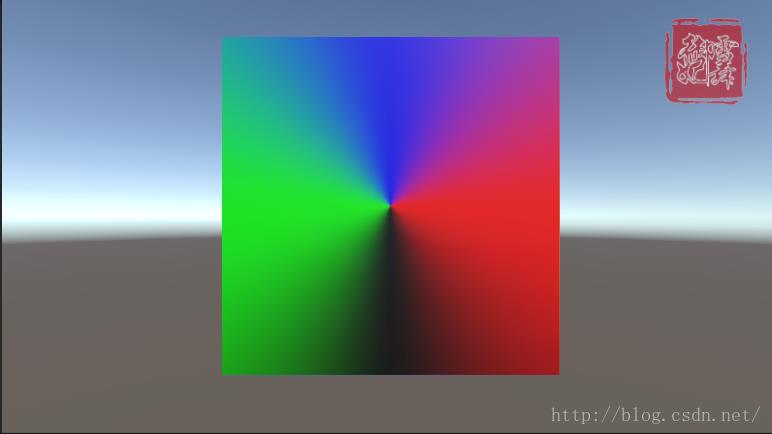
4.颜色根据方向向量和方向轴的数量积
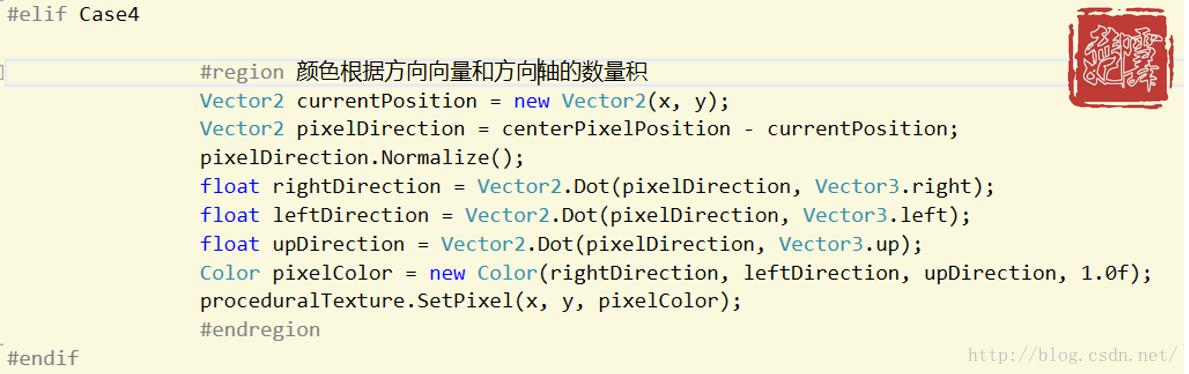 这个跟3很类似,就是把angle换成了dot,就是上面3的夹角的cos值,颜色会比上面的鲜亮点:
最后:粘上总得脚本,大家可以试试,有个条件编译,改下就好:
#define Case1 //条件编译

using UnityEngine;
using System.Collections;

public class _ProceduralTexture : MonoBehaviour


    public int widthHeight = 512;

    /// <summary>
    /// 生成的图片
    /// </summary>
    public Texture2D generatedTexture;

    /// <summary>
    /// 当前的材质
    /// </summary>
    private Material currentMaterial;

    /// <summary>
    /// 中心坐标
    /// </summary>
    private Vector2 centerPosition;


    // Use this for initialization
    void Start()

        if (!currentMaterial)

            //共享当前物体的材质
            currentMaterial = transform.GetComponent<Renderer>().sharedMaterial;
            if (!currentMaterial)

                Debug.LogWarning("Cannot find a material on:" + transform.name);


        if (currentMaterial)

            centerPosition = new Vector2(0.5f, 0.5f);
            generatedTexture = GenerateParabola();

            //设置当前材质的贴图为我们生成的贴图
            currentMaterial.SetTexture("_MainTex", generatedTexture);


    /// <summary>
    /// 生成贴图
    /// </summary>
    /// <returns></returns>
    private Texture2D GenerateParabola()

        //新建一张贴图
        Texture2D proceduralTexture = new Texture2D(widthHeight, widthHeight);

        //中心像素坐标
        Vector2 centerPixelPosition = centerPosition * widthHeight;

        //遍历像素点设置
        for (int x = 0; x < widthHeight; x++)

            for (int y = 0; y < widthHeight; y++)

#if Case1
                #region 颜色控制在黑白,线性变化函数是y=|1-x|,1>=x>=0
                Vector2 currentposition = new Vector2(x, y);
                float pixeldistance = Vector2.Distance(currentposition, centerPixelPosition) / (widthHeight * 0.5f);

                pixeldistance = Mathf.Abs(1 - Mathf.Clamp(pixeldistance, 0f, 1f));

                Color pixelcolor = new Color(pixeldistance, pixeldistance, pixeldistance, 1.0f);
                proceduralTexture.SetPixel(x, y, pixelcolor);
                #endregion

#elif Case2
#region 颜色控制在黑白随sin周期变化,变化是(2*π)/n,下面的n是30
                Vector2 currentPosition = new Vector2(x, y);
                float pixelDistance = Vector2.Distance(currentPosition, centerPixelPosition) / (widthHeight * 0.5f);
                pixelDistance = Mathf.Abs(1 - Mathf.Clamp(pixelDistance, 0f, 1f));
                pixelDistance = (Mathf.Sin(pixelDistance*30) * pixelDistance);
                Color pixelColor = new Color(pixelDistance, pixelDistance, pixelDistance, 1.0f);
                proceduralTexture.SetPixel(x, y, pixelColor);
#endregion
#elif Case3
#region 颜色根据方向向量偏移角度控制
                Vector2 currentPosition = new Vector2(x, y);
                Vector2 pixelDirection = centerPixelPosition - currentPosition;
                pixelDirection.Normalize();
                float rightDirection = Vector2.Angle(pixelDirection, Vector3.right) / 360;
                float leftDirection = Vector2.Angle(pixelDirection, Vector3.left) / 360;
                float upDirection = Vector2.Angle(pixelDirection, Vector3.up) / 360;
                Color pixelColor = new Color(rightDirection, leftDirection, upDirection, 1.0f);
                proceduralTexture.SetPixel(x, y, pixelColor);
#endregion
#elif Case4

                #region 颜色根据方向向量和方向轴的数量积
                Vector2 currentPosition = new Vector2(x, y);
                Vector2 pixelDirection = centerPixelPosition - currentPosition;
                pixelDirection.Normalize();
                float rightDirection = Vector2.Dot(pixelDirection, Vector3.right);
                float leftDirection = Vector2.Dot(pixelDirection, Vector3.left);
                float upDirection = Vector2.Dot(pixelDirection, Vector3.up);
                Color pixelColor = new Color(rightDirection, leftDirection, upDirection, 1.0f);
                proceduralTexture.SetPixel(x, y, pixelColor);
                #endregion
#endif


        proceduralTexture.Apply();

        return proceduralTexture;
以上是关于Unity脚本生成图片的主要内容,如果未能解决你的问题,请参考以下文章