物联网数据库 IoTDB —— 从协议到数据
Posted 麒思妙想
tags:
篇首语:本文由小常识网(cha138.com)小编为大家整理,主要介绍了物联网数据库 IoTDB —— 从协议到数据相关的知识,希望对你有一定的参考价值。

首先,先允许我,祝各位读者小可爱们,节日快乐。
在这个系列之前的文章里,我们介绍了Iotdb的LSM,以及Iot中的最佳实践,这次我们看看如何将mqtt和Iotdb整合起来。下面我们开始:
iotdb in docker
首先,做一个测试环境,我现在越发喜欢docker 和 WSL 了,除了吃点硬盘,内存和CPU资源以外,没有什么缺点了......
run in docker
直接把该开的端口都打开,只是测试环境,我就没再挂目录。
docker run -d -p 6667:6667 -p 31999:31999 -p 8181:8181 -p 5555:5555 -p 1883:1883 apache/iotdb
等待一会,执行 docker ps 查看是否成功了
➜  ~ docker ps
CONTAINER ID   IMAGE          COMMAND                  CREATED        STATUS        PORTS                                                                                                                                                                                                                       NAMES
ad9b18f8bff3   apache/iotdb   "/iotdb/sbin/start-s…"   2 hours ago    Up 2 hours    0.0.0.0:1883->1883/tcp, :::1883->1883/tcp, 0.0.0.0:5555->5555/tcp, :::5555->5555/tcp, 0.0.0.0:6667->6667/tcp, :::6667->6667/tcp, 0.0.0.0:8181->8181/tcp, :::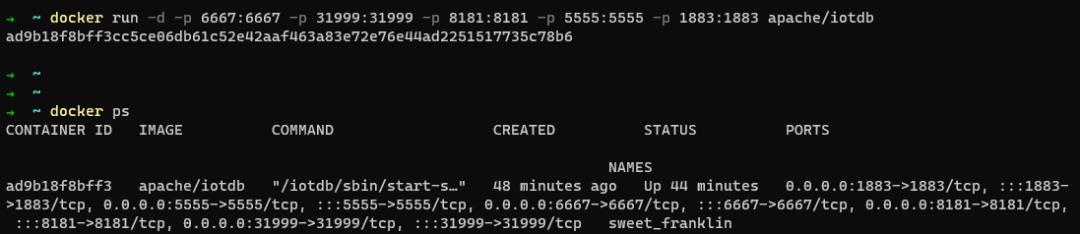
初步的iotdb in docker 环境,我们就搞好了。接下来,开启mqtt服务。
开启 Mqtt 服务
进入iotdb的docker docker exec -it ad9b18f8bff3 /bin/bash
编辑配置文件vi iotdb/conf/iotdb-engine.properties
开启服务,根据自己的需要,配置ip和端口等。
####################
### MQTT Broker Configuration
####################

# whether to enable the mqtt service.
enable_mqtt_service=false   # 修改成 true , 代表开启 mqtt服务

# the mqtt service binding host.
mqtt_host=0.0.0.0 # ip

# the mqtt service binding port.
mqtt_port=1883  # 端口

# the handler pool size for handing the mqtt messages.
mqtt_handler_pool_size=1

# the mqtt message payload formatter.
mqtt_payload_formatter=json  # 数据格式

# max length of mqtt message in byte
mqtt_max_message_size=1048576
重启服务,如果不会,就重启docker镜像。
iotdb 基础操作
启动服务:
sbin/start-client.shroot@ad9b18f8bff3:/iotdb/sbin# ./start-cli.sh --------------------- Starting IoTDB Cli --------------------- _____ _________ ______ ______ |_ _| | _ _ ||_ _ `.|_ _ \\ | | .--.|_/ | | \\_| | | `. \\ | |_) | | | / .'`\\ \\ | | | | | | | __'. _| |_| \\__. | _| |_ _| |_.' /_| |__) | |_____|'.__.' |_____| |______.'|_______/ version 0.11.1 IoTDB> login successfully退出CLI:
quit或exit停止服务:
$sbin/stop-server.sh设置一个存储组到IOTDB,名为root :
IoTDB> SET STORAGE GROUP TO root查看当前IOTDB的存储组 :
IoTDB> SHOW STORAGE GROUPIoTDB> SHOW STORAGE GROUP +-------------+ |storage group| +-------------+ | root.test| +-------------+ Total line number = 1 It costs 0.127s查看系统中存在的所有时间序列 :
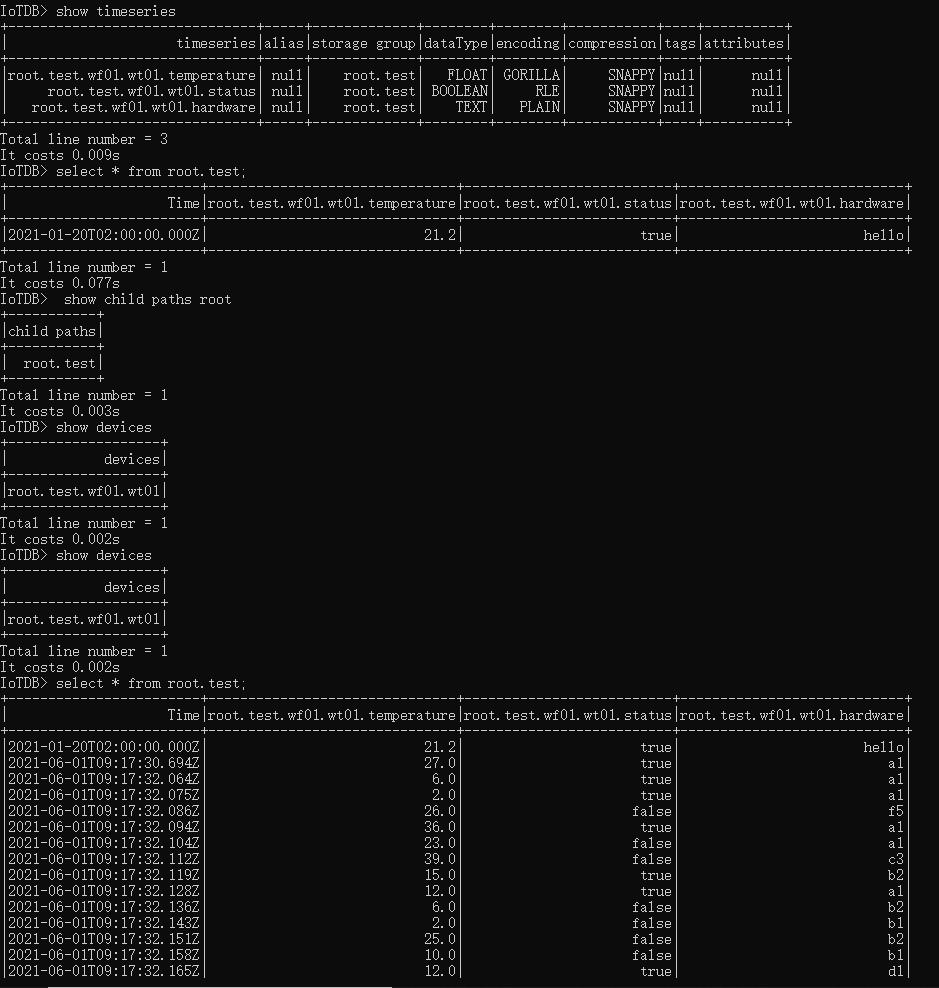
IoTDB> SHOW TIMESERIESIoTDB> show timeseries +-------------------------------+-----+-------------+--------+--------+-----------+----+----------+ | timeseries|alias|storage group|dataType|encoding|compression|tags|attributes| +-------------------------------+-----+-------------+--------+--------+-----------+----+----------+ |root.test.wf01.wt01.temperature| null| root.test| FLOAT| GORILLA| SNAPPY|null| null| | root.test.wf01.wt01.status| null| root.test| BOOLEAN| RLE| SNAPPY|null| null| | root.test.wf01.wt01.hardware| null| root.test| TEXT| PLAIN| SNAPPY|null| null| +-------------------------------+-----+-------------+--------+--------+-----------+----+----------+ Total line number = 3 It costs 0.009s查看系统中存在的特定时间序列:
SHOW TIMESERIES root.test.wf01.wt01.statusIoTDB> SHOW TIMESERIES root.test.wf01.wt01.status +--------------------------+-----+-------------+--------+--------+-----------+----+----------+ | timeseries|alias|storage group|dataType|encoding|compression|tags|attributes| +--------------------------+-----+-------------+--------+--------+-----------+----+----------+ |root.test.wf01.wt01.status| null| root.test| BOOLEAN| RLE| SNAPPY|null| null| +--------------------------+-----+-------------+--------+--------+-----------+----+----------+ Total line number = 1 It costs 0.003s插入数据
INSERT INTO root.test.wf01.wt01(timestamp,status,temperature) values(200,false,20.71)IoTDB> INSERT INTO root.test.wf01.wt01(timestamp,status,temperature) values(200,false,20.71) Msg: The statement is executed successfully.查看数据:
select * from root.test;IoTDB> select * from root.test; +------------------------+-------------------------------+--------------------------+----------------------------+ | Time|root.test.wf01.wt01.temperature|root.test.wf01.wt01.status|root.test.wf01.wt01.hardware| +------------------------+-------------------------------+--------------------------+----------------------------+ |2021-01-20T02:00:00.000Z| 21.2| true| hello| +------------------------+-------------------------------+--------------------------+----------------------------+ Total line number = 1 It costs 0.077s查看设备:
show devicesIoTDB> show devices +-------------------+ | devices| +-------------------+ |root.test.wf01.wt01| +-------------------+ Total line number = 1 It costs 0.002s
mqtt to iotdb
代码
构建一个实体对象,用于存储
package wang.datahub.iotdb;

import com.google.gson.Gson;
import java.util.List;

public class IotdbVO
    private String device;
    private long timestamp = System.currentTimeMillis();
    private List<String> measurements;
    private List<Object> values;

    public String getDevice()
        return device;


    public void setDevice(String device)
        this.device = device;


    public long getTimestamp()
        return timestamp;


    public void setTimestamp(long timestamp)
        this.timestamp = timestamp;


    public List<String> getMeasurements()
        return measurements;


    public void setMeasurements(List<String> measurements)
        this.measurements = measurements;


    public List<Object> getValues()
        return values;


    public void setValues(List<Object> values)
        this.values = values;


    public String toJson()
        Gson g = new Gson();
        String jsonData = g.toJson(this);
        return jsonData;


    @Override
    public String toString()
        return "IotdbVO" +
                "device='" + device + '\\'' +
                ", timestamp=" + timestamp +
                ", measurements=" + measurements +
                ", values=" + values +
                '';
使用祖传的代码来模拟数据发射到iotdb,这里直接将mqtt的主机和端口,配置到前文所修改的iotdb的mqtt服务上,就大功告成了。
package wang.datahub.iotdb;

import org.fusesource.mqtt.client.BlockingConnection;
import org.fusesource.mqtt.client.MQTT;
import org.fusesource.mqtt.client.QoS;

import java.util.ArrayList;
import java.util.List;
import java.util.Random;

public class EmmitToIotdb

    public static void main(String[] args)
        String[] hardwares = new String[]
                "a1",
                "b1",
                "b2",
                "c3",
                "d1",
                "f5"
        ;
        int count = 1000;

        for(int i = 0; i < count ;i++)
            IotdbVO iotdbVO = new IotdbVO();
            iotdbVO.setDevice("root.test.wf01.wt01");
            List<String> measurements = new ArrayList<>();
            List<Object> values = new ArrayList<>();
            measurements.add("temperature");
            measurements.add("status");
            measurements.add("hardware");

            Random r = new Random();
            values.add(r.nextInt(40));
            values.add(r.nextBoolean());
            values.add(hardwares[r.nextInt(hardwares.length)]);

            iotdbVO.setMeasurements(measurements);
            iotdbVO.setValues(values);
            emmitToIotdb(iotdbVO);


    public static void emmitToIotdb(IotdbVO content)
        try
            MQTT mqtt = new MQTT();
            mqtt.setHost("127.0.0.1", 1883);
            mqtt.setUserName("root");
            mqtt.setPassword("root");

            BlockingConnection connection = mqtt.blockingConnection();
            connection.connect();

            String payload = content.toJson();
            connection.publish(content.getDevice(),payload.getBytes(), QoS.AT_LEAST_ONCE,false);

            connection.disconnect();
         catch (Exception e)
            e.printStackTrace();
执行结果
iotdb,功能还是相当强大的,也非常有意思,希望本篇文章对你有所帮助,也非常欢迎您来与我交流。
关注 【 麒思妙想】解锁更多硬核。
历史文章导读:
如果文章对您有那么一点点帮助,我将倍感荣幸
欢迎 关注、在看、点赞、转发

以上是关于物联网数据库 IoTDB —— 从协议到数据的主要内容,如果未能解决你的问题,请参考以下文章
开源工业物联网数据库 Apache IoTDB 毕业成为 Apache 顶级项目!
2022 IoTDB Summit:中国核电刘旭嘉《工业时序数据库 Apache IoTDB 在核电的应用实践》...