Spring安装和使用(Eclipse环境)
Posted 程序员超时空
tags:
篇首语:本文由小常识网(cha138.com)小编为大家整理,主要介绍了Spring安装和使用(Eclipse环境)相关的知识,希望对你有一定的参考价值。
一、Spring框架概述
1、 什么是Spring
Spring是一个开源框架,Spring是于2003 年兴起的一个轻量级的Java 开发框架,由Rod Johnson 在其著作Expert One-On-One J2EE Development and Design中阐述的部分理念和原型衍生而来。它是为了解决企业应用开发的复杂性而创建的。框架的主要优势之一就是其分层架构,分层架构允许使用者选择使用哪一个组件,同时为 J2EE 应用程序开发提供集成的框架。Spring使用基本的JavaBean来完成以前只可能由EJB完成的事情。然而,Spring的用途不仅限于服务器端的开发。从简单性、可测试性和松耦合的角度而言,任何Java应用都可以从Spring中受益。Spring的核心是控制反转(IoC)和面向切面(AOP)。简单来说,Spring是一个分层的JavaSE/EE full-stack(一站式) 轻量级开源框架。
2、 Spring的优点
1)方便解耦,简化开发 (高内聚低耦合)
Spring就是一个大工厂可以将所有对象创建和依赖关系维护,交给Spring管理spring工厂是用于生成bean。
2)AOP编程的支持
Spring提供面向切面编程,可以方便的实现对程序进行权限拦截、运行监控等功能
3)声明式事务的支持
只需要通过配置就可以完成对事务的管理,而无需手动编程
4)方便程序的测试
Spring对Junit4支持,可以通过注解方便的测试Spring程序
5)方便集成各种优秀框架
Spring不排斥各种优秀的开源框架,其内部提供了对各种优秀框架(如:Struts、Hibernate、MyBatis、Quartz等)
6)降低JavaEE API的使用难度
Spring 对JavaEE开发中非常难用的一些API(JDBC、JavaMail、远程调用等),都提供了封装.
二、Eclipse中安装Spring
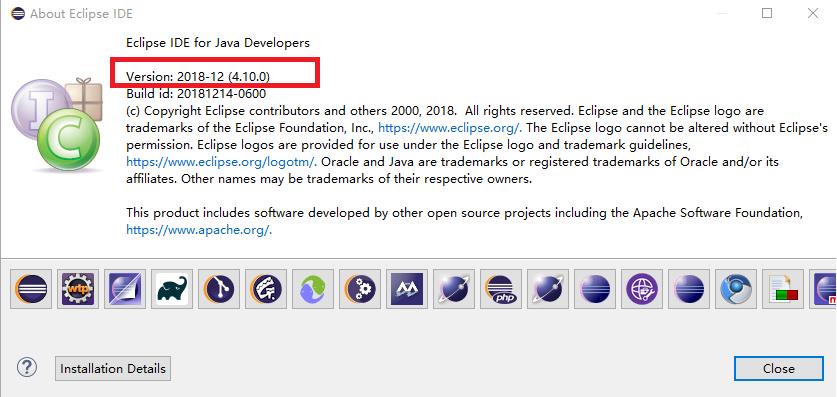
1、查看eclipse版本(必须和Spring版本对应才行)
----->打开eclipse----->Help-------->About Eclipse IDE
2、安装Spring IDE插件:
1)Help->Install New Software
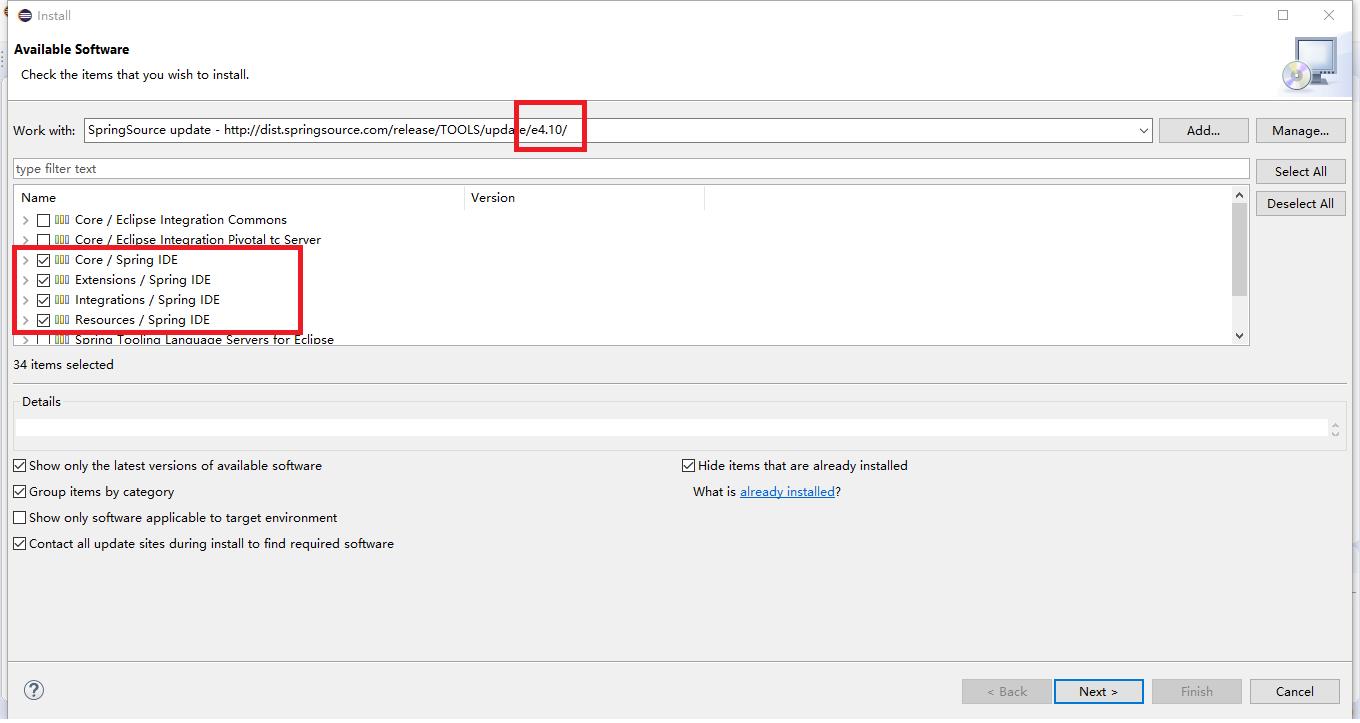
2)选择Add,添加Name(可以随便取)和Location:http://dist.springsource.com/release/TOOLS/update/e4.10/
3)勾选中下边四个和Spring相关的文件。Core/Spring IDE、Extensions/Spring IDE、Integrations/Spring IDE、Resources/Spring IDE四项
3、点Next直到选择I accpet the terms of the license agreements点Finish然后等待插件安装完成并提示重启。
**报错:**An error occurred while collecting items to be installed session context was:(profile=D__eclipse_java-2018-12_eclipse,phase=org.eclipse.equinox.internal.p2.engine.phases.Collect, operand=, action=).Unable to read repository at http://download.springsource.com/release/TOOLS/update/3.9.7.RELEASE/e4.10/plugins/org.springframework.ide.eclipse.boot.properties.editor.source_3.9.7.201812201020-RELEASE.jar.
Read timed out
解决办法:
打开Window->Preferences->Install/Update->Available software Sites,将Oracle Enterprise Pack For Eclipse改为disable
4、查看安装是否成功
点击菜单Help–>Welcome,如果找到Spring IDE项,恭喜你,安装成功了。
如果没有找到,怎么办呢?接着往下操作
5、安装失败了,你可以换一种方式安装了,先下载,下载地址:http://spring.io/tools3/sts/all
6、打开菜单Help–>Install New Software…
7、在弹出框install中点Add…按钮,Name栏输入localSpringIDE,在Location栏点击Archive…按钮,选择刚下载的springsource-tool-suite-x.x.x.RELEASE-e4.10.0-updatesite.zip,点OK按钮后依然在在列表框中勾选带Spring IDE的项,点下一步,然后根据提示直到安装完成,然后重启Eclipse即可。
8、查看安装是否成功
三、Spring使用
1、环境条件:
1)windows 10系统
2)eclipse(开发环境)
3)Spring IDE(上面已经安装了) 地址:http://spring.io/tools3/sts/all
4)Spring framework(一会儿要用的jar包) 地址:http://repo.spring.io/release/org/springframework/spring/

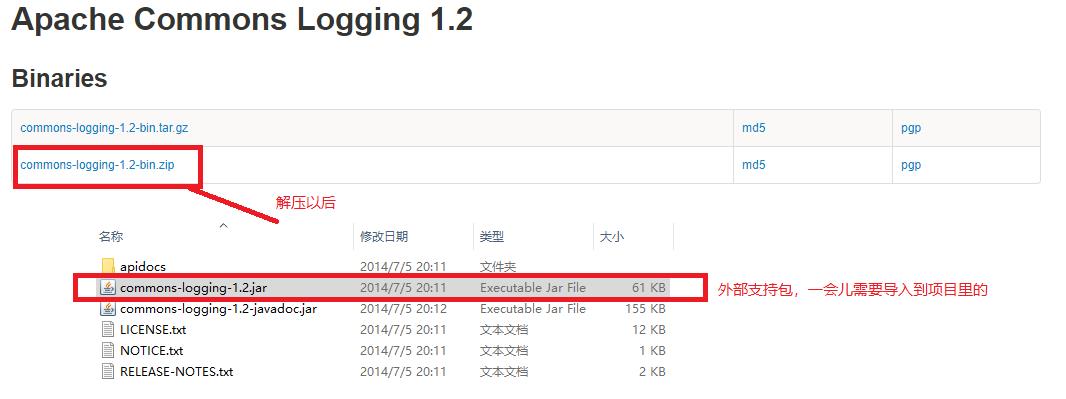
5)commens-logging-x.x.x.jar地址:http://commons.apache.org/proper/commons-logging/download_logging.cgi
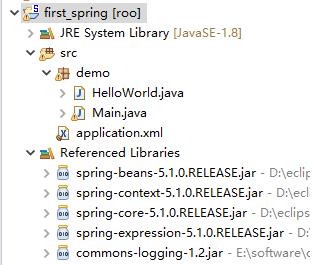
2、新建一个java工程,名字就叫first_spring,创建一个包名demo,创建两个类分别为HelloWorld和Main,导入4个spring核心jar包(分别是:spring-beans-5.1.0.RELEASE.jar、spring-context-5.1.0.RELEASE.jar、spring-core-5.1.0.RELEASE.jar、spring-expression-5.1.0.RELEASE.jar)和1个外部依赖包(spring-expression-5.1.0.RELEASE.jar)。
1)HelloWorld.java代码
package demo;

public class HelloWorld

	public void say()
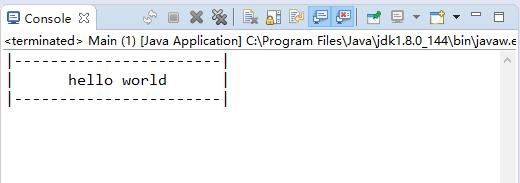
		System.out.println("|-----------------------|");
		System.out.println("|      hello world      |");
		System.out.println("|-----------------------|");
2)Main.java测试代码
import org.springframework.context.ApplicationContext;
import org.springframework.context.support.ClassPathXmlApplicationContext;

public class Main

	/**
	 * @param args
	 */
	public static void main(String[] args)
		// TODO Auto-generated method stub
		ApplicationContext a = new ClassPathXmlApplicationContext("classpath:/application.xml");
        HelloWorld helloWorld = (HelloWorld) a.getBean("helloWorld");
	    helloWorld.say();
3)application.xml配置文件
<?xml version="1.0" encoding="UTF-8"?>
<beans xmlns="http://www.springframework.org/schema/beans"
	xmlns:xsi="http://www.w3.org/2001/XMLSchema-instance"
	xsi:schemaLocation="http://www.springframework.org/schema/beans http://www.springframework.org/schema/beans/spring-beans.xsd">
<bean id="helloWorld" class="demo.HelloWorld"></bean>

</beans>
4)结果
以上是关于Spring安装和使用(Eclipse环境)的主要内容,如果未能解决你的问题,请参考以下文章