Android组件实现左滑露出右侧操作按钮
Posted 女儿控伪全栈老徐
tags:
篇首语:本文由小常识网(cha138.com)小编为大家整理,主要介绍了Android组件实现左滑露出右侧操作按钮相关的知识,希望对你有一定的参考价值。
一、最终效果
说在最前:
本例不包含任何第三方库,不集成任何轮子,全部使用android自带的UI组件和标准事件。
滑动方向可任意修改,滑动效果可放置在任何View组件上。
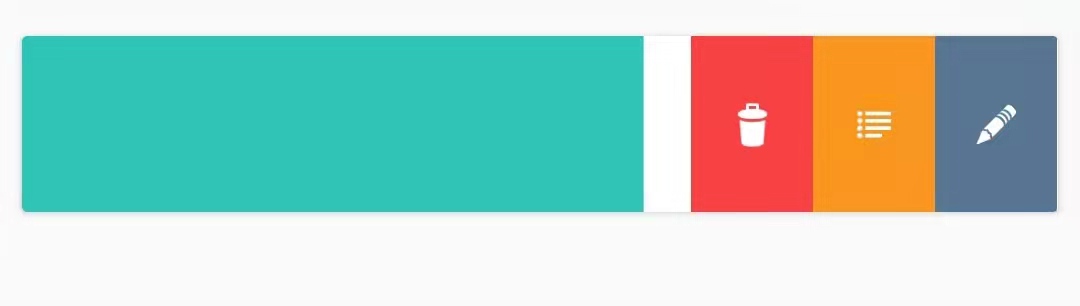
先来看最终效果,下图左侧的蓝色就是向左滑动后的view,而右侧的三个按钮就是滑动后显示出来的操作按钮:
二、思路
1.利用FrameLayout的布局顺序效果,后布局的元素会遮挡先前布局的元素
2.使用一个CardView容器,将FrameLayout及其中的遮挡层、下方的操作按钮等全部都放在这个CardView容器中,形成一个整体组件
3.使用View的基本事件:
- OnLongClickListener
- OnTouchListener
要注意的是,如果只实现OnTouchListener,而不实现OnLongClickListener,是无法触发滑动效果的。
三、UI布局
先来看一下整个UI布局的层次结构:

忽略那些警告吧...
在最外层,我们使用一个CardView来作为容器在这个CardView里面,放入一个FrameLayout布局,并且使这个FrameLayout的宽度和高度撑满CardView。
在FrameLayout的下一层,有两个LinearLayout布局,这里会出现第一个需要注意的地方,由于FrameLayout的特性,后加入的LinearLayout会遮挡先加入的。
因此,先加入的LinearLayout中,放置了一个TextView,用来挤占位置,之后放置三个按钮,这三个按钮就是左滑露出来的操作按钮。
而后加入的LinearLayout里,由于本例不涉及什么业务,因此只是把它设置了一个明亮的蓝色,以便观察。
<androidx.cardview.widget.CardView
    android:id="@+id/CARD_VIEW_EFFECT"
    android:layout_width="0dp"
    android:layout_height="64dp"
    android:layout_marginStart="8dp"
    android:layout_marginTop="16dp"
    android:layout_marginEnd="8dp"
    app:layout_constraintEnd_toEndOf="parent"
    app:layout_constraintStart_toStartOf="parent"
    app:layout_constraintTop_toBottomOf="@+id/TEXT_VIEW_TITLE" >

    <FrameLayout
        android:layout_width="match_parent"
        android:layout_height="match_parent">

        <LinearLayout
            android:id="@+id/LINEAR_LAYOUT_DASHBOARD"
            android:layout_width="match_parent"
            android:layout_height="match_parent"
            android:orientation="horizontal">

            <TextView
                android:id="@+id/textView5"
                android:layout_width="wrap_content"
                android:layout_height="match_parent"
                android:layout_weight="0.7"
                android:text="@string/app_name" />

            <ImageButton
                android:id="@+id/imageButton4"
                android:layout_width="wrap_content"
                android:layout_height="match_parent"
                android:layout_weight="0.1"
                android:background="@color/candyHeavyRed"
                app:srcCompat="@drawable/ic_action_trash_white"
                tools:ignore="SpeakableTextPresentCheck,TouchTargetSizeCheck" />

            <ImageButton
                android:id="@+id/imageButton5"
                android:layout_width="wrap_content"
                android:layout_height="match_parent"
                android:layout_weight="0.1"
                android:background="@color/candyHeavyOrange"
                app:srcCompat="@drawable/ic_action_list_white_2"
                tools:ignore="SpeakableTextPresentCheck,TouchTargetSizeCheck" />


            <ImageButton
                android:id="@+id/imageButton6"
                android:layout_width="wrap_content"
                android:layout_height="match_parent"
                android:layout_weight="0.1"
                android:background="@color/candyHeavyOcean"
                app:srcCompat="@drawable/ic_action_edit_white"
                tools:ignore="SpeakableTextPresentCheck,TouchTargetSizeCheck" />
        </LinearLayout>

        <LinearLayout
            android:id="@+id/LINEAR_LAYOUT_EFFECT"
            android:layout_width="match_parent"
            android:layout_height="match_parent"
            android:background="@color/colorRobin"
            android:orientation="horizontal">

            <androidx.constraintlayout.widget.ConstraintLayout
                android:layout_width="match_parent"
                android:layout_height="match_parent">

            </androidx.constraintlayout.widget.ConstraintLayout>

        </LinearLayout>
    </FrameLayout>

</androidx.cardview.widget.CardView>
四、滑动事件
4.1一些细节
在实现滑动事件之前,需要再次明确一下,所有的UI组件都位于一个CardView中,这个CardView可以视为一个整体,并且为滑出和滑入提供一个明显的、肉眼可见的边界。
需要滑动的是位于FrameLayout中的一个LinearLayout:
private LinearLayout linearLayout;你可以任意为这个LinearLayout设置一个id,方便自己在代码中通过这个id来获取到它:
this.linearLayout = this.findViewById(R.id.LINEAR_LAYOUT_EFFECT);4.2触发事件
我们为这个需要滑动的LinearLayout添加事件,并且全部都是Android标准事件。
长按事件
//为card view 添加长按事件,只有添加了长按事件,才会触发up、move等事件this.linearLayout.setOnLongClickListener(new View.OnLongClickListener()
    @Override
    public boolean onLongClick(View v)
        Log.i(TAG,"long click!");
        return false;

);
在长按事件里,本例并不做什么事情。长按事件的目的仅仅只是激活更多的屏幕触碰手势效果。
触碰事件
在触碰事件里,有必要提一下MotionEvent这个类。当屏幕的触碰手势被触发时,这个类的一个实例对象会被Android传递到我们的方法中。在这个MotionEvent的实例中,我们可以通过getAction()来获取到触碰手势的类型。
基本的类型有以下一些:
MotionEvent.ACTION_DOWN        //按下
MotionEvent.ACTION_UP          //手指从屏幕上抬起(即不再触碰)
MotionEvent.ACTION_MOVE        //移动、滑动
MotionEvent.ACTION_CANCEL      //取消,当事件被上层View拦截时会触发
MotionEvent.ACTION_OUTSIDE     //手指不在View的区域内时会触发
MotionEvent.ACTION_POINT_DOWN  //多点触控的按下
MotionEvent.ACTION_POINT_UP    //多点触控的抬起
MotionEvent.ACTION_HOVER_MOVE  //指针移动
MotionEvent.ACTION_HOVER_ENTER //指针移入View的区域内
MotionEvent.ACTION_HOVER_EXIT  //指针移出View的区域
MotionEvent.ACTION_SCROLL      //滚动滚轮
其它还有许多,其实在本例当中我们只需要关注ACTION_MOVE这一动作就行了
//为card view 添加碰触事件
this.linearLayout.setOnTouchListener(new View.OnTouchListener()

    boolean hasMoved = false;//标记view是否已经移动过了

    float xStartFrom;//碰触事件触发时,触碰点的初始x位置

    @Override
    public boolean onTouch(View v, MotionEvent event)
        Log.i(TAG,String.valueOf(event.getAction()));
        switch(event.getAction())
            case MotionEvent.ACTION_DOWN:
                xStartFrom = event.getX();
                Log.i(TAG,"action down!x starts from:" + xStartFrom);
                break;

            case MotionEvent.ACTION_MOVE:
                float x = event.getX();
                float y = event.getY();
                float rawX = event.getRawX();
                float rawY = event.getRawY();
                Log.i(TAG,"action move!x:"+x+",y:"+y+",rawX:"+rawX+",rawY:"+rawY);

                //检查在x轴上的位移量,如果向左或向右超过了预制的距离,则判定为触发左移或右移
                if(!hasMoved && x < xStartFrom && (xStartFrom - x) > 50)
                    //此处调用动画效果,将要移动的View向左移动
                    slideToLeft(linearLayout);

                    hasMoved = true;//标记移动完成,避免重复操作

                else if(hasMoved && x > xStartFrom && (x - xStartFrom) > 50)
                    //此处调用动画效果,将View移回到右边原始位置
                    backToRight(linearLayout);

                    hasMoved = false;//标记未发生移动,为下一次滑动做好准备

                break;


        return false;

);
在上述代码段中,有几个需要注意的地方:
第一处:
boolean hasMoved = false;//标记view是否已经移动过了当滑动发生之后,我们不希望它会因为我们手指还停留在屏幕上而不断重复发生,这样就会变得十分鬼畜,所以我们需要标记滑动是否已经发生;
同样的,当复位之后,我们则会希望当我们再次用手指滑动它的时候,能又一次触发它。
第二处:
float xStartFrom;//碰触事件触发时,触碰点的初始x位置每个人的手指有长有短,每个人习惯在屏幕上滑动的距离也各不相同。我们当然不希望手指轻轻一碰到屏幕,就立即触发滑动,那样会显得太灵敏;
当然了,我们也不希望当我们的手指从屏幕的一侧满满地滑动到另一侧,甚至都快要滑出屏幕了,才刚刚触发滑动效果,那么就又太迟钝;
因此我们就需要做一个规定,规定当手指在屏幕上滑动了多少距离之后,才会触发我们想要的滑动效果。为了实现这一目的,我们就必须记录下手指刚刚按到屏幕上时所在的位置。
由于在本例中,我们只关心左右滑动,而不关心上下滑动,所以只需要记录下x坐标即可。而这一操作必须在ACTION_DOWN的时候完成。
第三处:
float x = event.getX();
float y = event.getY();
float rawX = event.getRawX();
float rawY = event.getRawY();
getRawX()和getRawY()获得的是绝对坐标,即当我们的手指按到屏幕上的时候,相对于屏幕左上角而言的坐标值。
getX()和getY()获得的是相对坐标,相对于我们所触发滑动事件的那个View的左上角。
具体使用哪一对,其实需要根据我们的实际需求来选择。
在本例中,我们使用getX()来获得滑动过程中的x轴坐标位置,并将该坐标与手指刚刚按到屏幕上的初始位置进行对比,当它们的差值达到一定的数值的时候,采取触发滑动(动画效果)
4.3滑动的效果
既然我们已经触发滑动事件了,那么最后一步就是实现一个平缓滑行的动画效果。此处要用到的是TranslateAnimation类。
关于Android开发时所遇到的基本动画效果,可以查看这里的描述:
关于动画效果,这里就不再多做赘述了,直接贴上源代码,非常简单的几个方法:
/**
 * 播放移动效果的动画
 * @param view
 */
public void executeTranslate(View view,float fromX,float toX,float fromY,float toY,long durationMillis)
    /*
     *  创建一个移动动画效果
     *  入参的含义如下:
     *  fromXType:移动前的x轴坐标的类型
     *  fromXValue:移动前的x轴的坐标
     *  toXType:移动后的x轴的坐标的类型
     *  toXValue:移动后的x轴的坐标
     *  fromYType:移动前的y轴的坐标的类型
     *  fromYValue:移动前的y轴的坐标
     *  toYType:移动后的y轴的坐标的类型
     *  toYValue:移动后的y轴的坐标
     */
    TranslateAnimation translateAnimation
            = new TranslateAnimation(
                Animation.RELATIVE_TO_SELF, fromX,
                Animation.RELATIVE_TO_SELF, toX,
                Animation.RELATIVE_TO_SELF, fromY,
                Animation.RELATIVE_TO_SELF, toY);

    /*
     *  设置动画的持续时间
     */
    translateAnimation.setDuration(durationMillis);

    translateAnimation.setFillAfter(true);//动画执行完毕后, 停留在结束状态

    /*
     *  为界面对象启动动画效果
     */
    view.startAnimation(translateAnimation);


/**
 * 将一个view向左移动
 */
public void slideToLeft(View view)
    float fromX = 0;//从原始位置开始
    float toX = -0.4f;//向左移动一定的距离
    float fromY = 0;
    float toY = 0;

    long durationMillis = 500;//动画持续的时长

    this.executeTranslate(view,fromX,toX,fromY,toY,durationMillis);


/**
 * 将一个view向右归位
 * @param view
 */
public void backToRight(View view)
    float fromX = -0.4f;//从左移位的结束位置开始
    float toX = 0;//向右移动到原始位置
    float fromY = 0;
    float toY = 0;

    long durationMillis = 500;//动画持续的时长

    this.executeTranslate(view,fromX,toX,fromY,toY,durationMillis);
好了,整个过程到这里全部完成了。仔细想想根本没有什么高级的地方。
小结
1、没有任何第三方库、不集成任何轮子;
2、全部使用Android原生自带的UI组件和布局方式;
3、全部使用Android原生自带的标准事件;
4、所有的View或是Layout都可以根据自己的实际需求进行更换;
5、手指滑动的方向,以及界面组件移动的方向,向左、向右、向上、向下都可以随意调整。
以上是关于Android组件实现左滑露出右侧操作按钮的主要内容,如果未能解决你的问题,请参考以下文章