利用反射做一个简易 Spring IOC 容器,模仿其装配功能
Posted Java知音_
tags:
篇首语:本文由小常识网(cha138.com)小编为大家整理,主要介绍了利用反射做一个简易 Spring IOC 容器,模仿其装配功能相关的知识,希望对你有一定的参考价值。
点击关注公众号,实用技术文章及时了解
来源:blog.csdn.net/wenwenaier/article/
details/115549343
自己用代码模仿一个简易的SpringIOC容器,模仿其装配功能
文章目录
前言
一、模仿XML形式的装配思路
1.思路
2.具体代码实现
二、通过注解方式进行注入
1.思路
2.代码实现
三、@Autowired自动装配
总结
前言
在学习Spring之后,对其中的工作原理产生了浓厚的兴趣,近些日子看视频了解到了一些SpringIOC容器的工作原理,并边打边磨做出了一个非常简易的SpringIOC容器,实现了他的XML文件装配,java代码装配以及自动装配的功能,下面思路以及代码
一、模仿XML形式的装配思路
1.思路
采用XML装配bean时Spring会解析applicationContext.xml文件,并将各种类型的bean注入IOC容器,容器中的bean可以被无数次重复调用,极大地提高了系统效率而不用多次重复的new对象。
为了模仿IOC,我们利用Map集合存放需要的bean,并新建一个conf.properties文件存放信息,存放com.wql.dao.userDao=com.wql.daoImpl.userDaoImpl等数据信息
在获取bean之前解析conf.properties文件中的信息,利用反射技术将conf.properties文件中的内容通过Class.forName的形式解析为Class对象放入集合map中,这样每次获取对象都会从map中进行获取,不必再new
2.具体代码实现
conf.properties:
com.wql.dao.userDao=com.wql.daoImpl.userDaoImpl
com.wql.service.userService=com.wql.serviceImpl.userServiceImpl
MyApplicationContext类代码实现:
package com.wql.application;


import java.io.InputStream;
import java.util.HashMap;
import java.util.Map;
import java.util.Properties;
import java.util.Set;


public class MyApplicationContext<T>
    //模拟IOC容器
    private Map<Class,Object> map = new HashMap<>();

    private String ResourcePath;
    private String filepath;

    public MyApplicationContext()


    public MyApplicationContext(String resourcePath)
        ResourcePath = resourcePath;


    //获得一个类型不知的对象(通过map集合)
    public T getBean(Class clazz)
        return (T)map.get(clazz);


    //通过properties中存储的键值对获取Class对象,并注入进map集合
    public void initXMLSpringIOC()
        try
            InputStream stream = MyApplicationContext.class.getClassLoader().getResourceAsStream(ResourcePath);
            Properties properties = new Properties();
            properties.load(stream);
            //获取内容
            Set<Object> keys = properties.keySet();
            for(Object key:keys)
                //Class:实例
                map.put(Class.forName(key.toString()),Class.forName(properties.getProperty(key.toString())).newInstance() );

        catch (Exception e)
            e.printStackTrace();
我们对代码进行测试:
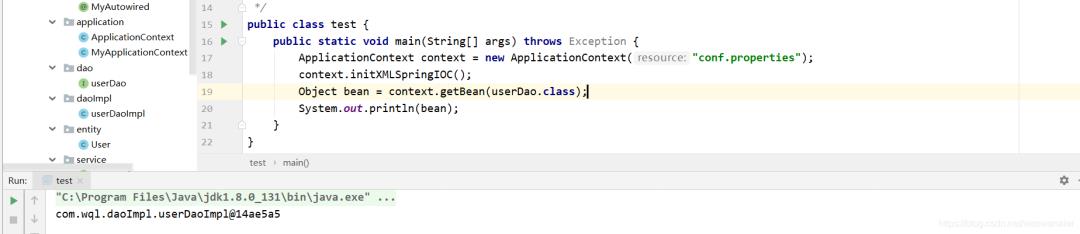
可见成功获得对象
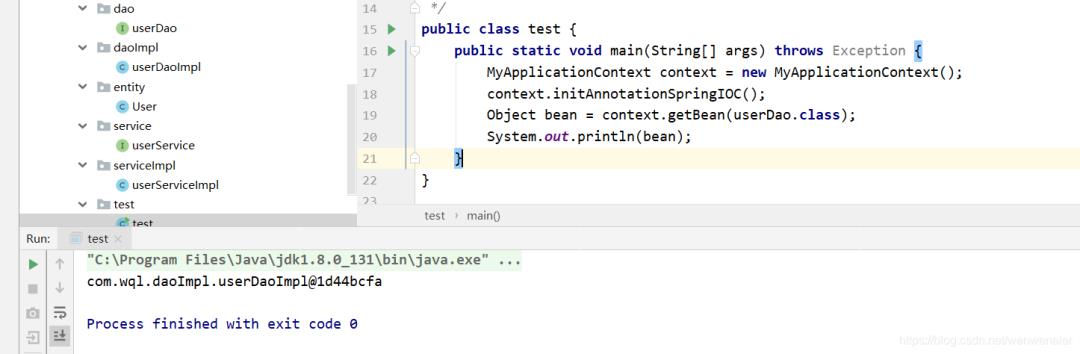
但是通过此种方式进行装配的方式似乎已经过时了,下面我们通过@Bean实现注入
二、通过注解方式进行注入
1.思路
先获取项目路径,然后通过字符串截取的方式获取接口实现类的全路径,通过反射技术检查该类是否含有@Bean注解,有则加入map
2.代码实现
@Bean:
package com.wql.Annotation;

import java.lang.annotation.ElementType;
import java.lang.annotation.Retention;
import java.lang.annotation.RetentionPolicy;
import java.lang.annotation.Target;


@Target(ElementType.TYPE)
@Retention(RetentionPolicy.RUNTIME)
public @interface Bean
MyApplicationContext类代码实现:
//通过注解进行bean的装配
    public void initAnnotationSpringIOC()
        filepath = MyApplicationContext.class.getClassLoader().getResource("").getFile();
        //获取项目路径后
        System.out.println(filepath);
        loadOne(new File(filepath));


    private void loadOne(File fileparent)
        if(fileparent.isDirectory())
            //获取子文件
            File[] files = fileparent.listFiles();
            if(files.length==0||files==null)
                return;
            else
                //其下文件夹不为空
                for(File file:files)
                    if(file.isDirectory())
                        loadOne(file);
                    else
                        try
                            String oldpath = file.getAbsolutePath().substring(filepath.length()-1,file.getAbsolutePath().length());
                            if(oldpath.contains(".class"))
                                String newpath = oldpath.replaceAll("\\\\\\\\",".").replace(".class","");
                                Class<?> aClass = Class.forName(newpath);
                                //模拟装配bean
                                if(!aClass.isInterface())
                                    if(aClass.getAnnotation(Bean.class)!=null)
                                        //证明此类包含Bean注解,将其加入map
                                        map.put(aClass.getInterfaces()[0],aClass.newInstance());


                        catch (Exception e)
                            e.printStackTrace();
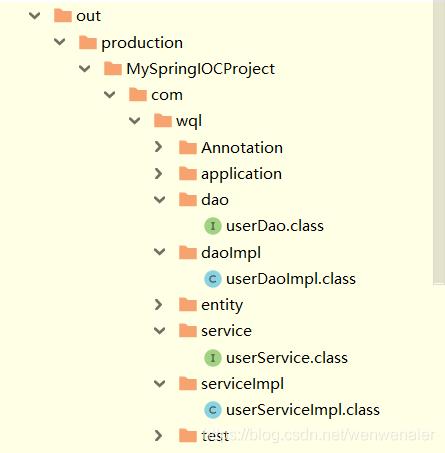
在代码中我们步步逼近,通过MyApplicationContext.class.getClassLoader().getResource("").getFile();获取项目路径,这样我们就有了获取.class文件的途径
项目路径:
/D:/IdeaJava/untitled1/out/production/MySpringIOCProject/
利用file.getAbsolutePath().substring(filepath.length()-1,file.getAbsolutePath().length()); 我们成功截取到.class文件和其他文件的路径
com\\wql\\Annotation\\Bean.class
com\\wql\\Annotation\\MyAutowired.class
com\\wql\\application\\ApplicationContext.class
com\\wql\\application\\MyApplicationContext.class
com\\wql\\dao\\userDao.class
com\\wql\\daoImpl\\userDaoImpl.class
com\\wql\\entity\\User.class
com\\wql\\service\\userService.class
com\\wql\\serviceImpl\\userServiceImpl.class
com\\wql\\test\\test.class
conf.properties
META-INF\\MySpringIOCProject.kotlin_module然后利用contains方法过滤出后缀名为.class的文件,对其路径进行更改将/用.进行替换,将.class字符删除
我们得到:
com.wql.Annotation.Bean
com.wql.Annotation.MyAutowired
com.wql.application.ApplicationContext
com.wql.application.MyApplicationContext
com.wql.dao.userDao
com.wql.daoImpl.userDaoImpl
com.wql.entity.User
com.wql.service.userService
com.wql.serviceImpl.userServiceImpl
com.wql.test.test此时我们离成功已经很近了,我们利用上一步获取的全类名,使用Class.forName获取Class对象,利用aClass.isInterface()与aClass.getAnnotation(Bean.class)我么你判断其实否为接口与是否含有@Bean注解,不为接口且含有@Bean注解,我们获得它的实例并将其加入map中
com.wql.daoImpl.userDaoImpl
com.wql.serviceImpl.userServiceImpl
测试:
userDaoImpl:
package com.wql.daoImpl;

import com.wql.Annotation.Bean;
import com.wql.dao.userDao;


@Bean
public class userDaoImpl implements userDao
    @Override
    public void test()
        System.out.println("成功自动装配");
成功通过@Bean进行注入
三、@Autowired自动装配
自动装配要先有东西才能装呀,所以我们只能先遍历map集合,获取已经存在map中的对象的Class,再获取他们的字段,判断字段上是否含有@Autowired注解,有的话进行自动装配即可
代码:
MyAutowired:
package com.wql.Annotation;

import java.lang.annotation.ElementType;
import java.lang.annotation.Retention;
import java.lang.annotation.RetentionPolicy;
import java.lang.annotation.Target;

@Target(ElementType.FIELD)
@Retention(RetentionPolicy.RUNTIME)
public @interface MyAutowired
userDaoImpl类代码实现:
package com.wql.daoImpl;

import com.wql.Annotation.Bean;
import com.wql.dao.userDao;


@Bean
public class userDaoImpl implements userDao
    @Override
    public void test()
        System.out.println("成功自动装配");
serviceImpl:
package com.wql.serviceImpl;

import com.wql.Annotation.MyAutowired;
import com.wql.Annotation.Bean;
import com.wql.dao.userDao;
import com.wql.service.userService;


@Bean
public class userServiceImpl implements userService

    @MyAutowired
    public userDao userDao;

    @Override
    public void test()
        userDao.test();
MyApplicationContext类代码实现:
//通过注解进行bean的装配
    public void initAnnotationSpringIOC()
        filepath = MyApplicationContext.class.getClassLoader().getResource("").getFile();
        //获取项目路径后
        System.out.println(filepath);
        loadOne(new File(filepath));
        AnnotationAutowired();


    //自动装配
    private void AnnotationAutowired()
        for(Map.Entry<Class,Object> entry:map.entrySet())
            Object obj = entry.getValue();
            Class<?> aClass = obj.getClass();

            Field[] fields = aClass.getDeclaredFields();
            for(Field field: fields)
                field.setAccessible(true);
                if(field.getAnnotation(MyAutowired.class)!=null)
                   try
                       field.set(obj,map.get(field.getType()));
                   catch (Exception e)
                       e.printStackTrace();
测试
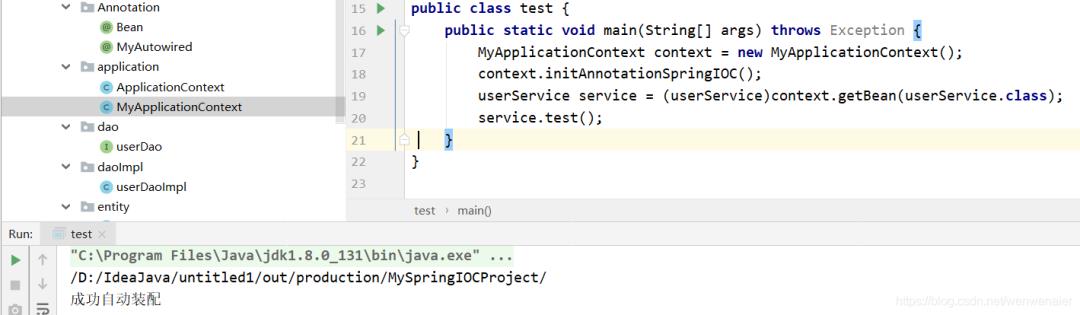
自动装配测试成功
总结
最后附上MyApplicationContext的全部代码:
package com.wql.application;

import com.wql.Annotation.Bean;
import com.wql.Annotation.MyAutowired;

import java.io.File;
import java.io.InputStream;
import java.lang.reflect.Field;
import java.util.HashMap;
import java.util.Map;
import java.util.Properties;
import java.util.Set;


public class MyApplicationContext<T>
    //模拟IOC容器
    private Map<Class,Object> map = new HashMap<>();

    private String ResourcePath;
    private String filepath;

    public MyApplicationContext()


    public MyApplicationContext(String resourcePath)
        ResourcePath = resourcePath;


    //获得一个类型不知的对象(通过map集合)
    public T getBean(Class clazz)
        return (T)map.get(clazz);


    //通过properties中存储的键值对获取Class对象,并注入进map集合
    public void initXMLSpringIOC()
        try
            InputStream stream = MyApplicationContext.class.getClassLoader().getResourceAsStream(ResourcePath);
            Properties properties = new Properties();
            properties.load(stream);
            //获取内容
            Set<Object> keys = properties.keySet();
            for(Object key:keys)
                //Class:实例
                map.put(Class.forName(key.toString()),Class.forName(properties.getProperty(key.toString())).newInstance() );

        catch (Exception e)
            e.printStackTrace();


    //通过注解进行bean的装配
    public void initAnnotationSpringIOC()
        filepath = MyApplicationContext.class.getClassLoader().getResource("").getFile();
        //获取项目路径后
        System.out.println(filepath);
        loadOne(new File(filepath));
        AnnotationAutowired();


    private void loadOne(File fileparent)
        if(fileparent.isDirectory())
            //获取子文件
            File[] files = fileparent.listFiles();
            if(files.length==0||files==null)
                return;
            else
                //其下文件夹不为空
                for(File file:files)
                    if(file.isDirectory())
                        loadOne(file);
                    else
                        try
                            String oldpath = file.getAbsolutePath().substring(filepath.length()-1,file.getAbsolutePath().length());
                            if(oldpath.contains(".class"))
                                String newpath = oldpath.replaceAll("\\\\\\\\",".").replace(".class","");
                                Class<?> aClass = Class.forName(newpath);
                                //模拟装配bean
                                if(!aClass.isInterface())
                                    if(aClass.getAnnotation(Bean.class)!=null)
                                        //证明此类包含Bean注解,将其加入map
                                        map.put(aClass.getInterfaces()[0],aClass.newInstance());


                        catch (Exception e)
                            e.printStackTrace();


    //自动装配
    private void AnnotationAutowired()
        for(Map.Entry<Class,Object> entry:map.entrySet())
            Object obj = entry.getValue();
            Class<?> aClass = obj.getClass();

            Field[] fields = aClass.getDeclaredFields();
            for(Field field: fields)
                field.setAccessible(true);
                if(field.getAnnotation(MyAutowired.class)!=null)
                    try
                        field.set(obj,map.get(field.getType()));
                    catch (Exception e)
                        e.printStackTrace();
推荐

PS:因为公众号平台更改了推送规则,如果不想错过内容,记得读完点一下“在看”,加个“星标”,这样每次新文章推送才会第一时间出现在你的订阅列表里。点“在看”支持我们吧!
以上是关于利用反射做一个简易 Spring IOC 容器,模仿其装配功能的主要内容,如果未能解决你的问题,请参考以下文章
spring学习总结002 --- IOC容器启动源码(简易版)
Spring IOC :相关接口分析手写简易 Spring IOC
Spring IOC :相关接口分析手写简易 Spring IOC