clickhouseclickhouse 副本与分片 分片详解
Posted 九师兄
tags:
篇首语:本文由小常识网(cha138.com)小编为大家整理,主要介绍了clickhouseclickhouse 副本与分片 分片详解相关的知识,希望对你有一定的参考价值。

1.概述
转载:【clickhouse】clickhouse 副本与分片 分片详解
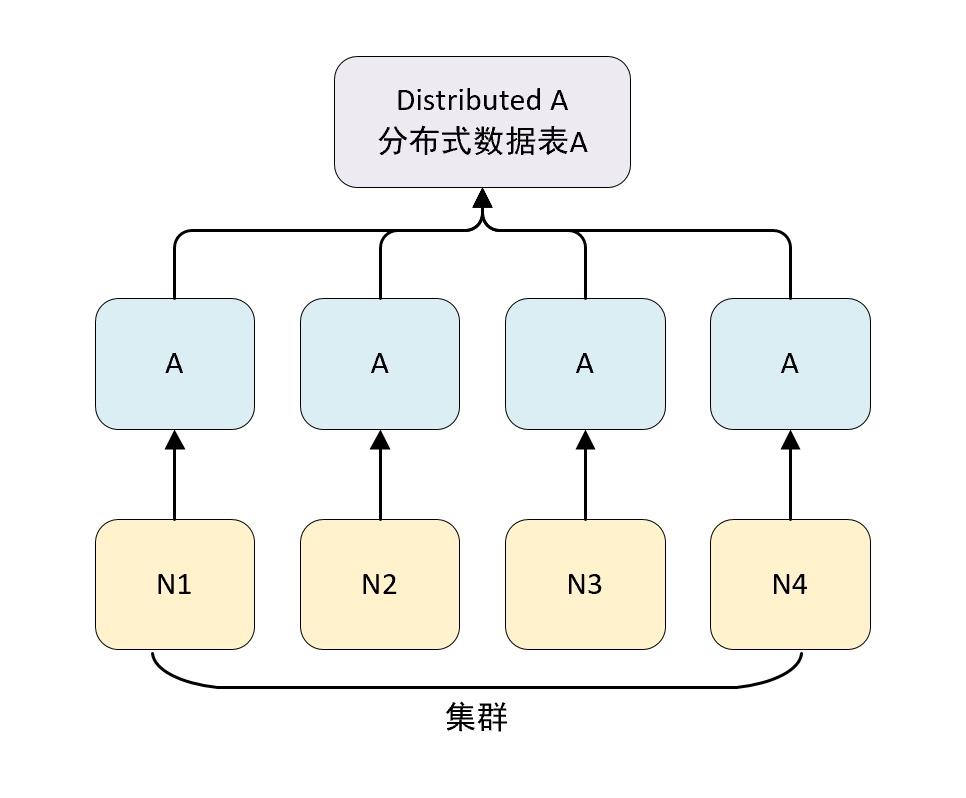
clickhouse 中每个服务器节点都可以被称为一个 shard(分片)。 假设有 N 台服务器,每个服务器上都有一张数据表 A,且每个服务器上的 数据表 A 的数据不重复,那么就可以说数据表 A 拥有 N 的分片。
对于一个完整的方案来说,还要考虑在数据写入时如何被均匀低写到各个分片中,以及数据在查询时如何路由到每个分片,组合成结果集。
clickhouse 的数据分片需要结合 DIstributed 表引擎一起使用。
DIstributed 表引擎本身不存储任何数据,它能够作为分布式表的一层代理,在集群内部自动展开数据写入、分发、查询、路由等工作。

2. 集群的配置方式
在 clickhouse 中集群配置用shard 代表分配,replica 代表副本。
1 分片,0 副本配置
<shard> <!--分片-->
  <replica> <!--副本-->
  </replica>
</shard>
1 分片,1 副本配置
<shard> <!--分片-->
  <replica> <!--副本-->
  </replica>
    <replica> <!--副本-->
  </replica>
</shard>
clickhouse 集群有两种配置方式
1.1 不包含副本的分片
如果直接使用 node 标签定义分配节点,那么该节点质保函分配,不包含副本,配置如下
<yandex>
  <!-- 自定义配置名称,与 conf.xml 配置的 include 属性相同即可-->
  <clickhouse_remote_servers>
    <shard_1> <!--自定义集群名称-->
      <node> <!--自定义 clickhouse 节点-->
        <!--必填参数-->
        <host>node3</host>
        <port>9977</port>

        <!--选填参数-->
        <weight>1</weight>
        <user>default</user>
        <password></password>
        <secure></secure>
        <compression></compression>
      </node>
      <node>
        <host>node2</host>
        <port>9977</port>
      </node>
    </shard_1>
  </clickhouse_remote_servers>
</yandex>
<!-- 配置定义了一个名为 shard_1 的集群,包含了两个节点 node3、node2 -->
| 配置 | 说明 |
|---|---|
| shard_1 | 自定义集群名称,全局唯一,是后续引用集群配置的唯一标识 |
| node | 用于定义节点,不包含副本 |
| host | clickhouse 节点服务器地址 |
| port | clickhouse 服务的tcp 端口 |
| weight | 分片权重,默认为 1 |
| user | clickhouse 用户,默认为 default |
| password | clickhouse 的用户密码,默认为空字符 |
| secure | SSL 连接端口,默认 9440 |
| conpression | 是否要开启数据压缩功能,默认 true |
1.2 自定义副本和分片
-
集群配置支持自定义分配和副本的数量,这种形式需要使用 shard 标签代替前面配置的 node标签,除此之外的配置完全相同。
-
配置自定义副本和分片时,副本和分片的数量完全交给由配置所决定。
-
其中 shard 表示逻辑上的数据分片,而物理上的分片则用 replica 表示
-
如果在一个 shard 标签下定义 N 组 replica,则该 shard 的语义表示 1 个分片和 N-1 个副本。
不包含副本的分片
<!-- 2 分片,0 副本-->
<sharding_simple> <!-- 集群自定义名称 -->
  <shard> <!-- 分片 -->
    <replica> <!-- 副本 -->
      <host>node3</host>
      <port>9977</port>
    </replica>
  </shard>
    <shard>
    <replica>
      <host>node2</host>
      <port>9977</port>
    </replica>
  </shard>
</sharding_simple>
N 分片和 N 副本
可以根据自己的需求,配置副本与分片的组合
<!-- 1 分片,1 副本-->
<sharding_simple> <!-- 集群自定义名称 -->
  <shard> <!-- 分片 -->
    <replica> <!-- 副本 -->
      <host>node3</host>
      <port>9977</port>
    </replica>
    <replica>
      <host>node2</host>
      <port>9977</port>
    </replica>
  </shard>
</sharding_simple>

<!-- 2 分片,1 副本-->
<sharding_simple> <!-- 集群自定义名称 -->
  <shard> <!-- 分片 -->
    <replica> <!-- 副本 -->
      <host>node3</host>
      <port>9977</port>
    </replica>
    <replica>
      <host>node2</host>
      <port>9977</port>
    </replica>
  </shard>
  <shard> <!-- 分片 -->
    <replica> <!-- 副本 -->
      <host>node4</host>
      <port>9977</port>
    </replica>
    <replica>
      <host>node5</host>
      <port>9977</port>
    </replica>
  </shard>
</sharding_simple>
<!-- 集群部署中,副本数量的上线是 clickhouse 节点的数量决定的 -->
在 clickhouse 中给我们配置了一些示例,可以打开配置文件看一下
<remote_servers>
        <!-- Test only shard config for testing distributed storage -->
        <test_shard_localhost>
            <!-- Inter-server per-cluster secret for Distributed queries
                 default: no secret (no authentication will be performed)

                 If set, then Distributed queries will be validated on shards, so at least:
                 - such cluster should exist on the shard,
                 - such cluster should have the same secret.

                 And also (and which is more important), the initial_user will
                 be used as current user for the query.

                 Right now the protocol is pretty simple and it only takes into account:
                 - cluster name
                 - query

                 Also it will be nice if the following will be implemented:
                 - source hostname (see interserver_http_host), but then it will depends from DNS,
                   it can use IP address instead, but then the you need to get correct on the initiator node.
                 - target hostname / ip address (same notes as for source hostname)
                 - time-based security tokens
            -->
            <!-- <secret></secret> -->

            <shard>
                <!-- Optional. Whether to write data to just one of the replicas. Default: false (write data to all replicas). -->
                <!-- <internal_replication>false</internal_replication> -->
                <!-- Optional. Shard weight when writing data. Default: 1. -->
                <!-- <weight>1</weight> -->
                <replica>
                    <host>localhost</host>
                    <port>9000</port>
                    <!-- Optional. Priority of the replica for load_balancing. Default: 1 (less value has more priority). -->
                    <!-- <priority>1</priority> -->
                </replica>
            </shard>
        </test_shard_localhost>
        <test_cluster_two_shards_localhost>
             <shard>
                 <replica>
                     <host>localhost</host>
                     <port>9000</port>
                 </replica>
             </shard>
             <shard>
                 <replica>
                     <host>localhost</host>
                     <port>9000</port>
                 </replica>
             </shard>
        </test_cluster_two_shards_localhost>


      <!-- 配置 2 个分配,0 副本 -->
        <test_cluster_two_shards>
            <shard>
                <replica>
                    <host>127.0.0.1</host>
                    <port>9000</port>
                </replica>
            </shard>
            <shard>
                <replica>
                    <host>127.0.0.2</host>
                    <port>9000</port>
                </replica>
            </shard>
        </test_cluster_two_shards>

       <!--2 分片,0 副本-->
        <test_cluster_two_shards_internal_replication>
            <shard>
                <internal_replication>true</internal_replication>
                <replica>
                    <host>127.0.0.1</host>
                    <port>9000</port>
                </replica>
            </shard>
            <shard>
                <internal_replication>true</internal_replication>
                <replica>
                    <host>127.0.0.2</host>
                    <port>9000</port>
                </replica>
            </shard>
        </test_cluster_two_shards_internal_replication>

       <!--1分片 0 副本,权重设为 1-->
        <test_shard_localhost_secure>
            <shard>
                <replica>
                    <host>localhost</host>
                    <port>9440</port>
                    <secure>1</secure>
                </replica>
            </shard>
        </test_shard_localhost_secure>


        <test_unavailable_shard>
            <shard>
                <replica>
                    <host>localhost</host>
                    <port>9000</port>
                </replica>
            </shard>
            <shard>
                <replica>
                    <host>localhost</host>
                    <port>1</port>
                </replica>
            </shard>
        </test_unavailable_shard>

      <!-- 手动添加新的集群 -->
      <two_shard>
              <shard>
                <replica>
                    <host>node3</host>
                    <port>9977</port>
                </replica>
            </shard>
            <shard>
                <replica>
                    <host>node2</host>
                    <port>9977</port>
                </replica>
            </shard>
      </two_shard>


    </remote_servers>
sql
-- 在 system.clusters 中查看配置情况
select cluster,host_name from system.clusters;

┌─cluster──────────────────────────────────────┬─host_name─┐
│ test_cluster_two_shards                      │ 127.0.0.1 │
│ test_cluster_two_shards                      │ 127.0.0.2 │
│ test_cluster_two_shards_internal_replication │ 127.0.0.1 │
│ test_cluster_two_shards_internal_replication │ 127.0.0.2 │
│ test_cluster_two_shards_localhost            │ localhost │
│ test_cluster_two_shards_localhost            │ localhost │
│ test_shard_localhost                         │ localhost │
│ test_shard_localhost_secure                  │ localhost │
│ test_unavailable_shard                       │ localhost │
│ test_unavailable_shard                       │ localhost │
└──────────────────────────────────────────────┴───────────┘
定义动态变量
在每个节点的 config 配置文件中 增加变量配置
# node3
vim /etc/clickhouse-server/config.xml
# 增加如下内容
<macros>
  <shard>01</shard>
  <replica>node3</replica>
</macros>

# node2
vim /etc/clickhouse-server/config.xml
# 增加如下内容
<macros>
  <shard>02</shard>
  <replica>node2</replica>
</macros>
sql
-- 进入 clickhouse 命令行查看变量是否配置成功

select * from system.macros;

-- 查看远端节点的数据
select * from remote('node2:9977','system','macros','default')
1.3 基于集群实现分布式 DDL
在默认情况下,创建多张副本表需要在不同服务器上进行创建,这是因为 create、drop、rename和 alter 等 ddl 语句不支持分布式执行,而在假如集群配置后,就可以使用新的语法实现分布式DDL 执行了。
create / drop / rename / alter table on cluster cluster_name

-- cluster_name 对应为配置文件中的汲取名称,clickhouse 会根据集群的配置,去各个节点执行 DDL 语句

-- 在 two_shard 集群 创建测试表

CREATE TABLE t_shard ON CLUSTER two_shard
(
    `id` UInt8,
    `name` String,
    `date` DateTime
)
ENGINE = ReplicatedMergeTree('/clickhouse/tables/shard/t_shard', 'replica')
PARTITION BY toYYYYMM(date)
ORDER BY id

┌─host──┬─port─┬─status─┬─error─┬─num_hosts_remaining─┬─num_hosts_active─┐
│ node2 │ 9977 │      0 │       │                   1 │                1 │
└───────┴──────┴────────┴───────┴─────────────────────┴──────────────────┘
┌─host──┬─port─┬─status─┬─error─┬─num_hosts_remaining─┬─num_hosts_active─┐
│ node3 │ 9977 │      0 │       │                   0 │                0 │
└───────┴──────┴────────┴───────┴─────────────────────┴──────────────────┘

-- 表引擎可以使用其他任意引擎
-- shard 和 replica 两个动态变量代替了前面的硬编码方式
-- clickhouse 会根据 shard_2 的配置在 node3 和 node2 中创建 t_shard 数据表

-- 删除 t_shard 表
drop table t_shard on cluster shard_2;
3. 数据结构
zookeeper 内的节点结构
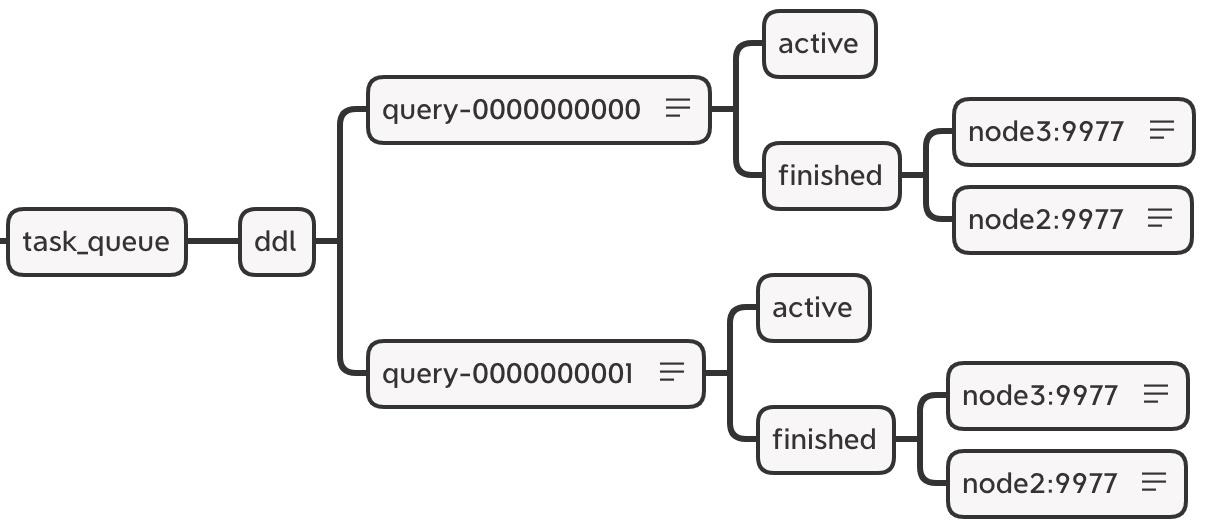
<!-- 在默认情况下,分布式 DDL 在 zookeeper 内使用的根路径由config.xml distributed_ddl 标签配置 -->

<distributed_ddl>
  <path>/clickhouse/task_queue/ddl</path>
</distributed_ddl>
<!-- 默认为 /clickhouse/task_queue/ddl-->
在此路径之下,还有一些其他监听节点,包括 /query-[seq] 这是 DDL 操作日志,每执行一次分布式 DDL 查询,该节点下就会增加一条操作日志,记录响应操作。当各个节点监听到有新的日志假如的时候,便会响应执行。
DDL 操作日志使用 zookeeper 持久化顺序节点,每条指令的名称以 query-[seq] 为前缀,后面的序号递增,在 query-[seq] 操作日志下,还有两个状态节点:
-
query-[seq]/active:用做监控状态,在执行任务的过程中,在该节点下会临时保存当前集群内状态为 active 的节点 -
query-[seq]/finished:用于检查任务完成情况,在任务执行过程中,每当集群内的某个 host 节点执行完成之后,就会在该节点下写入记录。
/query-000001/finished
node3 : 0
node2 : 0

# 表示 node3,node2 两个节点已经执行完成

DDLLogEntry 日志对象的数据结构
# 在 /query-[seq]下记录的信息由 DDLLogEntry 承载,它的核心属性有以下几个:
version: 1

query: CREATE TABLE default.t_shard UUID \\'d1679b02-9eae-4766-8032-8201a2746692\\' ON CLUSTER two_shard (`id` UInt8, `name` String, `date` DateTime) ENGINE = ReplicatedMergeTree(\\'/clickhouse/tables/shard/t_shard\\', \\'replica\\') PARTITION BY toYYYYMM(date) ORDER BY id

hosts: ['node3:9977','node2:9977']

initiator: node3%2Exy%2Ecom:9977

# query:记录了 DDL 查询的执行语句
# host:记录了指定集群的 hosts 主机列表,集群由分布式 DDL 语句中的 on cluster 指定,在分布式 DDL 执行过程中,会根据 hosts 列表逐个判断它们的执行状态。
# initiator:记录初始 host 主机的名称,hosts 主机列表的取值来自于初始化 host 节点上的去集群
host主机列表的取值来源等同于下面的查询
SELECT host_name
FROM system.clusters
WHERE cluster = 'two_shard'

┌─host_name─┐
│ node3     │
│ node2     │
└───────────┘
4.分布式 DDL 的执行流程
以创建分布式表为例说明分布式 DDL 的执行流程。
分布式 DDL 整个流程按照从上而下的时间顺序执行,大致分成 3 个步骤:
-
推送 DDL 日志:首先在 node3 节点执行 create table on cluster ,同时 node3 也会创建 DDLLogEntry 日志 ,并将日志推送到 zookeeper 中,并监控任务的执行进度 -
拉取日志并执行:node3、node2 两个节点分别监控以上是关于clickhouseclickhouse 副本与分片 分片详解的主要内容,如果未能解决你的问题,请参考以下文章