Android新控件MotionLayout介绍
Posted microhex
tags:
篇首语:本文由小常识网(cha138.com)小编为大家整理,主要介绍了Android新控件MotionLayout介绍相关的知识,希望对你有一定的参考价值。
文章目录
有关 Android新控件MotionLayout介绍(一)。今天主要是来看第二章。
主要是通过一系列包括自定义属性、图片操作和关键帧来描绘一下MotionLayout的特征。
原文地址为: https://medium.com/google-developers/introduction-to-motionlayout-part-ii-a31acc084f59
自定义属性
在上一篇文章中我们创建了独立的MotionScene,我们可以通过它来实现我们指定的属性转换,当然这种属性并不仅仅是指位置上的。
实际上,原始的ConstraintSet 只封装了layout布局规则;但是对于丰富的动画,我们经常需要转换其他(并非布局规则)的东西(举个例子,我需要改变背景颜色)。在ConstraintLayout 2.0中,ConstraintSet也可以存储自定义属性的状态。在接下来的运动情景中,我们的背景颜色是可以切换的。
很显然,在以前要实现这种动画,你必须在代码中实现。但是现在你在XML中指定相关的自定义直接指定就行了。
<Constraint
    android:id="@+id/button" ...>
    <CustomAttribute
        motion:attributeName="backgroundColor"
        motion:customColorValue="#D81B60"/>
</Constraint>
我们来看一下XML中的代码怎么写:
<?xml version="1.0" encoding="utf-8"?>
<MotionScene xmlns:android="http://schemas.android.com/apk/res/android"
    xmlns:motion="http://schemas.android.com/apk/res-auto">

    <Transition
        motion:constraintSetEnd="@+id/end"
        motion:constraintSetStart="@+id/start"
        motion:duration="1000"
        motion:interpolator="linear">
        <OnSwipe
            motion:dragDirection="dragRight"
            motion:touchAnchorId="@+id/button"
            motion:touchAnchorSide="right" />
    </Transition>

    <ConstraintSet android:id="@+id/start">
        <Constraint
            android:id="@+id/button"
            android:layout_width="64dp"
            android:layout_height="64dp"
            android:layout_marginStart="8dp"
            motion:layout_constraintBottom_toBottomOf="parent"
            motion:layout_constraintStart_toStartOf="parent"
            motion:layout_constraintTop_toTopOf="parent">
            <CustomAttribute
                motion:attributeName="backgroundColor"
                motion:customColorValue="#D81B60" />
        </Constraint>
    </ConstraintSet>

    <ConstraintSet android:id="@+id/end">
        <Constraint
            android:id="@+id/button"
            android:layout_width="64dp"
            android:layout_height="64dp"
            android:layout_marginEnd="8dp"
            motion:layout_constraintBottom_toBottomOf="parent"
            motion:layout_constraintEnd_toEndOf="parent"
            motion:layout_constraintTop_toTopOf="parent">
            <CustomAttribute
                motion:attributeName="backgroundColor"
                motion:customColorValue="#9999FF" />
        </Constraint>
    </ConstraintSet>

</MotionScene>
自定义属性可以通过属性名指定,但是它必须存在getter/setter方法,就像这种:
- getter: getName (比如getBackgrounColor)
- setter: setName (比如setBackgroundColor)
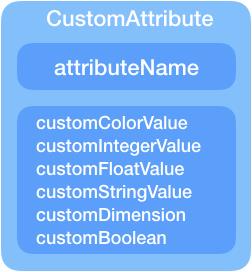
自定义属性的值也必须指定:(不同的类型的值需要不一样的赋值方式)
- customColorValue --> 针对颜色数据
- customIntegerValue --> 针对整型数据
- customFloatValue–> 针对浮点型数据
- customStringValue–> 针对字符串
- customDimension–> 针对尺寸
- customBoolean–> 针对布尔型
最终,当我们定义一个自定义属性时,我们需要在start ConstraintSet和end ConstraintSet中同时定义自定义属性和自定义属性值。
ImageFilterView (1/2)
当我们处理比较复杂的转换时,我们经常需要对图片做一些操作,然后将动画作用到它们图片身上。ConstraintLayout 2.0给我们带来了一个非常易用和实用的类:ImageFilterView (继承自AppCompatImageView)。
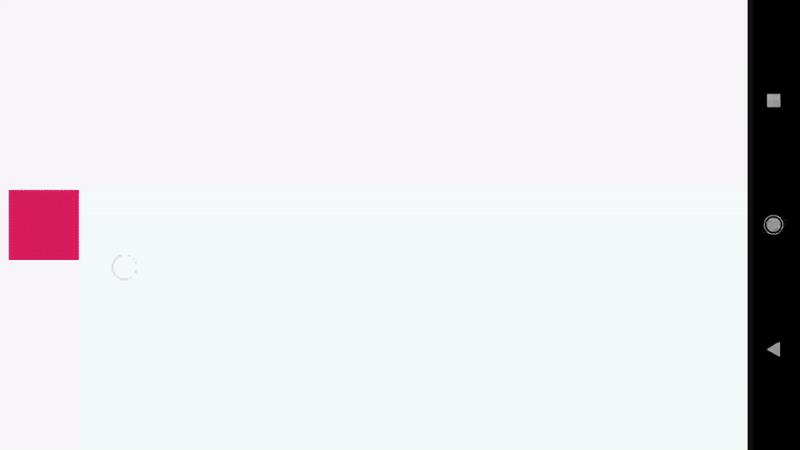
我们来做一个两张图片相互交换例子,就像下面:
首先我们需要定义一个有图片的MotionLayout文件:
<?xml version="1.0" encoding="utf-8"?>
<android.support.constraint.motion.MotionLayout
    xmlns:android="http://schemas.android.com/apk/res/android"
    xmlns:tools="http://schemas.android.com/tools"
    xmlns:app="http://schemas.android.com/apk/res-auto"
    android:id="@+id/motionLayout"
    app:layoutDescription="@xml/scene_04"
    android:layout_width="match_parent"
    android:layout_height="match_parent">

    <android.support.constraint.utils.ImageFilterView
        android:id="@+id/image"
        android:background="@color/colorAccent"
        android:src="@drawable/roard"
        app:altSrc="@drawable/hoford"
        android:layout_width="64dp"
        android:layout_height="64dp"/>

</android.support.constraint.motion.MotionLayout>
其中说明一下:roard.png图片是左侧人物图像,hoford.png图片是右侧人物图像。
与普通的ImageView相比,ImageFilterView多了一个属性:altSrc,(这个属性就是提供了淡入淡出的功能)
<android.support.constraint.image.ImageFilterView
    android:id="@+id/image"
...
    android:src="@drawable/roard"
    app:altSrc="@drawable/hoford"/>
在MotionScene文件中,我们可以定义一个淡入淡出的属性:
<?xml version="1.0" encoding="utf-8"?>
<MotionScene xmlns:android="http://schemas.android.com/apk/res/android"
    xmlns:motion="http://schemas.android.com/apk/res-auto">

    <Transition
        motion:constraintSetEnd="@+id/end"
        motion:constraintSetStart="@+id/start"
        motion:duration="1000"
        motion:interpolator="linear">
        <OnSwipe
            motion:dragDirection="dragRight"
            motion:touchAnchorId="@+id/image"
            motion:touchAnchorSide="right" />
    </Transition>

    <ConstraintSet android:id="@+id/start">
        <Constraint
            android:id="@+id/image"
            android:layout_width="100dp"
            android:layout_height="100dp"
            android:layout_marginStart="8dp"
            motion:layout_constraintBottom_toBottomOf="parent"
            motion:layout_constraintStart_toStartOf="parent"
            motion:layout_constraintTop_toTopOf="parent">
            <CustomAttribute
                motion:attributeName="crossfade"
                motion:customFloatValue="0" />
        </Constraint>
    </ConstraintSet>

    <ConstraintSet android:id="@+id/end">
        <Constraint
            android:id="@+id/image"
            android:layout_width="100dp"
            android:layout_height="100dp"
            android:layout_marginEnd="8dp"
            motion:layout_constraintBottom_toBottomOf="parent"
            motion:layout_constraintEnd_toEndOf="parent"
            motion:layout_constraintTop_toTopOf="parent">
            <CustomAttribute
                motion:attributeName="crossfade"
                motion:customFloatValue="1" />
        </Constraint>
    </ConstraintSet>

</MotionScene>
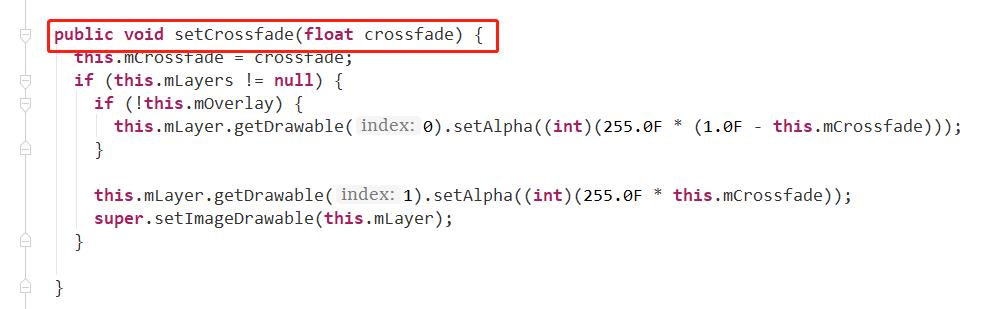
这crossfade是来自ImageFilterView的自身属性,可以参考源码:
ImageFilterView (2/2)
ImageFilterView提供了很多功能:
saturation : 0 = grayscale, 1 = original, 2 = hyper saturated (饱和度 0:灰度 1:原始 2: 超饱和)
contrast : 1 = unchanged, 0 = gray, 2 = high contrast (对比度 1:无改变 0:灰色 2:高对比度)
warmth : 1 = neutral, 2 = warm (red tint), 0.5 = cold (blue tint) (暖色 1:正常的 2:暖色调(偏红色的) 0.5: 冷色调(偏蓝色的))
crossfade (with app:altSrc) 渐入渐出(上面已经说过)
这里有个例子大家展示一下:图片太大,上传不了,我只能压缩一下上传了:(
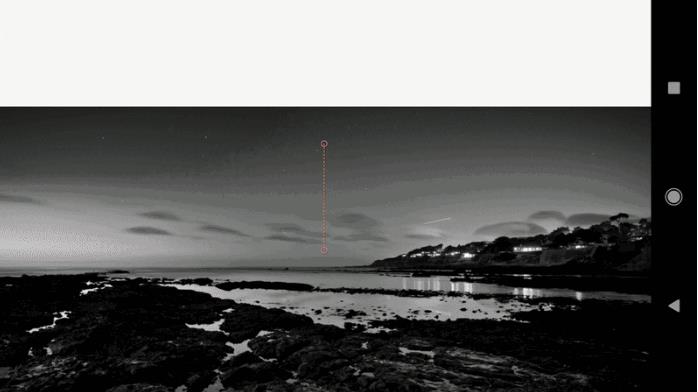
使用自定义属性来指定图片的饱和度信息,即可完成上面的骚操作:
<CustomAttribute
    motion:attributeName="saturation"
    motion:customFloatValue="1" />
完整的MotionLayout代码为:
<?xml version="1.0" encoding="utf-8"?>
<android.support.constraint.motion.MotionLayout xmlns:android="http://schemas.android.com/apk/res/android"
    xmlns:app="http://schemas.android.com/apk/res-auto"
    android:id="@+id/motionLayout"
    app:layoutDescription="@xml/scene_05"
    android:layout_width="match_parent"
    android:layout_height="match_parent">

    <android.support.constraint.utils.ImageFilterView
        android:id="@+id/image"
        android:src="@drawable/sunset2"
        android:scaleType="centerCrop"
        android:layout_width="match_parent"
        android:layout_height="300dp" />

</android.support.constraint.motion.MotionLayout>
其中scene_05.xml文件为:
<?xml version="1.0" encoding="utf-8"?>
<MotionScene
    xmlns:android="http://schemas.android.com/apk/res/android"
    xmlns:motion="http://schemas.android.com/apk/res-auto">

    <Transition
        motion:constraintSetStart="@+id/start"
        motion:constraintSetEnd="@+id/end"
        motion:duration="1000">
        <OnSwipe
            motion:touchAnchorId="@+id/image"
            motion:touchAnchorSide="top"
            motion:dragDirection="dragUp" />
    </Transition>

    <ConstraintSet android:id="@+id/start">
        <Constraint
            android:id="@+id/image"
            android:layout_width="match_parent"
            android:layout_height="300dp"
            motion:layout_constraintStart_toStartOf="parent"
            motion:layout_constraintTop_toTopOf="parent">
            <CustomAttribute
                motion:attributeName="saturation"
                motion:customFloatValue="1" />
        </Constraint>
    </ConstraintSet>

    <ConstraintSet android:id="@+id/end">
        <Constraint
            android:id="@+id/image"
            android:layout_width="match_parent"
            android:layout_height="300dp"
            motion:layout_constraintBottom_toBottomOf="parent"
            motion:layout_constraintEnd_toEndOf="parent">
            <CustomAttribute
                motion:attributeName="saturation"
                motion:customFloatValue="0" />
        </Constraint>
    </ConstraintSet>

</MotionScene>
关键帧
MotionLayout的一个非常好的想法就是“静止的状态”,它是由ConstraintSets实现的。我们由MotionLayout产生的布局将会适应不同的屏幕大小,本质上来说,MotionLayout就像典型的ConstraintLayout。
在有些情况在,你可能需要一个(转换过程中的)中间状态。这个状态不是一直保持的,而是某个过程中需要经历的(我的理解为瞬时状态)。我们可以通过轻量级的实现方案Keyframes来插入两个以上的ConstraintSets。
Keyframes(关键帧)可以被应用到位置上或者自定义属性值上。它会让你在某转换的某一个点上指定这种变化的值。
举个例子,如果你想在转换的25%的过程中,组件变成红色;转换50%的时候,组件上移动,就可以使用Keyframes了。
Keyframe (1/2), 位置
这里有好几种方式(pathRelative, deltaRelative, parentRelative) 可以帮助你实现关键帧的位置,每种方式的不同,将会在后面的内容中讲到。
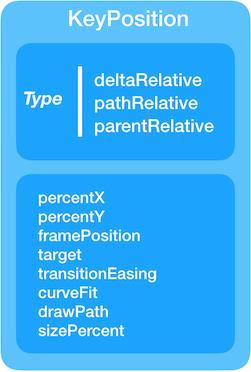
简单快速介绍一下关键帧的位置,这里我们指定一下在转换的50%时,目标view移动到屏幕的25%的位置。
<Transition ...>
    <KeyFrameSet>
        <KeyPosition
            motion:keyPositionType="parentRelative"
            motion:percentY="0.25"
            motion:framePosition="50"
            motion:target="@+id/button"/>
    </KeyFrameSet>
</Transition>
结果如下:

简单的MotionLayout代码如下:
<?xml version="1.0" encoding="utf-8"?>
<android.support.constraint.motion.MotionLayout xmlns:android="http://schemas.android.com/apk/res/android"
    xmlns:tools="http://schemas.android.com/tools"
    xmlns:app="http://schemas.android.com/apk/res-auto"
    android:id="@+id/motionLayout"
    app:layoutDescription="@xml/scene_06"
    android:layout_width="match_parent"
    android:layout_height="match_parent">

    <View
        android:id="@+id/button"
        android:background="@color/colorAccent"
        android:layout_width="64dp"
        android:layout_height="64dp" />

</android.support.constraint.motion.MotionLayout>
下面是MotionScene文件了,和以前的MotionScene文件差不多,只是区别在于KeyPosition 元素:
<?xml version="1.0" encoding="utf-8"?>
<MotionScene
    xmlns:android="http://schemas.android.com/apk/res/android"
    xmlns:motion="http://schemas.android.com/apk/res-auto">

    <Transition
        motion:constraintSetStart="@+id/start"
        motion:constraintSetEnd="@+id/end"
        motion:duration="1000"
        motion:interpolator="linear">
        <OnSwipe
            motion:touchAnchorId="@+id/button"
            motion:touchAnchorSide="right"
            motion:dragDirection="dragRight" />

        <KeyFrameSet>
            <KeyPosition
                motion:keyPositionType="parentRelative"
                motion:percentY="0.25"
                motion:framePosition="50"
                motion:target="@+id/button"/>
        </KeyFrameSet>
    </Transition>

    <ConstraintSet android:id="@+id/start">
        <Constraint
            android:id="@+id/button"
            android:layout_width="64dp"
            android:layout_height="64dp"
            android:layout_marginStart="8dp"
            motion:layout_constraintBottom_toBottomOf="parent"
            motion:layout_constraintStart_toStartOf="parent"
            motion:layout_constraintTop_toTopOf="parent">
            <CustomAttribute
                motion:attributeName="backgroundColor"
                motion:customColorValu以上是关于Android新控件MotionLayout介绍的主要内容,如果未能解决你的问题,请参考以下文章