Spirng+SpringMVC+Mybatis+Shiro 整合---实现用户认证
Posted 闲言博客
tags:
篇首语:本文由小常识网(cha138.com)小编为大家整理,主要介绍了Spirng+SpringMVC+Mybatis+Shiro 整合---实现用户认证相关的知识,希望对你有一定的参考价值。
Spirng+SpringMVC+Mybatis+Shiro 整合
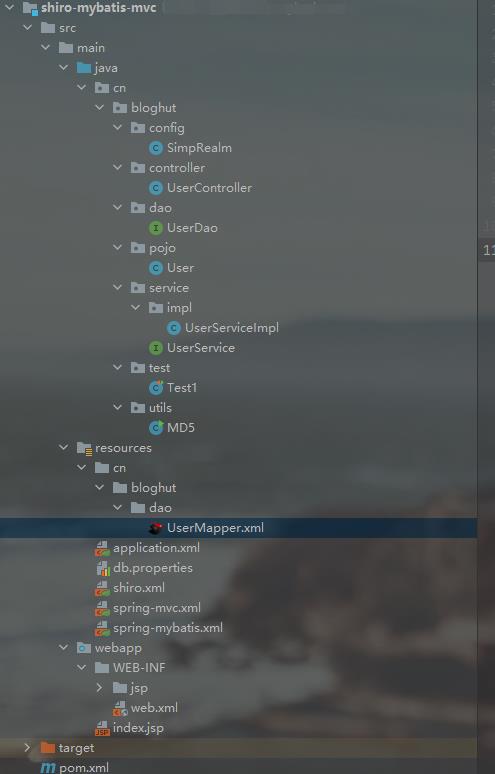
项目结构
- 简单说明
- SimpRealm 认证授权相关类
- UserController 控制层
- UserDao 持久层
- UserService 业务层
- User 实体类
- MD5 用用生成密文的
- Test1 测试用的
- UserMapper.xml 文件 用户操作数据库的
- application.xml spring 主配置文件
- db.properteis 主要配置连接数据库信息的
- shiro.xml shiro的配置文件
- spring-mvc springmvc的配置文件
- spring-mybatis mybatis 的配置文件

整合思路
- 使用spring 整合spring mvc
- 使用spring 整合 mybatis
- 最后整合shiro
导入相关依赖
  <dependencies>
    <!--单元测试-->
    <dependency>
      <groupId>junit</groupId>
      <artifactId>junit</artifactId>
      <version>4.13.2</version>
    </dependency>
    <!--shiro相关-->
    <dependency>
      <groupId>org.apache.shiro</groupId>
      <artifactId>shiro-spring</artifactId>
      <version>1.4.1</version>
    </dependency>
    <dependency>
      <groupId>org.apache.shiro</groupId>
      <artifactId>shiro-web</artifactId>
      <version>1.4.1</version>
    </dependency>
    <dependency>
      <groupId>org.apache.shiro</groupId>
      <artifactId>shiro-core</artifactId>
      <version>1.4.1</version>
    </dependency>
    <dependency>
      <groupId>org.apache.shiro</groupId>
      <artifactId>shiro-ehcache</artifactId>
      <version>1.4.1</version>
    </dependency>
    <dependency>
      <groupId>log4j</groupId>
      <artifactId>log4j</artifactId>
      <version>1.2.17</version>
    </dependency>

    <!--web支持-->
    <dependency>
      <groupId>org.springframework</groupId>
      <artifactId>spring-webmvc</artifactId>
      <version>5.0.2.RELEASE</version>
    </dependency>
    <dependency>
      <groupId>org.springframework</groupId>
      <artifactId>spring-web</artifactId>
      <version>5.0.2.RELEASE</version>
    </dependency>
    <dependency>
      <groupId>org.springframework</groupId>
      <artifactId>spring-jdbc</artifactId>
      <version>5.0.2.RELEASE</version>
    </dependency>

    <!--mybatis 依赖-->
    <dependency>
      <groupId>org.mybatis</groupId>
      <artifactId>mybatis</artifactId>
      <version>3.4.4</version>
    </dependency>
    <dependency>
      <groupId>org.mybatis</groupId>
      <artifactId>mybatis-spring</artifactId>
      <version>1.3.1</version>
    </dependency>

    <!--使用httpServletRequest时导入 top-->
    <dependency>
      <groupId>javax.servlet</groupId>
      <artifactId>servlet-api</artifactId>
      <version>2.5</version>
    </dependency>
    <dependency>
      <groupId>javax.servlet</groupId>
      <artifactId>jsp-api</artifactId>
      <version>2.0</version>
    </dependency>
    <!--使用httpServletRequest时导入 end-->

    <!--mysql 依赖-->
    <dependency>
      <groupId>mysql</groupId>
      <artifactId>mysql-connector-java</artifactId>
      <version>5.1.6</version>
    </dependency>
    <!--连接池-->
    <dependency>
      <groupId>com.alibaba</groupId>
      <artifactId>druid</artifactId>
      <version>1.1.21</version>
    </dependency>
  </dependencies>
一.Spring整合Spring MVC
- 创建:application.xml
- 创建:spring-mvc.xml
- 创建:UserController
UserController
@Controller
@RequestMapping("user")
public class UserController

    @RequestMapping("test")
    public String test()

        return "success";
application.xml
<?xml version="1.0" encoding="UTF-8"?>
<beans xmlns="http://www.springframework.org/schema/beans"
       xmlns:xsi="http://www.w3.org/2001/XMLSchema-instance"
       xmlns:context="http://www.springframework.org/schema/context"
       xmlns:aop="http://www.springframework.org/schema/aop"
       xsi:schemaLocation="http://www.springframework.org/schema/beans
       https://www.springframework.org/schema/beans/spring-beans.xsd
       http://www.springframework.org/schema/context
       https://www.springframework.org/schema/context/spring-context.xsd
       http://www.springframework.org/schema/aop
       https://www.springframework.org/schema/aop/spring-aop.xsd">

    <!--开启注解扫描-->
    <context:component-scan base-package="cn.bloghut"/>

</beans>
spring-mvc.xml
<?xml version="1.0" encoding="UTF-8"?>
<beans xmlns="http://www.springframework.org/schema/beans"
       xmlns:mvc="http://www.springframework.org/schema/mvc"
       xmlns:context="http://www.springframework.org/schema/context"
       xmlns:xsi="http://www.w3.org/2001/XMLSchema-instance"
       xsi:schemaLocation="
        http://www.springframework.org/schema/beans
        http://www.springframework.org/schema/beans/spring-beans.xsd
        http://www.springframework.org/schema/mvc
        http://www.springframework.org/schema/mvc/spring-mvc.xsd
        http://www.springframework.org/schema/context
        http://www.springframework.org/schema/context/spring-context.xsd">
    <!--包扫描-->
    <context:component-scan base-package="cn.bloghut.controller"/>

    <!--视图解析器-->
    <bean id="internalResourceViewResolver" class="org.springframework.web.servlet.view.InternalResourceViewResolver">
        <property name="prefix" value="/WEB-INF/jsp/" />
        <property name="suffix" value=".jsp" />
    </bean>

    <!--开启注解支持-->
    <mvc:annotation-driven/>
</beans>
web.xml
<web-app
        version="3.0"
        xmlns="http://java.sun.com/xml/ns/javaee"
        xmlns:xsi="http://www.w3.org/2001/XMLSchema-instance"
        xsi:schemaLocation="http://java.sun.com/xml/ns/javaee http://java.sun.com/xml/ns/javaee/web-app_3_0.xsd">
  <display-name>Archetype Created Web Application</display-name>


  <listener>
    <listener-class>org.springframework.web.context.ContextLoaderListener</listener-class>
  </listener>
  <!--设置配置文件的路径-->
  <context-param>
    <param-name>contextConfigLocation</param-name>
    <param-value>classpath:application.xml</param-value>
  </context-param>

  <!--设置前端控制器-->
  <servlet>
    <servlet-name>dispatcherServlet</servlet-name>
    <servlet-class>org.springframework.web.servlet.DispatcherServlet</servlet-class>
    <init-param>
      <param-name>contextConfigLocation</param-name>
      <param-value>classpath:spring-mvc.xml</param-value>
    </init-param>
    <load-on-startup>1</load-on-startup>
  </servlet>
  <servlet-mapping>
    <servlet-name>dispatcherServlet</servlet-name>
    <url-pattern>/</url-pattern>
  </servlet-mapping>

</web-app>
测试Spring整合SpringMVC
- 注意:在整合的时候,每整合一个框架就先进行测试,不然到后面如果出错了很难排除

二.Spring整合Mybatis
- 创建spring-mybatis文件
- 创建db.properties 文件
- 修改 application.xml 文件将 spring-mybatis文件 导入
- 创建UserDao 接口
- 创建UserMapper.xml 映射配置文件(注意:UserMapper.xml 建议放在和UserDao接口同级的目录结构)
db.properties
jdbc.driver=com.mysql.jdbc.Driver
jdbc.url=jdbc:mysql://127.0.0.1/shiro
jdbc.username=root
jdbc.password=123
spring-mybatis.xml
<?xml version="1.0" encoding="UTF-8"?>
<beans xmlns="http://www.springframework.org/schema/beans"
       xmlns:xsi="http://www.w3.org/2001/XMLSchema-instance"
       xmlns:context="http://www.springframework.org/schema/context"
       xmlns:aop="http://www.springframework.org/schema/aop"
       xsi:schemaLocation="http://www.springframework.org/schema/beans
       https://www.springframework.org/schema/beans/spring-beans.xsd
       http://www.springframework.org/schema/context
       https://www.springframework.org/schema/context/spring-context.xsd
       http://www.springframework.org/schema/aop
       https://www.springframework.org/schema/aop/spring-aop.xsd">
    <!--加载配置文件-->
    <context:property-placeholder location="classpath:db.properties"/>

    <!--配置数据源-->
    <bean id="dataSource" class="com.alibaba.druid.pool.DruidDataSource">
        <property name="driverClassName" value="$jdbc.driver"/>
        <property name="url" value="$jdbc.url"/>
        <property name="username" value="$jdbc.username"/>
        <property name="password" value="$jdbc.password"/>
    </bean>
    <!--配置SQLSessionFactory工厂-->
    <bean id="sqlSessionFactory" class="org.mybatis.spring.SqlSessionFactoryBean">
        <!--注入数据源-->
        <property name="dataSource" ref="dataSource"/>
        <!--扫描mapper映射文件-->
        <property name="mapperLocations" value="classpath:cn/bloghut/dao/*Mapper.xml"/>
    </bean>

    <!--配置Dao 接口所在的包-->
    <bean id="mapperScannerConfigurer" class="org.mybatis.spring.mapper.MapperScannerConfigurer">
        <property name="basePackage" value="cn.bloghut.dao"/>
    </bean>

</beans>
修改application.xml文件
<?xml version="1.0" encoding="UTF-8"?>
<beans xmlns="http://www.springframework.org/schema/beans"
       xmlns:xsi="http://www.w3.org/2001/XMLSchema-instance"
       xmlns:context="http://www.springframework.org/schema/context"
       xmlns:aop="http://www.springframework.org/schema/aop"
       xsi:schemaLocation="http://www.springframework.org/schema/beans
       https://www.springframework.org/schema/beans/spring-beans.xsd
       http://www.springframework.org/schema/context
       https://www.springframework.org/schema/context/spring-context.xsd
       http://www.springframework.org/schema/aop
       https://www.springframework.org/schema/aop/spring-aop.xsd">

    <!--开启注解扫描-->
    <context:component-scan base-package="cn.bloghut"/>
    <!--导入mybatis 配置-->
    <import resource="spring-mybatis.xml"/>
</beans>
UserDao接口
public interface UserDao
    /**
     * 根据用户名查询用户信息
     * @param username
     * @return
     */
    User findByUsername(@Param("username") String username);
UserMapper.xml
<?xml version="1.0" encoding="UTF-8" ?>
<!DOCTYPE mapper
        PUBLIC "-//mybatis.org//DTD Mapper 3.0//EN"
        "http://mybatis.org/dtd/mybatis-3-mapper.dtd">
<mapper namespace="cn.bloghut.dao.UserDao">
    <!--根据用户名查询用户信息-->
    <select id="findByUsername" resultType="cn.bloghut.pojo.User" parameterType="string">
        select * from user where username = #username
    </select>

</mapper>
测试Spring整合Mybatis
- 测试代码过于简单,这里不列出了
User admin = userService.findByUsername("admin");
System.out.println(admin);
输出结果
Userid=1, username='admin', password='202cb962ac59075b964b07152d234b70'
三.Spring整合Shiro
- 创建shiro.xml 文件
- 创建SimpRealm
- 修改application.xml 文件 (导入shiro.xml 文件)
- 修改web.xml 文件
shiro.xml
<?xml version="1.0" encoding="UTF-8"?>
<beans xmlns="http://www.springframework.org/schema/beans"
       xmlns:xsi="http://www.w3.org/2001/XMLSchema-instance"
       xmlns:context="http://www.springframework.org/schema/context"
       xmlns:aop="http://www.springframework.org/schema/aop"
       xsi:schemaLocation="http://www.springframework.org/schema/beans
       https://www.springframework.org/schema/beans/spring-beans.xsd
       http://www.springframework.org/schema/context
       https://www.springframework.org/schema/context/spring-context.xsd
       http://www.springframework.org/schema/aop
       https://www.springframework.org/schema/aop/spring-aop.xsd">

    <!--配置安全管理器-->
    <bean id="securityManager" class="org.apache.shiro.web.mgt.DefaultWebSecurityManager">
        <!--注入realm-->
        <property name="realm" ref="realm"/>
    </bean>

    <!--配置realm-->
    <bean id="realm" class="cn.bloghut.config.SimpRealm">
        <!--加密方式-->
        <property name="credentialsMatcher">
            <bean class="org.apache.shiro.authc.credential.HashedCredentialsMatcher">
                <!--加密方式-->
                <property name="hashAlgorithmName"  value="MD5"/>
                <property name="storedCredentialsHexEncoded" value="true"/>
            </bean>
        </property>
    </bean>


    <!--注入安全管理器-->
    <bean class="org.apache.shiro.spring.security.interceptor.AuthorizationAttributeSourceAdvisor">
        <property name="securityManager" ref="securityManager"/>
    </bean>

    <!--配置过滤器-->
    <bean id="shiroFilter" class="org.apache.shiro.spring.web.ShiroFilterFactoryBean">
        <!--注入安全管理器-->
        <property name="securityManager" ref="securityManager"/>
        <!--获取登录页面请求-->
        <property name="loginUrl" value="/user/login"/>
        <!--设置成功 发送请求-->
        <property name="successUrl" value="/user/success"/>
        <!--设置没有权限页面-->
        <property name="unauthorizedUrl" value="/user/unauthorized"/>
        <!--
            anon:可以匿名访问
            authc:需要认证才能访问
            通常在项目中不会配置过多
                一般就是登陆页面,注册页面,验证码,css/js/图片等文件
            这主要看你的是什么系统:
                比如说面向用户的:博客系统这些,就需要放行很多
            权限框架一般:用于管理端

        -->
        <property name="filterChainDefinitions">
            <value>
                <!--配置不拦截的路径-->
                /user/login = anon
                /user/unauthorized = anon
                /*.css = anon
                /*.jar = anon
                /*.js = anon
                /user/index.jsp = anon
                /user/login_finis = anon

                <!--配置拦截路径-->
                /** = authc
            </value>
        </property>

    </bean>

</beans>
SimpRealm
public class SimpRealm extends AuthorizingRealm

    @Autowired
    private UserService userService;

    /**
     * 认证
     *
     * @param token
     * @return
     * @throws AuthenticationException
     */
    @Override
    protected AuthenticationInfo doGetAuthenticationInfo(AuthenticationToken token) throws AuthenticationException
        //获取用户在controller输入的用户名对象
        UsernamePasswordToken userToken = (UsernamePasswordToken) token;
        //获取用户输入的用户名
        String username = userToken.getUsername();
        //根据用户名查询用户
        User user = userService.findByUsername(username);

        return new SimpleAuthenticationInfo("", user.getPassword(), getName());


    /**
     * 授权
     *
     * @param principals
     * @return
     */
    @Override
    protected AuthorizationInfo doGetAuthorizationInfo(PrincipalCollection principals)

        System.out.println("执行了授权============");

        return null;
application.xml
<?xml version="1.0" encoding="UTF-8"?>
<beans xmlns="http://www.springframework.org/schema/beans"
       xmlns:xsi="http://www.w3.org/2001/XMLSchema-instance"
       xmlns:context="http://www.springframework.org/schema/context"
       xmlns:aop="http://www.springframework.org/schema/aop"
       xsi:schemaLocation="http://www.springframework.org/schema/beans
       https://www.springframework.org/schema/beans/spring-beans.xsd
       http://www.springframework.org/schema/context
       https://www.springframework.org/schema/context/spring-context.xsd
       http://www.springframework.org/schema/aop
       https://www.springframework.org/schema/aop/spring-aop.xsd">

    <!--开启注解扫描-->
    <context:component-scan base-package="cn.bloghut"/>
    <!--导入mybatis 配置-->
    <import resource="spring-mybatis.xml"/>
    <!--导入shiro 配置-->
    <import resource="shiro.xml"/>
</beans>
web.xml
<web-app
        version="3.0"
        xmlns="http://java.sun.com/xml/ns/javaee"
        xmlns:xsi="http://www.w3.org/2001/XMLSchema-instance"
        xsi:schemaLocation="http://java.sun.com/xml/ns/javaee http://java.sun.com/xml/ns/javaee/web-app_3_0.xsd">
  <display-name>Archetype Created Web Application</display-name>


  <listener>
    <listener-class>org.springframework.web.context.ContextLoaderListener</listener-class>
  </listener>
  <!--设置配置文件的路径-->
  <context-param>
    <param-name>contextConfigLocation</param-name>
    <param-value>classpath:application.xml</param-value>
  </context-param>


  <servlet>
    <servlet-name>dispatcherServlet</servlet-name>
    <servlet-class>org.springframework.web.servlet.DispatcherServlet</servlet-class>
    <init-param>
      <param-name>contextConfigLocation</param-name>
      <param-value>classpath:spring-mvc.xml</param-value>
    </init-param>
    <load-on-startup>1</load-on-startup>
  </servlet>
  <servlet-mapping>
    <servlet-name>dispatcherServlet</servlet-name>
    <url-pattern>/</url-pattern>
  </servlet-mapping>

  <!--==========================shiroFilter top============================-->
  <filter>
    <filter-name>shiroFilter</filter-name>
    <filter-class>org.springframework.web.filter.DelegatingFilterProxy</filter-class>
  </filter以上是关于Spirng+SpringMVC+Mybatis+Shiro 整合---实现用户认证的主要内容,如果未能解决你的问题,请参考以下文章