vue3+ts+canvas项目中图片进行矩形批注
Posted 嘴巴嘟嘟
tags:
篇首语:本文由小常识网(cha138.com)小编为大家整理,主要介绍了vue3+ts+canvas项目中图片进行矩形批注相关的知识,希望对你有一定的参考价值。
canvas是什么?
一个html5支持的新标签,见名知意,canvas就是画板的意思,可以在canvas上画画。css画三角形很简单,但是要画五角星呢,不妨试试canvas(文档有教学)
今天我们做的是在图片中画矩形,顾名思义就是模仿批注功能。
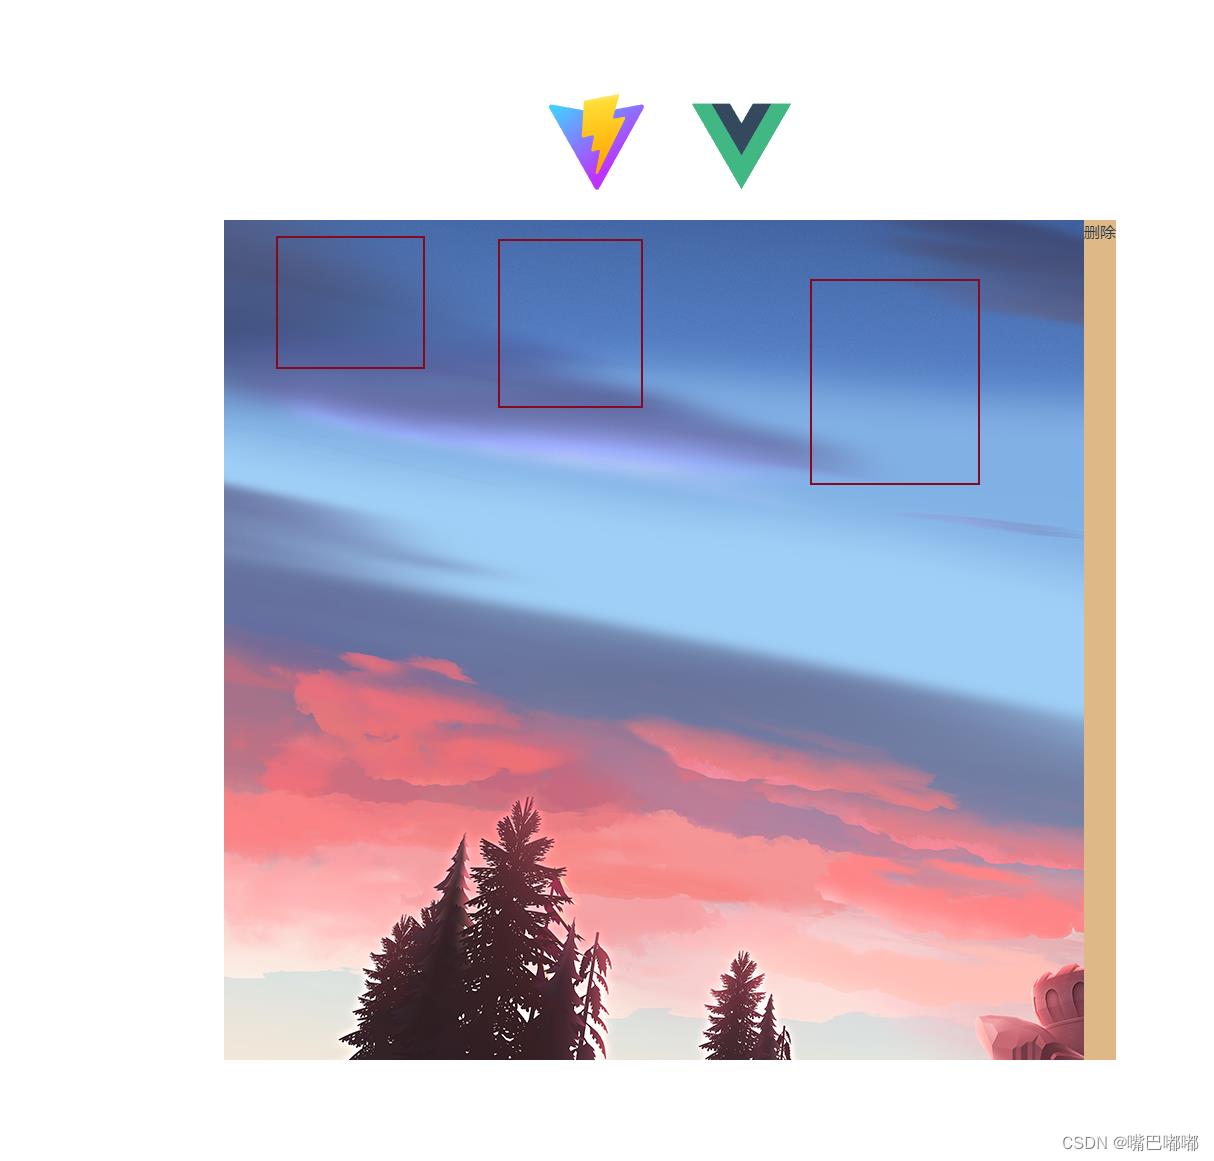
看效果:
废话不多说直接上代码
<template>
	<div class="test" style="background-color: burlywood; display: flex">
		<canvas
			id="myCanvas"
			ref="myCanvas"
			@click="findRect"
			width="860"
			height="840"
			@mousedown="mousedown"
			@mouseup="mouseup"
			@mousemove="mousemove"
		>
		</canvas>
		<el-button @click="del">删除</el-button>
	</div>
</template>

<script setup lang="ts">
import  ref, reactive, onMounted  from "vue";
const flag = ref(false);
const rectWidth = ref(0); //矩形框的宽
const rectHeight = ref(0); //矩形框的高
const totalRect = ref<any>([]); //画的所有的矩形坐标长度数据存储在数组中
const state = reactive(
	downX: 0,
	downY: 0,
);
const ctx = ref();
const canvas = ref(null);
const myCanvas = ref<HTMLCanvasElement | null>(null);
const rectTag = ref(false);
const delIndex = ref(); //删除时选中的矩形框的index
const atime = ref();
onMounted(() =>
	if (myCanvas.value) ctx.value = myCanvas.value.getContext("2d");
);
// 鼠标落下
const mousedown = (e: Event | any) =>
	console.log("鼠标落下");
	atime.value = new Date().getTime();
	flag.value = true;
	state.downX = e.offsetX; // 鼠标落下时的X
	state.downY = e.offsetY; // 鼠标落下时的Y
	mousemove(e);
;
// 抬起鼠标
const mouseup = (e: Event | any) =>
	flag.value = false;
	let a = new Date().getTime();
	if (a - atime.value > 150)
		rectTag.value = false;
	 else
		rectTag.value = true;

	if (rectWidth.value || rectHeight.value)
		//将画出的数据保存在totalRect中
		totalRect.value.push(
			beforex: state.downX,
			beforey: state.downY,
			rectW: rectWidth.value,
			rectH: rectHeight.value,
		);

;
// 移动鼠标
const mousemove = (e: Event | any) =>
	if (flag.value)
		//判断如果重右下往左上画,这种画法直接return
		if (state.downX - e.offsetX > 0 || state.downY - e.offsetY > 0)
			console.log("重右下往左上画");
			return;
		 else
			console.log("重左上往右下画");
			//如果重左上往右下画,计算出鼠标移动的距离,也就是矩形框的宽和高
			rectWidth.value = Math.abs(state.downX - e.offsetX);
			rectHeight.value = Math.abs(state.downY - e.offsetY);
			console.log("rectWidth.value", rectWidth.value);
			console.log("rectHeight.value", rectHeight.value);
			//判断这个宽高的长度,如果小于10,直接return,因为鼠标移动距离过于短
			//防止点击页面时,会画成一个点,没有意义
			if (rectWidth.value < 10 || rectHeight.value < 10)
				console.log("只是点击");
				rectWidth.value = 0;
				rectHeight.value = 0;
				return;

			clear(); //清空画布
			redrawAll();
			drawRect(
				state.downX,
				state.downY,
				rectWidth.value,
				rectHeight.value
			);


;
//点击画布
const findRect = (e: Event | any) =>
	if (rectTag.value)
		console.log("eeeeeeeeeee", e);
		console.log("this.totalRect", totalRect.value);
		//当点击画布的时候,计算有没有点再矩形框内、哪个矩形框内
		totalRect.value.map((item: any, index: number) =>
			if (
				e.offsetX - item.beforex > item.rectW ||
				e.offsetX < item.beforex ||
				e.offsetY - item.beforey > item.rectH ||
				e.offsetY < item.beforey
			)
				return;
			 else
				//找到之后,设置下标
				delIndex.value = index;
				//打开删除弹框

				console.log("this.delIndex", delIndex.value);

		);

;
const del = () =>
	ctx.value.clearRect(
		totalRect.value[delIndex.value].beforex - 2,
		totalRect.value[delIndex.value].beforey - 2,
		totalRect.value[delIndex.value].rectW + 4,
		totalRect.value[delIndex.value].rectH + 4
	);
	//删掉totalRect的数据,真正的项目中需要调用后台接口,删掉数据库中存储的数据
	totalRect.value.splice(delIndex.value, 1);
	//删掉之后,再画一次,刷新页面
	redrawAll();
	console.log(delIndex.value, "删除了没");
;
const clear = () =>
	if (myCanvas.value)
		ctx.value.clearRect(0, 0, myCanvas.value.width, myCanvas.value.height);
;
const redrawAll = () =>
	//    console.log("先画之前画过的图,保证画多个的时候看起来像前一个不消失");
	if (totalRect.value.length > 0)
		totalRect.value.forEach((e: any) =>
			drawRect(e.beforex, e.beforey, e.rectW, e.rectH);
		);

;
const drawRect = (x: any, y: any, lineW: any, lineY: any) =>
	//   开始绘制;
	ctx.value.beginPath();
	//   //设置线条颜色,必须放在绘制之前
	ctx.value.strokeStyle = "#850a1e";
	//   console.log("44444444");
	//   // 线宽设置,必须放在绘制之前
	ctx.value.lineWidth = 2;
	//   console.log("5555555555");
	// strokeRect参数:(左上角x坐标,y:左上角y坐标,绘画矩形的宽度,绘画矩形的高度)
	ctx.value.strokeRect(x, y, lineW, lineY);
	//   console.log("66666666666666");
;
</script>

<style scoped>
#myCanvas
	background-color: #3d0609;
	background-image: url("../assets/img.png");

.dislog
	width: 200px;
	height: 200px;
	background-color: pink;

</style>
以上是关于vue3+ts+canvas项目中图片进行矩形批注的主要内容,如果未能解决你的问题,请参考以下文章