HBase 一文读懂
Posted 在奋斗的大道
tags:
篇首语:本文由小常识网(cha138.com)小编为大家整理,主要介绍了HBase 一文读懂相关的知识,希望对你有一定的参考价值。
本文基于《尚硅谷大数据技术之HBase》编写。
HBase 简介
HBase定义
HBase是一种分布式、可扩展、支持海量数据存储的NoSQL数据库。
HBase数据模型
HBase的数据模型同关系型数据库(RDMS)很类似,数据存储在一张表中,有行有列。但从HBase的底层物理存储结构(K-V)来看,HBase更像是一个multi-dimensional map(多维度Map)。
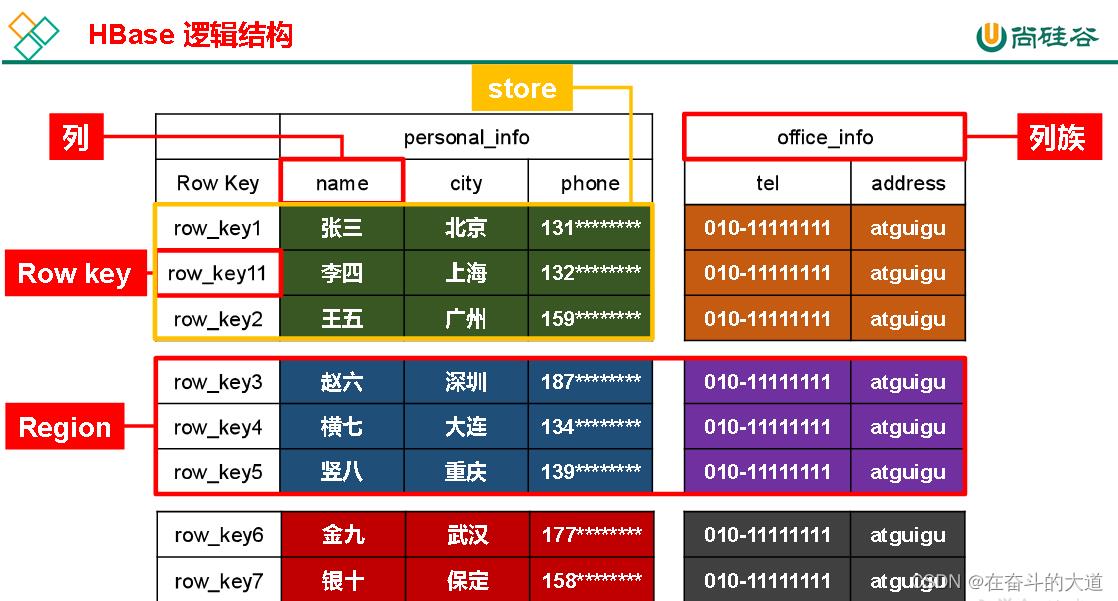
HBase逻辑结构
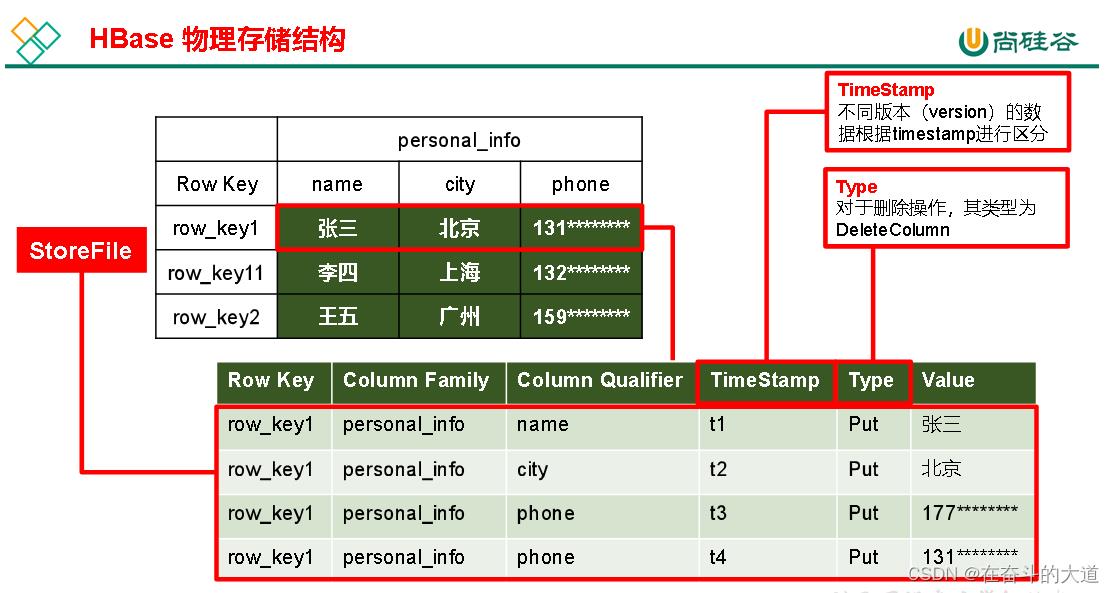
HBase物理存储结构
HBase 专有名词
1. Name Space
命名空间,类似于关系型数据库的 DatabBase 概念,每个命名空间下有多个表。HBase 有两个自带的命名空间,分别是 hbase 和 default,hbase 中存放的是 HBase 内置的表,default 表是用户默认使用的命名空间。
2. Region
类似于关系型数据库的表概念。不同的是,HBase 定义表时只需要声明列族即可,不需要声明具体的列。这意味着,往 HBase 写入数据时,字段可以动态、按需指定。因此,和关系型数据库相比,HBase 能够轻松应对字段变更的场景。
3. Row
HBase 表中的每行数据都由一个 RowKey 和多个 Column(列)组成,数据是按照 RowKey 的字典顺序存储的,并且查询数据时只能根据 RowKey 进行检索,所以 RowKey 的设计十分重要。
4. Column
HBase 中的每个列都由 Column Family (列族)和 Column Qualifier(列限定符)进行限定,例如 info:name,info:age。建表时,只需指明列族,而列限定符无需预先定义。
5. Time Stamp
用于标识数据的不同版本(version),每条数据写入时,如果不指定时间戳,系统会自动为其加上该字段,其值为写入 HBase 的时间。
6. Cell
由rowkey, column Family:column Qualifier, time Stamp唯一确定的单元。cell 中的数据是没有类型的,全部是字节码形式存储。
2.HBase基本架构

架构角色:
1)Region Server
Region Server为 Region的管理者,其实现类为HRegionServer,主要作用如下:
对于数据的操作:get, put, delete;
对于Region的操作:splitRegion、compactRegion。
2)Master
Master是所有Region Server的管理者,其实现类为HMaster,主要作用如下:
对于表的操作:create, delete, alter
对于RegionServer的操作:分配regions到每个RegionServer,监控每个RegionServer的状态,负载均衡和故障转移。
3)Zookeeper
HBase通过Zookeeper来做master的高可用、RegionServer的监控、元数据的入口以及集群配置的维护等工作。
4)HDFS
HDFS为Hbase提供最终的底层数据存储服务,同时为HBase提供高可用的支持。
3.HBase 快速入门
ZooKeeper 部署
进入 Zookeeper 官网下载:https://zookeeper.apache.org/releases.html 选择一个安装包下载。
将下载包apache-zookeeper-3.7.1-bin.tar.gz,上传CentOS-7 服务器的/usr/local 目录下。
切换至/usr/local 目录,解压apache-zookeeper-3.7.1-bin.tar.gz包。
[root@Hadoop3-master local]# tar -zxvf apache-zookeeper-3.7.1-bin.tar.gz将解压缩包apache-zookeeper-3.7.1-bin,重命名zookeeper.
[root@Hadoop3-master local]# mv apache-zookeeper-3.7.1-bin zookeeper切换至/usr/local/zookeeper 目录,创建zookeeper关联数据目录(data)和关联日志目录(logs)
[root@Hadoop3-master local]# cd zookeeper/
[root@Hadoop3-master zookeeper]# mkdir data
[root@Hadoop3-master zookeeper]# mkdir logs
切换至zookeeper 配置目录(/usr/local/zookeeper/conf/) ,拷贝 zoo_sample.cfg 为 zoo.cfg
[root@Hadoop3-master zookeeper]# cd conf/
[root@Hadoop3-master conf]# cp zoo_sample.cfg  zoo.cfg
使用vi 命令,编辑zoo.cfg 配置文件,添加zookeeper 存储数据文件地址(/usr/local/zookeeper/data)和存储日志文件地址(/usr/local/zookeeper/logs)
[root@Hadoop3-master conf]# cat zoo.cfg
# The number of milliseconds of each tick
tickTime=2000
# The number of ticks that the initial
# synchronization phase can take
initLimit=10
# The number of ticks that can pass between
# sending a request and getting an acknowledgement
syncLimit=5
# the directory where the snapshot is stored.
# do not use /tmp for storage, /tmp here is just
# example sakes.
# 数据存储地址
dataDir=/usr/local/zookeeper/data
# 日志存储地址
dataLogDir=/usr/local/zookeeper/logs
# the port at which the clients will connect
clientPort=2181
# the maximum number of client connections.
# increase this if you need to handle more clients
#maxClientCnxns=60
#
# Be sure to read the maintenance section of the
# administrator guide before turning on autopurge.
#
# http://zookeeper.apache.org/doc/current/zookeeperAdmin.html#sc_maintenance
#
# The number of snapshots to retain in dataDir
#autopurge.snapRetainCount=3
# Purge task interval in hours
# Set to "0" to disable auto purge feature
#autopurge.purgeInterval=1

## Metrics Providers
#
# https://prometheus.io Metrics Exporter
#metricsProvider.className=org.apache.zookeeper.metrics.prometheus.PrometheusMetricsProvider
#metricsProvider.httpPort=7000
#metricsProvider.exportJvmInfo=true
Zookeeper 运行
启动: bin/zkServer.sh start
查询状态: bin/zkServer.sh status
停止: bin/zkServer.sh stop
Hadoop3 单机部署
请参考文章:Hadoop3 单机版本(伪分布式版本)
HBase 部署
HBase 与Hadoop 版本对应关系表

温馨提示:本文演示的Hadoop版本:3.2.x ,HBase 版本为:2.3.x
首先将hbase-2.3.4-bin.tar.gz,上传到CentOS-7的/usr/local 目录下
使用cd 命令切换至/usr/local 目录,然后使用tar -zxvf hbase-2.3.4-bin.tar.gz 解压。
[root@Hadoop3-master local]# tar -zxvf hbase-2.3.4-bin.tar.gz使用mv 命令重命名解压后的文件夹hbase-2.3.4-bin.tar.gz为hbase
[root@Hadoop3-master local]# mv hbase-2.3.4 hbase5.配置hbase 全局环境变量,将HBase 安装目录(/usr/local/hbase)配置到/etc/profile的PATH环境变量中。
[root@Hadoop3-master local]# vi /etc/profile编辑内容如下:
# /etc/profile
export JAVA_HOME=/usr/local/jdk
export HADOOP_HOME=/usr/local/hadoop
export SQOOP_HOME=/usr/local/sqoop
export HBASE_HOME=/usr/local/hbase
export PATH=$PATH:$JAVA_HOME/bin:$HADOOP_HOME/bin:$HADOOP_HOME/sbin:$SQOOP_HOME/bin:$HBASE_HOME/bin
使用source /etc/profile 命令,使环境变量立即生效。
HBase 参数配置
切换至HBase 的配置文件目录/usr/local/hbase/conf, 然后分别修改HBase的配置文件hbase-env.sh 和hbase-site.xml
配置hbase-env.sh
修改如下两处配置:
# The java implementation to use.  Java 1.8+ required.
export JAVA_HOME=/usr/local/jdk
# Tell HBase whether it should manage it's own instance of ZooKeeper or not.
export HBASE_MANAGES_ZK=true
它们分别位于hbase-env.sh配置文件的第27行和第138行。
配置hbase-site.xml
在configuration标签中添加如下内容:
<property>
    <name>hbase.cluster.distributed</name>
    <value>true</value>
  </property>
# Hadoop3 文件存储地址
  <property>
    <name>hbase.rootdir</name>
    <value>hdfs://Hadoop3-master:9000/bhase</value>
  </property>
# Zookeeper 所在服务器主机名称
  <property>
    <name>hbase.zookeeper.quorum</name>
    <value>Hadoop3-master</value>
  </property>
</configuration>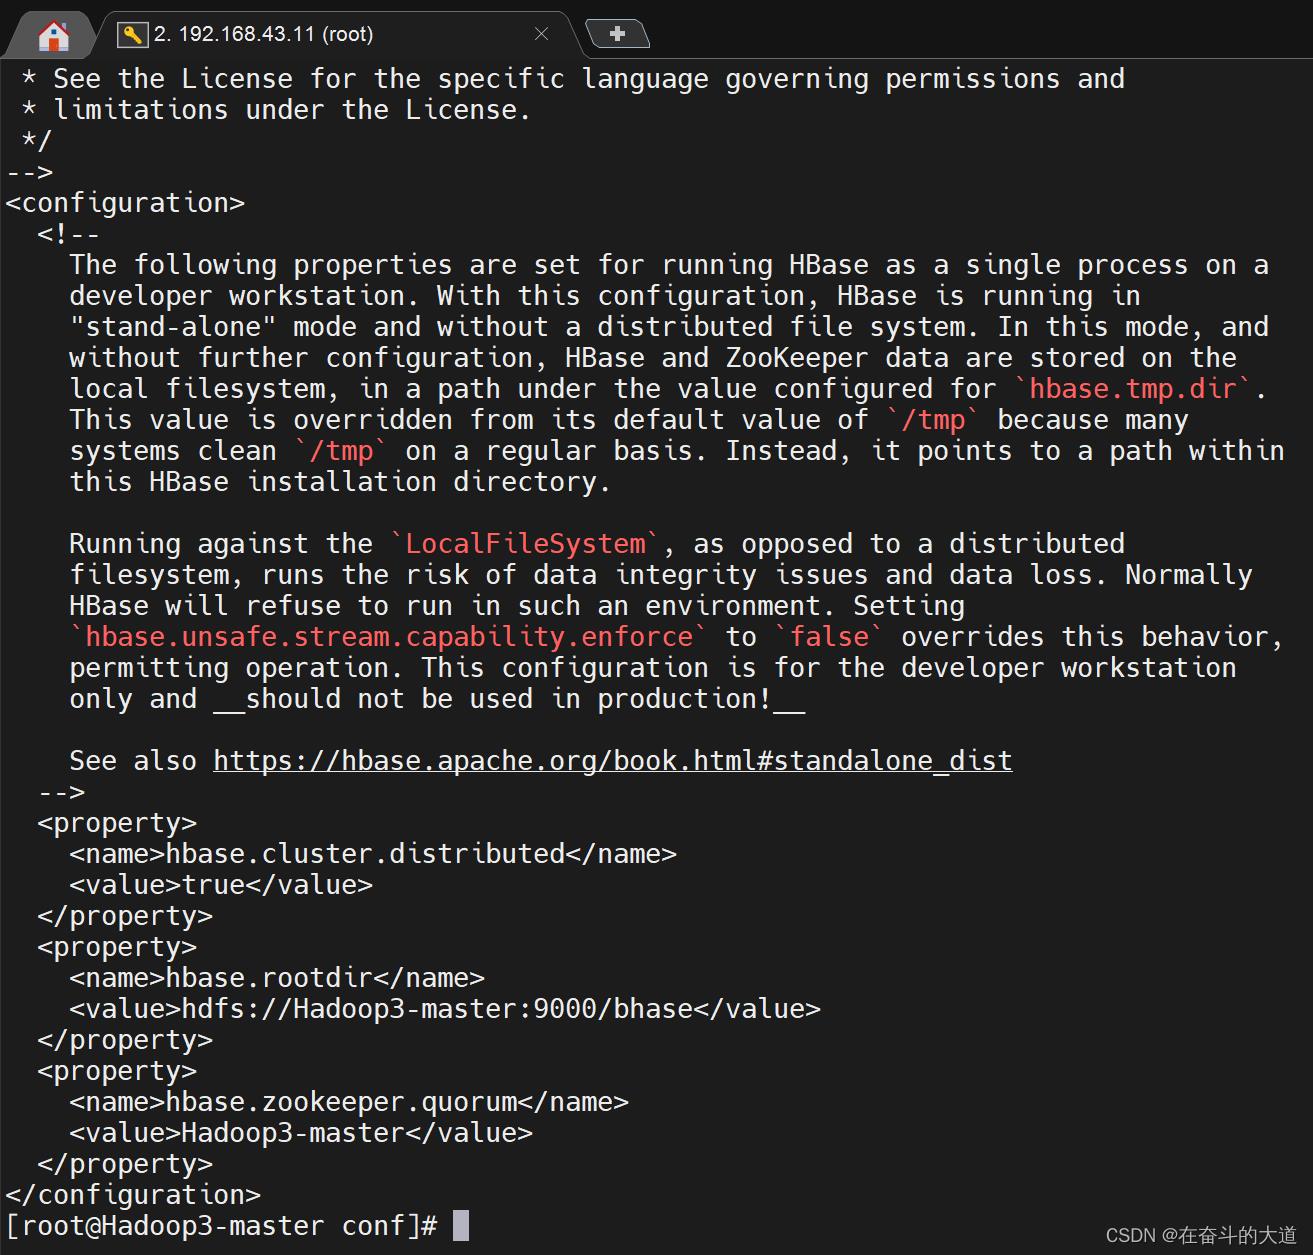
HBase 验证
验证HBase 必须先启动Hadoop 和ZooKeeper服务。
启动ZooKeeper服务
切换至Zookeeper 安装目录(/usr/local/zookeeper)目录,进入bin/目录,执行./zkServer.sh start 命令。
[root@Hadoop3-master bin]# ./zkServer.sh start
ZooKeeper JMX enabled by default
Using config: /usr/local/zookeeper/bin/../conf/zoo.cfg
Starting zookeeper ... STARTED
[root@Hadoop3-master bin]# ./zkServer.sh status
ZooKeeper JMX enabled by default
Using config: /usr/local/zookeeper/bin/../conf/zoo.cfg
Client port found: 2181. Client address: localhost. Client SSL: false.
Mode: standalone
温馨提示:./zkServer.sh status 为查看zooKeeper 服务状态命令。
启动Hadoop 3 服务
切换至Hadoop 3 安装目录(/usr/local/hadoop),进入sbin/目录,执行./start-all.sh 命令
[root@Hadoop3-master conf]# cd /usr/local/hadoop
[root@Hadoop3-master hadoop]# cd sbin/
[root@Hadoop3-master sbin]# ./start-all.sh
WARNING: HADOOP_SECURE_DN_USER has been replaced by HDFS_DATANODE_SECURE_USER. Using value of HADOOP_SECURE_DN_USER.
Starting namenodes on [Hadoop3-master]
上一次登录:六 2月 25 23:36:51 CST 2023从 192.168.43.15pts/0 上
Starting datanodes
上一次登录:日 2月 26 00:52:18 CST 2023pts/0 上
Starting secondary namenodes [Hadoop3-master]
上一次登录:日 2月 26 00:52:20 CST 2023pts/0 上
Starting resourcemanager
上一次登录:日 2月 26 00:52:24 CST 2023pts/0 上
Starting nodemanagers
上一次登录:日 2月 26 00:52:30 CST 2023pts/0 上
[root@Hadoop3-master sbin]# jps
42676 ResourceManager
42087 DataNode
42329 SecondaryNameNode
41930 NameNode
43195 Jps
19262 QuorumPeerMain
温馨提示:通过jps 进程指令查看Hadoop 服务启动是否正常。
启动HBase 服务
切换至HBase 安装目录(/usr/local/hbase),进入bin/目录,执行启动Hbase 命令:./start-bhase.sh
[root@Hadoop3-master bin]# cd /usr/local/hbase
[root@Hadoop3-master hbase]# cd bin
[root@Hadoop3-master bin]# ./start-hbase.sh
SLF4J: Class path contains multiple SLF4J bindings.
SLF4J: Found binding in [jar:file:/usr/local/hadoop/share/hadoop/common/lib/slf4j-reload4j-1.7.35.jar!/org/slf4j/impl/StaticLoggerBinder.class]
SLF4J: Found binding in [jar:file:/usr/local/hbase/lib/client-facing-thirdparty/slf4j-log4j12-1.7.30.jar!/org/slf4j/impl/StaticLoggerBinder.class]
SLF4J: See http://www.slf4j.org/codes.html#multiple_bindings for an explanation.
SLF4J: Actual binding is of type [org.slf4j.impl.Reload4jLoggerFactory]
Hadoop3-master: running zookeeper, logging to /usr/local/hbase/bin/../logs/hbase-root-zookeeper-Hadoop3-master.out
master running as process 43979. Stop it first.
: regionserver running as process 44213. Stop it first.
验证HBase 服务是否则正常启动,可以通过hbash shell 命令窗口、hbase 管理控制台页面、hadoop 数据存储管理(hbase)、jsp 查看相关服务进程等相关方式来验证确认。
方式一:hbash shell 命令窗口方式
[root@Hadoop3-master bin]# hbase shell
SLF4J: Class path contains multiple SLF4J bindings.
SLF4J: Found binding in [jar:file:/usr/local/hadoop/share/hadoop/common/lib/slf4j-reload4j-1.7.35.jar!/org/slf4j/impl/StaticLoggerBinder.class]
SLF4J: Found binding in [jar:file:/usr/local/hbase/lib/client-facing-thirdparty/slf4j-log4j12-1.7.30.jar!/org/slf4j/impl/StaticLoggerBinder.class]
SLF4J: See http://www.slf4j.org/codes.html#multiple_bindings for an explanation.
SLF4J: Actual binding is of type [org.slf4j.impl.Reload4jLoggerFactory]
HBase Shell
Use "help" to get list of supported commands.
Use "exit" to quit this interactive shell.
For Reference, please visit: http://hbase.apache.org/2.0/book.html#shell
Version 2.3.4, rafd5e4fc3cd259257229df3422f2857ed35da4cc, Thu Jan 14 21:32:25 UTC 2021
Took 0.0014 seconds
hbase(main):001:0>
紧着输入list命令。
list 是HBase 的基础命令,主要用于查询所有表
hbase(main):001:0> list
TABLE
0 row(s)
Took 0.6415 seconds
=> []
没有报错,则说明HBase 已经正确安装并启动。
方式二:打开浏览器,输入地址:http://192.168.43.11:16010/, 可以查看HBase 运行状态信息

方式三:查看Hadoop 文件系统
在HBase 服务启动时,会自动在Hadoop 文件系统中创建一个bhase 文件夹。我们可以通过以下命令进行验证。
[root@Hadoop3-master bin]# hadoop fs -ls /
Found 1 items
drwxr-xr-x   - root supergroup          0 2023-02-26 00:53 /bhase
方式四:通过jps 查看进程服务
[root@Hadoop3-master bin]# jps
42676 ResourceManager
48580 Jps
44213 HRegionServer
42087 DataNode
42329 SecondaryNameNode
41930 NameNode
43979 HMaster
46203 QuorumPeerMain
4. HBase Shell 操作
基本操作
进入HBase客户端命令行
[root@Hadoop3-master bin]# hbase shell
SLF4J: Class path contains multiple SLF4J bindings.
SLF4J: Found binding in [jar:file:/usr/local/hadoop/share/hadoop/common/lib/slf4j-reload4j-1.7.35.jar!/org/slf4j/impl/StaticLoggerBinder.class]
SLF4J: Found binding in [jar:file:/usr/local/hbase/lib/client-facing-thirdparty/slf4j-log4j12-1.7.30.jar!/org/slf4j/impl/StaticLoggerBinder.class]
SLF4J: See http://www.slf4j.org/codes.html#multiple_bindings for an explanation.
SLF4J: Actual binding is of type [org.slf4j.impl.Reload4jLoggerFactory]
HBase Shell
Use "help" to get list of supported commands.
Use "exit" to quit this interactive shell.
For Reference, please visit: http://hbase.apache.org/2.0/book.html#shell
Version 2.3.4, rafd5e4fc3cd259257229df3422f2857ed35da4cc, Thu Jan 14 21:32:25 UTC 2021
Took 0.0022 seconds
查看帮助命令
hbase(main):001:0> help
HBase Shell, version 2.3.4, rafd5e4fc3cd259257229df3422f2857ed35da4cc, Thu Jan 14 21:32:25 UTC 2021
Type 'help "COMMAND"', (e.g. 'help "get"' -- the quotes are necessary) for help on a specific command.
Commands are grouped. Type 'help "COMMAND_GROUP"', (e.g. 'help "general"') for help on a command group.

COMMAND GROUPS:
  Group name: general
  Commands: processlist, status, table_help, version, whoami

  Group name: ddl
  Commands: alter, alter_async, alter_status, clone_table_schema, create, describe, disable, disable_all, drop, drop_all, enable, enable_all, exists, get_table, is_disabled, is_enabled, list, list_regions, locate_region, show_filters

  Group name: namespace
  Commands: alter_namespace, create_namespace, describe_namespace, drop_namespace, list_namespace, list_namespace_tables

  Group name: dml
  Commands: append, count, delete, deleteall, get, get_counter, get_splits, incr, put, scan, truncate, truncate_preserve

  Group name: tools
  Commands: assign, balance_switch, balancer, balancer_enabled, catalogjanitor_enabled, catalogjanitor_run, catalogjanitor_switch, cleaner_chore_enabled, cleaner_chore_run, cleaner_chore_switch, clear_block_cache, clear_compaction_queues, clear_deadservers, clear_slowlog_responses, close_region, compact, compact_rs, compaction_state, compaction_switch, decommission_regionservers, flush, get_largelog_responses, get_slowlog_responses, hbck_chore_run, is_in_maintenance_mode, list_deadservers, list_decommissioned_regionservers, major_compact, merge_region, move, normalize, normalizer_enabled, normalizer_switch, recommission_regionserver, regioninfo, rit, snapshot_cleanup_enabled, snapshot_cleanup_switch, split, splitormerge_enabled, splitormerge_switch, stop_master, stop_regionserver, trace, unassign, wal_roll, zk_dump

  Group name: replication
  Commands: add_peer, append_peer_exclude_namespaces, append_peer_exclude_tableCFs, append_peer_namespaces, append_peer_tableCFs, disable_peer, disable_table_replication, enable_peer, enable_table_replication, get_peer_config, list_peer_configs, list_peers, list_replicated_tables, remove_peer, remove_peer_exclude_namespaces, remove_peer_exclude_tableCFs, remove_peer_namespaces, remove_peer_tableCFs, set_peer_bandwidth, set_peer_exclude_namespaces, set_peer_exclude_tableCFs, set_peer_namespaces, set_peer_replicate_all, set_peer_serial, set_peer_tableCFs, show_peer_tableCFs, update_peer_config

  Group name: snapshots
  Commands: clone_snapshot, delete_all_snapshot, delete_snapshot, delete_table_snapshots, list_snapshots, list_table_snapshots, restore_snapshot, snapshot

  Group name: configuration
  Commands: update_all_config, update_config

  Group name: quotas
  Commands: disable_exceed_throttle_quota, disable_rpc_throttle, enable_exceed_throttle_quota, enable_rpc_throttle, list_quota_snapshots, list_quota_table_sizes, list_quotas, list_snapshot_sizes, set_quota

  Group name: security
  Commands: grant, list_security_capabilities, revoke, user_permission

  Group name: procedures
  Commands: list_locks, list_procedures

  Group name: visibility labels
  Commands: add_labels, clear_auths, get_auths, list_labels, set_auths, set_visibility

  Group name: rsgroup
  Commands: add_rsgroup, balance_rsgroup, get_rsgroup, get_server_rsgroup, get_table_rsgroup, list_rsgroups, move_namespaces_rsgroup, move_servers_namespaces_rsgroup, move_servers_rsgroup, move_servers_tables_rsgroup, move_tables_rsgroup, remove_rsgroup, remove_servers_rsgroup, rename_rsgroup
NameSpace操作
1.查看当前Hbase中有哪些namespace
hbase(main):002:0> list_namespace
NAMESPACE
default(创建表时未指定命名空间的话默认在default下)
hbase(系统使用的,用来存放系统相关的元数据信息等,勿随便操作)
2.创建namespace
hbase(main):004:0> create_namespace "test"
Took 0.1895 seconds
hbase(main):005:0> create_namespace "test01", "author"=>"zzg", "create_time"=>"2023-02-26 08:08:08"
Took 0.1326 seconds
3.查看namespace
hbase(main):006:0> describe_namespace "test01"
DESCRIPTION
NAME => 'test01', author => 'zzg', create_time => '2023-02-26 08:08:08'
Quota is disabled
Took 0.1631 seconds
4.修改namespace的信息(添加或者修改属性)
hbase(main):007:0> alter_namespace "test01", METHOD => 'set', 'author' => 'zzy'
Took 0.1898 seconds
hbase(main):008:0> describe_namespace "test01"
DESCRIPTION
NAME => 'test01', author => 'zzy', create_time => '2023-02-26 08:08:08'
Quota is disabled
Took 0.0173 seconds
5.删除namespace
hbase(main):009:0> drop_namespace "test01"
Took 0.1633 seconds
温馨提示:要删除的namespace必须是空的,其下没有表。
表的操作
0.查看当前数据库中有哪些表
hbase(main):010:0> list
TABLE
0 row(s)
Took 0.0408 seconds
=> []
1.创建表
hbase(main):011:0> create 'student','info'
Created table student
Took 1.2770 seconds
=> Hbase::Table - student
2.插入数据到表
hbase(main):012:0> put 'student','1001','info:sex','male'
Took 0.1569 seconds
hbase(main):013:0> put 'student','1001','info:age','18'
Took 0.0077 seconds
hbase(main):014:0> put 'student','1002','info:name','Janna'
Took 0.0087 seconds
hbase(main):015:0> put 'student','1002','info:sex','female'
Took 0.0063 seconds
hbase(main):016:0> put 'student','1002','info:age','20'
Took 0.0060 seconds
3.扫描查看表数据
hbase(main):017:0> scan 'student'
ROW                                   COLUMN+CELL
 1001                                 column=info:age, timestamp=2023-02-26T01:54:00.725, value=18
 1001                                 column=info:sex, timestamp=2023-02-26T01:53:49.446, value=male
 1002                                 column=info:age, timestamp=2023-02-26T01:54:36.969, value=20
 1002                                 column=info:name, timestamp=2023-02-26T01:54:16.702, value=Janna
 1002                                 column=info:sex, timestamp=2023-02-26T01:54:26.971, value=female
2 row(s)
Took 0.0591 seconds
hbase(main):018:0> scan 'student',STARTROW => '1001', STOPROW  => '1001'
ROW                                   COLUMN+CELL
 1001                                 column=info:age, timestamp=2023-02-26T01:54:00.725, value=18
 1001                                 column=info:sex, timestamp=2023-02-26T01:53:49.446, value=male
1 row(s)
Took 0.0138 seconds
hbase(main):019:0> scan 'student',STARTROW => '1001'
ROW                                   COLUMN+CELL
 1001                                 column=info:age, timestamp=2023-02-26T01:54:00.725, value=18
 1001                                 column=info:sex, timestamp=2023-02-26T01:53:49.446, value=male
 1002                                 column=info:age, timestamp=2023-02-26T01:54:36.969, value=20
 1002                                 column=info:name, timestamp=2023-02-26T01:54:16.702, value=Janna
 1002                                 column=info:sex, timestamp=2023-02-26T01:54:26.971, value=female
2 row(s)
Took 0.0158 seconds
4.查看表结构
hbase(main):020:0> describe 'student'
Table student is ENABLED
student
COLUMN FAMILIES DESCRIPTION
NAME => 'info', BLOOMFILTER => 'ROW', IN_MEMORY => 'false', VERSIONS => '1', KEEP_DELETED_CELLS => 'FALSE', DATA_BLOCK_ENCODING => 'NONE', COMPRE
SSION => 'NONE', TTL => 'FOREVER', MIN_VERSIONS => '0', BLOCKCACHE => 'true', BLOCKSIZE => '65536', REPLICATION_SCOPE => '0'

1 row(s)
Quota is disabled
Took 0.0835 seconds
5.更新指定字段的数据
hbase(main):021:0> put 'student','1001','info:name','Nick'
Took 0.0055 seconds
hbase(main):022:0> put 'student','1001','info:age','100'
Took 0.0067 seconds
6.查看“指定行”或“指定列族:列”的数据
hbase(main):023:0> get 'student','1001'
COLUMN                                CELL
 info:age                             timestamp=2023-02-26T01:58:35.096, value=100
 info:name                            timestamp=2023-02-26T01:58:23.287, value=Nick
 info:sex                             timestamp=2023-02-26T01:53:49.446, value=male
1 row(s)
Took 0.0205 seconds
hbase(main):024:0> get 'student','1001','info:name'
COLUMN                                CELL
 info:name                            timestamp=2023-02-26T01:58:23.287, value=Nick
1 row(s)
Took 0.0208 seconds
7.统计表数据行数
hbase(main):025:0> count 'student'
2 row(s)
Took 0.0590 seconds
=> 2
8.删除数据
删除某rowkey的全部数据:
hbase(main):026:0> deleteall 'student','1001'
Took 0.0229 seconds
删除某rowkey的某一列数据:
hbase(main):027:0> delete 'student','1002','info:sex'
Took 0.0070 seconds
9.清空表数据
hbase(main):028:0> disable 'student'
Took 1.2229 seconds
hbase(main):029:0> truncate 'student'
Truncating 'student' table (it may take a while):
Truncating table...
Took 1.1999 seconds
提示:清空表的操作顺序为先disable,然后再truncate。
10.删除表
hbase(main):030:0> disable 'student'
Took 0.3597 seconds
hbase(main):031:0> drop 'student'
Took 0.1918 seconds
提示:清空表的操作顺序为先disable,然后再drop。如果直接drop表,会报错:ERROR: Table student is enabled. Disable it first.
5. HBase 进阶
RegionServer 架构

1)StoreFile
保存实际数据的物理文件,StoreFile以Hfile的形式存储在HDFS上。每个Store会有一个或多个StoreFile(HFile),数据在每个StoreFile中都是有序的。
2)MemStore
写缓存,由于HFile中的数据要求是有序的,所以数据是先存储在MemStore中,排好序后,等到达刷写时机才会刷写到HFile,每次刷写都会形成一个新的HFile。
3)WAL
由于数据要经MemStore排序后才能刷写到HFile,但把数据保存在内存中会有很高的概率导致数据丢失,为了解决这个问题,数据会先写在一个叫做Write-Ahead logfile的文件中,然后再写入MemStore中。所以在系统出现故障的时候,数据可以通过这个日志文件重建。
4)BlockCache
读缓存,每次查询出的数据会缓存在BlockCache中,方便下次查询。
写流程
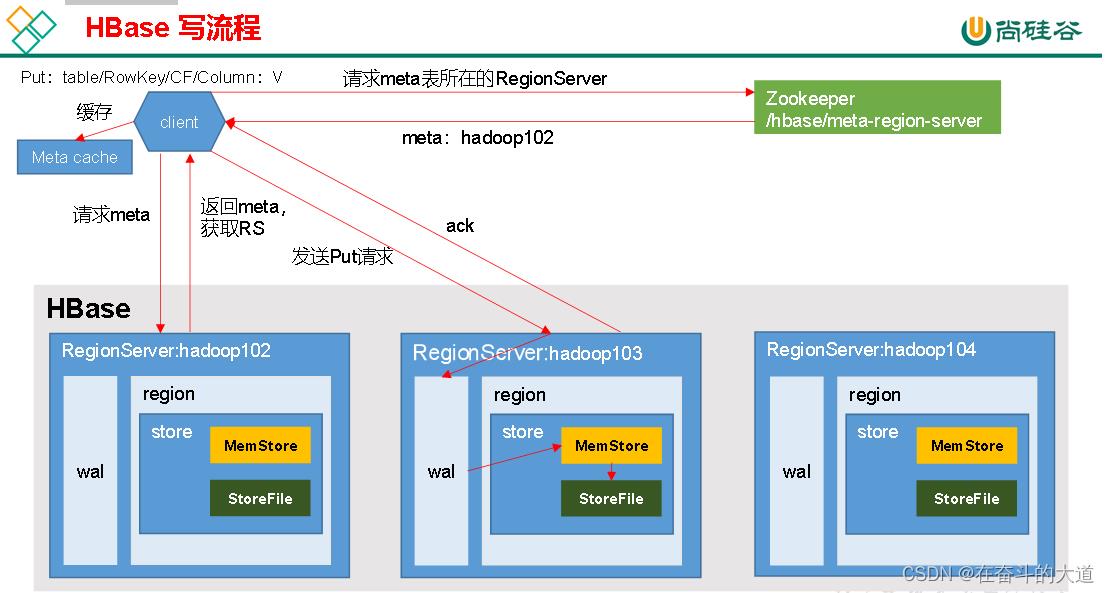
写流程:
1)Client先访问zookeeper,获取hbase:meta表位于哪个Region Server。
2)访问对应的Region Server,获取hbase:meta表,根据读请求的namespace:table/rowkey,查询出目标数据位于哪个Region Server中的哪个Region中。并将该table的region信息以及meta表的位置信息缓存在客户端的meta cache,方便下次访问。
3)与目标Region Server进行通讯;
4)将数据顺序写入(追加)到WAL;
5)将数据写入对应的MemStore,数据会在MemStore进行排序;
6)向客户端发送ack;
7)等达到MemStore的刷写时机后,将数据刷写到HFile。
MemStore Flush

MemStore刷写时机:
1.当某个memstore的大小达到了hbase.hregion.memstore.flush.size(默认值128M),其所在region的所有memstore都会刷写。
当memstore的大小达到了
hbase.hregion.memstore.flush.size(默认值128M)
* hbase.hregion.memstore.block.multiplier(默认值4)
时,会阻止继续往该memstore写数据。
2.当region server中memstore的总大小达到
java_heapsize
*hbase.regionserver.global.memstore.size(默认值0.4)
*hbase.regionserver.global.memstore.size.lower.limit(默认值0.95),
region会按照其所有memstore的大小顺序(由大到小)依次进行刷写。直到region server中所有memstore的总大小减小到上述值以下。
当region server中memstore的总大小达到
java_heapsize
*hbase.regionserver.global.memstore.size(默认值0.4)
时,会阻止继续往所有的memstore写数据。
3. 到达自动刷写的时间,也会触发memstore flush。自动刷新的时间间隔由该属性进行配置hbase.regionserver.optionalcacheflushinterval(默认1小时)。
4.当WAL文件的数量超过hbase.regionserver.max.logs,region会按照时间顺序依次进行刷写,直到WAL文件数量减小到hbase.regionserver.max.logs以下(该属性名已经废弃,现无需手动设置,最大值为32)。
读流程
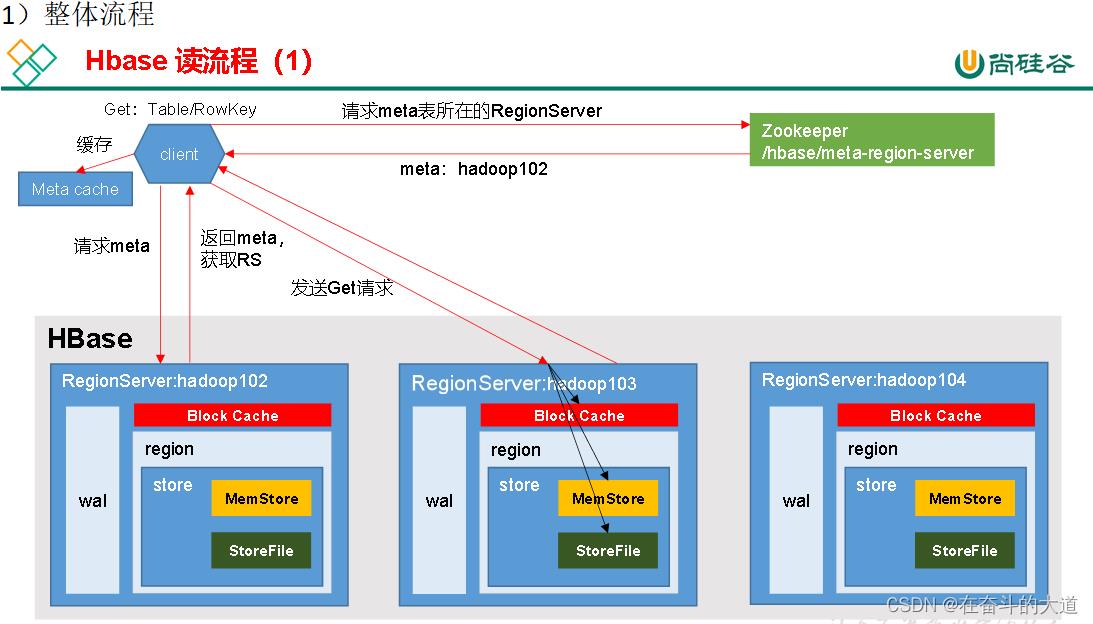
读流程
1)Client先访问zookeeper,获取hbase:meta表位于哪个Region Server。
2)访问对应的Region Server,获取hbase:meta表,根据读请求的namespace:table/rowkey,查询出目标数据位于哪个Region Server中的哪个Region中。并将该table的region信息以及meta表的位置信息缓存在客户端的meta cache,方便下次访问。
3)与目标Region Server进行通讯;
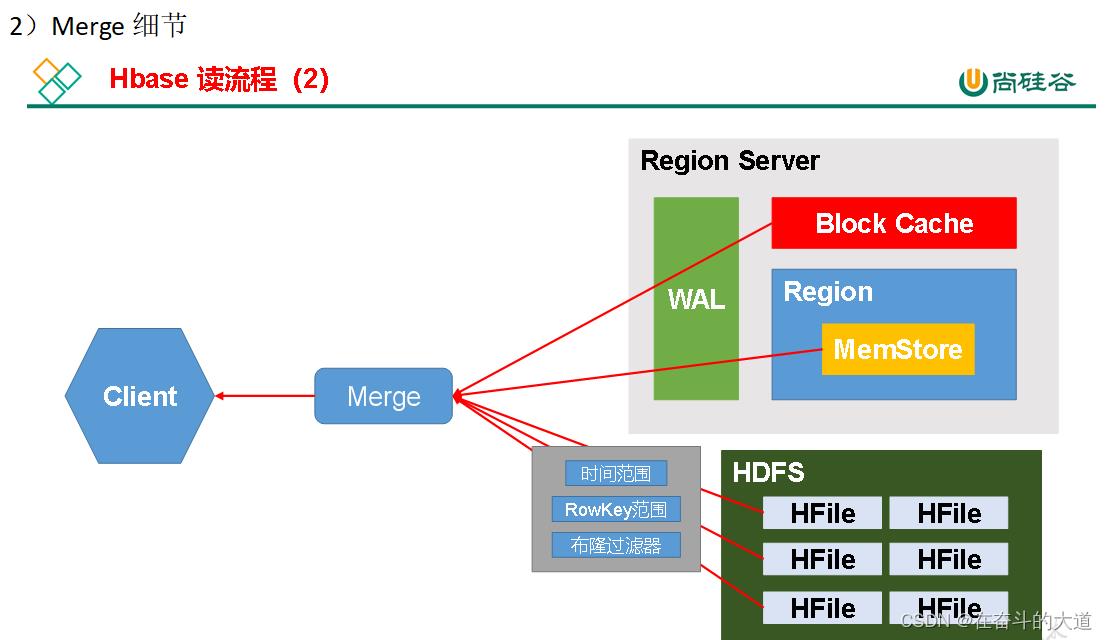
4)分别在MemStore和Store File(HFile)中查询目标数据,并将查到的所有数据进行合并。此处所有数据是指同一条数据的不同版本(time stamp)或者不同的类型(Put/Delete)。
5)将查询到的新的数据块(Block,HFile数据存储单元,默认大小为64KB)缓存到Block Cache。
6)将合并后的最终结果返回给客户端。
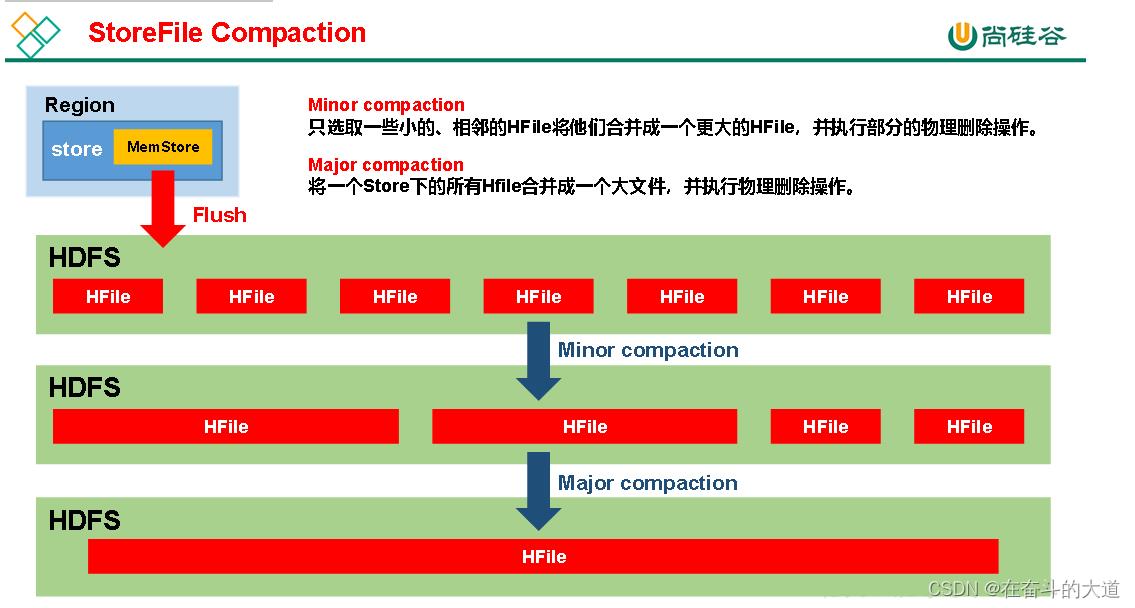
StoreFile Compaction
由于memstore每次刷写都会生成一个新的HFile,且同一个字段的不同版本(timestamp)和不同类型(Put/Delete)有可能会分布在不同的HFile中,因此查询时需要遍历所有的HFile。为了减少HFile的个数,以及清理掉过期和删除的数据,会进行StoreFile Compaction。
Compaction分为两种,分别是Minor Compaction和Major Compaction。Minor Compaction会将临近的若干个较小的HFile合并成一个较大的HFile,并清理掉部分过期和删除的数据。Major Compaction会将一个Store下的所有的HFile合并成一个大HFile,并且会清理掉所有过期和删除的数据。
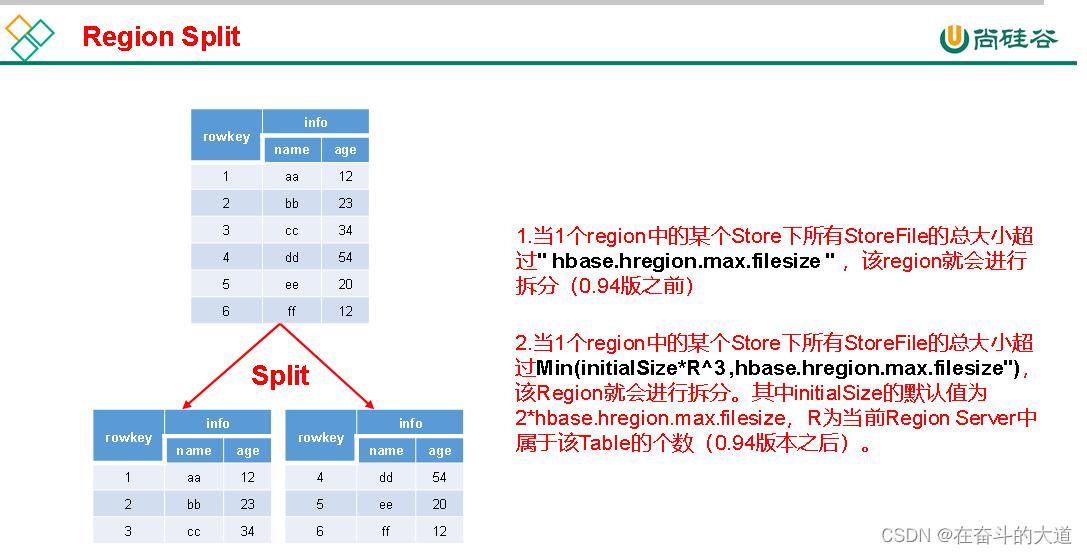
Region Split
默认情况下,每个Table起初只有一个Region,随着数据的不断写入,Region会自动进行拆分。刚拆分时,两个子Region都位于当前的Region Server,但处于负载均衡的考虑,HMaster有可能会将某个Region转移给其他的Region Server。
Region Split时机:
1.当1个region中的某个Store下所有StoreFile的总大小超过hbase.hregion.max.filesize,该Region就会进行拆分(0.94版本之前)。
2.当1个region中的某个Store下所有StoreFile的总大小超过Min(initialSize*R^3 ,hbase.hregion.max.filesize"),该Region就会进行拆分。其中initialSize的默认值为2*hbase.hregion.memstore.flush.size,R为当前Region Server中属于该Table的Region个数(0.94版本之后)。
具体的切分策略为:
第一次split:1^3 * 256 = 256MB
第二次split:2^3 * 256 = 2048MB
第三次split:3^3 * 256 = 6912MB
第四次split:4^3 * 256 = 16384MB > 10GB,因此取较小的值10GB
后面每次split的size都是10GB了。
3.Hbase 2.0引入了新的split策略:如果当前RegionServer上该表只有一个Region,按照2 * hbase.hregion.memstore.flush.size分裂,否则按照hbase.hregion.max.filesize分裂
6.HBase Java API
环境准备
新建项目,在pom.xml 添加如下依赖
        <!--添加Hbase 客户端-->
        <dependency>
            <groupId>org.apache.hbase</groupId>
            <artifactId>hbase-server</artifactId>
            <version>2.3.4</version>
        </dependency>

        <dependency>
            <groupId>org.apache.hbase</groupId>
            <artifactId>hbase-client</artifactId>
            <version>2.3.4</version>
        </dependency>
HBASE Java通用封装
请参考文章:
以上是关于HBase 一文读懂的主要内容,如果未能解决你的问题,请参考以下文章