SpringBoot的自动装配原理自定义Starter与SPI机制
Posted BasicLab基础架构实验室
tags:
篇首语:本文由小常识网(cha138.com)小编为大家整理,主要介绍了SpringBoot的自动装配原理自定义Starter与SPI机制相关的知识,希望对你有一定的参考价值。
一、前言
Spring简直是java企业级应用开发人员的春天,我们可以通过Spring提供的ioc容器,避免硬编码带来的程序过度耦合。
但是,启动一个Spring应用程序也绝非易事,他需要大量且繁琐的xml配置,开发人员压根不能全身心的投入到业务中去。
因此,SpringBoot诞生了,虽然本质上还是属于Spring,但是SpringBoot的优势在于以下两个特点:
(1)约定大于配置
SpringBoot定义了项目的基本骨架,例如各个环境的配置文件统一放到resource中,使用active来启用其中一个。配置文件默认为application.properties,或者yaml、yml都可以。
(2)自动装配
以前在Spring使用到某个组件的时候,需要在xml中对配置好各个属性,之后被Spring扫描后注入进容器。
而有了SpringBoot后,我们仅仅需要引入一个starter,就可以直接使用该组件,如此方便、快捷,得益于自动装配机制。
二、自动装配原理
我们从SpringBoot的主入口开始
@SpringBootApplicationpublicclassYmApplication publicstaticvoidmain(String[] args) SpringApplication.run(YmApplication.class, args); 这个类最大的特点就是使用了@SpringBootApplication注解,该注解用于标注主配置类。
这样SpringBoot在启动的时候,就会运行这个类的run方法。
@SpringBootApplication
@SpringBootApplication注解又是一个组合注解
@Target(ElementType.TYPE)@Retention(RetentionPolicy.RUNTIME)@Documented@Inherited@SpringBootConfiguration@EnableAutoConfiguration@ComponentScan(excludeFilters = @Filter(type = FilterType.CUSTOM, classes = TypeExcludeFilter.class), @Filter(type = FilterType.CUSTOM, classes = AutoConfigurationExcludeFilter.class) )public@interface SpringBootApplication ...其中@Target、 @Retention、@Documented与@Inherited是元注解,即对注解的注解,可以移步我的另外一篇文章来了解它们使用自定义注解简易模拟Spring中的自动装配@Autowired。
还包含了@SpringBootConfiguration与@EnableAutoConfiguration
以下注解都将省略这些元注解
@SpringBootConfiguration
@Configurationpublic@interface SpringBootConfiguration @Componentpublic@interface Configuration @AliasFor( annotation = Component.class ) String value()default"";可以看到,@SpringBootConfiguration注解本质上是一个@Configuration注解,表明该类是一个配置类。
而@Configuration又被@Component注解修饰,代表任何加了@Configuration注解的配置类,都会被注入进Spring容器中。
@EnableAutoConfiguration
该注解开启了自动配置的功能
@AutoConfigurationPackage@Import(AutoConfigurationImportSelector.class)public@interface EnableAutoConfiguration ...本身又包含了以下两个注解
@AutoConfigurationPackage与@Import(AutoConfigurationImportSelector.class)
@AutoConfigurationPackage
以前我们直接使用Spring的时候,需要在xml中的context:component-scan中定义好base-package,那么Spring在启动的时候,就会扫描该包下及其子包下被@Controller、@Service与@Component标注的类,并将这些类注入到容器中。
@AutoConfigurationPackage则会将被注解标注的类,即主配置类,将主配置类所在的包当作base-package,而不用我们自己去手动配置了。
这也就是为什么我们需要将主配置类放在项目的最外层目录中的原因。
那么容器是怎么知道主配置当前所在的包呢?
我们注意到,@AutoConfigurationPackage中使用到了@Import注解
@Import注解会直接向容器中注入指定的组件
引入了AutoConfigurationPackages类中内部类Registrar
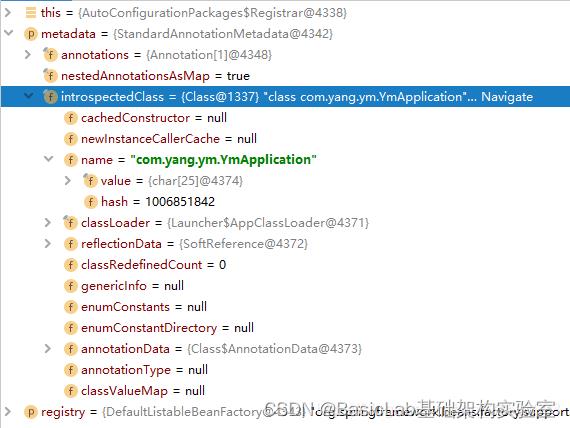
staticclassRegistrarimplementsImportBeanDefinitionRegistrar, DeterminableImports @Override publicvoidregisterBeanDefinitions(AnnotationMetadata metadata, BeanDefinitionRegistry registry) register(registry, newPackageImport(metadata).getPackageName()); @Override public Set<Object> determineImports(AnnotationMetadata metadata) return Collections.singleton(newPackageImport(metadata)); debug后可以看到,metadata是主配置类

而getName将会返回主配置类所在的包路径

这样,容器就知道了主配置类所在的包,之后就会扫描该包及其子包。
@Import(AutoConfigurationImportSelector.class)
该注解又引入了AutoConfigurationImportSelector类
而AutoConfigurationImportSelector中有一个可以获取候选配置的方法,即getCandidateConfigurations
protected List<String> getCandidateConfigurations(AnnotationMetadata metadata, AnnotationAttributes attributes) List<String> configurations = SpringFactoriesLoader.loadFactoryNames( getSpringFactoriesLoaderFactoryClass(), getBeanClassLoader()); Assert.notEmpty(configurations, "No auto configuration classes found in META-INF/spring.factories. If you " + "are using a custom packaging, make sure that file is correct."); return configurations; protected Class<?> getSpringFactoriesLoaderFactoryClass() return EnableAutoConfiguration.class; 其中核心方法SpringFactoriesLoader.loadFactoryNames,第一个参数是EnableAutoConfiguration.class
loadFactoryNames方法
publicstaticfinalStringFACTORIES_RESOURCE_LOCATION="META-INF/spring.factories"; publicstatic List<String> loadFactoryNames(Class<?> factoryClass, @Nullable ClassLoader classLoader) StringfactoryClassName= factoryClass.getName(); return loadSpringFactories(classLoader).getOrDefault(factoryClassName, Collections.emptyList()); privatestatic Map<String, List<String>> loadSpringFactories(@Nullable ClassLoader classLoader) MultiValueMap<String, String> result = cache.get(classLoader); if (result != null) return result; try Enumeration<URL> urls = (classLoader != null ? classLoader.getResources(FACTORIES_RESOURCE_LOCATION) : ClassLoader.getSystemResources(FACTORIES_RESOURCE_LOCATION)); result = newLinkedMultiValueMap<>(); while (urls.hasMoreElements()) URLurl= urls.nextElement(); UrlResourceresource=newUrlResource(url); Propertiesproperties= PropertiesLoaderUtils.loadProperties(resource); for (Map.Entry<?, ?> entry : properties.entrySet()) StringfactoryClassName= ((String) entry.getKey()).trim(); for (String factoryName : StringUtils.commaDelimitedListToStringArray((String) entry.getValue())) result.add(factoryClassName, factoryName.trim()); cache.put(classLoader, result); return result; catch (IOException ex) thrownewIllegalArgumentException("Unable to load factories from location [" + FACTORIES_RESOURCE_LOCATION + "]", ex); 可以看得出,loadSpringFactorie方法,会从META-INF/spring.factories文件中读取配置,将其封装为Properties对象,将每个key作为返回的map的key,将key对应的配置集合作为该map的value。
而loadFactoryNames则是取出key为EnableAutoConfiguration.class的配置集合
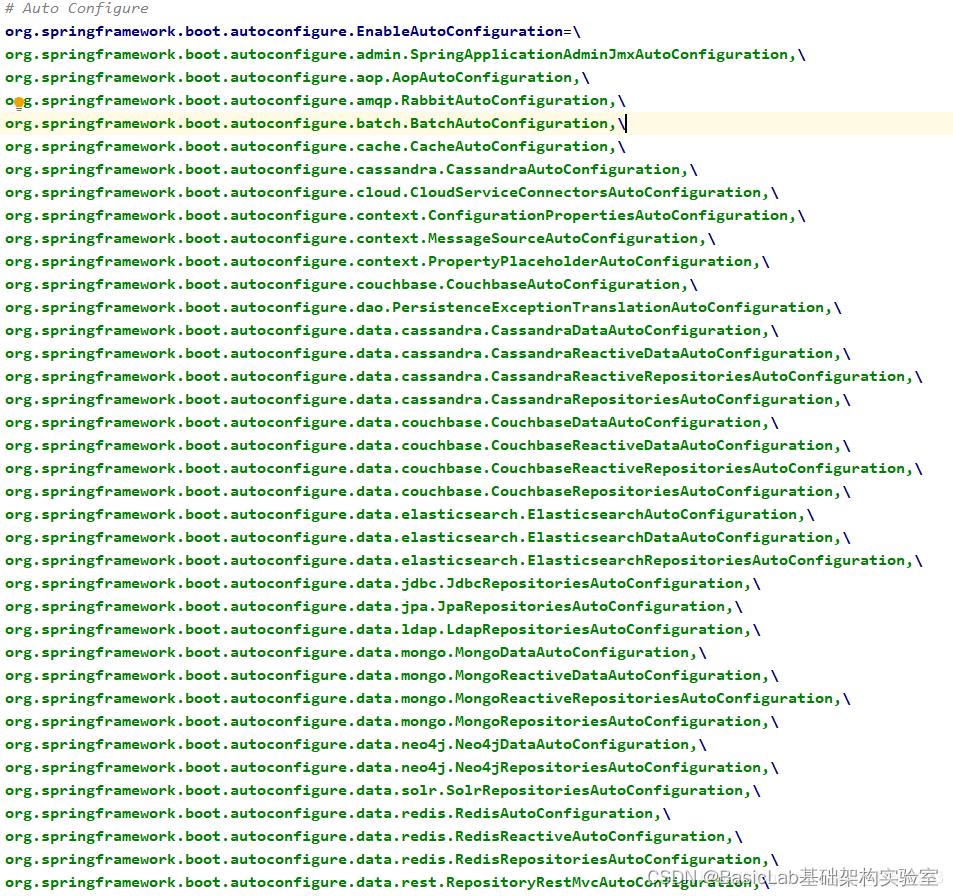
我们查看META-INF/spring.factories的内容(完整路径:org\\springframework\\boot\\spring-boot-autoconfigure\\2.1.4.RELEASE\\spring-boot-autoconfigure-2.1.4.RELEASE.jar!\\META-INF\\spring.factories)

可以看到,EnableAutoConfiguration对应的value,则是我们在开发中经常用到的组件,比如Rabbit、Elasticsearch与Redis等中间件。
到这里,我们可以知道getCandidateConfigurations方法会从META-INF/spring.factories中获取各个组件的自动配置类的全限定名。这么多自动配置类,难道是一启动SpringgBoot项目,就会全部加载吗?
那显然不是的,我们点进其中的一个自动配置类中,例如是org.springframework.boot.autoconfigure.data.redis.RedisAutoConfiguration
@Configuration@ConditionalOnClass(RedisOperations.class)@EnableConfigurationProperties(RedisProperties.class)@Import( LettuceConnectionConfiguration.class, JedisConnectionConfiguration.class )publicclassRedisAutoConfiguration @Bean @ConditionalOnMissingBean(name = "redisTemplate") public RedisTemplate<Object, Object> redisTemplate( RedisConnectionFactory redisConnectionFactory)throws UnknownHostException RedisTemplate<Object, Object> template = newRedisTemplate<>(); template.setConnectionFactory(redisConnectionFactory); return template; @Bean @ConditionalOnMissingBean public StringRedisTemplate stringRedisTemplate( RedisConnectionFactory redisConnectionFactory)throws UnknownHostException StringRedisTemplatetemplate=newStringRedisTemplate(); template.setConnectionFactory(redisConnectionFactory); return template; 可以看到,该自动配置类中,确实提供了RedisTemplate与StringRedisTemplate的Bean。
但是我们注意到上面的注解,
@EnableConfigurationProperties(RedisProperties.class)
使得被@ConfigurationProperties修饰的类生效,RedisProperties就是被@ConfigurationProperties修饰,即会将RedisProperties类注入到容器中。
@ConfigurationProperties(prefix = "spring.redis")publicclassRedisProperties privateintdatabase=0; private String url; privateStringhost="localhost"; private String password; ...@ConfigurationProperties(prefix = "spring.redis")则会将application.yml中以spring.redis开头的配置映射到该类中。
@ConditionalOnClass(RedisOperations.class)
当前的类路径下存在RedisOperations.class时,才会加载RedisAutoConfiguration配置类。
同样的注解还有
@ConditionalOnBean:当容器里有指定Bean的条件下
@ConditionalOnMissingBean:当容器里没有指定Bean的情况下
@ConditionalOnMissingClass:当容器里没有指定类的情况下
那怎么样才能加载RedisAutoConfiguration类呢?
这就需要我们在pom中引入redis的starter,即spring-boot-starter-data-redis。我们以2.1.4.RELEASE版本为例。该版本的starter又会引入2.1.6.RELEASE版本的spring-data-redis的依赖,spring-data-redis中会有RedisOperations类。
全路径为spring-data-redis\\2.1.6.RELEASE\\spring-data-redis-2.1.6.RELEASE.jar!\\
org\\springframework\\data\\redis\\core\\RedisOperations.class
我们结合redis总结下SpringBoot的自动装配流程

三、如何自定义一个starter
我们实现一个简单的功能吧,实现一个LRU缓存(对LRU不熟悉的同学,可以先移步我的这篇文章Redis的键过期策略、内存淘汰机制与LRU实现,这一篇给你安排了!)
从第二节的末尾来看,redis的starter中,包含以下几个核心构件:
(1)自动配置类RedisAutoConfiguration ,并且向容器中注入RedisTemplate
(2)用于映射以spring.redis为前缀的配置的类RedisProperties
(3)用于操作redis的RedisOperation接口,RedisTemplate是对其的实现
(4)在spring.factories中将RedisAutoConfiguration添加进EnableAutoConfiguration的vaule集合中
那我们新建一个maven项目,这是我的项目结构:

pom文件内容为:
<?xml version="1.0" encoding="UTF-8"?><projectxmlns="http://maven.apache.org/POM/4.0.0"xmlns:xsi="http://www.w3.org/2001/XMLSchema-instance"xsi:schemaLocation="http://maven.apache.org/POM/4.0.0 https://maven.apache.org/xsd/maven-4.0.0.xsd"><modelVersion>4.0.0</modelVersion><parent><groupId>org.springframework.boot</groupId><artifactId>spring-boot-starter-parent</artifactId><version>2.1.4.RELEASE</version><relativePath/><!-- lookup parent from repository --></parent><groupId>com.y</groupId><artifactId>lru-spring-boot-starter</artifactId><version>0.0.1-SNAPSHOT</version><name>lru-spring-boot-starter</name><properties><java.version>1.8</java.version></properties><dependencies><dependency><groupId>org.springframework.boot</groupId><artifactId>spring-boot-starter</artifactId></dependency></dependencies></project>操作lru的类:
/** * @author qcy * @create 2021/08/23 22:19:38 */publicclassLRUService private LRUCache lruCache; LRUService(LRUProperties properties) lruCache = newLRUCache(properties.getCapacity()); publicvoidput(Integer key, Integer value) lruCache.put(key, value); public Integer get(Integer key) return lruCache.get(key); public String print() return lruCache.print(); staticclassLRUCache //维护位置的LinkedList,set()的时间复杂度O(n),但如果只操作头尾元素,则时间复杂度为O(1)private LinkedList<Integer> list;//维护键值的HashMap,get()的时间复杂度O(1)private HashMap<Integer, Integer> map;//缓存的容量privateint capacity; LRUCache(int capacity) this.list = newLinkedList<>();this.map = newHashMap<>();this.capacity = capacity; private Integer get(Integer key) if (map.get(key) == null) //说明缓存中没有该keyreturnnull; //缓存中有该key,则先将该key在链表中删除,再移动到链表的尾部,从而保证头部是最近最久未使用的元素 list.remove(key); list.offer(key);return map.get(key); privatevoidput(Integer key, Integer value) if (map.get(key) != null) //说明缓存中有该key,先在链表中删除,再移动到尾部 list.remove(key); list.offer(key); else //说明缓存中没有该key,需要往缓存中插入if (list.size() == capacity) //说明缓存已经满了//删除链表头部元素Integerhead= list.poll();//删除键值対 map.remove(head); //此时缓存没满,或刚删除了头部元素 list.offer(key); //插入map或刷新vaule map.put(key, value); //输出缓存内元素private String print() StringBuildersb=newStringBuilder();for (inti= list.size() - 1; i >= 0; i--) Integerkey= list.get(i);Integervalue= map.get(key); sb.append("(").append(key).append(",").append(value).append(")").append("\\n"); return sb.toString(); 配置类:
@ConfigurationProperties(prefix = "lru")publicclassLRUProperties private Integer capacity;public Integer getCapacity() return capacity; publicvoidsetCapacity(Integer capacity) this.capacity = capacity; LRU的自动配置类:
/** * @author qcy * @create 2021/08/23 22:25:31 */@Configuration@EnableConfigurationProperties(LRUProperties.class)publicclassLRUAutoConfiguration @Autowired LRUProperties properties;@Bean@ConditionalOnMissingBeanpublic LRUService lruService() returnnewLRUService(properties); 在resource目录下新建META-INF文件夹,新建spring.factories文件
org.springframework.boot.autoconfigure.EnableAutoConfiguration=\\com.y.lru.LRUAutoConfiguration最后使用mvn clean install打成本地jar
然后在其他项目中,引用该jar
<dependency><groupId>com.y</groupId><artifactId>lru-spring-boot-starter</artifactId><version>0.0.1-SNAPSHOT</version></dependency>并且设置一下lru缓存的大小
lru.capacity=2现在测试一下:
@Autowired LRUService lruService;@RequestMapping("put")private String put(@RequestParam Integer key, @RequestParam Integer value) lruService.put(key, value);return"ok"; @RequestMapping("get")private Integer get(@RequestParam Integer key) return lruService.get(key); @RequestMapping("print")private String print() return lruService.print(); 先后put(1,1)、(2,2)与(3,3),因为缓存大小是2,所以直接打印后可以得到以下结果,越先输出,代表越是最近使用的。

四、SpringBoot与JDK中的SPI机制
这里我们先谈谈SpringBoot中的spi机制
什么是spi呢,全称是Service Provider Interface。简单翻译的话,就是服务提供者接口,是一种寻找服务实现的机制。
我举一个生活中的例子吧,汽车的轮胎是可以更换的吧,不可能厂家直接将轮胎焊死在汽车上的,你大可以换成其他制造商的轮胎,但总不可能换上自行车的轮胎。
那么这里的轮胎就是可插拔的,只要满足厂家制定的规范,汽车就可以正常上路行驶。
写代码也是一样的,有时候我不想直接写死具体的实现类,否则,如果要更换实现类的话,就需要修改代码。为了让能实现类具有可插拔的特性,我可以定义一个规范,只要外部厂家按照规范去做,我就可以去动态地去发现这些实现类。
SpringBoot为了实现组件的动态插拔,定义了这样一套规范:SpringBoot在启动的时候,会扫描所有jar包resource/META-INF/spring.factories文件,依据类的全限定名,利用反射机制将Bean装载进容器中。
所以呢,只要外部的jar按照这套规范做事,就可能将自己的功能为SpringBoot所用,上一节的自定义starter其实就是在实现这一套规范。
spi机制呢,就是会利用额外的一个配置文件,来完成对组件的动态装载,从而实现解耦。
所以,对于SpringBoot的spi机制,用一句话概括:
SpringBoot利用SpringFactoriesLoader将spring.factories内容映射为Properties,利用反射实例化Bean并注入进容器,来实现组件的动态插拔,实现解耦。
那么jdk中的spi机制呢?
先从一个简单的例子开始:
定义一个日志接口,内部有一个打印方法
package com.yang.ym.spi;/** * @author qcy * @create 2021/08/24 23:15:27 */publicinterfaceLog publicvoidprint();有两个实现类,一个是控制台日志
package com.yang.ym.spi;/** * @author qcy * @create 2021/08/24 23:15:39 */publicclassConsoleLogimplementsLog @Overridepublicvoidprint() System.out.println("在控制台里打印日志"); 还有一个实现类是文件日志:
package com.yang.ym.spi;/** * @author qcy * @create 2021/08/24 23:16:02 */publicclassFileLogimplementsLog @Overridepublicvoidprint() System.out.println("在文件里打印日志"); 接着我们需要按照jdk中spi的规范
在resources目录下,新建META-INF\\services目录,在services目录底下新建com.yang.ym.spi.Log目录,即接口的全限定名,在该全限定名目录底下,以实现类的全限定名新建两个文件,一个是com.yang.ym.spi.ConsoleLog,另外一个是com.yang.ym.spi.FileLog,如下图所示:

最后利用ServiceLoader去发现这些实体类
publicstaticvoidmain(String[] args) ServiceLoader<Log> logServiceLoader = ServiceLoader.load(Log.class);for (Log log : logServiceLoader) log.print(); logServiceLoader就是实现类的集合,最后的效果:

ServiceLoader内部会借助一个LazyIterator,因为增强型for循环会被编译为Iterator,而LazyIterator实现了Iterator,其hasNext()方法会去寻找下一个服务实现类,next()方法才会利用反射实例化该实现类,起到一种懒加载的作用,故命名为LazyIterator。
可以看得出,SpringBoot与jdk在spi机制上,存在些许的差别,但本质上还是事先定义一套规范,来完成对实现类或者组件的动态发现。
在获取实现类名称集合的层面上,SpringBoot借助于SpringFactoriesLoader加载spring.factories配置文件,而jdk借助于ServiceLoader读取指定路径。
在是否实例化实现类的层面上,SpringBoot会依据Conditional注解来判断是否进行实例化并注入进容器中,而jdk会在next方法内部懒加载实现类。
以上是关于SpringBoot的自动装配原理自定义Starter与SPI机制的主要内容,如果未能解决你的问题,请参考以下文章