CVAT 用户指南
Posted Alex_996
tags:
篇首语:本文由小常识网(cha138.com)小编为大家整理,主要介绍了CVAT 用户指南相关的知识,希望对你有一定的参考价值。
CVAT 用户指南
- 用户指南
用户指南
计算机视觉标注工具(CVAT)是基于 Web 为计算机视觉算法标注视频和图像的在线工具。
它的灵感来自Vatic免费的、在线的、交互式的视频注释工具。
CVAT有许多强大的功能:
- 在关键帧之间插入边界框
- 使用深度学习模型自动标注
- 大多数关键行动的捷径
- 带有注释任务列表的仪表板
- LDAP和基本授权
- 等……
它是为一个专业的数据注释团队创建和使用的。
特别针对我们团队开发的计算机视觉任务进行了用户体验和用户界面优化。
入门
授权
- 首先,您必须登录到CVAT工具。
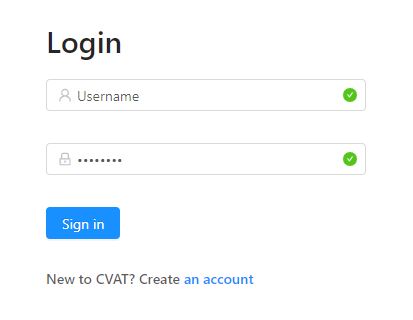
- 要注册新用户,请按“创建帐户”

-
您可以注册用户,但在默认情况下,新用户无权查看任务列表。因此,您应该创建一个超级用户。超级用户可以使用Django管理面板为用户分配正确的组。请使用以下命令创建管理员帐户:
docker exec -it cvat bash -ic '/usr/bin/python3 ~/manage.py createsuperuser' -
如果您想创建一个非管理员帐户,您可以使用下面登录页面上的链接来创建。别忘了在“管理”面板中修改新用户的权限。有几个组(又称角色):管理员、用户、标注员、质检员。

管理面板
转到Django管理面板。在这里您可以:
- 创建/编辑/删除用户
- 控制用户的权限和对工具的访问。
创建标注任务
-
点击主页面上的
Create new task按钮创建标注任务。

-
指定任务的参数:
基本配置
Name 要创建的任务的名称。

Labels. 使用标签有两种方法:-
Constructor是添加和调整标签的简单方法。要添加新标签,请单击Add label按钮。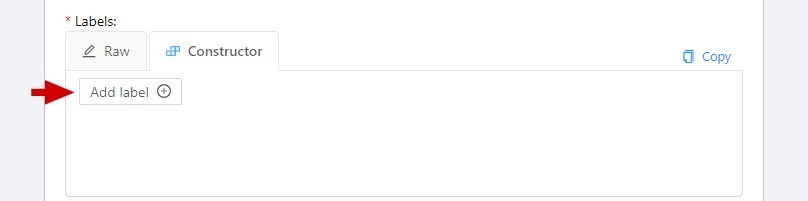
可以在Label name字段中设置标签的名称。
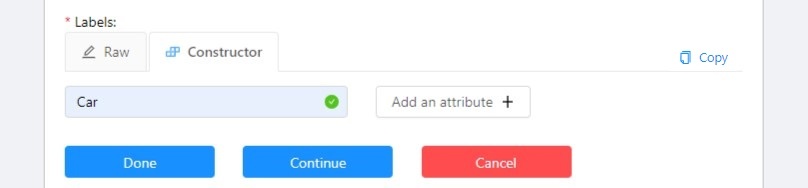
如有必要,您可以通过单击Add an attribute来添加属性并设置其属性:
此处提供以下操作:- 设置属性的名称。
- 选择显示属性的方式:
- Select — 下拉列表选值
- Radio — 从建议的几个选项中只选择一个时使用
- Checkbox — 从建议的选项中选择任意数量的选项时使用
- Text — 属性作为文本输入,默认属性
- Number — 属性作为数字输入
- 为属性设置值。按
Enter键可以分隔这些值。输入的值显示为一个单独的元素,可以通过按Backspace或单击“关闭”按钮(x)来删除该元素。
如果指定的属性显示方式是文本或数字,则默认情况下输入的值将显示为文本。 - 复选框
Mutable确定属性是否将被逐帧更改。 - 可以通过单击
关闭按钮(x)删除该属性。
单击Continue按钮添加更多标签。
如果需要取消添加标签-请按Cancel按钮。
添加完所有必要的标签后,单击Done按钮。
单击Done后,添加的标签将显示为不同颜色的单独元素。
您可以通过单击Update attributes或Delete label来编辑或删除标签。
-
Raw是高级用户使用标签的一种方式。
Raw以 json 格式显示标签数据,并提供了编辑和复制标签作为文本的选项。
Done按钮应用更改,Reset按钮取消更改。
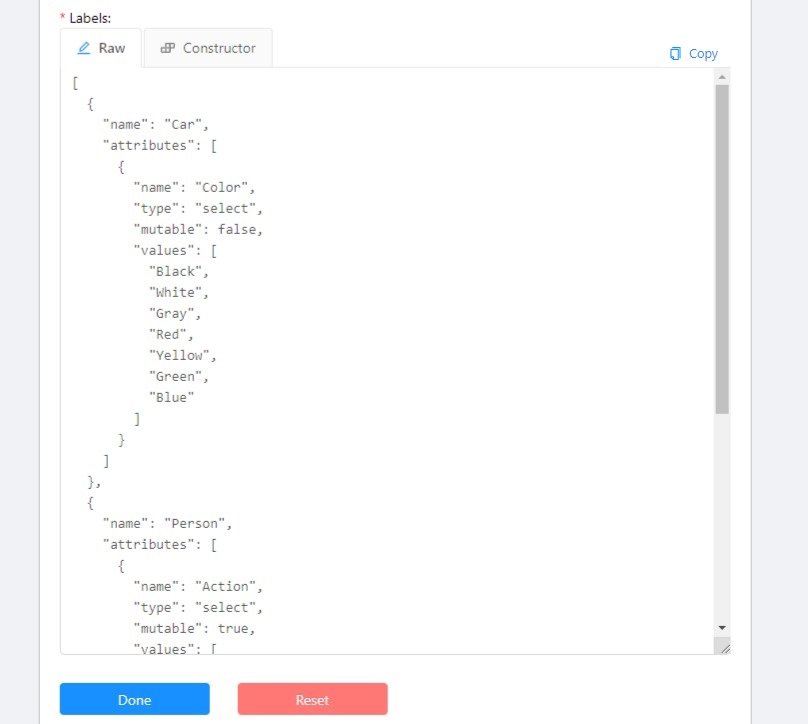
在Raw和Constructor模式下,可以按“Copy”按钮复制标签列表。
Select files. 点击
My computer从您的电脑中选择一些要添加批注的文件。
如果点击Connected file share,则可以从网络中选择要标注的文件。
如果选择Remote source,您将看到一个字段,您可以在其中输入URL列表(每行一个URL)。

高级配置

Z-Order. 定义绘制多边形的顺序。选中启用分层显示复选框。
Use zip chunks. 强制使用压缩块作为压缩数据。实际只用于视频。
Image Quality. 使用此选项可指定上载图像的质量。
该选项有助于更快地加载高分辨率数据集。
使用从1(完全压缩的图像)到95(几乎不是压缩图像)的值。Overlap Size. 使用此选项可生成重叠段。
该选项使轨迹从一个线段连续到另一个线段。
将其用于插值模式。使用该参数有几个选项:- 用于插值任务(视频序列)。
如果在两个相邻的线段上标注边界框,它们将合并为一个边界框。
如果重叠等于零或标注在转储的标注文件中的相邻段上较差,则将有多个轨迹,每个段对应一个对象。 - 标注(独立图像)。
如果一个对象存在于重叠的线段上,重叠大于零,并且相邻线段上的标注足够好,则该对象将自动合并为一个对象。
如果重叠等于零或标注在转储标注文件内的相邻段上较差,则同一对象将有多个边界框。
因此,可以在第一个线段上注释对象。
在第二个线段上标注同一个对象,如果您做得对,标注中就有一个轨迹。
如果不同段(重叠框架上)上的标注非常不同,则同一对象将有两个形状。
此功能仅适用于边界框。
多边形、多段线、点不支持重叠段上的自动合并,即使重叠参数不为零,相邻线段上相应形状之间的匹配也非常完美。
Segment size. 使用此选项可以将一个巨大的数据集分成几个较小的段。
例如,一个作业不能由多个贴标器标注(不支持)。
因此,使用"segment size"可以为同一注释任务创建多个作业。
它将有助于您并行数据标注过程。Start frame. 任务中的视频开始的帧。
Stop frame. 任务中的视频结束的帧。
Frame Step. 使用此选项可过滤视频帧。
例如,输入“25”可在视频中每隔二十五帧或每二十五幅图像保留一次。Chunk size. 定义从客户端发送到服务器时要打包在块中的帧数。
如果为空,服务器将自动定义。推荐值:
- 1080p or less: 36
- 2k or less: 8 - 16
- 4k or less: 4 - 8
- More: 1 - 4
Dataset Repository. 存储库的URL链接可选地指定存储库的路径 (
default: annotation / <dump_file_name> .zip).
支持注解的.zip和.xml文件扩展名。
Field format:URL [PATH]example:https://github.com/project/repos.git [1/2/3/4/annotation.xml]支持的URL格式:
https://github.com/project/repos[.git]github.com/project/repos[.git]git@github.com:project/repos[.git]
如果标注与存储库不同步,则创建后任务将以红色突出显示。
Use LFS. 如果标注文件很大,可以使用LFS创建一个存储库支持。
Issue tracker. 如果需要,请指定问题跟踪程序的完整URL。
按
Submit按钮,它将被添加到注释任务列表中。
然后,创建的任务将显示在仪表板上:

-
-
仪表板包含元素,每个元素都与单独的任务相关。它们按创建顺序排序。
每个元素包含:任务名称、预览、进度条、按钮“打开”和菜单“操作”。
每个按钮负责菜单内“操作”特定功能:Dump Annotation和Export as a dataset—下载特定格式的批注或批注和图像。以下格式可用:- CVAT for video
如果任务具有插值模式,则突出显示。 - CVAT for images
如果任务具有批注模式,则突出显示。 - PASCAL VOC
- (VOC) Segmentation mask —
archive包含png格式的每个帧的类和实例掩码,以及一个文本文件,其中包含每个颜色的值。 - YOLO
- COCO
- TFRecord
- MOT
- LabelMe 3.0
- Datumaro
- CVAT for video
Upload annotation的格式与Dump annotation中的格式相同。- CVAT 同时接受视频和图像子格式。
Automatic Annotation—使用OpenVINO toolkit进行自动注释。
存在性取决于如何构建CVAT实例。Open bug tracker— 打开指向问题跟踪程序的链接。Delete— 删除任务。
按
Open按钮转到任务详细信息。 -
任务详细信息是一个任务页面,其中包含预览、进度条、任务的详细信息(在创建任务时指定)和“作业”部分。
[外链图片转存失败,源站可能有防盗链机制,建议将图片保存下来直接上传(img-t0hODpHu-1596171611932)(static/documentation/images/image131_detrac.jpg)]
- 此页上提供了以下操作:
- 更改任务的标题
- 打开“Actions”菜单
- 更改问题跟踪程序或打开问题跟踪程序(如果已指定)
- 更换标签。
可以在原始模式或构造函数模式下为现有标签添加新标签或添加属性。
单击Copy可将标签复制到剪贴板。 - Assigned to — 用于将任务分配给某人。开始输入被派遣人的姓名和/或从下拉列表中选择合适的人。
Jobs— 是特定任务的所有作业的列表。在这里您可以找到下一个数据:- 带有超链接的作业名称。
- Frames — 帧间隔。
- 任务的状态。 状态由用户在任务内的菜单中指定。
有三种类型的状态:标注、质检或已完成。
作业的状态是根据任务的进度条变化的。 - Started on — 此任务的开始日期。
- Duration — 是任务的时间量。
- Assignee是正在处理任务的用户。
你可以开始输入被派遣人的姓名和/或从下拉列表中选择合适的人。 Copy. 单击“复制”可将作业列表复制到剪贴板。
任务列表包含指向任务的直接链接。
- 此页上提供了以下操作:
-
按照“作业”部分中的链接开始标注过程。
在某些情况下,可以有多个链接。它取决于任务的大小以及“重叠大小”和“段大小”参数。为了提高用户体验,只会加载几个帧的第一个块,并且您可以对第一个图像进行注释。其他帧将在后台加载。
模型
在“模型”页面上,您可以管理为自动标注而上载的深度学习(DL)模型。
使用该功能,您可以上载、更新或删除特定的DL模型。
要打开模型管理器,请单击导航栏上的“模型”按钮。
“模型”页面包含有关所有现有模型的信息。
模型列表分为两部分:
- Primary — 包含默认的CVAT模型。每个模型都是一个单独的元素。
它包含模型的名称、模型所基于的框架和“支持的标签”(所有支持标签的下拉列表)。 - Uploaded by a user — 包含用户上载的模型。
用户模型列表中有其他列,其中包含以下信息:
上传模型的用户名以及上传日期。
在这里,您可以在“操作”菜单中删除模型。

要添加模型,请单击“创建新模型”。
输入模型名称,然后使用“选择文件”按钮选择模型文件。
要使用自定义模型标注任务,您需要准备4个文件:
Model config(*.xml) - 具有网络配置的文本文件。Model weights(*.bin) - 经过训练的权重的二进制文件。Label map(*.json) - 一个简单的json文件,带有label_map的字典,类似于一个带有标签号字符串值的对象。Interpretation script(*.py) - 用于将网络输出层转换为可由CVAT处理的预定义结构的文件。
了解有关创建模型文件的详细信息可以阅读:自动标注
如果希望每个人都能使用模型,请选中“全局加载”。
单击“提交”按钮提交模型。

上传完成后,您的模型可以在“由用户上载”部分找到。
使用“Auto annotation”按钮使用您的一个DL模型对任务进行预注释。
搜索
对于搜索有几个选项。
- 在所有字段中搜索(所有者、代理人、任务名称、任务状态、任务模式)。
在搜索字段中输入搜索字符串执行。 - 如何执行搜索特定字段:
owner: admin- 由名称中有子字符串“admin”的用户创建的所有任务assignee: employee- 分配给名称中有子字符串“employee”的用户的所有任务name: mighty- 所有名称中带有子字符串“mighty”的任务mode: annotationormode: interpolation- 所有带有图像或视频的任务。status: annotationorstatus: validationorstatus: completed- 按状态搜索id: 5- id=5的任务。
- Multiple filters. 可以使用关键字
AND组合筛选器(标识符除外):mode: interpolation AND owner: adminmode: annotation and status: annotation
搜索不区分大小写。

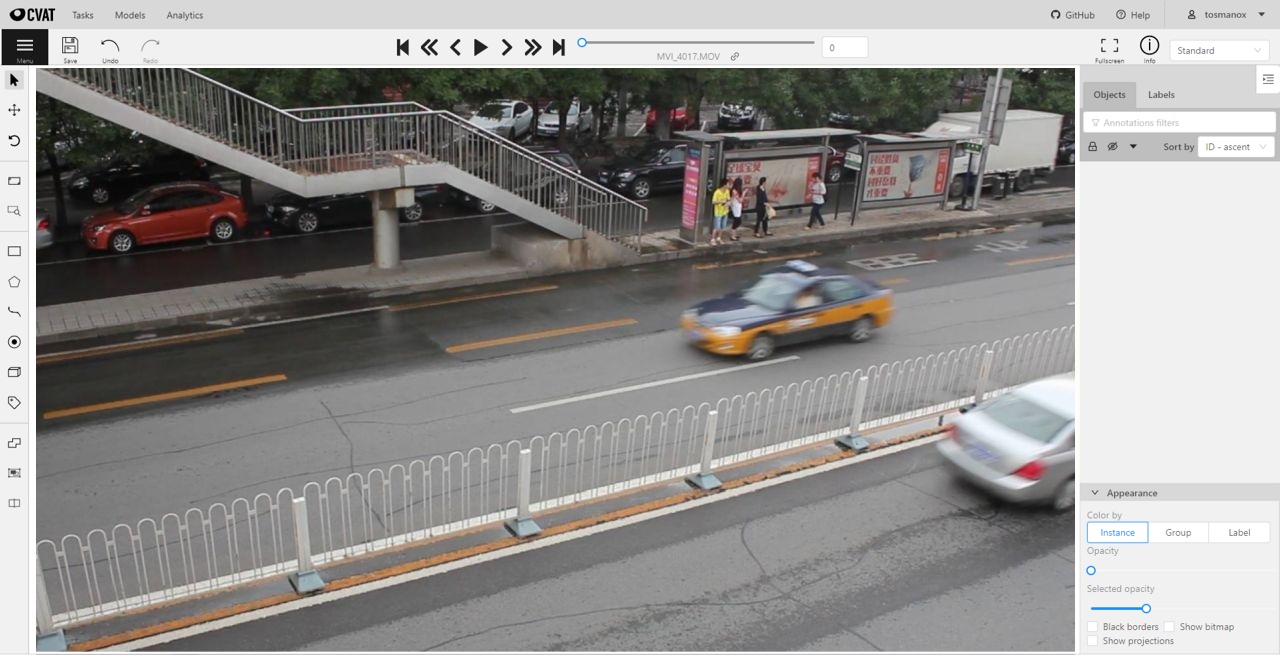
标注工具的界面
该工具包括:
Header- 用于导航CVAT部分和帐户设置的固定标题;Top panel— 包含导航按钮、主要功能和菜单访问;Workspace— 显示图像的空间;Controls sidebar— 包含用于导航图像、缩放、创建形状和编辑轨迹的工具(合并、拆分、分组)Objects sidebar— 包含标签过滤器,两个列表:
对象(帧上的)和标签(帧上对象的)和外观设置。

基本导航
-
使用下面的箭头移动到下一帧/上一帧。
使用滚动条滑块在帧之间滚动。
几乎每个按钮都有一个快捷方式。
To get a hint about a shortcut, just move your mouse pointer over an UI element.

-
要导航图像,请使用控件侧栏上的按钮。
另一种可以移动/移动图像的方法是在没有注释对象的区域内按住鼠标左键。
如果按下“鼠标滚轮”,则忽略所有带注释的对象。否则,将移动高亮显示的边界框而不是图像本身。

-
您可以使用边栏控件上的按钮缩放感兴趣的区域。
使用“调整图像大小”按钮在工作区中调整图像大小。
您也可以使用鼠标滚轮缩放图像(图像将相对于当前光标位置进行缩放)。
形状类型(基础)
有五种形状可以为图像添加标注:
RectangleorBounding boxPolygonPolylinePointsCuboidTag
它们看起来都是这样的:


Tag - 工作区中没有形状,但显示在对象侧栏中。
形状模式(基础)
使用示例:
- 为一组图像创建新标注。
- 为现有标注添加/修改/删除对象。
-
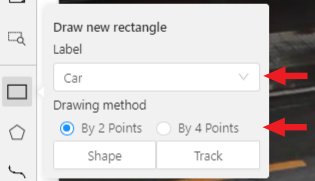
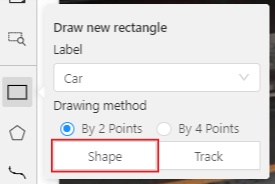
您需要在控件侧栏上选择“矩形”:
开始之前,请选择正确的“标签”(创建任务时应指定)和“绘图方法”(两点或四点):
-
在“形状模式”中创建新标注:
-
单击“形状”创建一个单独的“矩形”。
-
选择相反的点。你的第一个矩形准备好了!

-
了解如何使用“按4点”绘制方法创建矩形的步骤, (read here).
-
使用鼠标可以调整矩形的边界和位置。
Rectangle’s size is shown in the top right corner , you can check it by clicking on any point of the shape.
You can also undo your actions usingCtrl+Zand redo them withShift+Ctrl+ZorCtrl+Y.
-
-
You can see the
Object cardin the objects sidebar or open it by right-clicking on the object.
You can change the attributes in the details section.
You can perform basic operations or delete an object by clicking on the action menu button.

-
The following figure is an example of a fully annotated frame with separate shapes.
[外链图片转存失败,源站可能有防盗链机制,建议将图片保存下来直接上传(img-oRxUV641-1596171611968)(static/documentation/images/image013_detrac.jpg)]
Read more in the section shape mode (advanced).
轨迹模式(基础)
使用示例:
- 为帧序列创建新标注。
- 为现有标注添加/修改/删除对象。
- 编辑轨迹,将几个矩形合并为一个轨迹。
-
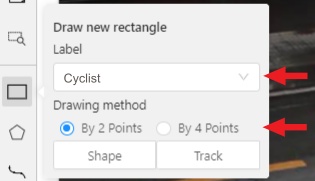
与“形状模式”一样,您需要在侧栏上选择一个“矩形”,在出现的表单中,选择所需的“标签”和“绘图方法”。
-
为对象创建轨迹(以选定的汽车为例):
-
通过单击“Track”在“Track mode”下创建一个“Rectangle”。

-
In
Track modethe rectangle will be automatically interpolated on the next frames. -
The cyclist starts moving on frame #2270. Let’s mark the frame as a key frame.
You can pressKfor that or click thestarbutton (see the screenshot below).[外链图片转存失败,源站可能有防盗链机制,建议将图片保存下来直接上传(img-8XFejoDU-1596171611971)(static/documentation/images/image016.jpg)]
-
If the object starts to change its position, you need to modify the rectangle where it happens.
It isn’t necessary to change the rectangle on each frame, simply update several keyframes
and the frames between them will be interpolated automatically. -
Let’s jump 30 frames forward and adjust the boundaries of the object. See an example below:
[外链图片转存失败,源站可能有防盗链机制,建议将图片保存下来直接上传(img-xiedw6RV-1596171611972)(static/documentation/images/image017_detrac.jpg)]
-
After that the rectangle of the object will be changed automatically on frames 2270 to 2300:
[外链图片转存失败,源站可能有防盗链机制,建议将图片保存下来直接上传(img-bwvIrfna-1596171611973)(static/documentation/images/gif019_detrac.gif)]
-
-
When the annotated object disappears or becomes too small, you need to
finish the track. You have to chooseOutside Property, shortcutO.[外链图片转存失败,源站可能有防盗链机制,建议将图片保存下来直接上传(img-9FX70dWo-1596171611975)(static/documentation/images/image019.jpg)]
-
If the object isn’t visible on a couple of frames and then appears again,
you can use theMergefeature to merge several individual tracks
into one.[外链图片转存失败,源站可能有防盗链机制,建议将图片保存下来直接上传(img-nxg8MdWG-1596171611977)(static/documentation/images/image020.jpg)]
-
Create tracks for moments when the cyclist is visible:
[外链图片转存失败,源站可能有防盗链机制,建议将图片保存下来直接上传(img-a9DNXklL-1596171611979)(static/documentation/images/gif001_detrac.gif)]
-
Click
Mergebutton or press keyMand click on any rectangle of the first track
and on any rectangle of the second track and so on:[外链图片转存失败,源站可能有防盗链机制,建议将图片保存下来直接上传(img-ISGPgo4d-1596171611980)(static/documentation/images/image162_detrac.jpg)]
-
Click
Mergebutton or pressMto apply changes.[外链图片转存失败,源站可能有防盗链机制,建议将图片保存下来直接上传(img-wqXg6XXv-1596171611982)(static/documentation/images/image020.jpg)]
-
The final annotated sequence of frames in
Interpolationmode can
look like the clip below:[外链图片转存失败,源站可能有防盗链机制,建议将图片保存下来直接上传(img-lJEPfF0l-1596171611983)(static/documentation/images/gif003_detrac.gif)]
Read more in the section track mode (advanced).
-
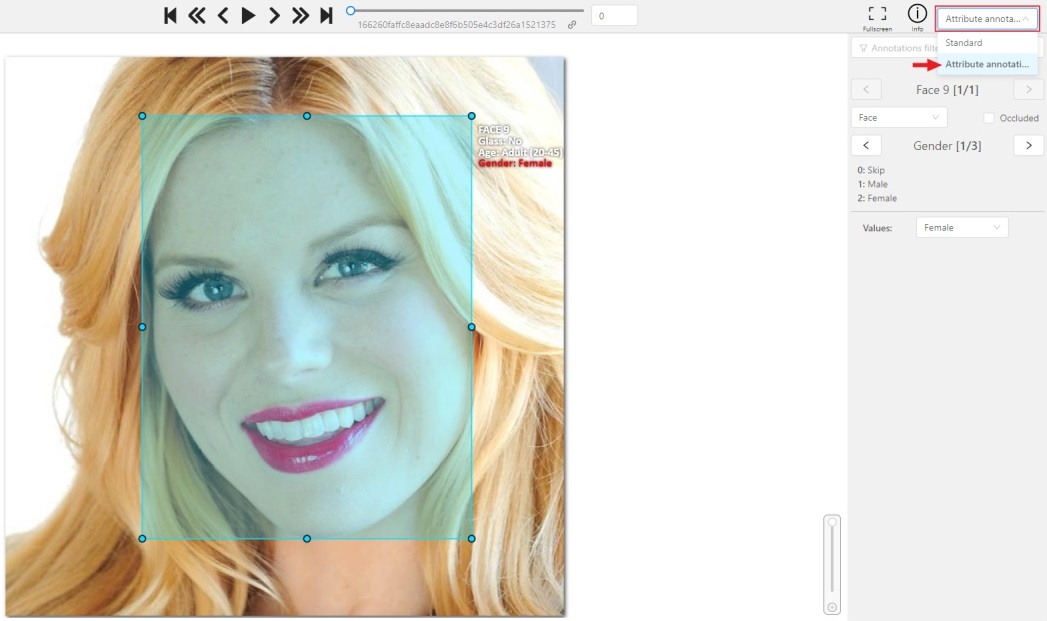
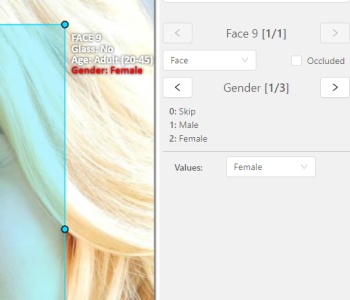
属性标注模式(基础)
-
在此模式下,可以使用键盘在对象和帧之间快速导航来编辑属性。
打开顶部面板中的下拉列表,然后选择“属性标注模式”。
-
在此模式下,对象面板更改为特殊面板:
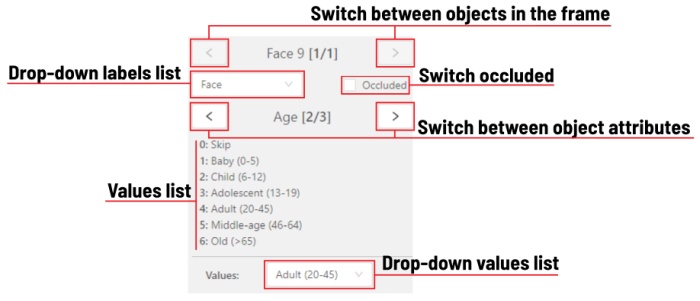
-
The active attribute will be red. In this case it is
gender. Look at the bottom side panel to see all possible shortcuts for changing the attribute. Press key2on your keyboard to assign a value (female) for the attribute or select from the drop-down list.
-
Press
Up Arrow/Down Arrowon your keyboard or click the buttons in the UI to go to the next/previous
attribute. In this case, after pressingDown Arrowyou will be able to edit theAgeattribute.

-
Use
Right Arrow/Left Arrowkeys to move to the previous/next image with annotation.
To see all the hot keys available in the attribute annotation mode, press F2.
Read more in the section attribute annotation mode (advanced).
下载标注
- 要下载最新的标注,必须先保存所有更改。点击“保存”按钮,或者“Ctrl+S”快捷键可以快速保存标注。
- 然后,点击“菜单”按钮。
- 按“转储标注”按钮。

- 选择转储标注文件的格式.:
-
CVAT for video
如果任务具有插值模式,则突出显示。 -
CVAT for images
如果任务具有标注模式,则突出显示。
-
(VOC) Segmentation mask — archive包含png格式的每个帧的类和实例掩码,以及一个文本文件,其中包含每个颜色的值。
-
同步存储库任务
-
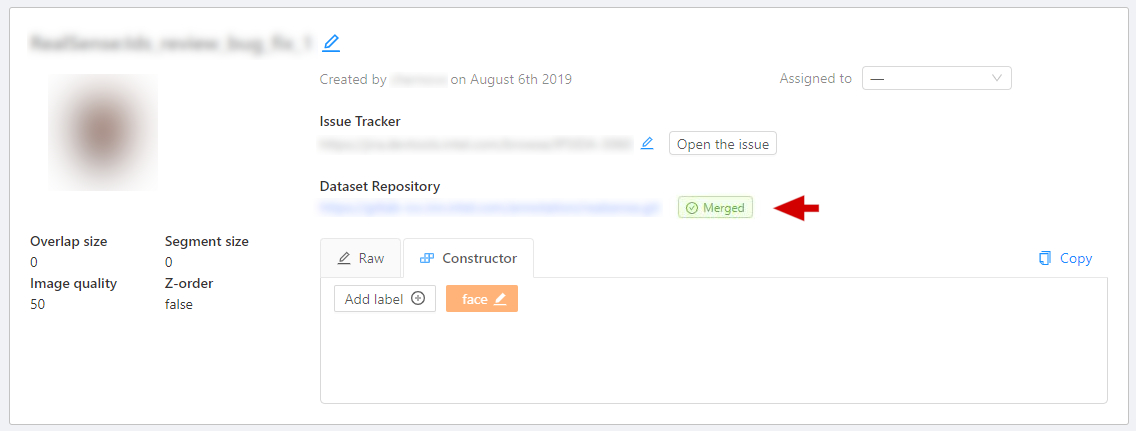
在注释过程结束时,通过单击任务页上的“同步”来同步任务。注意:只有在创建任务时指定了git存储库时,此功能才有效。

-
同步后,按钮“Sync”以绿色突出显示。注释现在位于存储库中的临时分支中。
-
下一步是转到存储库并手动创建对主分支的请求。
-
确认PR后,当注释保存在主分支中时,任务的颜色变为蓝色。

词汇
Label 是带标注对象的一种类型(例如人、车等)
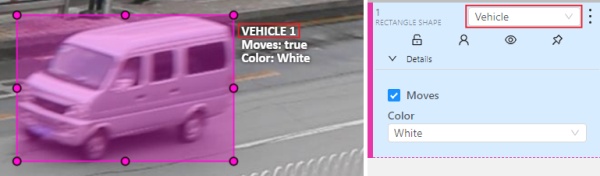
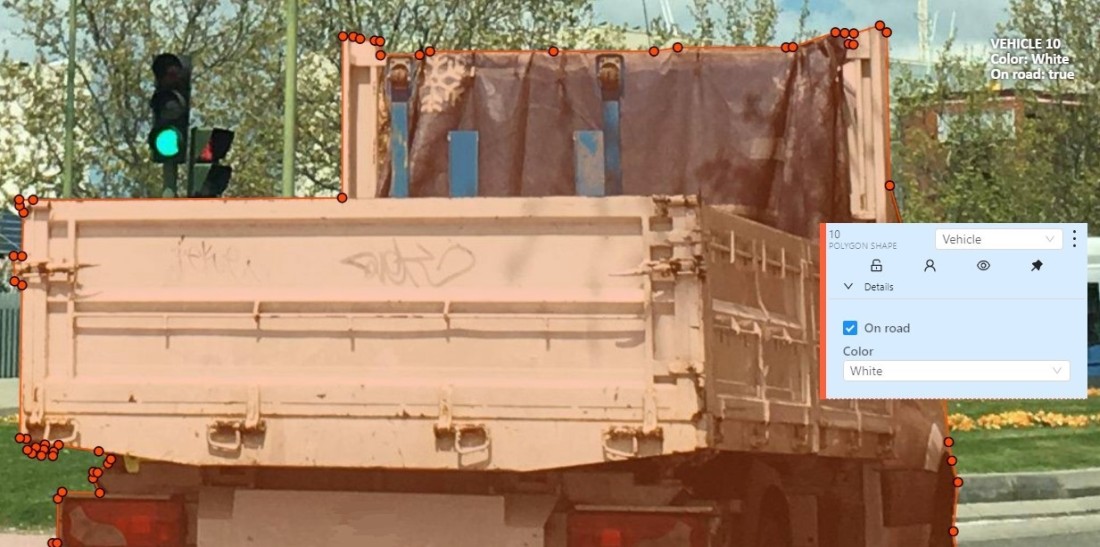
Attribute 是标注对象的属性(例如颜色、模型、质量等),有两种类型的属性:
-
Unique: 不可变,不能在帧之间更改(例如年龄、性别、颜色等)

-
Temporary: 可变,可在任何帧上更改(例如质量、姿势、截断等)
Track 是不同框架上对应于一个对象的一组形状。Track是在轨迹模式下创建的
Annotation 是一组形状和轨迹。有几种类型的标注:
- Manual 是个人创造的
- Semi-automatic 主要是自动创建,但用户提供一些数据(例如插值)
- Automatic 它是在没有人参与的情况下自动创建的
工作区
这是用于绘制和编辑对象的主字段。
此外,工作区还具有以下功能:
-
右键单击一个对象会调用“对象卡”—这是一个包含更改对象标签和属性以及操作菜单所需控件的元素。
-
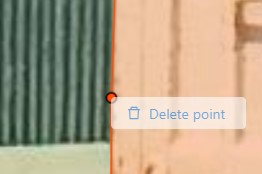
右键单击一个点将删除该点。
-
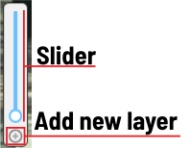
Z-axis slider- 允许您切换隐藏上层的批注层(如果帧上有多个z层,则启用滑块)。
此元素有一个用于添加新层的按钮。按下时,会添加一个新层并切换到该层。
可以使用+``和-``键在层中移动对象。
设置
要打开“设置”,请打开标题中的“用户”菜单,然后选择“设置”项。
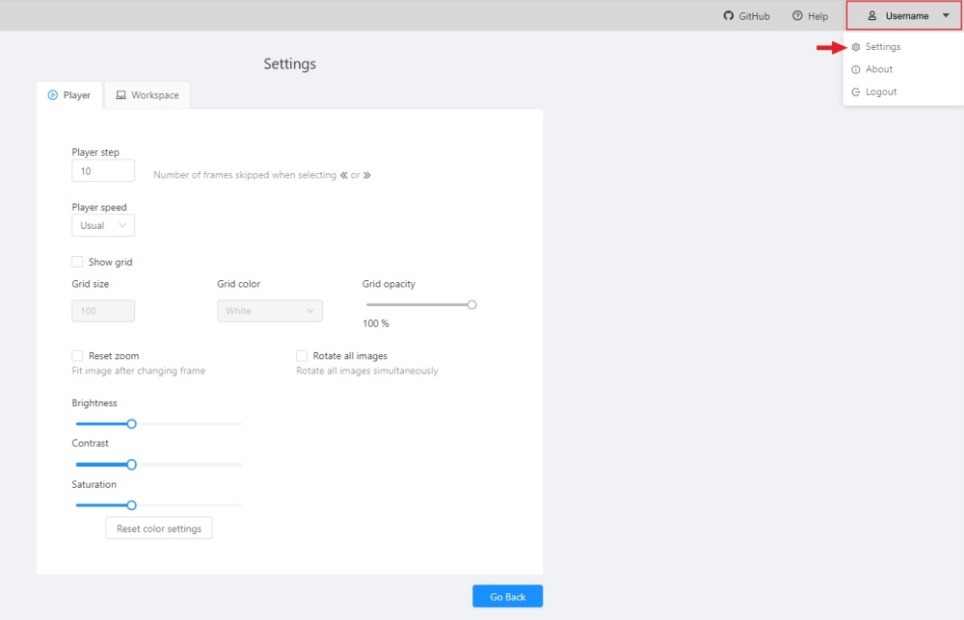
Settings 有两个选项卡:
在Player选项卡中,您可以:
- Control step of
CandVshortcuts. - 控制
Space/Play按钮的速度。 - 显示“网格”,更改网格大小,选择颜色和透明度:

- 以全尺寸显示每个图像或像以前一样缩小(默认情况下,插值模式启用,注释模式禁用)。
Rotate all imagescheckbox — 切换所有帧或单个帧的旋转。- 调整
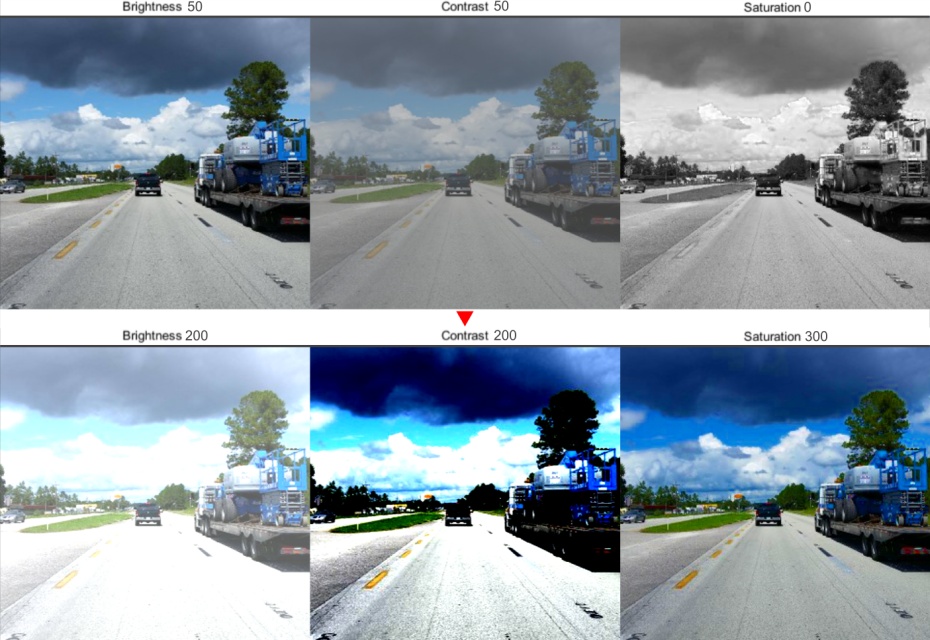
Brightness/Contrast/Saturation太暴露或太暗的图像使用F3— 颜色设置(更改显示设置而不是图像本身)。
Shortcuts:
-
Shift+B+=/Shift+B+-for brightness. -
Shift+C+=/Shift+C+-for contrast. -
Shift+S+=/Shift+S+-for saturation.
-
Reset color settingsto 默认值。
在“工作区”选项卡中,您可以:

-
Enable auto save复选框-默认情况下处于禁用状态。 -
Auto save interval (min)输入框-默认为15分钟。 -
Show all interpolation tracks复选框-在侧面板上为每个插值对象显示隐藏对象(默认情况下禁用)。 -
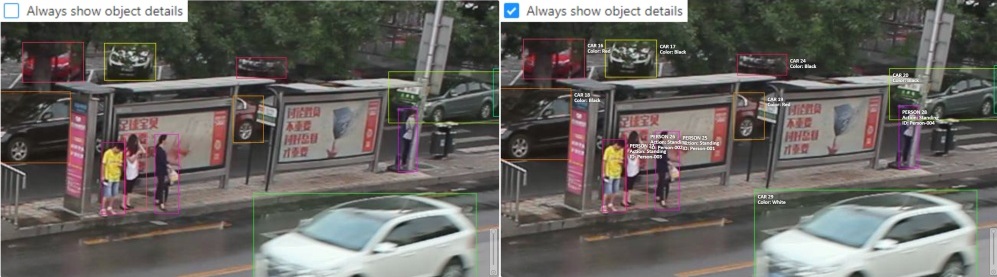
Always show object details- 不仅在激活对象时在画布上显示对象的文本:
-
Automatic bordering- 在绘图/编辑期间启用多边形和多段线的自动边界。
For more information To find out more, go to the section annotation with polygons. -
Attribute annotation mode (AAM) zoom margin输入框-定义属性标注模式下形状的边距(以px为单位)。 -
Press
Go backorF3to return to the annotation.
顶部面板

菜单按钮
它是标注工具的主菜单。它可以用来下载,上传和删除标注。
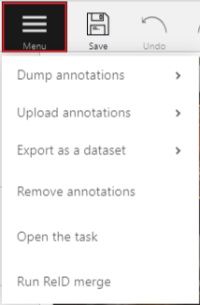
按钮分配:
Dump Annotations— 从任务下载标注。Upload Annotations— 将批注上载到任务中。Remove Annotations— 从当前作业中删除标注。Export as a dataset— 从任务下载数据集。有几种格式可用:Open the task— 打开包含任务详细信息的页面。Run ReID merge— 形状或轨迹的自动合并。
它用于在单个轨迹中组合由自动标注创建的单个对象。
更多信息请点击这里。
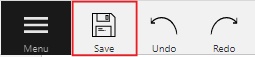
保存工作
保存当前作业的批注。该按钮指示保存过程。
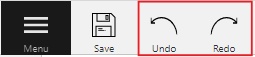
撤消重做按钮
使用按钮撤消或重做操作。
Player
转到第一帧/最后一帧。

Go to the next/previous frame with a predefined step. Shortcuts:
V — step backward, C — step forward. By default the step is 10 frames
(change at Account Menu —> Settings —> Player Step).

Go to the next/previous frame (the step is 1 frame). Shortcuts: D — previous, F — next.

Play the sequence of frames or the set of images.
Shortcut: Space (change at Account Menu —> Settings —> Player Speed).

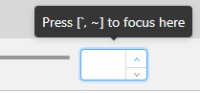
Go to a specific frame. Press ~ to focus on the element.
全屏播放器
全屏播放模式。键盘快捷键是“F11”。

Info
Open the job info.
[外链图片转存失败,源站可能有防盗链机制,建议将图片保存下来直接上传(img-Cw3RtBeZ-1596171612020)(static/documentation/images/image144_detrac.jpg)]
- Job status:
annotation,validationorcompletedtask
Overview:
Assinger- the one to whom the job is assigned.Start Frame- the number of the first frame in this job.End Frame- the number of the last frame in this job.Frames- the total number of all frames in the job.Z-Order- z-order enable indicator.
Annotations statistics:
This is a table number of created shapes, sorted by labels (e.g. vehicle, person)
and type of annotation (shape, track). As well as the number of manual and interpolated frames.
UI switcher
Switching between user interface modes.
[外链图片转存失败,源站可能有防盗链机制,建议将图片保存下来直接上传(img-yklCr3i6-1596171612022)(static/documentation/images/image145.jpg)]
控件边栏
Navigation block - 包含用于移动和旋转图像的工具。
| Icon | Description |
|---|---|
 | Cursor (Esc)- a basic annotation pedacting tool. |
| [外链图片转存失败,源站可能有防盗链机制,建议将图片保存下来直接上传(img-tU6iHk4u-1596171612023)(static/documentation/images/image149.jpg)] | Move the image- a tool for moving around the image withoutthe possibility of editing. |
| [外链图片转存失败,源站可能有防盗链机制,建议将图片保存下来直接上传(img-Bw0lVxrL-1596171612024)(static/documentation/images/image102.jpg)] | Rotate- two buttons to rotate the current framea clockwise ( Ctrl+R) and anticlockwise (Ctrl+Shift+R).You can enable Rotate all images in the settings to rotate all the images in the job |
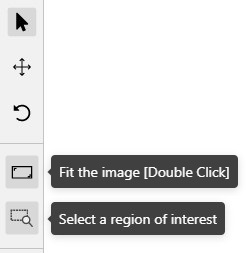
Zoom block - contains tools for image zoom.
| Icon | Description |
|---|---|
| [外链图片转存失败,源站可能有防盗链机制,建议将图片保存下来直接上传(img-DDYuWn0b-1596171612025)(static/documentation/images/image151.jpg)] | Fit image- fits image into the workspace size.Shortcut - double click on an image |
| [外链图片转存失败,源站可能有防盗链机制,建议将图片保存下来直接上传(img-cvEN197d-1596171612027)(static/documentation/images/image166.jpg)] | Select a region of interest- zooms in on a selected region.You can use this tool to quickly zoom in on a specific part of the frame. |
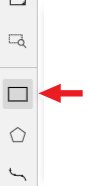
Shapes block - contains all the tools for creating shapes.
| Icon | Description | Links to section |
|---|---|---|
| [外链图片转存失败,源站可能有防盗链机制,建议将图片保存下来直接上传(img-lxhHLtW9-1596171612028)(static/documentation/images/image167.jpg)] | Rectangle | Shape mode; Track mode; Drawing by 4 points |
| [外链图片转存失败,源站可能有防盗链机制,建议将图片保存下来直接上传(img-HJ3fmllq-1596171612029)(static/documentation/images/image168.jpg)] | Polygon | Annotation with polygons |
| [外链图片转存失败,源站可能有防盗链机制,建议将图片保存下来直接上传(img-I4Lb4jxW-1596171612030)(static/documentation/images/image169.jpg)] | Polyline | Annotation with polylines |
| [外链图片转存失败,源站可能有防盗链机制,建议将图片保存下来直接上传(img-elI2Xwb5-1596171612030)(static/documentation/images/image170.jpg)] | Points | Annotation with points |
| [外链图片转存失败,源站可能有防盗链机制,建议将图片保存下来直接上传(img-CHTtzaws-1596171612031)(static/documentation/images/image176.jpg)] | Cuboid | Annotation with cuboids |
| [外链图片转存失败,源站可能有防盗链机制,建议将图片保存下来直接上传(img-2r1dheNM-1596171612032)(static/documentation/images/image171.jpg)] | Tag | Annotation with tagss |
Edit block - contains tools for editing tracks and shapes.
| Icon | Description | Links to section |
|---|---|---|
| [外链图片转存失败,源站可能有防盗链机制,建议将图片保存下来直接上传(img-BECK3ozg-1596171612033)(static/documentation/images/image172.jpg)] | Merge Shapes(M) — starts/stops the merging shapes mode. | Track mode (basics) |
| [外链图片转存失败,源站可能有防盗链机制,建议将图片保存下来直接上传(img-Kceg3Cro-1596171612034)(static/documentation/images/image173.jpg)] | Group Shapes (G) — starts/stops the grouping shapes mode. | Shape grouping |
| [外链图片转存失败,源站可能有防盗链机制,建议将图片保存下来直接上传(img-GZPRgbEJ-1596171612035)(static/documentation/images/image174.jpg)] | Split — splits a track. | Track mode (advanced) |
对象提要栏
Hide - 该按钮隐藏对象的侧栏。
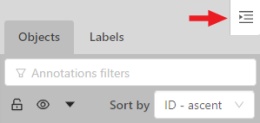
Objects
Filter input box

The way how to use filters is described in the advanced guide here.
List of objects
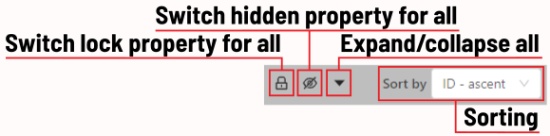
- Switch lock property for all - switches lock property of all objects in the frame.
- Switch hidden property for all - switches hide property of all objects in the frame.
- Expand/collapse all - collapses/expands the details field of all objects in the frame.
- Sorting - sort the list of objects: updated time, ID - accent, ID - descent
In the objects sidebar you can see the list of available objects on the current
frame. The following figure is an example of how the list might look like:
| Shape mode | Track mode |
|---|---|
| [外链图片转存失败,源站可能有防盗链机制,建议将图片保存下来直接上传(img-Qod8ZqOE-1596171612040)(static/documentation/images/image044.jpg)] | [外链图片转存失败,源站可能有防盗链机制,建议将图片保存下来直接上传(img-4vcy4vWx-1596171612041)(static/documentation/images/image045.jpg)] |
Objects on the side bar
The type of a shape can be changed by selecting Label property. For instance, it can look like shown on the figure below:
[外链图片转存失败,源站可能有防盗链机制,建议将图片保存下来直接上传(img-wb0mblHM-1596171612043)(static/documentation/images/image050.jpg)]
Object action menu
The action menu calls up the button:
[外链图片转存失败,源站可能有防盗链机制,建议将图片保存下来直接上传(img-DQfRhG12-1596171612044)(static/documentation/images/image047.jpg)]
The action menu contains:
-
Create object URL- puts a link to an object on the clipboard. After you open the link, this object will be filtered. -
Make a copy- copies an object. The keyboard shortcut isCtrl + CCtrl + V. -
Propagate- Сopies the form to several frames,
invokes a dialog box in which you can specify the number of copies
or the frame onto which you want to copy the object. The keyboard shortcutCtrl + B.[外链图片转存失败,源站可能有防盗链机制,建议将图片保存下来直接上传(img-6Kodjp9M-1596171612045)(static/documentation/images/image053.jpg)]
-
To background- moves the object to the background. The keyboard shortcut-,_. -
To foreground- moves the object to the foreground. The keyboard shortcut+,=. -
Remove- removes the object. The keyboard shortcutDel,Shift+Del.
A shape can be locked to prevent its modification or moving by an accident. Shortcut to lock an object: L.
[外链图片转存失败,源站可能有防盗链机制,建议将图片保存下来直接上传(img-MvfGUOW4-1596171612046)(static/documentation/images/image046.jpg)]
A shape can be Occluded. Shortcut: Q. Such shapes have dashed boundaries.
[外链图片转存失败,源站可能有防盗链机制,建议将图片保存下来直接上传(img-4rGP0SaB-1596171612047)(static/documentation/images/image048.jpg)]
[外链图片转存失败,源站可能有防盗链机制,建议将图片保存下来直接上传(img-9NajWWCM-1596171612048)(static/documentation/images/image049_detrac.jpg)]
You can change the way an object is displayed on a frame (show or hide).
[外链图片转存失败,源站可能有防盗链机制,建议将图片保存下来直接上传(img-R7xQHxdn-1596171612048)(static/documentation/images/image055.jpg)]
Switch pinned property - when enabled, a shape cannot be moved by dragging or dropping.
[外链图片转存失败,源站可能有防盗链机制,建议将图片保存下来直接上传(img-rNnliAlA-1596171612049)(static/documentation/images/image052.jpg)]
You can change an object’s color.
To do so, click on the color bar of the object and select a color from the palette that appears.
[外链图片转存失败,源站可能有防盗链机制,建议将图片保存下来直接上传(img-etCLn1m8-1596171612050)(static/documentation/images/image153.jpg)]
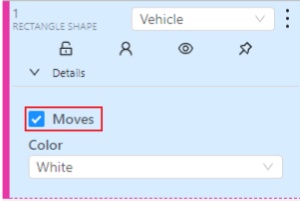
By clicking on the Details button you can collapse or expand the field with all the attributes of the object.
[外链图片转存失败,源站可能有防盗链机制,建议将图片保存下来直接上传(img-DEPNyTd2-1596171612051)(static/documentation/images/image154.jpg)]
Labels
You can also change the color of any object to random, to do so just hover
the mouse over the object on the frame and highlight them by clicking on a label you need.
In this tab, you can lock or hide objects of a certain label.
[外链图片转存失败,源站可能有防盗链机制,建议将图片保存下来直接上传(img-49LY3VIq-1596171612051)(static/documentation/images/image062.jpg)]
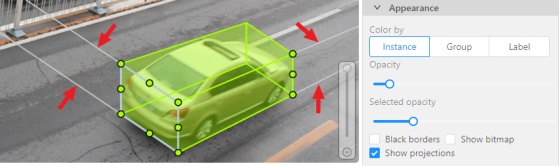
Appearance
Color By options
Change the color scheme of annotation:
-
Instance— every shape has random color[外链图片转存失败,源站可能有防盗链机制,建议将图片保存下来直接上传(img-mHqmzAQt-1596171612052)(static/documentation/images/image095_detrac.jpg)]
-
Group— every group of shape has its own random color, ungrouped shapes are white[外链图片转存失败,源站可能有防盗链机制,建议将图片保存下来直接上传(img-6SvfwThS-1596171612053)(static/documentation/images/image094_detrac.jpg)]
-
Label— every label (e.g. car, person) has its own random color[外链图片转存失败,源站可能有防盗链机制,建议将图片保存下来直接上传(img-GbkZocQQ-1596171612054)(static/documentation/images/image093_detrac.jpg)]
You can change any random color pointing to a needed box on a frame or on an
object sidebar.
Fill Opacity slider
Change the opacity of every shape in the annotation.
[外链图片转存失败,源站可能有防盗链机制,建议将图片保存下来直接上传(img-UeteOcRo-1596171612055)(static/documentation/images/image086_detrac.jpg)]
Selected Fill Opacity slider
Change the opacity of the selected object’s fill.
[外链图片转存失败,源站可能有防盗链机制,建议将图片保存下来直接上传(img-zghcnStt-1596171612055)(static/documentation/images/image089_detrac.jpg)]
Black Stroke checkbox
Changes the shape border from colored to black.
[外链图片转存失败,源站可能有防盗链机制,建议将图片保存下来直接上传(img-CIXr81rO-1596171612056)(static/documentation/images/image088_detrac.jpg)]
Show bitmap checkbox
If enabled all shapes are displayed in white and the background is black.
[外链图片转存失败,源站可能有防盗链机制,建议将图片保存下来直接上传(img-WntHqkZe-1596171612057)(static/documentation/images/image087_detrac.jpg)]
Show projections checkbox
Enables / disables the display of auxiliary perspective lines. Only relevant for cuboids
Shape mode (advanced)
Basic operations in the mode were described in section shape mode (basics).
Occluded
Occluded是当一个对象被另一个对象遮挡或在帧上不完全可见时使用的属性。使用Q快捷方式可以快速设置该属性。

例子: 下图中的三辆车应标记为occluded。

如果一个框架包含太多的对象,并且由于许多形状大多放置在同一个位置而很难对它们进行标注,那么可以锁定它们。锁定对象的形状是透明的,很容易为新对象添加标注,并且可以避免意外修改以前标注的对象,快捷键:L。

Track mode (advanced)
Basic operations in the mode were described in section track mode (basics).
Shapes that were created in the track mode, have extra navigation buttons.
-
These but
以上是关于CVAT 用户指南的主要内容,如果未能解决你的问题,请参考以下文章